Esri Technical Support Blog - Page 2

cancel
Showing results for 
Show  only  | Search instead for 
Did you mean: 

Latest Activity

(383 Posts)
KoryKramer
Esri Community Moderator

Have you ever wanted to create an empty feature service to use in ArcGIS Online, and found yourself stuck with no easy way to get this done? If you’re asking why in the world anybody would want to do this, this blog may not be for you – but keep reading anyway, because you may find new ways to leverage your ArcGIS Online account!

There are cases where you are planning on going out and collecting data, maybe using the Collector app … the point is, you don’t have any existing features. However, you need to provide the structure and format that field staff, volunteers, or community members use to add data to the feature service.


Since you’re using ArcGIS Online, your natural instinct is to go to the documentation and search for “create empty feature service.” You find a section of documentation called Publish an empty hosted feature layer. Steps 1 and 2 go by quickly - no sweat. But then you get to Step 3 and you can't go forward. You find yourself saying things like, “I don’t have an existing feature layer that is right,” or “this template just doesn’t work at all for what I want to do. It’s going to take way too much time to get this to work. This should be easier. Sigh.”Pssst…  Here’s the secret. Every named user for an ArcGIS Online Organization account has access to developers.arcgis.com. Go to the website and sign in from the upper-right corner using your ArcGIS Online Organization username and password. Once signed in, you will see options to the left of your profile. Hover over the options until you see Hosted Data.

MyHostedData-1024x336.png

My Hosted Data section of developers.arcgis.com


Once in Hosted Data, you will find the answer that you’ve been looking for: a super quick, super simple way to create an empty feature service. Clicking either 'Create a Feature Service' or 'New Feature Service' will launch the same wizard to guide you through the process.

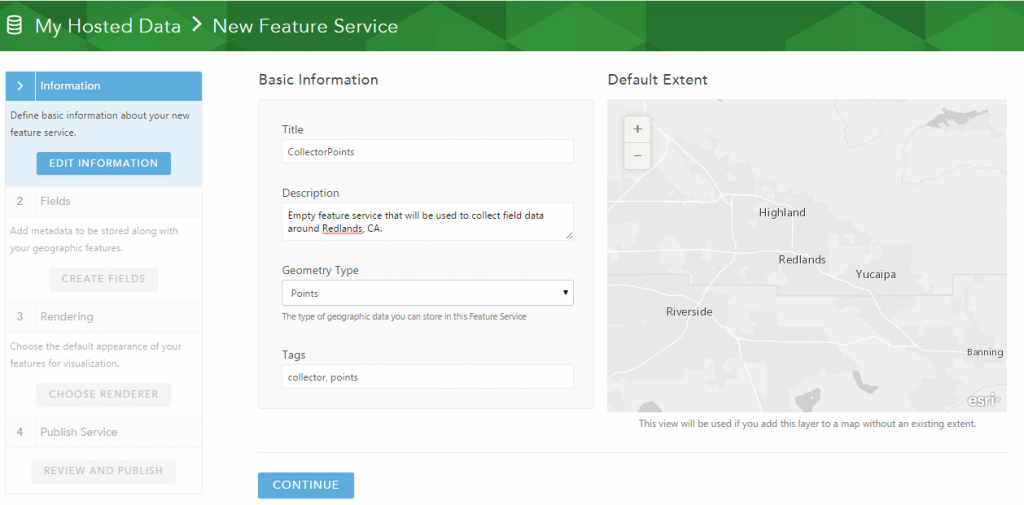
Enter the service’s Title, Description, Geometry Type, and Tags. Also be sure to set the service’s Default Extent.
NewFeatureService-1024x505.png

New Feature Service section of developers.arcgis.com


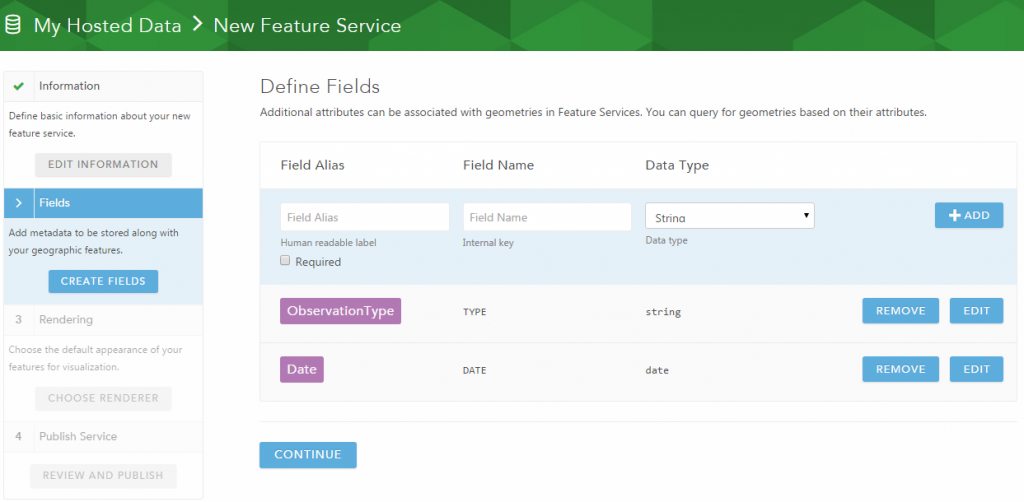
In Step 2 of the wizard, add the Field Alias, Field Name, and Data Type for each field of the service. Fields can be marked as Required or left as optional.
NewFeatureService_CreateFields-1024x502.png

Create Fields section of developers.arcgis.com


Select the renderer for your new service. Renderers define the visual display of your data when you are using the ArcGIS SDKs as well as how the service will look when initially added to the map viewer. You can override your chosen renderer in the SDKs and map viewer at any time. View this service in the ArcGIS.com map viewer to configure a custom renderer.

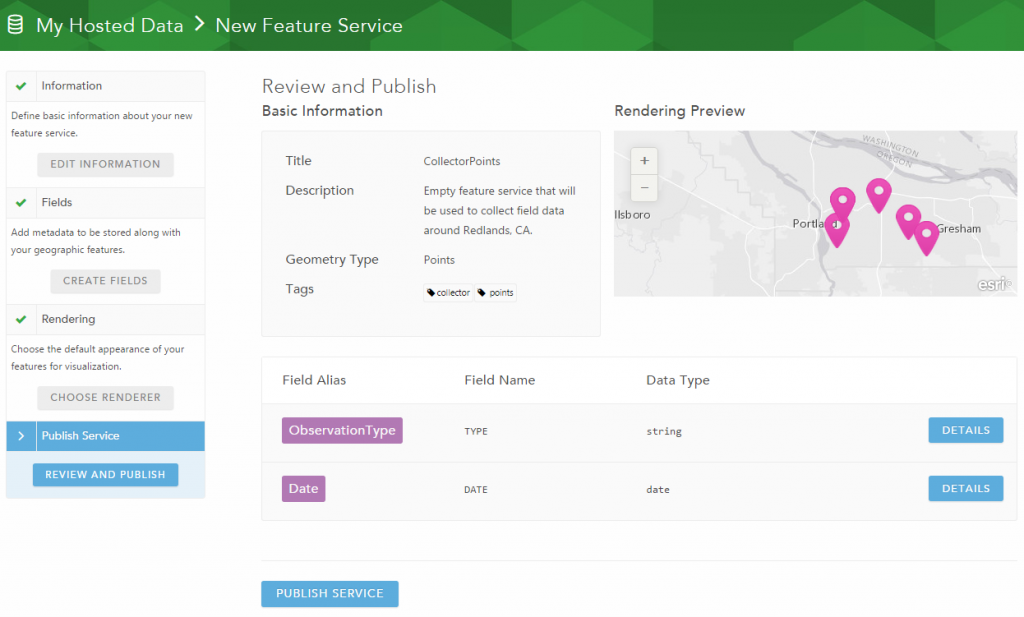
Review and publish your service.
ReviewAndPublish-1024x617.png

Review and Publish service section of developers.arcgis.com


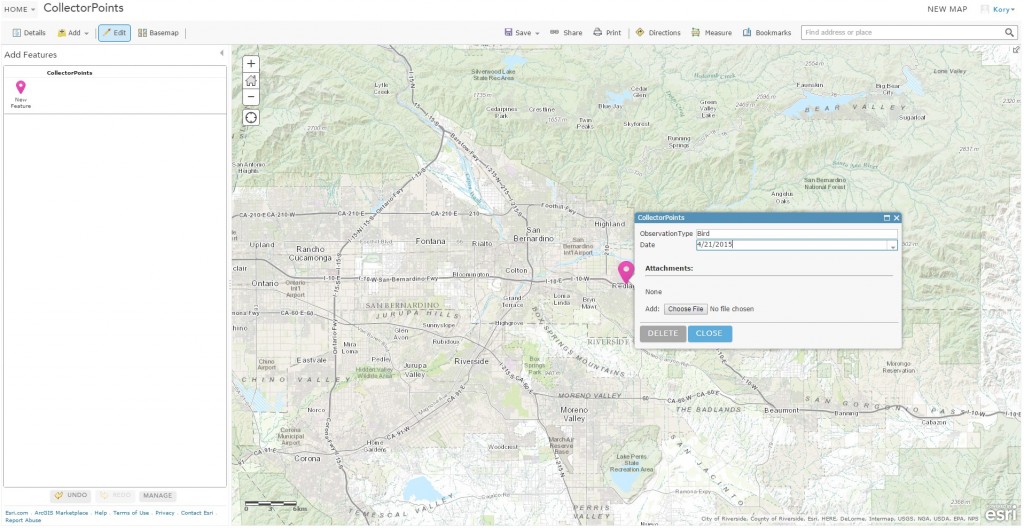
Your service has been published and is ready for data collection. Add it to ArcGIS Online and give it a spin!
EditServiceInAGOL-1024x528.jpg

Edit empty feature service from developers.arcgis.com in ArcGIS Online


Kory K. - Desktop Analyst - Support Services

more
1 3 4,915
JuliaGuard
Esri Contributor

ArcGIS Pro is the latest addition to the Esri Desktop suite of software. It offers a brand new way to do GIS, and with that, a brand new way to license and distribute the software. Check out these six great tips to get started, and you'll be a pro in no time!1. You need an active ArcGIS Online Organizational Account.*

Your software purchase that is current on maintenance includes what we call an “Entitlement account” to use ArcGIS Online. In other words, an Entitlement account is a fancy term for the licensing structure that includes: one named user, and 100 annual credits per Desktop license purchased. This account comes at no additional cost and provides access for your organization to use ArcGIS Online, Esri Maps for Office, and ArcGIS Pro.agol.png

An activation e-mail was sent to the primary maintenance contact for each account. The e-mail included instructions and a hyperlink for activating and configuring the ArcGIS Online Organization. The person who activates the account is automatically set as the organization administrator and will have the necessary permissions to invite other users to the organization and then provision those users' ArcGIS Pro licenses.

Esri also provides a free version of ArcGIS Online called a public account. This type of account does not support licensing ArcGIS Pro. An Account Troubleshooting guide has been created to provide more information.If your organization does not have an ArcGIS Online Organizational account or you would like to upgrade your public account, please contact Esri Customer Service.* It is also possible to setup ArcGIS Pro to get a license through Portal for ArcGIS. 2. You can download the software from My Esri.

My Esri is a new customer solution that integrates your ArcGIS Online, Support, and Customer Care accounts into a single site. In order to install ArcGIS Pro, sign in to your My Esri account as the Primary Maintenance Contact.

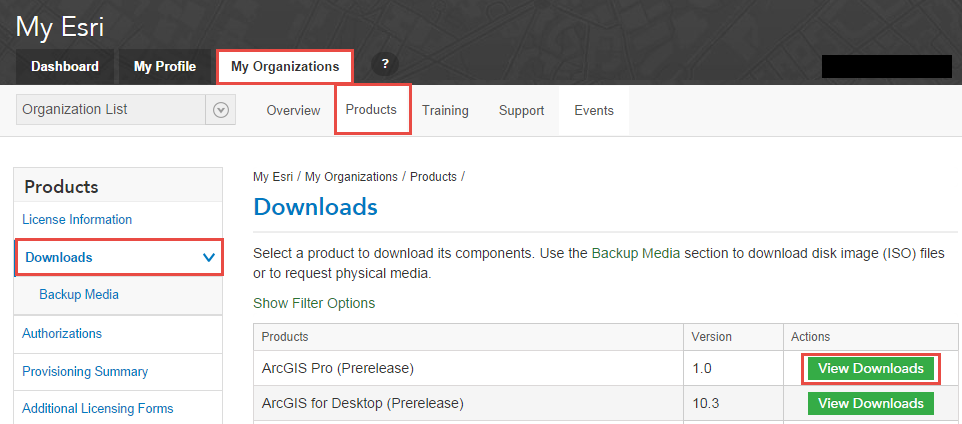
If your account is current on maintenance, the Primary Maintenance Contact should have permission to view an Organizational dashboard. The dashboard includes the option to filter by products and then by downloads in order to download the software.downloadpro.pngIf you do not see the option to download software in My Esri, please contact the primary maintenance contact for your account or Esri Customer Service.3. Provisioning the licenses in ArcGIS Online is flexible based your needs.

With an ArcGIS Online Organizational account and administrator permissions, you should see the following option when you sign in to your account:managelie.png

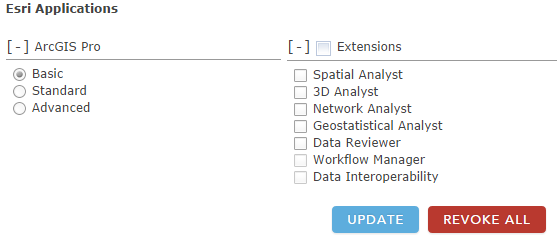
Click “Manage Licenses” to get started provisioning your ArcGIS Pro Licenses. The licenses are assigned to named users in your organization. You can provision each user individually, or select multiple users to batch provision the licenses. After making your selection, click the “Configure” button to grant the license levels and extensions.lasjdlf.png

Good news: the ArcGIS Pro licenses and extensions can be reassigned at any time! As an administrator you can update or revoke the use of license in real time. It may help to think of ArcGIS Online as a cloud-based licensing manager driven by the named users in your organization.If your organization does not have a “Manage Licenses” option, please contact Esri Customer Service.4. ArcGIS Pro Licenses can be “checked out” for offline use.

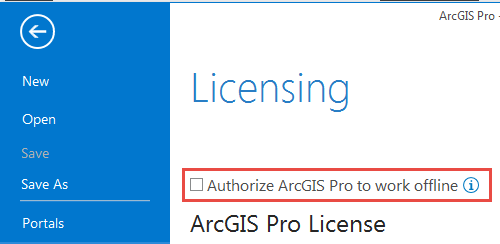
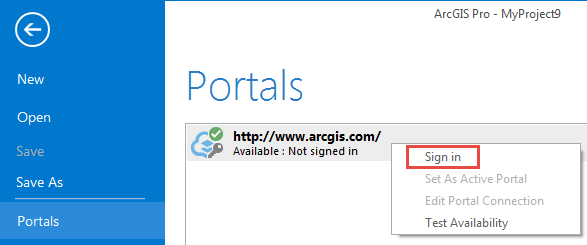
If you need to work with ArcGIS Pro in a disconnected mode, you can check out a license. You can check out a license on only one machine at a time, so you won't be able to sign in or use ArcGIS Pro on any other machine while your license is offline. To use ArcGIS Pro on other machines, you need to check in the license on the original machine where you took the license offline.How to check out a license: Open a project > Click the “Project” tab > Licensing > check the box for: Authorize ArcGIS Pro to work offline.authorize.pngHow to check in a license: Uncheck the box for “Authorize ArcGIS Pro to work offline”. If you find this box is greyed out, it is because you are no longer signed into ArcGIS Online. To resolve this, Open a project > Click the “Project” tab > Portals > right-click your portal connection > Sign in. Now you should be able to check in your offline license in the Licensing tab.signin2.pngIf you are having trouble checking in or out offline licenses to use ArcGIS Pro, please contact Esri Technical Support.5. Installing ArcGIS Pro is a breeze!

Once the software has been successfully downloaded from My Esri, ArcGIS Pro can be installed. Please review the install guide before getting started. You do not need to uninstall any previous version of desktop products; ArcGIS Pro can run side-by-side with any version of ArcMap, giving you the flexibility to test your ArcMap workflows in ArcGIS Pro.If you have a question or issue with installing ArcGIS Pro, please contact Esri Technical Support.6. ArcGIS Pro gives you brand new functionality.

ArcGIS Pro has a 64-bit architecture and leverages your machine's GPU and multithreading to keep the user interface responsive and to utilize additional CPU cores on the local machine. It supports multiple layouts and map views that can be linked and explored in both 2D and 3D. The new drawing and output engine in ArcGIS Pro also includes new output capabilities, such as the ability to export your maps with native transparency support. It also includes some brand new geoprocessing tools, such as Space Time Cube and Emerging Hotspots. For more information about platform GIS or ways to integrate ArcGIS Pro into an existing workflow, please refer to the help or Learn GIS.


Julia G. - Desktop Support Analyst

more
0 0 1,559
KoryKramer
Esri Community Moderator

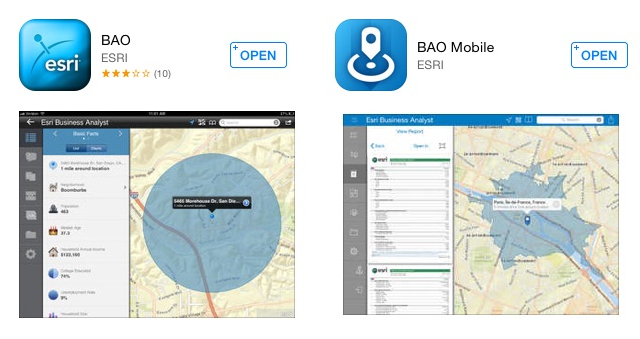
BAOMobile.pngIf you are a Business Analyst Online (BAO) user, then you are familiar with all the great information you can find about a place. You can generate reports for your specific areas of interest based on thousands of data variables ranging from demographics and census to consumer spending and employment data as well as traffic counts.

Now, what if you are out and about and just have to have that information right now? The BAO Mobile app is what you need.

The next-generation BAO Mobile app is now available on the Apple App Store. Customers who have purchased BAO as a premium app get the mobile app as part of the subscription. BAO users who are a member of the organization’s Group (normally named ‘My BAO Group’) containing the BAO application will have access to both the BAO web app and the BAO Mobile app. If you believe that your organization has BAO but you are not able to log in, please refer to this post.

If your organization currently does not have BAO and you would like to try it out, sign up for a 30-day trial.

Keep in mind that if you’re using the old BAO mobile app, this will not automatically be updated to the Next Gen BAO Mobile app. You will need to download the new BAO Mobile app from the App Store and log in with your ArcGIS Online username and password. The old mobile app will remain available for a short time to allow users to download and start using the new app.

BAOAppCompare1.png

Old BAO app released 2012 (left) and new BAO Mobile app released 2014 (right)

While we understand there might be some confusion regarding which authentication credentials to use, it is necessary to have both the new mobile app and the preexisting product available for a short time to allow users time to download and start using the new BAO Mobile app. The new mobile app requires ArcGIS Online credentials (username/password) and the user must have the BAO web app to use the new version, which should streamline the login process between ArcGIS Online, the BAO Web app, and BAO Mobile.

Previous BAO mobile app users that do not have a current subscription to BAO will not be able to use the new app unless they purchase a subscription. This is the primary reason to keep the previous BAO mobile app available so these users will have time to transition to the new app if they want to continue using the mobile app.


Kory K. - Desktop Support Analyst

more
0 0 1,304
GregoryLehner
Esri Contributor

If you try to log in to Business Analyst Online or Community Analyst and you receive the message, "Error: Invalid username or password", see the following reasons and ways to troubleshoot.

Reason 1: You’re using a username/password for the legacy application.

To see if this is the case, log in to the legacy Business Analyst Online or legacy Community Analyst. The legacy applications are retired and only available to allow you to migrate your sites from the legacy application to the new application. For more information, go to:

Reason 2: Your ArcGIS Online subscription administrator has restricted access to the application.

Please see your administrator.

Reason 3: Your organization has not purchased or not requested a trial.

a. Try Business Analyst Online Now or Try Community Analyst Now.

b. Call 1-800-447-9778 to purchase (for U.S. customers only), or visit this page.

Reason 4: The application is not provisioned to a group within your ArcGIS Online subscription.

WARNING: Procedures described in this section must be performed ONLY by your ArcGIS Online Administrator.

Email notifications were sent to ArcGIS Online administrators for customers subscribed to Business Analyst Online or Community Analyst. If you are the administrator of your ArcGIS Online subscription, please see the email notification instructions and follow the instructions.

If you cannot find the emails, please click this link for Business Analyst Online, and this link for Community Analyst. We will create a special group(s) for your application users, granting them access to the application(s). As an administrator, you will also be part of the group. After that, you can add/invite users. To add users, do the following:

  • Log in to ArcGIS Online > click Groups > click the 'named group' (e.g. My BAO Group)
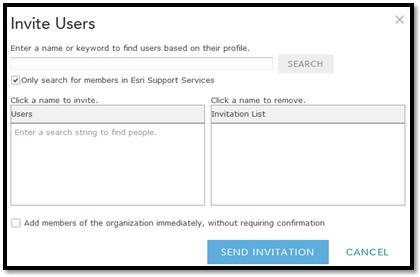
  • Click the Invite Users link, add the users, and click Send Invitation. Here is an example:

inviteusers.jpg

Note: If you have more than one administrator for your ArcGIS Online subscription and if another administrator activated it, the group may not appear in ArcGIS Online. If this happens, you can click on 'The organization’s groups' on the right of the page and see if the group is created. If it is, you can click 'Join this Group' at the top, and an email will be sent to the administrator who originally created the group.

If the above links don’t work, log in to ArcGIS Marketplace > My Console > My Purchased Items.

Scenario 1: If you don’t see the application, return to the home page and click the application (Business Analyst Online or Community Analyst). Click 'Get it Now' and follow the instructions.

Note: When you click 'Get It Now', an Esri representative will contact you to get you set up.

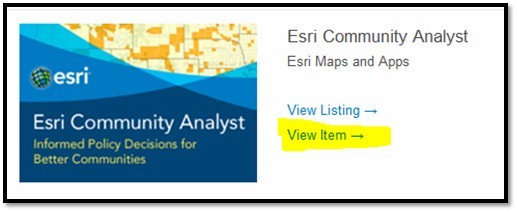
Scenario 2: If you see the application, click View Item.

ECA.jpg

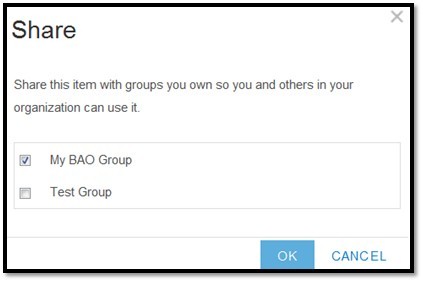
The Share dialog box appears, allowing you to create a new group (if one doesn’t exist) or select existing groups.

Share.jpg

You will invite users; see the Invite Users section above.

Why the change?

We’ve created a better way to manage access for Business Analyst Online and Community Analyst in ArcGIS Online subscriptions. These changes allow better control in the sharing and use within your organization.


Pavan Y. - Technical Lead - Location Analytics

more
0 0 2,239
Noah-Sager
Esri Regular Contributor

This blog post is the first in a series of debugging tips and tricks to help you on your way. 

It’s a jungle out there. And like it or not, it’s a jungle inside your application as well. Working through the bugs isn’t as simple as slowly sifting through lines of code; it takes dedicated tools and candid curiosity. In the jungle, the momma gorilla has little more to rely upon than her courage and her cunning. But as a web developer, you have a variety of tools at your disposal.  Today, we are going to take a look at the Network tab inside Google Chrome’s Developer Tools.

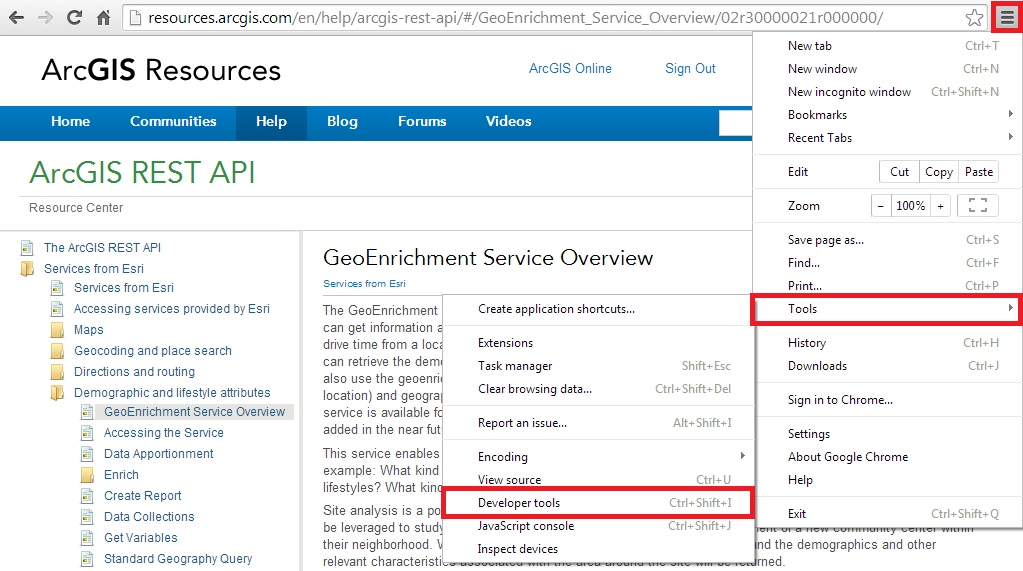
Accessing the Chrome Developer Tools is easily done using shortcut keys (Control + Shift + I) or by navigating to the top right of the browser, clicking on the three grey horizontal lines, then choosing “Tools”, then “Developer tools”.three_grey_lines4.png

Unlike the momma gorilla, Chrome Developer Tools cares about you and your applications. It likes you. It thinks you’re a really good developer. But you need to do some work. It’s kind of like Esri Support. We like you. We want to help you, and we’ll be there when you take the first step.

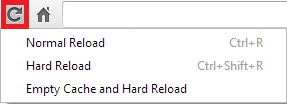
While the developer tools are open, you can clear the browser cache by simply clicking and holding the refresh button.  This action presents you with three different options: Normal Reload, Hard Reload, and Empty Cache and Hard Reload. These options help you ensure that changes to your code are reflected in the browser. Otherwise, the application may load the older code from the browser’s cache. When I’m feeling blue, a couple of Hard Reloads always does the trick. If it’s near the end of the day, you may want to empty the cache first. 3_reload.png

Now that you’ve cleared the cache and reloaded your application, we can continue.  Like the developer tools in other major browsers, such as Firebug, and standalone tools like Fiddler, the Network tab in Chrome logs individual requests spawned from the tab currently open in the browser.  Typically, a variety of resources are loaded when a page is refreshed and additional requests are executed while the user is interacting with the page.

The Network tab is my personal favorite. I always open this tab before running any test application. Here we can focus on inspecting web traffic to discover how the application interacts with online services. If there is a print service in the application, you can grab the webmap as JSON in the network tab, and compare it’s parameters against the REST API to see if the JSON is valid. You could also see all the resources the application is consuming, and where those resources are located.

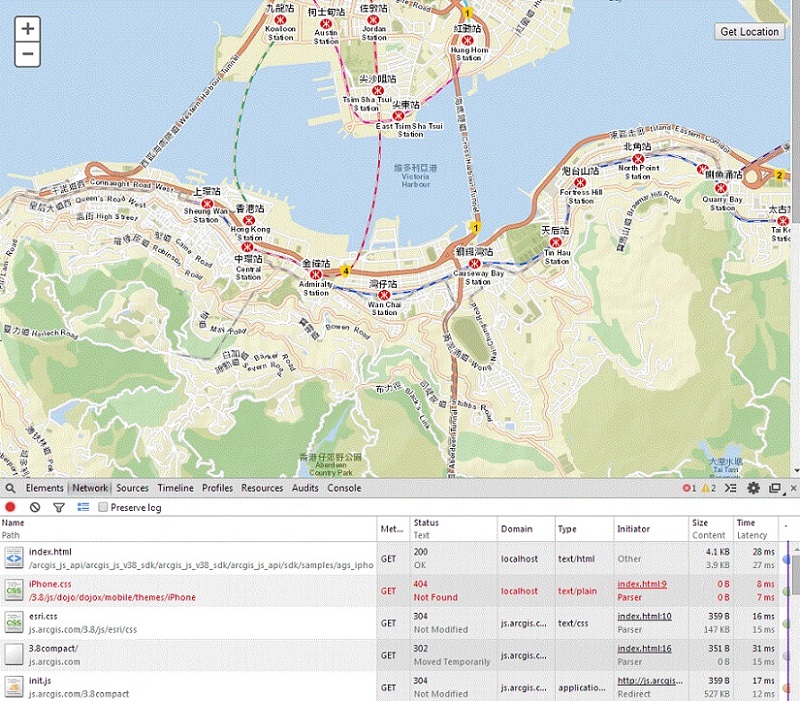
If something has gone visibly wrong in the application, the first things to look for are requests that have failed entirely.  The most common errors are a 403, indicating that you don’t have permission to access the resource, and 404, which means the resource can’t be found.  In my own experience, 404 errors are most often caused by a typo I introduced when I wrote out the location of a service, because I write code like a momma gorilla.

converted.jpg

This screenshot shows the Network tab open with a 404 error (Not Found) in the network traffic regarding a missing .css file on the server named localhost (I put the .css in the wrong folder)


In this installment, we learned how to access and use the Network tab inside Chrome Developer tools to reveal the individual requests launched by an application, and their success or failure. This information can greatly facilitate the debugging of an application when minimal other error information is available by indicating to the developer what is occuring behind the scenes, and on what areas in the code to place focus. This concludes part one of a multi-part series on JavaScript Debugging Tips. Join us next time when we delve even deeper into the Network tab with a real-world example. Happy debugging!

more
2 2 2,677
GregoryLehner
Esri Contributor

As you may or may not be aware, a recent security vulnerability was unveiled for servers using the OpenSSL cryptographic library that affects many different products and software worldwide. This vulnerability has been codenamed 'The Heartbleed Bug', and potentially allows attackers to read the memory of a protected server or client and retrieve encrypted personal information from that server/client.

As a result, Esri staff have been performing maintenance to validate, secure, and patch Esri servers and infrastructure to close this vulnerability and ensure Esri customers are protected.

Please read the following KB Article for further information regarding the Heartbleed bug and whether any customer action is required for your Esri software.


Gregory L. - Online Support Resources

more
0 0 425
by Anonymous User
Not applicable

DCarroll-geotrigger-300x296.pngWe are pleased to announce support for Esri’s new Geotrigger Service and have a great team ready to help developers push out useful information to people based on their locations. With more ease than ever, messages can be pushed out to mobile devices without ever clicking a button. If you are a mobile developer, do consider getting behind Esri's Geotrigger Service release, which includes the Geotrigger SDK for Android and Geotrigger SDK for iOS.

In readying our staff, we tested a new interactive training method. We blended the new dojo-style lessons coming out of Esri Training with a series of mini internal hackathons. The conditions were: make something, think together, work as a team, and basically code 'til your fingers hurt. The goal was simple - ready ourselves to help developers incorporate Geotrigger events in their apps.

Learning Day 1


Five support team members gathered around comfortable chairs brainstorming an application idea. The application we decided upon through consensus was a self-guided tour application of the Esri campus. Since time was of the essence (18 hours to deliver something), we eliminated doing Disney and other major theme parks to keep things simple. The rest of the day involved provisioning our development environments (getting the required iOS and Android pieces in place) and reading the Esri Geotrigger Service Guide.
Learning Day 2

Andrew W. scanned social media from our Geotrigger Service developer team. He read through the PDX blog, Twitter feeds from @EsriPDX, and anything he could find on GitHub to give the team a boost. Andrew focused on Android and trained using Eclipse and Android Studio.Noah S. also skimmed the feeds while reading Apple's help documentation on how to provision a profile to use push notifications. For Noah and I, the goal of the iOS app was to keep things simple. Initialize Geotrigger events in the main class implementing Application Delegate. Open a splash screen which implemented UIViewController and then segue into a UIWebView containing a Web Map of our campus. Essentially, while looking at the campus map, we wanted app users to receive informative messages about where they were on campus.Jason H. was our Esri’s Learning Center coach on Day 2. Jason has been instrumental in getting dojo training techniques off the ground. His central role (alongside doing his share of the coding) was to make sure everyone collaborated. Essentially, with five SDK developers training together, only two machines were used to build the self-guided tour app. Paired together, working together, working in teams - we talked out loud, scribbled across the white board, unraveled challenges, spoke code, pecked on the same keyboard and provided an endless stream of encouragement - even when times got tough.

Learning Day 3


Learning Day 3 led to many breakthroughs involving the core fundamentals. Major concepts like Tags, Triggers and Devices had set in. Conditions like ‘leave’ and ‘enter’ and tracking profiles like ‘fine’, ‘adaptive’ and ‘rough’ became a part of our vocabulary. We also had time to experiment with non-geographic messaging (possible via ArcGIS Online) and sent this message by Benjamin Franklin which inspired our training event.
"Tell me and I forget, teach me and I may remember, involve me and I learn."

We also spent a significant amount of time annotating the steps we took on Day 3. The list of challenges we encountered became the official training topics used in follow-up Geotrigger Service trainings. Best of all, we completed what we set out to do and finished our self-guided tour of Esri's campus.

In summary, everyone in Support and Development are excited about this release. We have a great team ready to support any questions people may have regarding the Geotrigger Service and their supporting SDKs, and we want to make every ArcGIS developer successful. In addition, our project-based learning approach is something we are going to continue to refine in Support Services. If anyone has similar training methodologies in their workplace or is ever interested in attending an Esri-sponsored hackathon or Meetup, let us know!
Doug C. - Advocacy Lead

more
0 0 442
JuliaGuard
Esri Contributor

As of January 2014, the use of Bing imagery requires a ‘Bing key’ purchased from Microsoft. Before you can complete the steps below, you will need to contact Microsoft to obtain a key. You can email bing4esri@microsoft.com to get in touch with a Microsoft representative.

To install your Microsoft Bing key:


1. With administrative access, sign in to your ArcGIS Online organizational account.

2. Navigate to ‘My Organization’ > Edit Settings.

3. In the Organizational Settings, select the Maps tab.

4. Under the Bing Maps section, paste your Microsoft-supplied Bing key and save the changes.

Bing1-300x80.png


5. Navigate to Groups > Create A Group. Give your group a name, a tag, and update the Status to Organization. Save this group.

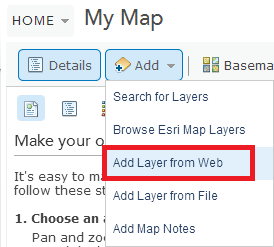
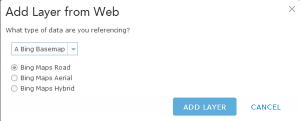
6. Navigate to Map > Add > Add Layer from Web. Select ‘A Bing Basemap’ from the drop-down menu.bing7.png

7. Select the type of Bing basemap you want access to, and click 'Add Layer'.bing8-300x121.png

8. Save the web map. Give the web map a name and tag.

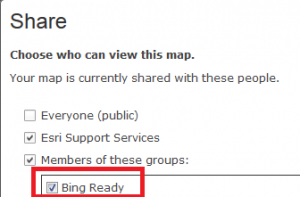
9. Share the web map. Select both your Organization and the group created in Step 5. At this point, you can choose to repeat Steps 6-9 if you want to save all three formats of Bing imagery.Bing2-300x197.png

10. Navigate back to My Organization > Edit Settings > Map tab.

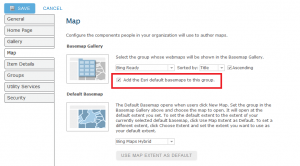
11. Under the Basemap Gallery Section, select the group created in Step 5 and check the box for “Add the Esri default basemaps to this group”. Save the changes.Bing3-300x166.png

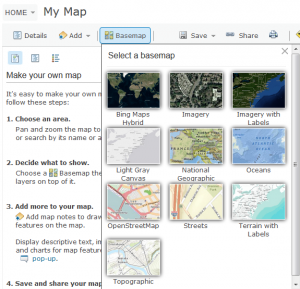
12. When you navigate back to the map viewer and select “Basemap”, you should see both your Bing basemaps and the Esri default basemaps in one location!bing5-300x289.png

13. If you are using ArcMap Desktop 10.0 or later, you may also want to access the Bing imagery on your local machine. To do this, you will also need to supply your Bing key to the machine where Desktop is installed. If using ArcMap 10.0 SP5 or 10.1 SP1, you will need to first install the Bing key patch, which is available for download under the Additional Resources section of this blog. Once the patch is installed or if you are running ArcMap 10.2, the steps are as follows:

1. Open Windows Explorer and navigate to the [location where you installed the software]\ArcGIS\Desktop10.2\bin.bing6-300x90.png

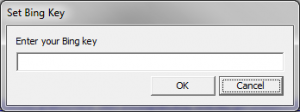
2. In the 'bin' folder, there should be a SetBingKey.exe. Double-click the executable file, and a window will open, allowing you to enter your Microsoft-supplied Bing key. Once the key has been entered, click OK.bingkeyexe-300x112.png

3. Open a blank or existing map document.

4. Navigate to File > Sign in, and enter your ArcGIS Online Organizational credentials.

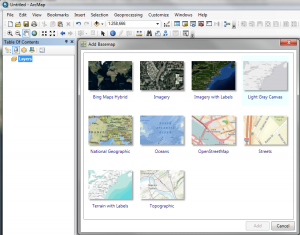
5. Navigate to File > Add Data > Add Basemap. You should now see the same Basemap options available to you in ArcGIS Online, including the Bing Maps imagery. You will also be able to open and use any map documents that contain Bing imagery created prior to the requirement of an access key.bing4-300x235.png

Additional resources:

Bing Map Use in ArcMap has changedGetting a Bing Map Key from MicrosoftBing Maps FAQBing Key Patch for ArcMap 10.1 SP 1Bing Key Patch for ArcMap 10.0 SP 5How To: Set the Bing Maps key in ArcGIS for Desktop
Julia G. - Desktop Support Analyst

more
1 1 16K
AlexanderNohe1
Honored Contributor

Staying updated on the latest revisions to online templates can sometimes prevent problems from appearing further down the road, and is one way a user can avoid being in a situation where they would need to start customizing their template from scratch. Users are able to check on the updates for their application that they downloaded through the GitHub page.

Most applications that are showcased on www.arcgis.com have the option to allow users to view the source code.sourceCode-300x28.png

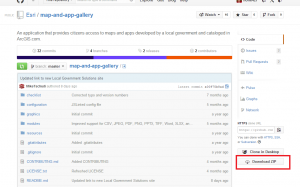
The source code will have all of the code that has been written for every release of that application listed on the GitHub page. The most recent version of the source code can be downloaded from the GitHub page via the 'Download ZIP' button outlined in red in the graphic below.downloadZip-300x187.png

If you have already downloaded the latest version of the application, be sure to write down the date somewhere so you can manage the updates as they become available. About once a month, log in to the applications GitHub page and click on the 'commits' button.commits-300x79.png

Here you are able to view every change that has been made to the source code, including the date that the code was updated. When using an application that can be customized, it is useful to stay updated with the source code, rather than re-download the source code and start customizing from the beginning when a major change has been made to the logic of the code.

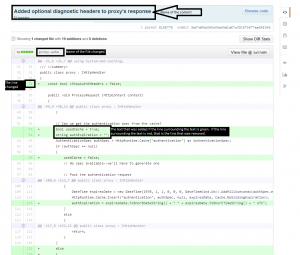
When clicking on an individual commit, it will show you the name of the commit, the number of lines changed, the name of the file changed, and the line on which the file was changed.commitDetails-300x255.png

From there, the users are then able to go into their own application and make the updates to the source code as they deem necessary based on the commits that were provided to the source code. Instead of worrying about changing the code in major portions, you can keep the application updated in smaller bits. This will allow you to use the latest application at all times, and you may even circumvent issues that may be present in the code with which you had originally started.

Good luck with your application!Alexander N. - Desktop Support Analyst


more
0 0 539
AlexanderNohe1
Honored Contributor

Virtual Campus courses are an online community of users that are receiving training in a fully self-paced environment. Several different kinds of Virtual Campus courses can be taken at training.esri.com. Sometimes, after registering for a course, users are unable to view the course videos. When this happens, the following steps are recommended for users to troubleshoot the issue.

  1. Make sure a supported version of Adobe Flash player is installed. The operating system should be running version 9 or later. To find out what version is installed, go to http://www.adobe.com/software/flash/about. Flash player is not required to view the course videos, but it is required to view the live training seminars.
  2. The system must be running a supported browser. Esri currently supports Internet Explorer versions 7 through 11 as well as the most recent version of Firefox and Chrome. If the user has trouble with one browser, try viewing the video in a different browser.
  3. If the user is unable to view the video in multiple browsers, your associated organization may be blocking the server that hosts our training videos. Please work with your IT department to add an exception to your firewall to allow streaming from the following location: http://trainingmedia.esri.com/webcourses/*
  4. Resetting the browser cache may resolve the issue by clearing out old information that the browser is relying on.
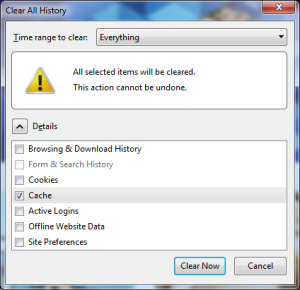
To reset the cache in Firefox:
  1. Press Ctrl + Shift + Del. This opens the Clear Recent History window.
  2. Make sure that Cache is checked, and press Clear Now.
ClearFireFox-300x290.pngTo reset the cache in Internet Explorer:
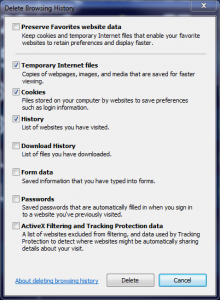
  1. Go to Tools (Alt + X) and then click on 'Internet options'.
  2. In the General tab, click on 'Delete...' under Browsing history.
  3. Make sure that Temporary Internet Files, Cookies, and History are checked. Press the Delete button.
ieDelete1-220x300.png

After performing the aforementioned steps, you should then be able to see the course videos. If you are otherwise unable to see the course videos, please contact Support with information on the following:
  • The specific error messages that are being received, and at which point in the process that the error is received
  • Which web browser (and version) is being used
  • Which operating system the computer is using

I hope that you all find this helpful! Thanks!Alexander N. - Support Services Analyst

more
0 0 518
48 Subscribers