Esri Technical Support Blog

cancel
Showing results for 
Show  only  | Search instead for 
Did you mean: 

Other Boards in This Place

Latest Activity

(380 Posts)
Jacqui_Newell
Esri Contributor

Soon, ArcGIS users will have a new Technical Support experience featuring a new look and helpful new ways to access information. 

Read more...

more
2 0 107
DavidVelhartický
New Contributor III

When I create new case of Technical support in My Esri, an e-mail comes with informations about my case number (and other informations). Unfortunately, there is only a name of technical support local company and case number in subject of e-mail instead of the subject I wrote in My Esri. So, with more technical suport cases opened at one time, I get very quickly lost in my e-mail message box.

Please, write the subject of case in subject of automaticaly generated technical support e-mails.

Thank you

(Ps: Maybe this happens only in case of the first automaticaly sent e-mail message, informing about case number and what's the toppic.)

more
1 1 739
DavidVelhartický
New Contributor III

When I get e-mail notification / reply from technical support, there is no information about communication history. Would it be possible to attach thread history into e-mail body?

It's difficult to remember all the history of the thread. Login to My Esri needed and much of clicing to get all the information to understand and reply back. (Even if there are no pictures saved in My Esri TS thread, which were sent in e-mail body previously. => It's needed to keep all single e-mail messages one-by-one in Outlook history to get all informations which were sent during history, searching them, go through, ...)

Thank you


more
1 1 562
DavidVelhartický
New Contributor III

It would be easier to communicate with technical support when possible to insert pictures directly in the message window - like in e-mail. (It is difficult to prepare pictures, numbers in their names, write references to attachements and so on.)

History of my e-mail communication with technical support is written in My Esri TS case history, but there are no pictures from these e-mails neither. Would it be possible to get them into the text, like they came to technical support in the e-mail message?

Thank you

more
1 1 512
MeganSingleton
Occasional Contributor III

Esri Support Mobile App Logo

The Esri Support Mobile App

Find answers and get expert help for your geospatial solutions

The upcoming Esri Support mobile app provides a tailored support experience that makes getting help for your ArcGIS Platform convenient.

Quick access to Esri Support Convenient case managementFind answers on your own

We're excited to release the app and are preparing for launch. If you'd like early access to the app or wish to influence the trajectory of your mobile support experience with Esri, please join us in beta testing the Esri Support app. 

To learn more about the app and request access to the closed beta testing program, please visit the app page on the Esri Support website.*

Learn More & Navigate to the Closed Beta Download


We’ll release the full mobile app once beta testing is complete—stay tuned. 


Cheers,

The Esri Online Support Team

*For now, the closed beta version of the app is available for U.S. customers and international distributors. 

more
3 0 1,397
RachelApplebaum
Esri Contributor

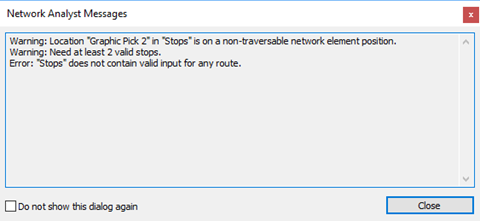
Have you ever tried to get a route between several points in ArcMap and received the message "Warning: Location X in 'Stops' is on a non-traversable network element position"? You do a little research and find out you need to enable the setting "Exclude restricted portions of the network". Even after turning that setting on, you still get the error. What's going on?


If you try the same route in ArcGIS Pro, there’s no error message. And you can't find the “Exclude restricted portions of the network” setting anyway.


What's going on? What is the problem here? And what is the difference between ArcMap and ArcGIS Pro?


The problem that's preventing the stop from being on the route is with the network location.

What is the network location? Per Esri Help documentation, “a network location is a type of network analysis object that is tied to the network; furthermore, its position on the network is input for the analysis." (Network Locations, http://bit.ly/2gfVM6m). In plain terms, it's where ArcGIS Network Analyst routes to.


When ArcGIS Network Analyst solves a route, Network Analyst doesn't route to the XY location of the point. Instead, the extension will snap the point to the nearest street and calculate some location values on that street. That location is the network location.

The network location can be seen in four fields*: SourceID, SourceOID, PosAlong, and SideofEdge.

  • SourceID: This will be the name of the source feature class that the network location is on.
  • SourceOID: The OID of the source feature that the network location is on in the source feature class.
  • PosAlong: The position along the digitized direction of the source line feature**. The number is expressed as a ratio, between 0 and 1. For example, a PosAlong value of 0.557 indicates that the location is 55.7% down the line.
  • SideOfEdge: The side of the line that the original XY location is on with reference to the digitized direction of the line.

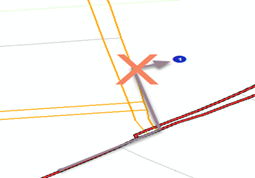
The message "Warning: Location X in 'Stops' is on a non-traversable network element position" indicates that the network location for that point is on a street that is considered prohibited or non-traversable. Some examples of a location that is on a prohibited street include, but are not limited to:

  • The analysis has been set so that it simulates driving a car, and the network location is on a pedestrian-only street.
  • The stop is on the right side of a one-way street which is prohibited in the "along" direction***.
  • The network location is on an unpaved road, and unpaved roads are prohibited in the analysis.

You can use the Network Identify tool on an edge in the network dataset to see which network attribute restrictions (like one-way or unpaved roads) would cause the edge to be traversable or prohibited.

So, the network location is on a prohibited network edge. What do you do about that? Let's continue by looking at the "Exclude restricted portions of the network" setting, since that's the setting we use to fix the error.

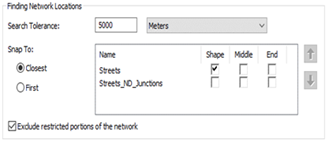
The "Exclude restricted portions of the network" setting causes network analysis objects to locate only on elements that don't have active prohibit-restrictions, which are restrictions that are checked in the Analysis Settings tab. With this on, then a network location will not be placed on any edge considered prohibited at the time.

How does it work? If the "Exclude restricted portion of the network" setting is on when ArcGIS Network Analyst is calculating the network locations, ArcGIS Network Analyst will skip any street considered prohibited and find the closest street which is traversable.

Let's go back to the example of the analysis being set up to simulate driving a car, and the point is closest to a street marked as pedestrian-only. Getting more specific, let's say I work for a pizza delivery service. A customer called and ordered a pizza. They live in a college dorm, which is located on a pedestrian walkway. If I have the "Exclude restricted portions of the network" setting enabled when I load the point for that location, I'll get a route. And I'll see that it's not taking me to that pedestrian walkway; it's taking me to a point on the main road through the campus. From there, I'll park on the side of the road, get out and walk to the dorm to deliver the pizza. Then go back to my car and continue the route.

This setting is where we see one of the biggest differences in network locations between ArcMap and ArcGIS Pro. Let's start with ArcMap.

ArcMap


In ArcMap, all network location settings are accessed through the Network Locations tab of the network analysis Layer Properties****.

The order of changing settings related to network location matters because network location settings in ArcMap are not retroactive—they don’t go back and change any network locations already calculated. So, if you change a network location setting after loading your locations, you'll need to recalculate the network locations.

By default, ArcGIS Network Analyst in ArcMap does not use the "Exclude restricted portions of the network” setting, so you will need to turn it on. Either turn it on before loading the locations or after—if after, be sure to recalculate the network locations before solving.

In the situation described in the beginning of this blog, the "Exclude restricted portions of the network" was turned on, but the network locations were not recalculated. Here are some example steps to follow to ensure stops are included in the route:

  1. Load the locations into the analysis layer.
  2. Turn on "Exclude restricted portions of the network".
  3. Make any remaining changes to the analysis settings, including which restrictions are turned on or off.
  4. Recalculate the network locations *****.
  5. Solve

ArcGIS Pro

ArcGIS Pro has more advanced network location settings. All settings are found in the Add Locations geoprocessing tool, which loads the points into the network analysis layer and calculates the network locations. So, it makes sense that the network location settings are found in the Add Locations geoprocessing tool.

But wait, where is the "Exclude restricted portions of the network"? It's not gone; it's still there. In fact, ArcGIS Pro turns it on by default, so it's always in effect. Also, ArcGIS Pro automatically recalculates network locations for locations affected by setting changes automatically before the solve. So, you do not need to manually recalculate locations in ArcGIS Pro; it does it for you.

These are some of the most used settings to keep in mind when working with ArcGIS Network Analyst, but there are many more. I encourage you to check out the settings and see how they can improve your network analysis.

Resources:

For points. Network locations for lines and polygons (for barriers, route zones, etc.) are stored in a single blob field and cannot be easily read.

** One of the easiest ways to see the digitized direction of a line is to add an arrow at the end of the line symbology. In ArcMap and ArcGIS Pro, there is a default symbology called “Arrow at End” that can be used.

*** “Along” indicates travelling with the digitized direction. “Against” indicates travelling against the digitized direction.

**** Common ways to access the network analysis Layer Properties are either double-clicking the analysis layer name in the Table of Contents or by clicking the Layer Properties box in the top-right corner of the Network Analysis window.

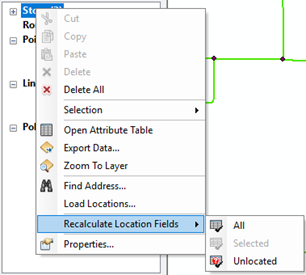
***** To recalculate the network locations, right-click the sublayer in the Network Analysis window, and choose Recalculate Location Fields.


more
3 0 3,805
MeganSingleton
Occasional Contributor III

When looking for answers and solutions related to the ArcGIS Platform, you may have used Support.Esri.Com in the past. This site hosts the largest search collections on the Esri.com and ArcGIS.com domains, returning content from the Support knowledge base, ArcGIS product documentation, the GeoNet community, Wiki.GIS.com, and other helpful repositories. 

To refine your experience when you're looking for answers, Esri recently updated the search experience on Support.Esri.Com by adding a new search engine and search features.

Search Features

The Support.Esri.com search page includes two filters, chronological sorting, the total number of results, and an option to select the number of results displayed per page.

Support.Esri.Com New Search Features

Content Type Filter

The Content Type filter enables you to select a specific repository for your search results. For example, if you select Technical Articles, only results from the technical article knowledge base return.   


Content Type Filter on Support.Esri.Com

Time Filter 

The Time filter narrows your search results down to a recent time frame, ranging from the past 24 hours to the past year. For example, if you select Past 3 Months, only content published or modified in the last three months returns. In the image below, the results are filtered to only display Patches and Updates content published in the Past 3 Months.


Time Filter on Support.Esri.Com

Chronological Sort

The Chronological sort orders search results by publish date. By default, search results are displayed in order of relevancy, but this feature can re-order the results by Newest to Oldest or Oldest to Newest within the selected time filter. For example, if you filter by Patches and Updates and sort by Newest to Oldest, the most recent content displays at the top.

Chronological Sort Feature on Support.Esri.Com


Total Number of Search Results 

The total number of search results for the search query and applied filters displays under the filters and sort drop-down options. The new search engine limits the total number of results returned to 10,000 results. If a search query returns 10,000 results and the expected page is not included, please refine the search query or apply content and time filters.

Pro Tip: You can search for exact phrases by adding double quotes around the search text (for example, “Create buffers tool”). Searching with double quotes only works if all text is inside double quotes; if there is text outside of the double quotes, the quotes are ignored.

Results Per Page Selector

The Results Per Page selector displays up to 50 results on each page. For example, if you select 50 results per page, 50 results display instead of the default of 10 results.  

Total Number of Search Results Feature on Support.Esri.Com

What to Expect

Search results will be different with the new search engine. Search engines typically improve over time as the results are fine-tuned and we generate more content for better relevancy. For the localized Support websites, both English and translated content is returned in search results. If needed, you can also search with Google or Bing, which are not impacted by the updates.

How to Help Improve Search

We understand that content discoverability through search is an important part of the  support experience. If the new search does not return the results you expect, please submit your feedback via the feedback web form in the footer of the Support website or email us at support_feedback@esri.com.

Happy searching,

The Esri  Support Resources Team 

more
3 0 3,479
by Anonymous User
Not applicable

Picture the scenario: You are working with Collector for ArcGIS, but you continue experiencing minor problems with adding points. You give your friendly Esri Support Analyst a call and they begin walking you through some steps to troubleshoot the app. You’re not seeing the options they’re talking about, and it’s getting a little frustrating. If only there was a way to show the Esri Analyst your screen so things could go more smoothly….Well there is! It is possible to share the screen on your iOS and Android devices using Zoom.

Please be aware that iOS 11 or later is required to perform screensharing with Zoom


To screenshare from a Mobile Device with Zoom....

1. Install the Zoom app from the Google or Apple Store on the mobile device

2. Launch the Zoom app > Ignore Sign In/Sign Up and click on "Join a Meeting"

3. You will be prompted for the meeting ID, just as you would on a desktop. Enter the meeting ID provided by the analyst

4. Once you have joined the meeting, things are a little different for beginning the share between Android and iOS

Android:
5a. Tap the black screen once and you will see a toolbar come up from the bottom. Click "Share Content." Click "Allow" if prompted to give the device permissions to share. You are now sharing on an Android device.

iOS (>11 only):

5b. Add Screen Recording to the Control Center 
> Settings > Control Center > Customize Controls > Add Screen Recording

6. Once Screen Recording is added, swipe up from the bottom of the screen to display the Control Center

7. Tap and HOLD the Screen Record button > A dialogue will pop up to have you switch Screen Recording from Camera Roll to Zoom

8. Start Broadcasting > 3,2,1 countdown will begin and the screenshare will begin after 1.


If you would like to get in contact with an Esri Support Analyst, please call 1 (888) 377-4575 and choose option 2. You can also visit our website to request a case or begin a live chat: https://support.esri.com/en/contact-tech-support

Happy Screensharing!

more
11 3 12.5K
KatieCullen
Regular Contributor II


Users/Administrators of ArcGIS Online Organizations may have noticed some irregularities with feature storage credit charges between January 1st and July 4th, 2018. This was a result of a bug in the credit accounting process that resulted in sporadic timeouts and increased execution times while running the feature storage credit calculation service. This issue fixed on July 4th, 2018. The operations team is working towards being able to detect such scenarios with improved monitoring of these services.

BUG-000100343: Occasionally, users are not charged for feature service storage for an hour at a time.


As a result of the bug, some organizations were sporadically not charged for feature storage in hour long increments over this time. Organizations will not be charged for any missing feature storage charges. Although no action is required on your part, we want to show you what the error may have looked on the status tab and point you to the reporting tools to understand credit storage. understand if you were affected by this bug


Identify irregularities:

1. Navigate to the status tab and view the last 60 days, or a time period that includes before and after July 4th

2. View Irregular and Consistent Feature Storage in status reporting.

NOTE: Keep in mind that if members in the organization were publishing, deleting or adding to new features to hosted feature layers, feature storage may fluctuate due to changes in data storage.

3. Click on a specific day to verify if the charges were consistent for each hour. If there are sporadic missing hourly charges, then you have probably experienced BUG-000100343. If you are consistently charged hourly across the day, then you were not affected. As this bug was sporadic, you may have been affected on some days and not others, so feel free to check out multiple days.

BUG-000100343:


Correct hourly credit charges:


 4. To verify the amount of data stored for a specific day, click on the storage ring and view the table below. You will notice that the size remains the same when comparing the feature storage before July 4th and after July 4th, but the credits charged may vary.

BUG-000100343: Before July 4th 2.76 GB, 11.83 credits


After July 4th, 2.76 GB,  21.84 Credits


To verify your feature storage size, throughout this time period, please  view the feature storage details on the status dashboard. As mentioned above, there is no action required on your part, but as an administrator you can dig into your credit reporting to see if you were affected. If something doesn't quite seem right, feel free to get in touch with us in Technical Support to answer any questions.


Some helpful blog links:

Feature Storage Reporting on the Status Tab:

https://www.esri.com/arcgis-blog/products/arcgis-online/administration/understanding-feature-storage... 

Strategies for managing credits:

https://www.esri.com/arcgis-blog/products/arcgis-online/administration/five-strategies-and-tools-for... 

Help:

http://doc.arcgis.com/en/arcgis-online/reference/credits.htm 

http://doc.arcgis.com/en/arcgis-online/administer/view-status.htm#ESRI_SECTION1_1D001100A7A24CDF85A0...     

more
5 0 2,468
GeorgePlumley
Occasional Contributor

I'm trying to download some base maps that covers the extent of Alaska using the Download Map Tool in ArcGIS Pro 2.2, but since Alaska spans across the 180° line I get everything except the area that I want. Hopefully this can be addressed in a future update.

I've included a couple screen captures, one of the area of interest, and the other being the resulting tile package.

Thanks

more
0 0 1,490
35 Subscribers