Esri Technical Support Blog - Page 3

cancel
Showing results for 
Show  only  | Search instead for 
Did you mean: 

Latest Activity

(383 Posts)
chailasikasula
New Contributor

Hi I created Apps for different sites situated in different locations  using Portal for Arcgis .All the Apps seem to be working just fine apart from 1 site were I m getting complaints that some published tile  layers are not visible even when turned on in layers tool. 

What could be causing this problem? I asked that the proxy parameters be added to the LAN settings but I m told the problem still persists.

Please help

more
0 0 674
tempJosephMayfield
New Contributor III

As part of our commitment to expanding the online support experience for international customers, Esri Support is pleased to announce the launch of the award-winning Support.Esri.com in Chinese and Japanese!
The Esri Support website hosts many critical resources for the Esri community, such as popular technical articles, product lifecycle documentation, support downloads, and more. The launch of the site in these languages represents our commitment to making these resources readily available for ArcGIS users around the globe. 

The Chinese and Japanese versions of Support.Esri.com join the Spanish version of the website, which was launched last summer, and will be joined in the upcoming months by additional languages. 

Note: To view Support.Esri.Com in a language other than your default, navigate to the language selector on any Esri.com page and select the desired language.

more
1 0 829
DouglasWunneburger
New Contributor

We have attempted several times to configure a server on a virtual machine running the following setup. The server was previously running the same DBMS and OS with ArcGIS Server 10.4 successfully; however, we wanted to upgrade and include Portal. Unfortunately, we have had problems with the upgrade.

  • Microsoft Windows Server 2012 R2 Ver. 6.3.9600
  • IIS Ver. 6.2.9200
  • Microsoft SQL Server 2016
  • ArcGIS Server Enterprise 10.5.1
  • ArcGIS Portal
  • Web adaptors for Portal and Server
  • ArcGIS Datastore

In previous attempts using the Enterprise Builder app, I have opened SSL ports as instructed for 6080, 6443, 7443, and 2443; however, I have since removed bindings in trying to get back to where we were with a simple install of ArcGIS Server.

Currently, IIS has been configured with bindings for ports 80, 6080 and 6443.

For the moment, Windows Firewall is turned off; however, I have set inbound Rules to allow access to the following local ports:

Inbound Rule

Local Ports

ArcGIS Enterprise Setup

80, 6080, 7080, 443, 2443, 6443, 7443, 9876

ArcGIS Server

1098, 4000-4004, 606, 6080, 6099, 6443

ArcGIS Portal

7080, 7443

ArcGIS DataStore

2443, 9876, 29080


I have tried installing using the automated Enterprise Builder application and manually by using the ArcGIS Server for Enterprise installation ISO distribution. In both cases, the software appears to install and configure correctly, but attempts to access the arcgis/manager (or any other related links) through a browser returns 404 errors. IIS is running as indicated by other web services.

In some attempts, it has appeared that the ArcGIS server software is running correctly, because I can see the map REST services in the system services list. Nevertheless, we are unable to access them with the same 404 error results.

I have many years of experience with ESRI products but am not much of a web programmer, so these setup problems are confounding me. There is probably a simple issue which you may have seen previously that is blocking access to the system framework; however, despite many web searches and after many unsuccessful (and some partially successful) attempts, I am at a loss as to what the problem is.

If you need more information about setup, I will be happy to provide it. I appreciate your assistance on this.

more
0 5 2,051
JuliaLenhardt1
New Contributor III

Exciting things are coming for GIS users in 2018 - ArcGIS Desktop 10.6 and ArcGIS Pro 2.1 are being released in January, along with some great new tools, features and functionality. Esri Technical Support is excited to work with our customers in these new environments, but what does this mean for some of the older platform versions?

Alas, on January 1, 2018, ArcGIS 10.1 is officially retired

Here's a quick list of what this entails: 

  • Technical Support will not be available for ArcGIS Desktop 10.1, ArcGIS Server 10.1, or Enterprise GDBs at 10.1
  • It will not be possible to request a Support Case for ArcGIS Desktop/Server/Enterprise 10.1
  • We are here to help you with upgrading. If you need technical support for the upgrade process, give us a call. 

As this year comes to a close, it's important to plan ahead. Get a jump start on upgrading your applications and geodatabases, and reach out to us if you have questions. 

For more information, check out some of our documentation:

Product Life Cycle for ArcGIS 10.1

Deprecation Plan for ArcGIS 10.1 and ArcGIS 10.1

more
3 3 1,427
TinaMorgan1
Occasional Contributor II

What is it?

The synchronization process is made up of multiple tasks involving sending and receiving data and acknowledgements between the two geodatabases that participate in the replica.  The Disconnected Synchronization process allows the user to manually complete each of these individual tasks. 

One way to think of synchronization can be to compare it to a phone conversation between two people, speaking and listening to each other.

Why use it?

To provide a method of synchronization for customers with replication between geodatabases that are in a disconnected environment.

To troubleshoot issues with replicas in a connected environment.

To get a deeper understanding of the synchronization process.

How to use it?

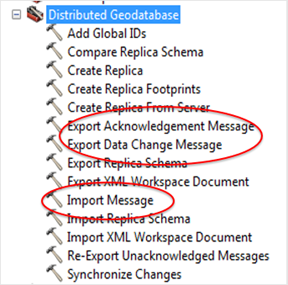
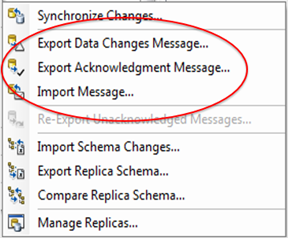
There are three ways you can access the tools needed to perform a disconnected synchronization.


                           ArcCatalog Context Menu:                                        ArcToolbox Geoprocessing tools:                                                  

ArcMap Distributed Geodatabase toolbar:

Before running any tools, use the replica manager to confirm which geodatabase in your replica is the data sender.  *Always check this status from both the parent and the child.

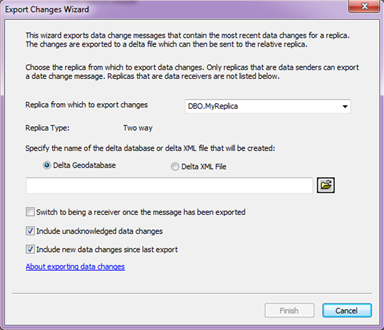
Step 1: Export Data Changes from the Data Sender.

If you are using a two way replica, and need to synchronize data in both direction, check the 'Switch to being a receiver once the message has been exported' so this workflow can be done in the opposite direction later.

Exporting the changes to Delta Geodatabase allows you to see the records with updates, inserts, and deletes that are being synchronized.  If features have not been updated, inserted or deleted since the last synchronization then you will not see those records in your Delta Geodatabase. 

Esri Support insight:  If other synchronization methods fail, this is my go-to option for troubleshooting that failure.

This step can be compared to saying “Hello” to start a conversation.

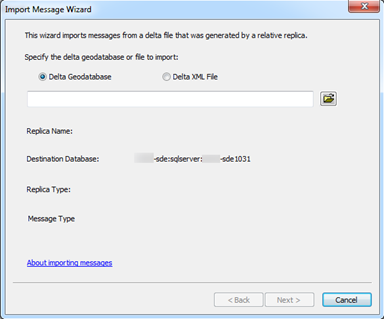
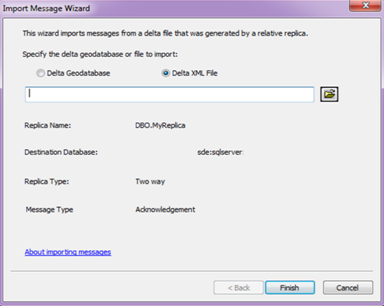
Step 2:  Import those data changes into the Data Receiver using the Import Messages Wizard.  Since our output in step 1 was a file geodatabase, we will choose to import a delta file geodatabase here.

This step can be compared to hearing someone say “hello” to you to start a converstaion.

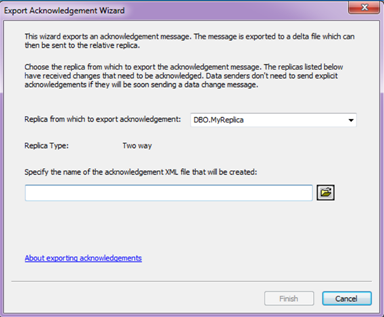
Step 3:  Export an Acknowledgement Message from the Data Receiver.  This output will be an XML document.

This step can be compared to saying “hello” back to someone who just greeted you.

Step 4:  Import that Acknowledgement Message into the Data Sender. 

This step can be compared to someone hearing your “hello” reply.

The four steps are needed in order to perform a synchronization in one direction of a single replica.  If you are using a two way replica, and need to send data in both directions, then you will need to repeat these four steps again in the opposite direction.

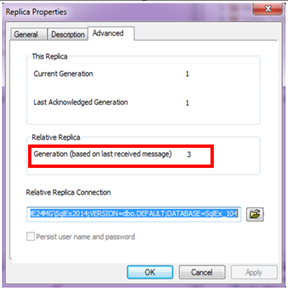
*Use the Advanced tab in the Replica Properties to see the history of your replica geodatabases conversations. 

                 Parent geodatabase Replica Properties                             Child geodatabase Replica Properties                                            

  • The Current Generation of the Data Sender increases when data changes are exported from the sender geodatabase.
  • From the Data Receiver, The relative replica generation increases when new data changes are imported into the receiver geodatabase.
  • The Last Acknowledged Generation of the Data Sender increases when this geodatabase imports the acknowledgement message

For Fun!

*Always check this status from both the parent and the child.

Now that you have completed the disconnected synchronization workflow, let’s look at the statement above. 

  • Can you now think of WHY it is important to check the status from both the parent and the child? 
  • If you see both the parent and the child have the same status, what would you do to reconcile that so that only one geodatabase is the sender, and the other is the receiver?


*Use the Advanced tab in the Replica Properties to see the history of your replica geodatabases conversations.

This blog uses images to show the generations of a parent and child geodatabase.  In the images, the generations are "in sync", meaning that the conversation between the two geodatabases is completed...one said hello, and the other said hello back.

  • The generation numbers are 3-3-1 in the parent, and 1-1-3 in the child.   Can you determine how many times the parent has sent data to the child?  Can you determine how many times the child has sent data to the parent?
  • Can you determine what needs to be done if those numbers were 3-2-1 and 1-1-3?

esrisupport‌

more
10 9 3,529
TinaMorgan1
Occasional Contributor II

We have all been there.  Your stomach is growling, yet all of your mental energy is focused on fixing the car in front of you going fifty in the fast lane.  When people are hangry (hungry/angry) they may come off irritable and agitated, maybe even point out every little thing that is going wrong, when the issue at hand is as simple as “I am hungry.  Feed me!”. 

Misdiagnosis happens all the time and can translate into many other facets of life, including software issues, but could you diagnose software issues when it seems like your software is being hangry?

The good news is that with some practice, and skills of observation, anyone can categorize software issues like a pro.  This blog will help guide you when encountering software issues.  The intention is to lift the many layers that can complicate issues, so that you may accurately, yet simply state the issue you need help with.

Symptoms of software issues are observable by the end user in many forms, such as an error, performance degradation, or a software crash, to name a few.  Hopefully, these interruptions prompt users to call to Esri Support and log a case for investigation.  At Esri Support, our analysts have a specific skillset.  Few of us are generalists, and this structure is designed to provide our customers with elite technical support…in other words, we don’t use scripts. 

Why is this important?  One of the first steps to logging a case with Esri Support is providing a description of the issue, which will be used to form a subject line in the case.  These subject lines can be altered as more knowledge is gained on the issue through investigation, but this initial subject line is big factor in determining which analyst owns the case first. 


Determining the overall symptom helps guide the triage process and the lifetime of the case.   Let’s explore these symptoms in more detail.

1.  Error: 

Error messages will stop us in our tracks.  Sometimes the messages are very useful, and tell us exactly what we need to know to proceed, sometimes not so much.  When users encounter errors we always request a screenshot of the error and the workflow (clicks) leading up to the error.  For example, “Error: invalid coordinate system identifier” is seen when adding data from an Oracle enterprise geodatabase into ArcMap.

2.  Performance degradation:  

Personally, this is the most frustrating issue to encounter.  There is no error; instead, the process is slow, and the spinning hour glass doesn’t tell you when you can expect performance to return.  When performance cases come to my desk, I first gauge the slowness, because “slowness” is a relative term, and something that is slow in one environment may be optimal in another.  The symptom here isn’t just performance, but specifically performance degradation.  In other words, there was a more optimal performance, which has now degraded.

Symptoms of slow performance can be caused by many things including workflows, overloaded resources, and software compatibility to name a few.   To get started troubleshooting it is always helpful to have a comparison case available for investigation.  If you believe you are seeing slowness in software, first ask yourself ‘this is slow compared to what?”  

For example, “using ArcMap 10.1 sp1 to do the same workflow on the same data takes 1 seconds, while using ArcMap 10.5.1 takes 20 seconds”, or “Previewing feature class A in ArcCatalog takes 1 second, while previewing feature class B takes 20 seconds.  Both features are stored in the same enterprise geodatabase”. 

These examples give us a “fast” example and a “slow” example that can be compared to each other.  Notice in these examples that there is only one difference in the workflows, giving us controlled variables and a single dependent variable to review…right, like scientists.

3.  Unexpected results:  

This symptom, like performance, will not produce an error, but unlike performance symptoms, these processes will complete, seemingly successful.  However, when the results are analyzed they are incorrect or incomplete.   Unexpected results can also take the form of tools being disabled, or grayed out. 

For example, “I open ArcCatalog to enable Editor Tracking on my feature class, but Enable Editor Tracking is grayed out”, or “I created a replica of my U.S. States feature class, but only 48 of the states were replicated into the child geodatabase”.

Most of the time unexpected results stem from a workflow issue.  Some setting that needed to be turned on for this tool to work was not turned on, or properties/constraints on this data caused the unexpected results.  In the first example above the connection must be made as the data owner to enable Editor Tracking.  Any other user connection will see the Editor Tracker option grayed out.  The second example, where not all data has been replicated, may be due to filters placed on the data being replicated, or relationship classes enforcing database referential integrity.  


4.  Crash:

Click, click boom goes the dynamite.  There is no error.  The best you can do is re-open the software and try again.  Esri considers all crashes a bug.  We want our software to give you a meaningful error that will help you complete your work.  Crashes occur when the software encounters an argument that it doesn’t know how to resolve.  Always report crashes to Esri Support so we can ensure our software understands how to handle these situations.


Software issues can be complex, can employ multiple technologies that require different levels of expertise on many different subjects.  These issues can be more approachable by answering the question, “What did I observe during my daily work that prompted me to request help”?   While there are always exceptions, 90% of the time I can start answering that question with one, or more, of the symptoms discussed in this blog.   I hope this helps brighten up the perceived darkness around software issues, and as always, give us a call if you encounter any of these issues, or just have questions for us. 

esrisupport‌

more
24 9 3,626
TinaMorgan1
Occasional Contributor II

As a Support analyst, I take for granted how easy it is to say the words “how can we help you?” But as a software user, I understand answering that question can be difficult.  My expertise lies in the enterprise geodatabase, and even with my near decade of experience, I can still get overwhelmed when discussing other technologies. 

Esri Support has taught me enough to fill a novel, so for the sake of your time, here are a few rules of thumb I live by when discussing technical details with customers, management, engineers, and development alike…

  • Write an accurate and detailed, yet succinct description of the issue. 

The subject line on a support case is often the first thing we Support analysts see.  A clear and universally understandable subject line can help your case get assigned to the right analyst the first time, and avoid unnecessary transfers. 

Hint:  Understanding the issue is key.  To help formulate a primo subject line by focusing  on the heart of your issue you can refer to my blog Understanding Software Issues

  • Use numbers and bullets to list steps in a workflow.

Paragraphs are great for storytelling, but bullets drive home details. 

Hint:  When reproducing the issue, think of each mouse click as a step in the workflow.  If there are 10 mouse clicks to reproduce the issue, then that workflow will have 10 bullet points.

  • Ensure the workflow starts at a point that your audience can relate to. 

The common ground you start on is relative, and can change depending on your and your audience’s combined experience.   

Hint:  If the first step in the workflow is to ‘click on the Manage Replicas button to open the replica manager’, then first make sure your audience knows where and how to find the Manage Replicas button. 

  1. Open ArcMap 10.5.1
  2. Click ‘Customize’ on the menu bar
  3. Expand ‘toolbars’
  4. Click on ‘Distributed Geodatabase’ to open the toolbar
  5. Click on the Manage Replicas tool

  • When in doubt about what to call a tool, open the software and call it what the interface calls it. 

For example, the terms ‘layer’ and ‘feature class’ are often used interchangeably in conversation, however, a feature class is data stored in a geodatabase, and a feature layer is a representation of that feature class, usually in-memory and often in a map.   These two items, while they look and act very similarly, will require different background and experience to troubleshoot.

  • Refrain from using pronouns, acronyms or industry specific language, unless they have been previously defined for both you and your audience.  Don’t assume that everyone knows what is meant by the “OPI”.  One person’s “Oracle Program Interface” is another person’s “Offensive Pass Interference” is another person’s favorite nail polish.


While no one knows everything, we all know something, and if we can clearly communicate ourselves, then combining that knowledge becomes much easier.  Ask questions, ask 20 questions if you must, because each question will help determine the most effective triage path to take (See my awesome colleague’s blog that discusses this method in more detail...  What Would Tech Support Do?). 

Esri Support Analysts practice this approach from day one.  I often recall my onsite interview where I was asked to explain to my future manager how to tie her own shoelaces with my back turned to her.  I thought “this will be easy. I can tie shoes with my eyes closed.”.   After about a minute of giving what I considered an award-winning description of how to tie shoelaces, I turned around to see her shoes did not even have laces!  I failed to ask the right questions and find our common ground.  That moment has taught me not to shy away from even the most basic questions, and has turned out to be very valuable when needing to describe technical details in a timely manner to people with wide ranges of technical experience.

So, whether you are just getting started, or a GIS guru, give us a call at Esri Support, where our first question will always be “How can we help you?”. 

esrisupport‌

more
22 10 4,464
GregoryLehner
Esri Contributor

Hello there, and welcome! We've been preparing for this day, and we are almost ready! But before we move all the way in, I would like to introduce you to the new home of the Esri Support Services Blog.

Previously, our blog and several other Esri blogs would post their updates to the blogs.esri.com domain. Now we are moving here to the Esri Community (GeoNet) website, a move that is great for everyone. In the Technical Support group, we'll have more opportunities to engage with you and help further your GIS goals with the ArcGIS Platform. As blog readers, not only will you gain access to a plethora of forum discussion topics, ideas, and community groups involving Esri, GIS, and The Science of Where, but you will be able to participate in all of this content in a single place.

If you are not familiar with our previous blog, then all you have to do is prepare yourself for some new content from the Esri Support team! However, if you were a regular reader, you may want to know what this move means - i.e. accessing previous blog posts, RSS feeds, and the like. The following thread goes into more detail, but here are some highlights:

  • The "official" move date period is early to mid-October 2017.
  • The home page URL for the new site is https://community.esri.com/groups/technical-support/.
  • All links to blogs from our old website will automatically redirect to their new URLs on GeoNet. No need to update your bookmarks or edit your posts - we got you covered.
  • Some blogs were not migrated (e.g., Happy Halloween 2009). If a blog was not migrated, you will be redirected to the Technical Support home page.
  • You do *not* need an account to access this blog, but you will need an account in order to post comments, like posts, etc.

As administrators, we have thoroughly enjoyed developing and growing our blog site over the years, and we hope you will join us on our next voyage within this community.

-Greg and Megan

more
4 0 1,048
KristaMcPherson
Esri Contributor

This blog post is part II of the WWTSD blog series from Esri Support Services. Click here to view the first part in the series: WWTSD (What Would Tech Support Do?) Part I.

Have you ever attempted to run a geoprocessing tool, only to have the tool fail? Perhaps your data fails to publish to ArcGIS Online or draws incorrectly on your map. Maybe you are running a geoprocessing tool only to have it fail with a generic error message. You are using the same workflow you use every day with the same settings and configuration, but you can't seem to find another cause to the problem.

You may be dealing with a data-specific issue. There are a few basic troubleshooting steps that may provide a resolution to this, but it all starts with determining if the issue is truly data-specific. Determining if an Issue Is Data-specific

A quick test to determine if an issue is data-specific is to bring your dataset into a blank map document, map frame, or web map (depending on the environment in which you are working). If the issue does not persist in a new map, then the issue may be specific to the map document. If you experience the same issue in a new map document, the source of the problem may be the data.

Another way to determine if an issue is data-specific is to run the same process with a different dataset similar to the one that you are using. For instance, if using a point shapefile that fails to import into your file geodatabase, run the process on a different point shapefile of a similar size. If the tool or process succeeds on the new dataset, then the issue may be data-specific. Luckily, there are tools available that can help to resolve some of these data-specific issues.

If you find that the problem or error is reproducible with multiple datasets, you may want to investigate some of our additional resources to determine the source of the issue. Feel free to check out more resources from the first post in the WWTSD series (linked above).Possible Data-specific Issues and Their Solutions

A geometry error can be one potential source of a data-specific issue that has a quick fix. ArcGIS applications require that a feature's geometry meets certain standards. Issues can occur if any features have null or incorrect geometry. In ArcMap and ArcGIS Pro, you can determine if your dataset has any geometry errors by running the Check Geometry tool, which generates a table that lists the geometry errors found in the data. If there are errors present in the resulting table, run the Repair Geometry tool to fix the geometry errors present in the data. It is recommended to make a copy of your data prior to running this tool, as the tool may delete records with geometry errors.

If your features appear in a different location on the globe than you would expect, your data may have an issue with your data's projection. You can view the coordinate system of your data by navigating to the properties of the layer. If the data does not have a defined projection, you may need to use the Define Projection tool to assign the correct projection (see the tool documentation here for more information). If your data has been assigned a different projection than the other layers in your map, you may need to use the Project tool (here) to alter the coordinate system of your data. For more information about when to use the Define Projection tool versus the Project tool, take a look at the blog post found here. If you do not know what projection your data should be in, please see the technical article here for more information.

Data can become corrupt for various reasons, including incorrectly copying data or  experiencing connection issues to a network drive. These issues sometimes can be resolved by exporting the data into a different format or location, such as to a different feature class or to a .tif rather than to a .png raster file. If you are working in a file geodatabase, run the Recover File Geodatabase tool, which creates a new file geodatabase with repaired versions of feature classes that the tool identifies as potentially corrupt. Considerations for Raster Datasets

Raster datasets have many parameters and properties and therefore, many sources of data-specific issues. The following by no means addresses all potential issues with raster datasets, but does address a couple common sources of data-specific issues for rasters and troubleshooting steps to address the issues.

Bit-depth is a characteristic of a raster that defines the possible cell values allowed for the dataset (for more information, click here). If the bit-depths of two or more rasters that you are running a geoprocessing operation on do not match, you may run into errors or issues. For instance, if you create a mosaic dataset containing rasters from multiple sources, you may want to confirm that the bit-depths of the rasters are the same. You can determine the bit-depth of a raster by navigating to the raster properties. If you must change the bit-depth of your raster, you can use the Copy Raster tool to manually set the necessary bit-depth and create a new output raster with those parameters.

When adding a raster dataset to a map document or creating a new one, you are given the option to build pyramids that control how the dataset is viewed at different scale levels. If you are unable to view your raster dataset at some scale levels, but not at other levels, the raster pyramids may have become corrupt. Exporting the raster into a different format or deleting and rebuilding pyramids may help resolve this issue. If you would like more information about deleting and rebuilding pyramids, click here.Contact Esri Support

These steps can help to begin narrowing down potential causes to an issue, but they may not resolve every potential problem. If you need additional assistance with diagnosing or resolving an issue, feel free to contact Esri Support. We are happy to assist our customers resolve any technical issue they encounter. When contacting Esri Support, please be prepared to provide the following information so that an analyst can assist you as efficiently as possible.

  • Software version and license level
  • Operating system
  • Device, if using a mobile application
  • Synopsis of the issue
  • Detailed workflow
  • Error message
  • Test data

Krista M. - Desktop Support Analyst

more
2 0 1,074
MeganSingleton
Occasional Contributor III

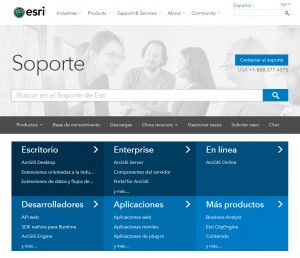
As part of our ongoing commitment to enhance the online support experience for our global user base, we are very pleased to announce the official launch of the Spanish language version of our award-winning Esri Support website.

Main-Page-in-Spanish-Screenshot-300x258.jpg

Main Page in Spanish

http://support.esri.com/es/

Support site localization empowers customers to access important online support resources in their preferred language, such as:
  • Popular technical articles
  • Product lifecycles
  • Support downloads for all products in General Availability
  • The Request Case web form
  • The GIS Dictionary (to be completed by Q3 2017)


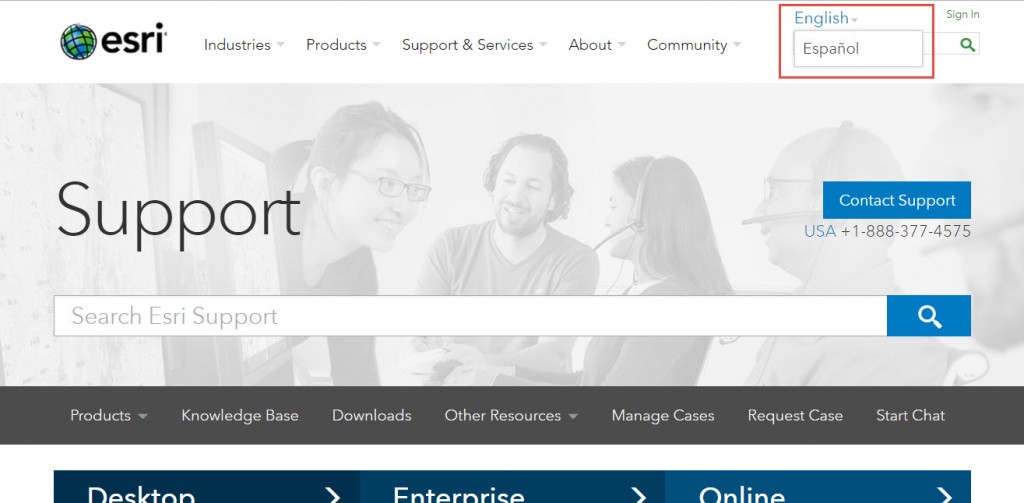
You can directly access the Spanish site through http://support.esri.com/es/, or by going to the English version of the site and selecting "Español" from the drop-down menu in the upper-right banner next to the Esri ID Sign In option.
Language-Selection-Screenshot-1024x503.jpg

Language Selection


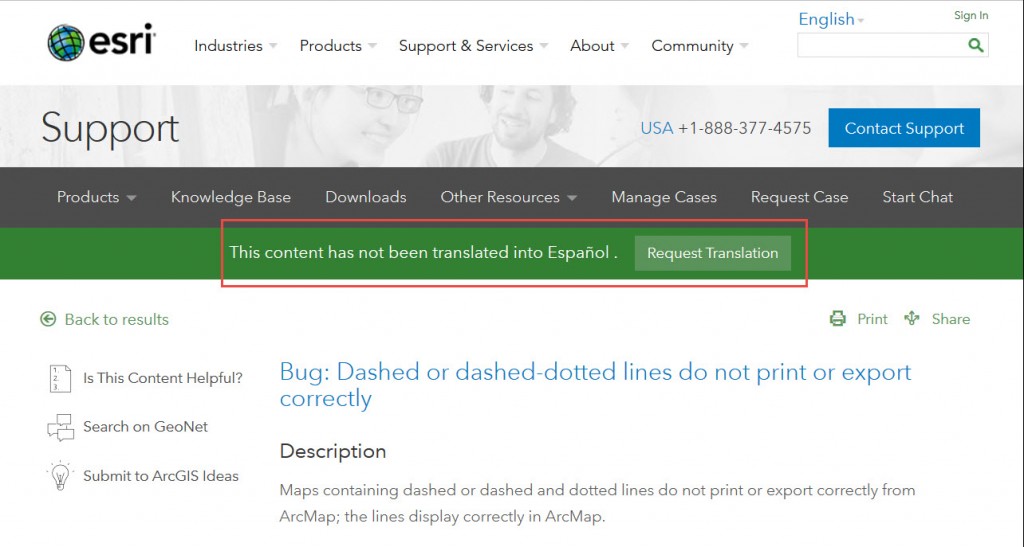
As you navigate through the site, you may come across content that has not yet been translated. You can submit a translation request for this content by clicking the "Request Translation" button in the green banner at the top of the page or by filling out the site's feedback web form in the page footer.
Request-Translation-Screenshot-1024x547.jpg

Request Translation


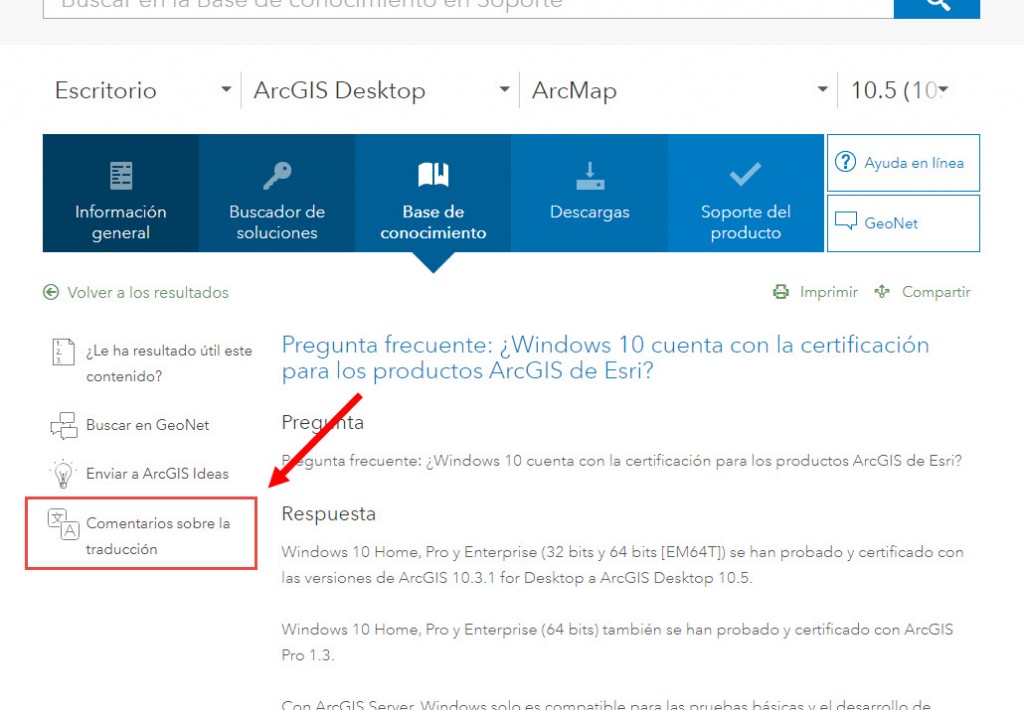
Our goal is to provide helpful and instructive content, and we strive to ensure this content maintains a high standard of quality. If you find any problems with the translated content or feel there are potential improvements, please use the "Translation Feedback" option (comentarios sobre la traducción) to send us your feedback.
Translation-Feedback-Screenshot-1024x710.jpg

Translation Feedback


Moving forward, we will translate the site into additional languages including Chinese, French, German, and Arabic.
Megan S. - Online Support Resources

more
0 0 1,493
42 Subscribers