Esri Technical Support Blog - Page 3

cancel
Showing results for 
Show  only  | Search instead for 
Did you mean: 

Latest Activity

(383 Posts)
JuliaLenhardt1
New Contributor III

14676756924_a96569de8b_o-300x199.jpgYou've just updated your client and geodatabases to ArcGIS 10.3, and you want to ensure you are using the most up-to-date ArcSDE command line tools and application server install. So where is the install for ArcSDE 10.3?

For the last several releases, we incorporated more functionality into the user interface of the ArcGIS client. For upgrading the geodatabase repository at 10.0, the Upgrade Geodatabase tool replaced the ArcSDE Post Installation wizard. At 10.1, the Create and Enable Enterprise Geodatabase tools allowed for the deprecation of the ArcSDE Post Installation wizard all together. The application server and command line tools have been an optional install since 10.1, and the database connection dialog box was reworked to allow a direct connect for the default method of working with database connections. Overall, these upgrades prepare us for the deprecation of the command line tools and the application server.

With the release of ArcGIS 10.3 comes the end of support for the ArcSDE service and the application server connections (three-tier). Additionally, ArcSDE command line tools have been replaced by geoprocessing tools in the ArcGIS clients. Therefore...There is no install for ArcSDE 10.3.

You can connect to all of your databases in ArcGIS for Desktop 10.3 using direct connections by adding a database connection in ArcCatalog. You can also use existing SDE files created from application server connections and create application server connections to services from previous versions. Since ArcGIS 10.2.2 is the last release to include the ArcSDE application server, we encourage you to use direct connections moving forward.

If you're wondering what to do about the ArcSDE command line tools no longer being available, geoprocessing tools have been added to the Geodatabase Administration toolset to help you with any administrative needs. So rejoice! There is one less step in the installation process of upgrading to the newest versions of ArcGIS products.

Please follow the GeoNet discussion for more in-depth conversations related to the install for ArcSDE 10.3.

For additional information, check out our documentation linked below:ArcGIS for Desktop Help: What's new for Geodatabases in ArcGIS 10.3?ArcGIS for Desktop Help: Client and Geodatabase Compatibility in 10.3ArcGIS for Desktop Help: Database servers in 10.3ArcGIS for Desktop Help: Database connections in ArcGIS for DesktopArcGIS for Desktop Help: Migrate from ArcSDE administration commands


Julia L. - Geodata Support Analyst

more
1 1 10.2K
MeganSingleton
Occasional Contributor III

ArcGIS-10.3-300x138.jpgWe are pleased to announce that web help for ArcGIS 10.3 has a new home! To access the web help, please click the respective links below.ArcGIS for DesktopArcGIS for Server

Similar to the help websites for ArcGIS Pro and ArcGIS Online, the new web help is a comprehensive place to find documentation and other resources related to ArcGIS 10.3.

Additionally, this website has the following new features to help you accomplish your GIS goals.

  • Streamlined navigation to facilitate content discovery
  • End-to-end workflow topics to take your projects from start to finish
  • Major topics (Get Started, Map, Analyze, etc.) listed as tabs to centralize searches
  • A modern look and feel to provide a consistent experience across the Esri web platform

Web help for all versions before ArcGIS 10.3 can be found in the ArcGIS Resources center under Help.

Happy mapping!
Megan S. - Online Support Resources

more
0 0 543
JuliaGuard
Esri Contributor

ArcGIS Pro is the latest addition to the Esri Desktop suite of software. It offers a brand new way to do GIS, and with that, a brand new way to license and distribute the software. Check out these six great tips to get started, and you'll be a pro in no time!1. You need an active ArcGIS Online Organizational Account.*

Your software purchase that is current on maintenance includes what we call an “Entitlement account” to use ArcGIS Online. In other words, an Entitlement account is a fancy term for the licensing structure that includes: one named user, and 100 annual credits per Desktop license purchased. This account comes at no additional cost and provides access for your organization to use ArcGIS Online, Esri Maps for Office, and ArcGIS Pro.agol.png

An activation e-mail was sent to the primary maintenance contact for each account. The e-mail included instructions and a hyperlink for activating and configuring the ArcGIS Online Organization. The person who activates the account is automatically set as the organization administrator and will have the necessary permissions to invite other users to the organization and then provision those users' ArcGIS Pro licenses.

Esri also provides a free version of ArcGIS Online called a public account. This type of account does not support licensing ArcGIS Pro. An Account Troubleshooting guide has been created to provide more information.If your organization does not have an ArcGIS Online Organizational account or you would like to upgrade your public account, please contact Esri Customer Service.* It is also possible to setup ArcGIS Pro to get a license through Portal for ArcGIS. 2. You can download the software from My Esri.

My Esri is a new customer solution that integrates your ArcGIS Online, Support, and Customer Care accounts into a single site. In order to install ArcGIS Pro, sign in to your My Esri account as the Primary Maintenance Contact.

If your account is current on maintenance, the Primary Maintenance Contact should have permission to view an Organizational dashboard. The dashboard includes the option to filter by products and then by downloads in order to download the software.downloadpro.pngIf you do not see the option to download software in My Esri, please contact the primary maintenance contact for your account or Esri Customer Service.3. Provisioning the licenses in ArcGIS Online is flexible based your needs.

With an ArcGIS Online Organizational account and administrator permissions, you should see the following option when you sign in to your account:managelie.png

Click “Manage Licenses” to get started provisioning your ArcGIS Pro Licenses. The licenses are assigned to named users in your organization. You can provision each user individually, or select multiple users to batch provision the licenses. After making your selection, click the “Configure” button to grant the license levels and extensions.lasjdlf.png

Good news: the ArcGIS Pro licenses and extensions can be reassigned at any time! As an administrator you can update or revoke the use of license in real time. It may help to think of ArcGIS Online as a cloud-based licensing manager driven by the named users in your organization.If your organization does not have a “Manage Licenses” option, please contact Esri Customer Service.4. ArcGIS Pro Licenses can be “checked out” for offline use.

If you need to work with ArcGIS Pro in a disconnected mode, you can check out a license. You can check out a license on only one machine at a time, so you won't be able to sign in or use ArcGIS Pro on any other machine while your license is offline. To use ArcGIS Pro on other machines, you need to check in the license on the original machine where you took the license offline.How to check out a license: Open a project > Click the “Project” tab > Licensing > check the box for: Authorize ArcGIS Pro to work offline.authorize.pngHow to check in a license: Uncheck the box for “Authorize ArcGIS Pro to work offline”. If you find this box is greyed out, it is because you are no longer signed into ArcGIS Online. To resolve this, Open a project > Click the “Project” tab > Portals > right-click your portal connection > Sign in. Now you should be able to check in your offline license in the Licensing tab.signin2.pngIf you are having trouble checking in or out offline licenses to use ArcGIS Pro, please contact Esri Technical Support.5. Installing ArcGIS Pro is a breeze!

Once the software has been successfully downloaded from My Esri, ArcGIS Pro can be installed. Please review the install guide before getting started. You do not need to uninstall any previous version of desktop products; ArcGIS Pro can run side-by-side with any version of ArcMap, giving you the flexibility to test your ArcMap workflows in ArcGIS Pro.If you have a question or issue with installing ArcGIS Pro, please contact Esri Technical Support.6. ArcGIS Pro gives you brand new functionality.

ArcGIS Pro has a 64-bit architecture and leverages your machine's GPU and multithreading to keep the user interface responsive and to utilize additional CPU cores on the local machine. It supports multiple layouts and map views that can be linked and explored in both 2D and 3D. The new drawing and output engine in ArcGIS Pro also includes new output capabilities, such as the ability to export your maps with native transparency support. It also includes some brand new geoprocessing tools, such as Space Time Cube and Emerging Hotspots. For more information about platform GIS or ways to integrate ArcGIS Pro into an existing workflow, please refer to the help or Learn GIS.


Julia G. - Desktop Support Analyst

more
0 0 1,440
JuliaLenhardt1
New Contributor III

You want to combine your data. Okay, so which tool should you use?Combine1-300x291.jpg

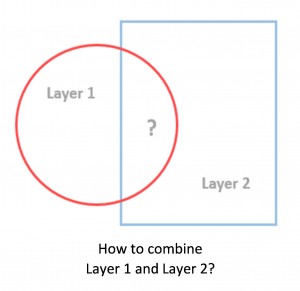
Do you ever want to combine multiple spatial datasets in ArcMap, but you aren’t sure which tool to use? You may wonder if you should use Merge, Append or Union, or if there are other tools available. Seriously – what does Dissolve do!? ArcGIS has a lot of tools that perform many useful operations, but sometimes it can be hard to figure out which one to use. Here we’ll take a look at the differences among these tools to help you decide which one will help achieve your particular goal.Merge 
The Merge tool combines multiple input datasets of the same geometry type (e.g., polyline, polygon, or point), or tables, into a new feature class. The output will have an extent that encompasses all of the features included in the merge. The relationship of input features relative to each other does not change, so the physical boundMerge1.pngaries of the features are not actually blended together - the features simply belong to the same feature class after the Merge. Therefore, the number of features in the output is equal to the sum of features used in the Merge.  No new features are created for where areas overlap.

With Merge, you can decide which attributes are transferred to the output, and these can be any combination of the input attribute fields. It is not necessary for inputs to have the same coordinate system to be merged, as the tool does this on-the-fly. However, the output defaults to the coordinate system of the first input unless specified in the Environment Settings.Example: Your colleagues collected data in different parts of the state. One collected population and age data for the western counties, while the other collected population, age, and gender information for the eastern counties. You obtain the two feature classes from your colleagues and use Merge to create a single feature class with population and age attribute information for the entire state.
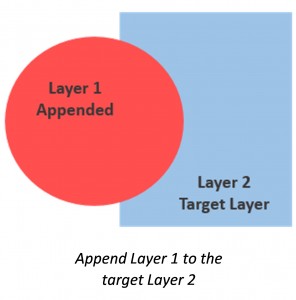
Append-296x300.jpgAppend The Append tool does exactly what the name implies: it adds, or appends, data from one feature class to another feature class of the same type. No new dataset is actually created, so you have to be sure you want to change the original data before using this tool. You can use Append for point, line, or polygon feature classes; tables, rasters, raster catalogs, annotation feature classes, or dimensions feature classes – the only requirement is that the inputs are the same type as the target.  In this case, you can choose to only append feature classes with the same schema (set of attributes, domains, and so forth), or you can choose to append different schemas. If appending a feature class with a different schema other than the target, the attributes will not be transferred to the target feature class.

The full geometry of the underlying features is preserved, and the number of features in the output is equal to the sum of the features from the appending layers and the target layer.Example: You work for the Department of Parks and Recreation for your city, and you have a detailed feature class with all the spatial and attribute information for city parks. A new park was just finished in the downtown area, and you have been asked to update the master parks polygon feature class. Your colleague sends you a shapefile of the new park polygon with all the required attributes. After ensuring the shapefile is correct and contains the right information, use Append to add the shapefile to the master parks feature class.  Union-300x270.jpgUnionUnion 
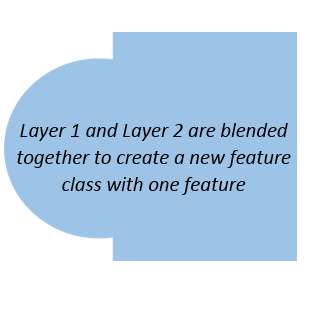
can do some nifty things, but here’s the catch: it only works with polygons. This tool is interesting because the output of the tool contains features and/or parts of features representing areas of unique intersection, as well as features and/or parts of features representing no intersection among all the features in the input feature classes. Attributes from all features involved in the intersection are contained in the output record for the newly created feature that represents the intersecting feature or feature part.  Features in the output representing areas with no intersection will have the FID_<FcName> value of -1.Example: You are looking for regions with specific combinations of soil and rainfall to help you find a good place to grow certain crops. You have two feature classes: one with the location of certain soil types and the other with ranges of precipitation.  You use the Union tool to find all the areas with unique combinations of rain and soil.Other Tools: DissolveDissolve is used for combining features from a single dataset based on a
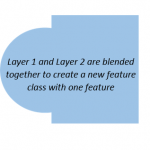
Dissolve_test1-150x150.png common attribute. The tool dissolves the boundaries between features to aggregate them by category. If you have a feature class with a polygon representing each state and you just want a feature class that represents the United States, use the Dissolve tool and specify the 'country' field as the dissolve attribute. If you select the multi-part option, the output contains one polygon with no boundaries between states. You can also choose to calculate statistics of attributes during the dissolve. For example, you can calculate the sum of all state populations to get the population for the entire US.Aggregate PolygonsThis tool combines polygons within a specified distance of each other into new polygon features. The input is a single polygon layer with multiple features, and the output is a polygon layer with a reduced number of polygons encompassing the area of the input features. You can set the distance for aggregation and choose to preserve orthogonal angles in the output.

Note: Aggregate everything within a 500 meter radius.Spatial JoinThe Spatial Join tool does not combine the physical features of two datasets. Rather, it appends the attributes of a layer to a different layer. A new feature class is created based on the geometry of the target features, but the attributes of the joined features are added to the output attribute table. This tool is useful when you are looking for statistics about features located in relation to other features. Additionally, the inputs can have any combination of feature types – points can be joined to polygons, polygons can be joined to lines, and so forth.Combine This tool is specific to raster datasets. The Combine tool combines raster datasets in such a way where each output pixel has a value indicating a specific combination of input values. This is really useful for categorical raster data. For example, if you have three raster datasets, and each represents a different type of risk (e.g. drought, earthquake, and floods), use the Combine tool to find all the different combinations of risk that exist throughout an area. Which areas have a high risk of earthquakes and floods, but a low risk of drought? This combination is represented by a specific value in the output of the Combine tool.Intersect1-150x150.jpgIntersect
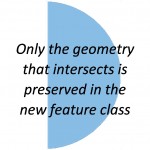
The Intersect tool calculates the geometric intersection of all input features. So what’s a geometric intersection? It’s the physical geometry of the overlapping features. If you have different input types (e.g. points and polygons), the output will use the lowest dimension; points have a lower dimension than lines, and lines are lower than polygons. Use this tool when you are only interested in the unique intersections between features in all your inputs, and when an intersection between the inputs is not important for the analysis.Erase
I include the Erase tool here because it does the opposite of the Intersect tool - the Erase tool removes overlapping areas of input feature classes. Use the Erase tool to remove features or parts of features representing an intersection between the input feature classes.  The output feature class only contains features or parts of features that do not intersect with the erased feature class.

There are many tools you can use to combine, overlay, or spatially relate data that share common locations– but don’t worry.  The next time you're confused about which of these tools to use, ask yourself this question: "What information do I want in my output?" Use this blog as a guide to discover the best tool for you.


Julia L. - Geodata Support Analyst

more
4 0 32.7K
KoryKramer
Esri Community Moderator

BAOMobile.pngIf you are a Business Analyst Online (BAO) user, then you are familiar with all the great information you can find about a place. You can generate reports for your specific areas of interest based on thousands of data variables ranging from demographics and census to consumer spending and employment data as well as traffic counts.

Now, what if you are out and about and just have to have that information right now? The BAO Mobile app is what you need.

The next-generation BAO Mobile app is now available on the Apple App Store. Customers who have purchased BAO as a premium app get the mobile app as part of the subscription. BAO users who are a member of the organization’s Group (normally named ‘My BAO Group’) containing the BAO application will have access to both the BAO web app and the BAO Mobile app. If you believe that your organization has BAO but you are not able to log in, please refer to this post.

If your organization currently does not have BAO and you would like to try it out, sign up for a 30-day trial.

Keep in mind that if you’re using the old BAO mobile app, this will not automatically be updated to the Next Gen BAO Mobile app. You will need to download the new BAO Mobile app from the App Store and log in with your ArcGIS Online username and password. The old mobile app will remain available for a short time to allow users to download and start using the new app.

BAOAppCompare1.png

Old BAO app released 2012 (left) and new BAO Mobile app released 2014 (right)

While we understand there might be some confusion regarding which authentication credentials to use, it is necessary to have both the new mobile app and the preexisting product available for a short time to allow users time to download and start using the new BAO Mobile app. The new mobile app requires ArcGIS Online credentials (username/password) and the user must have the BAO web app to use the new version, which should streamline the login process between ArcGIS Online, the BAO Web app, and BAO Mobile.

Previous BAO mobile app users that do not have a current subscription to BAO will not be able to use the new app unless they purchase a subscription. This is the primary reason to keep the previous BAO mobile app available so these users will have time to transition to the new app if they want to continue using the mobile app.


Kory K. - Desktop Support Analyst

more
0 0 1,202
GregoryLehner
Esri Contributor

Please be aware that if the recent Oracle Critical Patch Update (CPU) released on October 14th, 2014 is installed on your Oracle database, connecting to the Oracle database will crash ArcGIS.

This issue only affects you if you use Oracle. All versions of ArcGIS are impacted by this CPU.What You Need to Do:

  • If you have not yet installed the patch listed above, do not install it, per Esri's recommendation.
  • If you have installed the patch listed above, Esri recommends that you roll it back to restore normal operations.

Esri and Oracle are working closely to understand and resolve the problem.For specific details, see Esri Knowledge Base article 43293.

more
0 0 2,761
KirstenPinkston
Esri Contributor

Participating in the ArcGIS Pro Beta program is just as easy at Beta 5 as in previous beta releases. However, there are a few things users and their ArcGIS Online administrators need to know heading into this release.What do you need to know?

At Beta 5, there is a new authorization process for ArcGIS Pro that is managed through ArcGIS Online. This change is in preparation for the ArcGIS Pro licensing model moving forward. Beta 5 and subsequent releases will require ArcGIS Pro licenses to be assigned to organization users by an administrator, through a new set of hosted tools in ArcGIS Online.What do you need to do?

If you are a non-admin user, please contact the administrator of your organization to request they assign an ArcGIS Pro license to your username. Once that is done, launch Beta 5 and you will be able to log in.

If you are the administrator of your organization, please log in to your org and find the “Manage Licenses” button. From here, begin configuring licenses for individual users or a group of users that wish to participate in the ArcGIS Pro Beta program.For further details, please review the help.


Kirsten P. - Support Advocacy Lead

more
0 0 375
GregoryLehner
Esri Contributor

esrilogo-resize1.jpgAt each release, Esri assesses if there are any platforms (operating systems, databases, development environments, or hardware) that are at the end of their supportability. Additionally, we review our technology to see if any of the newer functionality has superseded older functionality. In either case, we try to give as much advanced notice as possible for any changes in supported platforms or functionality through our Deprecation Plan documents.

Given the pace in the change of technology, we have been fairly conservative in what we deprecate. However, with the update to the Deprecation Plan for ArcGIS 10.1 and 10.2, plus the releases of ArcGIS 10.2.1 and 10.2.2, we have a number of items that need to be deprecated. Many of these changes have been a long time coming (for both platforms and functionality); and we have also noted upcoming plans to give you early notice for software that will eventually be impacted.

Starting at the ArcGIS 10.2.1 update to the Deprecation Plan, the pattern changed from a once-a-year release format to new updates with every release. The Deprecation Plan also expanded to cover apps, mobile, and ArcGIS Runtime SDK products.

Here are some of the major changes:

  • There will not be a release of the ArcGIS Runtime SDKs at 10.2.1.
  • ArcGIS 10.2.1 will be the last release that supports Microsoft Windows XP and Windows Vista for ArcGIS for Server, ArcGIS for Desktop, ArcGIS Engine, ArcGIS Reader, and Runtime SDK (for Java and WPF).
  • ArcGIS 10.2.1 will be the last release that supports Microsoft Windows Server 2003 and Windows Server 2003 R2 for ArcGIS for Server, ArcGIS for Desktop, ArcGIS Engine, ArcGIS Reader, and Runtime SDK (for Java and WPF).
  • The ArcGIS 10.2 series of releases (ArcGIS 10.2, 10.2.1, and 10.2.2) will be the last releases that include the ArcSDE command line tools.
  • The ArcGIS 10.2 series of releases (ArcGIS 10.2, 10.2.1, and 10.2.2) will be the last releases that include the ArcSDE application server.

For updated information on our deprecation plans, refer to the following link: Deprecation Plan for ArcGIS 10.1 and ArcGIS 10.2. (This deprecation plan is also linked from a technical article in the Esri Support Knowledge Base.)

John B. - Product Management

more
0 0 1,168
GregoryLehner
Esri Contributor

Esri would like to remind our ArcGIS for Desktop / Server / Engine 10.2 users that a patch exists to fix an issue where the software crashes on launch when attempting to open shapefiles.

The patch to fix this issue is available now for ArcGIS 10.2 for Desktop, Engine and Server users.

Please refer to KB article 41680 for more information.Can’t install the patch or upgrade?

Usually, the shapefiles associated with this crash contain dBase files with a large number of fields. Converting the shapefiles to file geodatabase feature classes can help to work around the crashing.

Contact Esri

For any and all error reports you receive, please send them to Esri with a valid email address. This enables us to identify and respond faster to issues impacting your work.


Kirsten P. - User Advocacy Group

more
0 0 379
AlexanderNohe1
Occasional Contributor III

It is difficult to troubleshoot serious problems with any type of software. When faced with repetitive and persistent crashing, it is important to ask yourself questions like, "Does the problem occur on multiple machines?", "Does this occur for every user on a machine?", and "Is the problem specific to certain data?" One of the more common reasons that ArcMap may repeatedly crash is when there are issues with the display adapter. An easy way to check if your display adapter is causing problems is to temporarily disable the adapter to see if that resolves the issue.NOTE: Before doing this, take note of what specific display adapter is being disabled. This will make it easier to undo any changes made.

To disable your display adapter:

  1. Click Start, right-click on Computer, and select Manage.
  2. In the Computer Management window, click on Device Manager and select the drop down for 'Display adapters'. You should see your display adapter(s) listed there.
  3. Right-click your display adapter and select Disable. This enables the Windows generic driver to start running instead.disableBlog-300x213.png
  4. You may notice that your screen resolution is not as clear as it was before, in addition to any additional monitors you had running have now stopped. To adjust this to continue testing, right-click the desktop background and select 'Screen resolution'.
  5. For screen resolution, select the drop-down menu under Resolution, and change it to the highest value possible.screenRez-300x213.png
  6. Finally, open ArcMap and attempt to reproduce the behavior that caused the crash.

If the crash can no longer be reproduced after disabling the adapter, then you will need to troubleshoot what is wrong with the adapter. A few things to try:
  1. Verify that the video driver currently being used is the most up-to-date driver available by visiting the Video Driver Manufacturer's website. You can check to see what video driver is installed by navigating to Start > Run, and typing in 'DXDIAG'. Click Yes to check that the drivers are digitally signed. Once the DirectX dialog window opens, click on the Display tab. This will provide you with information on the maker and version of the Graphics Device installed.
  2. Try performing a clean uninstall and reinstall of the display adapter.
  3. Visit the Can you run it? website, and check your system against the ArcGIS for Desktop system requirements. If your system does not meet the minimum requirements, you may have to upgrade your hardware.

If, however, you see the same crash happening after disabling the adapter, then you know that the display adapter is not the culprit. If the crash continues even after trying the steps listed above, you may want to reach out to Esri Support Services for additional help.
Alexander N. and Alan R. - Desktop Support Analysts

more
0 0 2,608
41 Subscribers