Esri Technical Support Blog - Page 8

cancel
Showing results for 
Show  only  | Search instead for 
Did you mean: 

Latest Activity

(383 Posts)
MeganSingleton
Deactivated User

Are you unable to view the Support tab in My Esri? Can you see the Support tab, but not the buttons for Request Case or Chat with an Analyst? We can help.

The ability to view the Support tab is governed by the View Support permission in My Esri. Whoever assigns permissions for your organization (for example, your administrator or distributor) grants the View Support permission. Actions such as Request Case and Chat with an Analyst are available to users recognized as Authorized Callers in My Esri. If you do not see those buttons, My Esri does not process that you are an Authorized Caller.

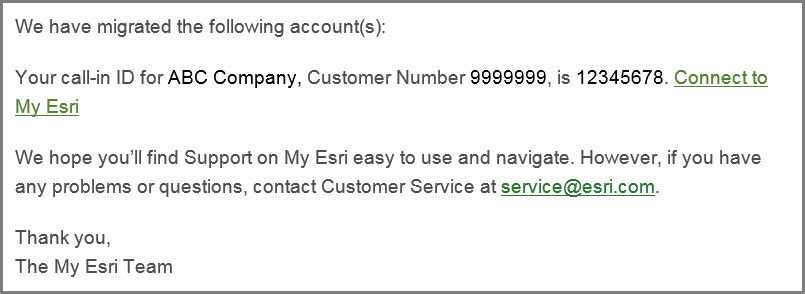
When we launched Support on My Esri, we notified all Authorized Callers about the new site. If the Authorized Caller was a My Support user, and if we were able to match records between systems, we directly assigned Authorized Caller permissions on My Esri and sent an email with the following content:2-23-2016-12-40-22-PM.jpg

If we were unable to identify the Authorized Caller as a My Support user, we sent an email inviting the user to My Esri. That email contained a “token” in the “Connect to My Esri” link.
If you received the invitation, use the following steps to ensure you are an Authorized Caller in My Esri.

  1. Sign out of My Esri.
  2. Locate the "Welcome to Support on My Esri" email message containing the token.
  3. Click the "Connect to My Esri" link in the email message, which will redirect you to the Esri Accounts sign in page.
  4. After signing in, Authorized Caller permissions are added. You will now have Authorized Caller access in My Esri.
2-23-2016-11-45-32-AM1-1024x237.jpg

If you are an Authorized Caller for your organization and did not receive either of the migration emails, please contact Esri Customer Service or your distributor.

Additionally, Esri Customer Service can enable Support permissions in My Esri.
Megan S. - Online Support Resources

more
1 0 2,884
by Anonymous User
Not applicable

Esri Support has launched an updated version of the Support Request Form, now known as the Request Case web form. You can access the Request Case web form from the Esri Support website home page by clicking the Support Request Form button. This new web form streamlines the support request process and includes a number of new features.

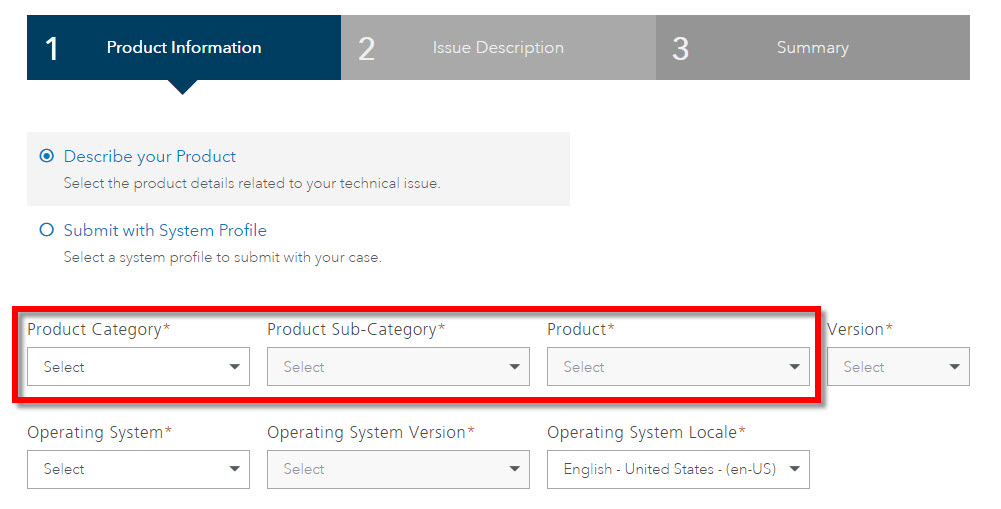
Support case requests that are submitted through this new web form are routed to specialized teams inside of Esri Support. This routing is based on the product and issue topics that you select on the webform. Esri products are grouped by technology into product categories and product sub-categories. If you choose to describe your product, use the product category drop-downs on the first page of the new web form, as shown in the image below.

Support-Request-Case-Product-Selection.jpg

Support Request Case Product Selection


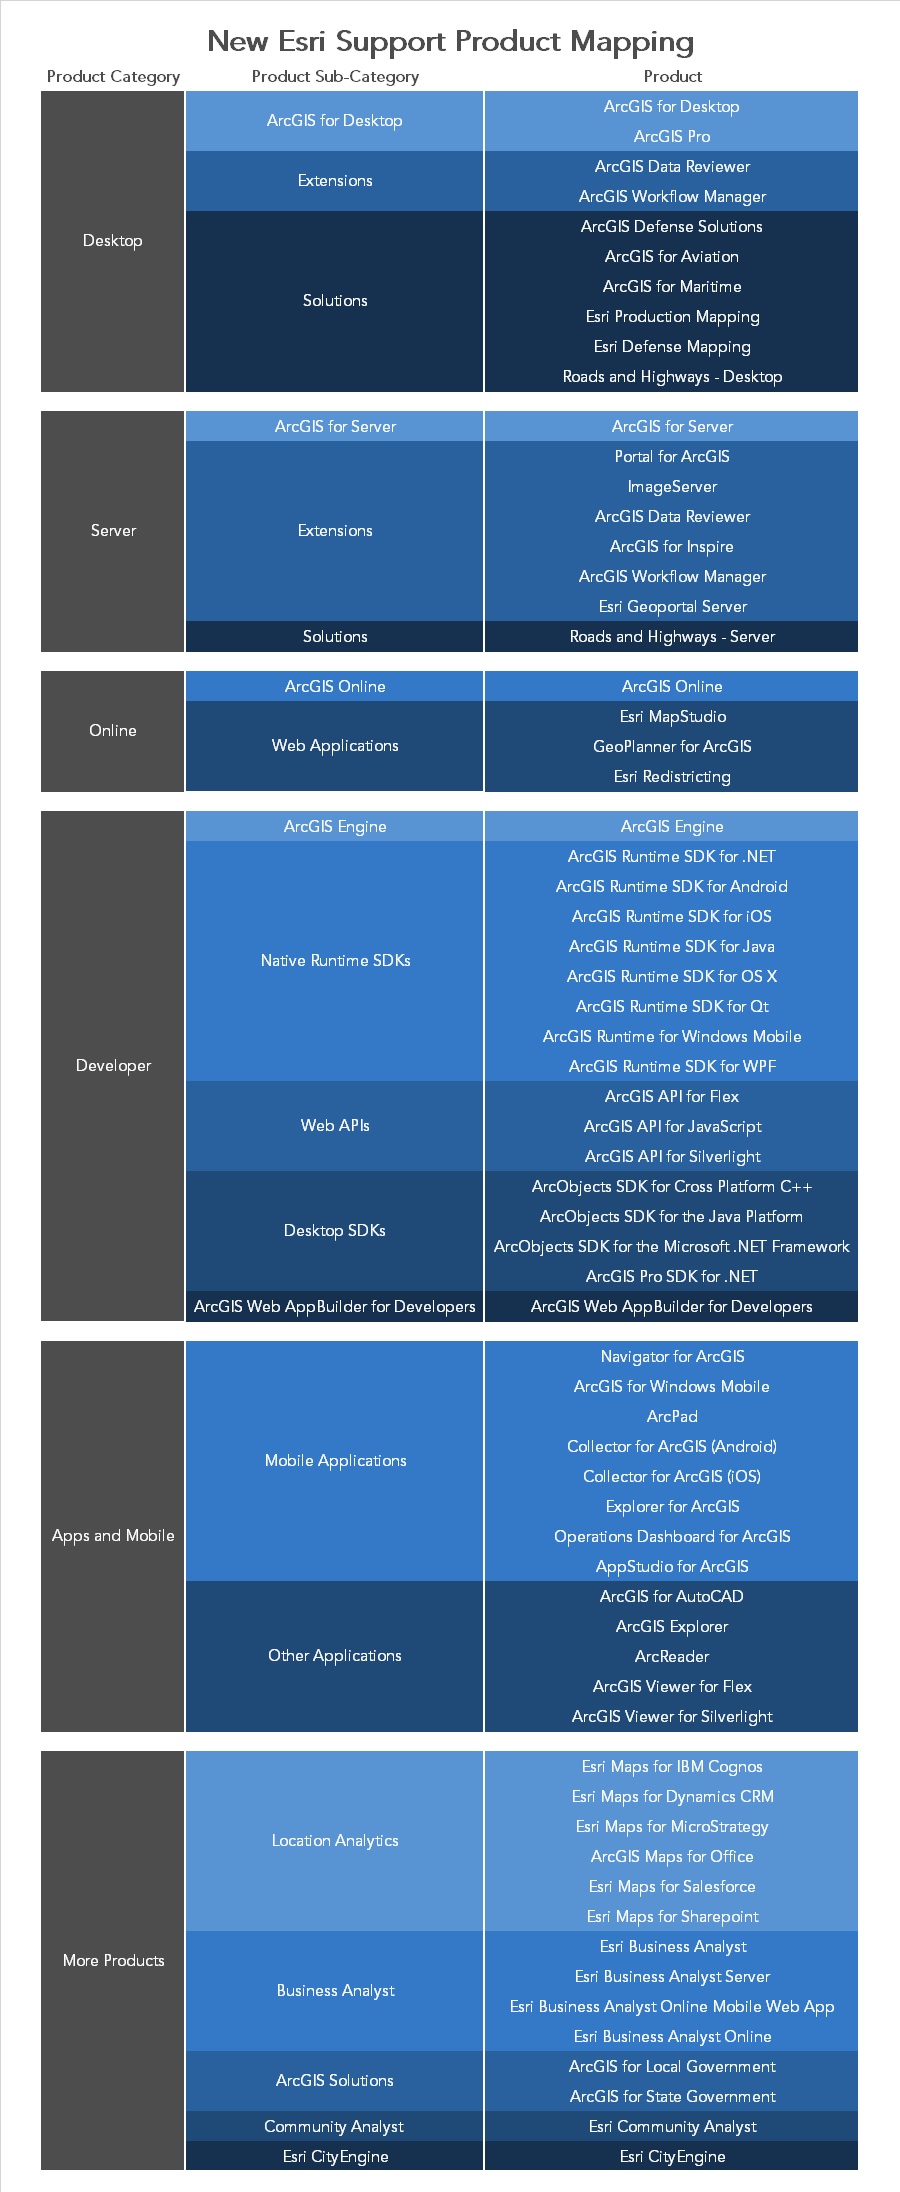
In case it is needed, we have created a reference table which shows the products in their respective categories. Use the Esri Support Product Mapping table below to find the appropriate product category and/or sub-category for your product.
New-Esri-Support-Product-Mapping.jpg

New Esri Support Product Mapping


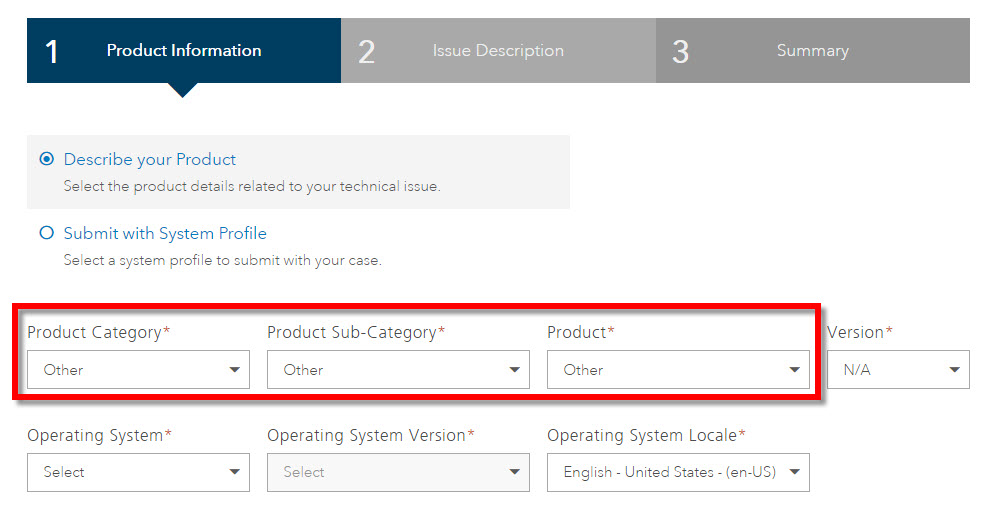
If you cannot find your product in the table above or the web form drop-downs, please select "Other" for each product and category field, as shown below.
Support-Request-Case-Other-Product.jpg

Support Request Case Other Product


Joseph M. - Online Support Resources

more
0 0 818
TinaMorgan1
Frequent Contributor

As a support analyst, we get a range of fun issues to review. These issues may be specific to the user’s environment, data, workflow, etc. Sometimes, we may notice an influx of calls pertaining to a single workflow. When this happens, we revisit the resources our users have available to them, and ensure that the documentation clearly describes how to execute workflows.

One of these workflow issues we have seen in the call center lately has been working with schema changes in replicas. For example, after creating a replica, you realize you need to add a field to a certain feature class, or remove a domain that is no longer necessary. This blog hopes to make this workflow more intuitive with a few tricks that will help the replica gurus out there efficiently deal with schema changes.


Let’s review: when a replica is created, the data and schema of the objects being replicated are registered in the parent geodatabase and child geodatabase. The data is defined as the rows in the table and uses the GlobalId values as a link between parent and child, while the schema consists of the fields, domains, subtypes, and other properties that describe the replicated data. Remember, if you use the Distributed Geodatabase toolbar in ArcMap to create the replica, and use the option to 'Register existing data only', then the replica could have differing schemas upon creation. This is allowed as some organizations have a need for this diagram, so it is up to the replica creator to ensure that the data is prepared to their own needs before creating the replica.

Ideally, the schemas are identical on both replicas during replica creation, but over time, changes might be applied to each replica schema. For example, one replica may require additional fields to complete a project, while the relative replica may need to apply a new domain to an existing field. When this happens, the schemas of the replicas are no longer the same. Again, it is not required to have identical schemas in the parent and child geodatabases; however, if the differences are not intended, then you may see some unexpected behavior.

What can happen if there are schema differences in the replicated data?
  • Edits that don't synchronize- Data synchronization only imports changes for tables and fields that are common to both replicas.
    • Note: If schemas do not match when data is synchronized, the data is flagged as having been sent to its relative replica. Remember, replicas do not require schemas to match, but any and all edits will be flagged as synched during synchronization, whether or not there is a matching schema (for example, a field) in the relative replica to receive the edits.
  • Invalid values - Changes that violate domains, subtypes, connectivity rules, and relationship rules are applied when synchronizing changes. The validation tools on the editor can be used to check the newly imported values.
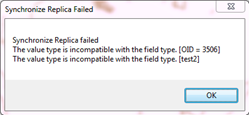
  • Data synchronization errors - This can happen when you manually make a schema change to both replicas. For example, you may want to add a field to a table. If you do this, be sure to make the exact same schema change in all cases. If there is a difference (for example, a field is a string on one replica but an integer in the other), a data synchronization error will occur.
    SchemaChanges1.png

    Synchronization error due to mismatched field types between replicas.

  • Unsupported changes - Some types of schema changes can cause synchronization to fail, but no warning is displayed if you make the change. These changes are not detectable by the geodatabase replication system. They include database-level operations like changing permissions on tables in the database. If permissions are changed to read-only for replicated data, a failure will happen when importing changes from the relative replica.
Applying schema changes across replicas - Modifying the schema of a replica to match the schema of a relative replica is a completely separate process from data synchronization.  If you believe you are encountering some of the unexpected behavior described above, you may use the following tools.

Three tools are provided to update replica schemas:
  1. Export Replica Schema - Used to export the schema from the geodatabase that has the schema you want applied to the relative replica. Typically only used for disconnected environments or scripting.
  2. Compare Replica Schema - Used to find the differences between the two geodatabases in the replica. This is always done from the geodatabase that you want the changes applied to. This is the first step if working in a connected environment.
  3. Import Replica Schema - Used to import the differences found during the replica comparison into the geodatabase that you want the changes applied.

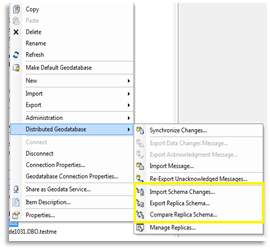
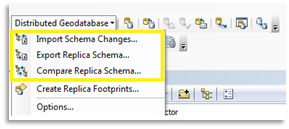
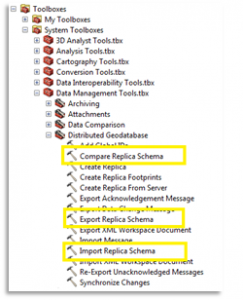
The tools are available on the Distributed Geodatabase right-click context menu in the Catalog tree, Distributed Geodatabase toolbar in ArcMap, and as geoprocessing tools.
SchemaChanges21.png

Distributed Geodatabase right click context menu in ArcCatalog

SchemaChanges3.png

Distributed Geodatabase toolbar in ArcMap

SchemaChanges4-243x300.png

Data Management Geoprocessing Tools


It is important to note that there are very slight differences in these three methods. For example, the Import Replica Schema wizard on the Distributed Geodatabase right-click menu from ArcCatalog and the Distributed Geodatabase toolbar in ArcMap list the changes that the user can opt to apply or not apply, while the geoprocessing tools (which are more often used in disconnected environments or scripted automatic processes) do not.

Lastly, keep in mind that the geoprocessing tools are typically used in a three-step process (Export, Compare, and Import) and are mostly used when this process is part of a scheduled task. The Distributed Geodatabase toolbar in ArcMap and the Distributed Geodatabase right-click context menu can be used in a connected environment and with only two steps (Compare and Import).

While eliminating the Export Replica Schema step can save you time, if there is doubt about which geodatabase schema should be the input for the tools, or doubt about which changes are being propagated, I find that the 3-step Geoprocessing Tool method can be much more intuitive. The first tool will always be the Export Schema Changes geoprocessing tool. This tool has only one geodatabase input (the geodatabase that has the schema you would like propagated to the relative replica), and creates a single output XML file.

Now, we run the Compare Replica Schemas geoprocessing tool where our input is the relative geodatabase and the XML file we just created. The output for the Compare Replica Schema Geoprocessing tool is a single XML file. Finally, our third step is to run the Import Replica Schema. Our input will be a geodatabase - the relative to the input we enter in the Export Replica Schema tool, and the compare.XML we just created. While the geoprocessing tools do not have the organized UI that lists the recognized schema differences, this method can clarify any confusion about where the changes are being taken from and where they are being sent to.See Resource documents:
Tina M. - Geodata Support Analyst

more
1 2 6,045
GregoryLehner
Esri Contributor

Edit: February 19, 2016 - ArcPad 10.2.2 (or earlier) users utilizing the Trimble Positions for ArcPad post-processing software in their workflows may now safely upgrade to ArcPad 10.2.3, as the Trimble Positions for ArcPad extension (and the February 2016 update) has been certified as compatible with ArcPad 10.2.3 when running on a Windows Mobile or CE device. For more information, please read Trimble's blog post.

The February 2016 software update for Trimble Positions will also include support for ArcGIS for Desktop versions 10.3.1 and 10.4. This update is expected to be released on their website by the end of February 2016.

For more information regarding the release of ArcPad 10.2.3, click here. If you have any further questions, please contact Esri Technical Support.


Gregory L. - Online Support Resources

more
0 0 811
ArtemisFili
Esri Contributor

Beta versions of Esri vector basemaps are now available through ArcGIS Online as vector tile layers. These vector basemaps are accessible as both ready-to-use web maps and as vector tile layers you can add to a map. Additionally, vector basemaps include a variety of styles, some new and some that are similar to existing Esri basemaps. Web maps you create that contain vector tile layers can be used in web applications you configure or build using Web AppBuilder for ArcGIS. As a developer, you can build your own custom applications that use these vector tile layers using the ArcGIS API for JavaScript.

Please consider the following before deciding to use the current release of vector tile layers:

  • Vector tile layers are only supported in applications built with the ArcGIS API for JavaScript. This includes configurable applications, applications built with Web AppBuilder, and custom applications built with the JavaScript application programming interface (API). ArcGIS Runtime SDKs will add support in 2016.
  • Vector tile layers can be displayed in Internet Explorer 11 and in most other current versions of desktop browsers, including Chrome, Firefox, and Safari.
  • Vector tile layers have the best performance on machines with newer hardware.
  • There are issues displaying vector tile layers at a large scale.
  • Maps containing an Esri vector basemap are printed with the Esri Streets basemap. All other maps containing vector tile layers are printed without the vector tile layers.
  • The Esri vector basemaps are currently in the beta stage and are subject to change during this period. You may need to update or replace vector tile layers built using the beta versions of the vector basemaps. The Esri vector basemaps have some known limitations that Esri will address during the beta period, including the following:
    • Labels in languages that display right-to-left scripts, such as Arabic, are not drawn properly.
    • Labels along vector tile boundaries sometimes do not display completely.
    • The topographic map style does not contain some layers (for example, contours, landform labels, and spot elevations) that are included in World Topographic Map.
    • The topographic and streets (with relief) maps, which reference a hillshade base layer, only enable users to zoom in to about a 1:10k scale.
    • The tiles do not include layers for one-way arrows or address labels.
    • Some parks and land polygon features extend into the adjacent ocean areas.
    • River labels along very curvy lines are sometimes too compressed and difficult to read.
    • In some areas, local road labels and shields display, but not the underlying local roads.

Learn more about vector tile layers here.
Julie P. - Technical Product Manager, ArcGIS API for JavaScript

more
0 0 2,038
JuliaLenhardt1
Occasional Contributor

Are you running ArcGIS 10.0 for some of your GIS needs? We know, it’s a great platform, but it’s time to move onward and upward. Over the last five years, Esri has developed greater and more powerful functionalities across all platforms, moving from ArcGIS 10.0 all the way to the upcoming release of ArcGIS 10.4. These upgrades have come with more tools, more efficient processing, and more features that allow you to create and share the data and maps you need. If you haven’t upgraded your applications and geodatabases yet, it’s time to start planning. Starting in January 2016, Esri will no longer provide Standard Support for ArcGIS 10.0. Of course, we at Esri Support are more than happy to help with any upgrade questions you may have, and the experience will only be smoother if you don’t wait until the last minute to upgrade. We can walk you through the workflow from start to finish and are here if you run into any issues. The upcoming deprecation of support includes:

  • ArcGIS for Desktop 10.0
  • ArcGIS Server 10.0
  • ArcSDE 10.0 and enterprise geodatabases in version 10.0
  • ArcIMS
  • ArcInfo Workstation 
For more information, check out the following links:Esri Product Life Cycle Support Policy Deprecation Plan for ArcGIS 10.0 and ArcGIS 10.1ArcIMS Product Life Cycle Support StatusArcInfo Workstation Product Life Cycle Status
Julia L. - Geodata Support Analyst

more
0 0 702
by Anonymous User
Not applicable

Welcome to part two! In our last blog post, we looked at how to set up a proxy to work with a JavaScript application. Today, we’ll be taking a look at the workflow to set up a proxy with Web AppBuilder for ArcGIS.

Please note: This blog assumes you have already downloaded, hosted, and properly configured a proxy. Unsure if you’ve done this? No worries; just follow the instructions HERE .


Just to recap, here are some reasons to set up a proxy with a Web AppBuilder application.
  • Access secured services with token-based authentication
  • Going across domains for your resources
  • Request exceeds 2,048 characters
  • O-Auth 2.0 app logins used
  • Enables logging
  • Both resource and referer based rate limiting

To make sure we’re all on the same page, let’s clear the murky water. A marvelous application has been created inside the Developer Edition of Web AppBuilder. Go ahead and double check to make sure that the application has been downloaded and deployed on a web server.

Two things are secured:
  1. An ArcGIS Online web map shared with the organization
  2. An ArcGIS for Server map service secured using ArcGIS Server built-in with ArcGIS tokens

In this example, we’ll have two challenges when we run the application: one, authenticating the secured web map and two, securing the ArcGIS for Server map service.

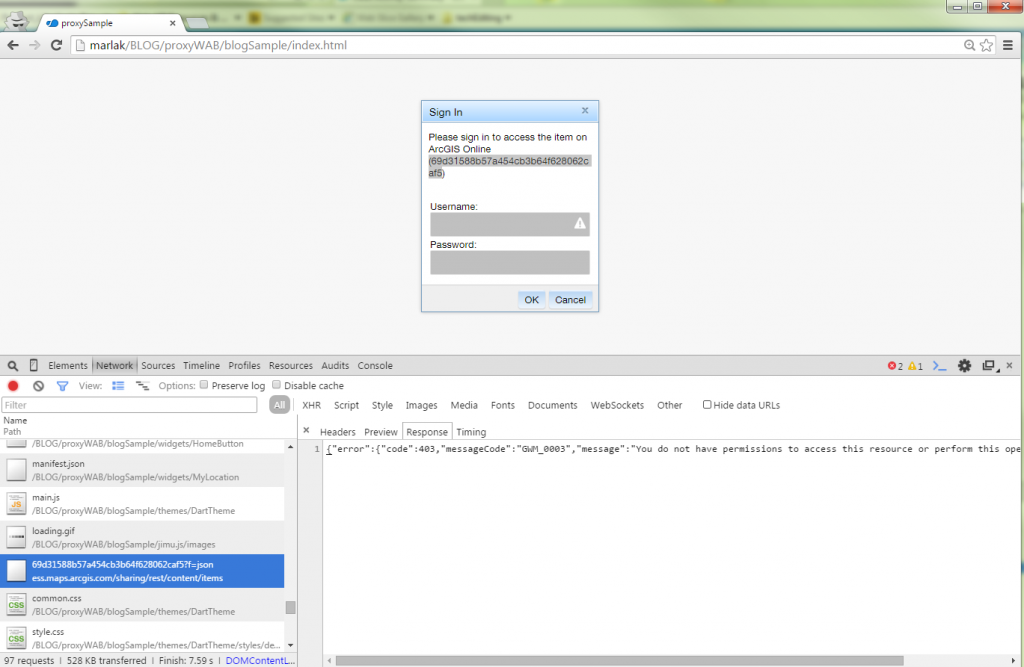
When we open the developer tools and take a look at the Network tab, we can see that the response returns a 403 error when accessing the ArcGIS Online web map. This is because by default, an anonymous user doesn’t have permission to access this resource.
networkTabChallengeWebMap-1024x667.png

challenge for securing a web map


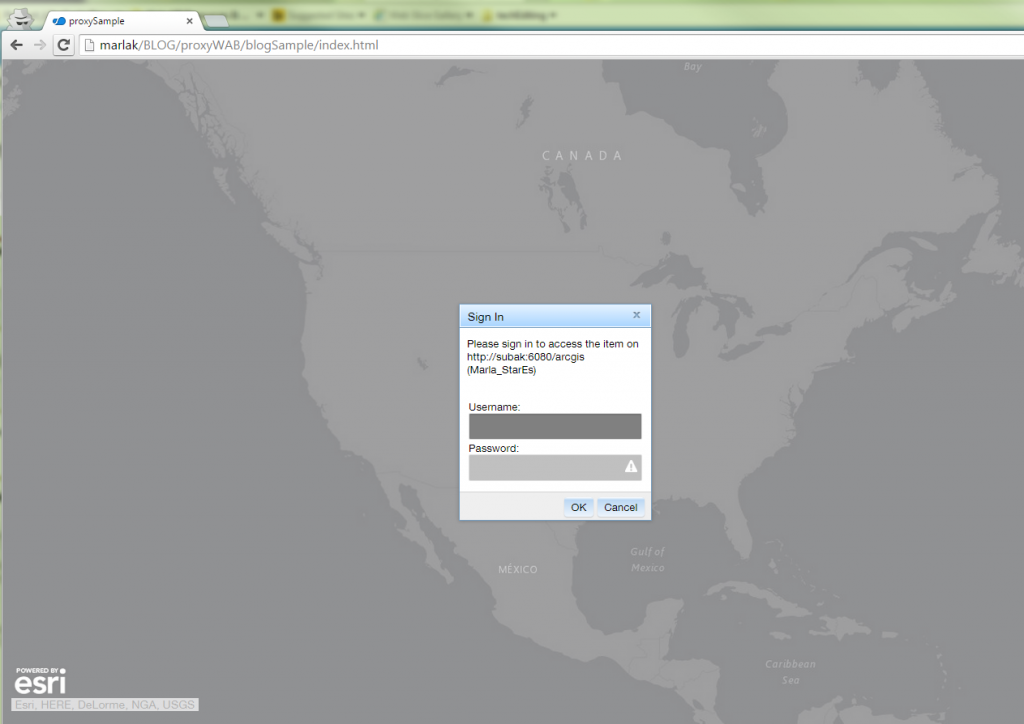
For the second challenge, we see that in the Network tab, the application fails to load the service, returning a 499 token required error. This tells us that to access the content, we need to pass a token.
challengeForSecuredService-1024x724.png

challenge for securing an ArcGIS for Server map service


Alright, now we're ready to dive in!

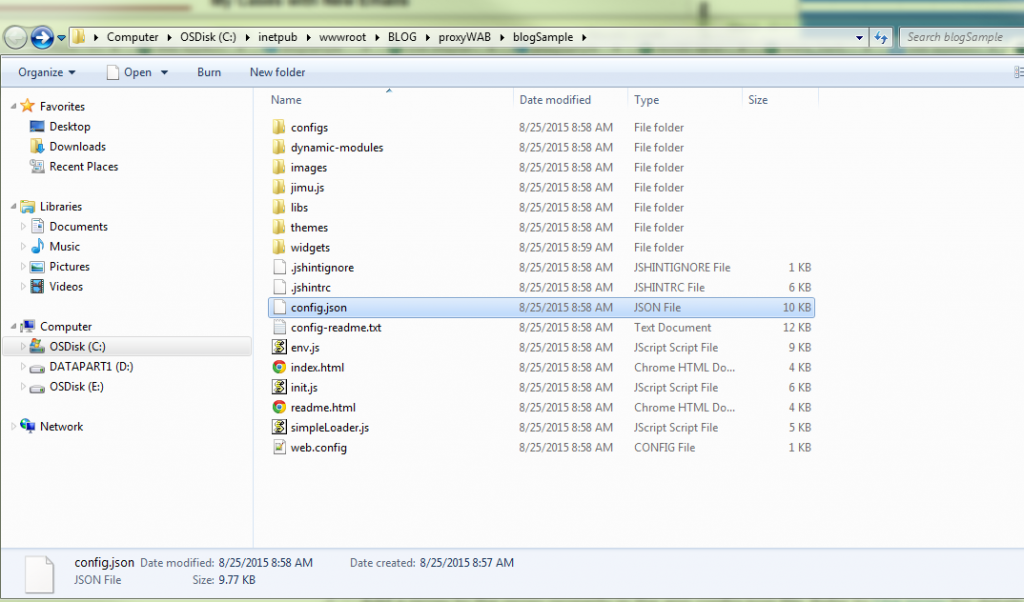
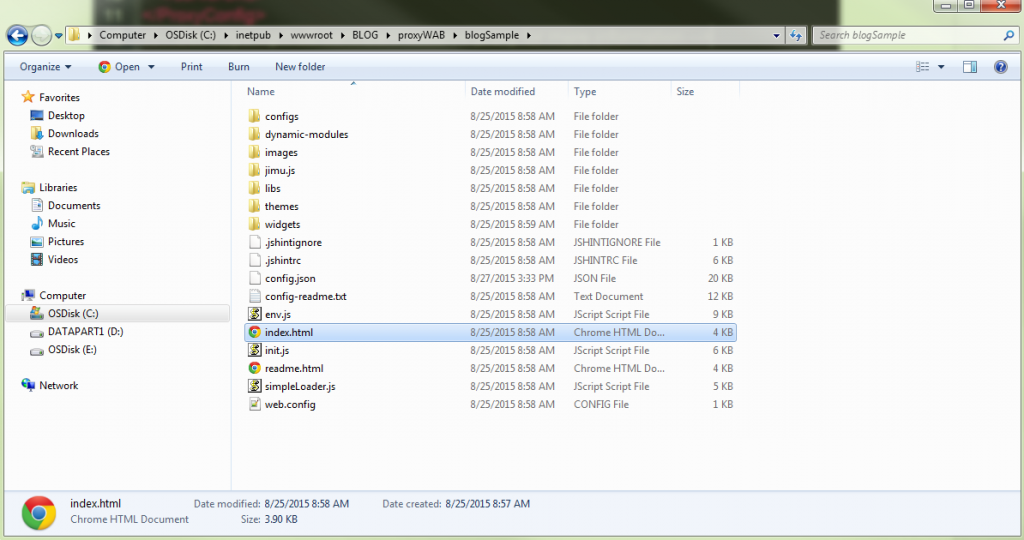
1. In Windows Explorer, open the application's "config.json" file. configJSONFile-1024x602.png

2. At the very bottom of the file, there is a cozy spot to add the proxy rule to the application. useProxy_WebAppBuilder_20151028.jpg

The parameter useProxy (Boolean) is set to true by default. If it is set to false, all requests will not use a proxy.

The url (String) parameter is optional, which is the URL of the proxy location. When a request must use a proxy for a Cross Domain request, or a request is larger than 2048 characters, this proxy will be used.

The alwaysUseProxy (Boolean) is also optional and set to false by default. If set to true, all requests for communication to a REST endpoint will use the proxy set in the url parameter.

The rules (Object[]) parameter is also optional and, if set, defines specific requests that will use the proxy.

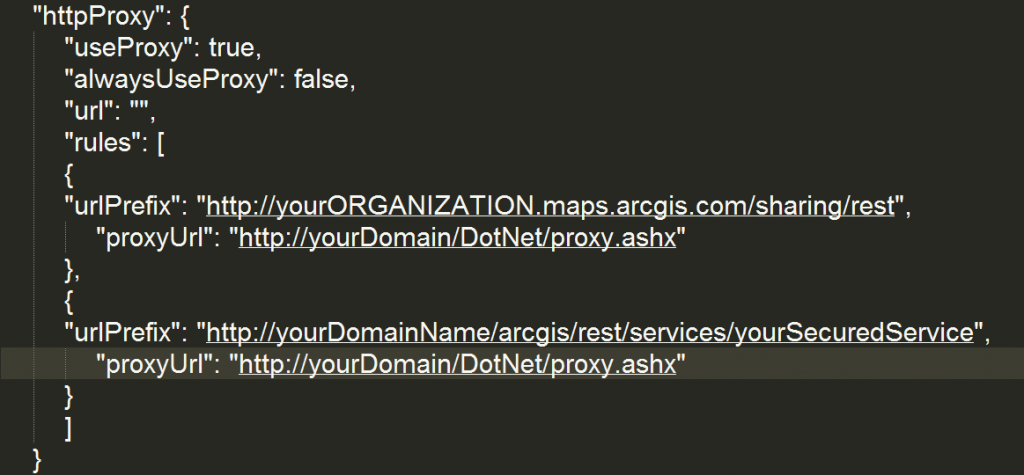
3. Since we have two secured resources, we can channel the requests through the proxy to authenticate. To do this, we need to add some proxy rules to the config.json file.
rules1-1024x475.png

proxy rules


The first rule is for the web map shared to the organization, and the second rule is for the secured ArcGIS for Server service.

The urlPrefix property tells the application that when you see this prefix in the request, use the proxy to access the resource. The proxyUrl property tells the application where the proxy is located.

Web maps can be shared with the organization, or not shared at all. By using clientId and clientSecret, we can authenticate the web map or resources inside the web map. If you are working with an ArcGIS Online hosted feature service, you MUST be the owner of that hosted feature service to authenticate using an app login.


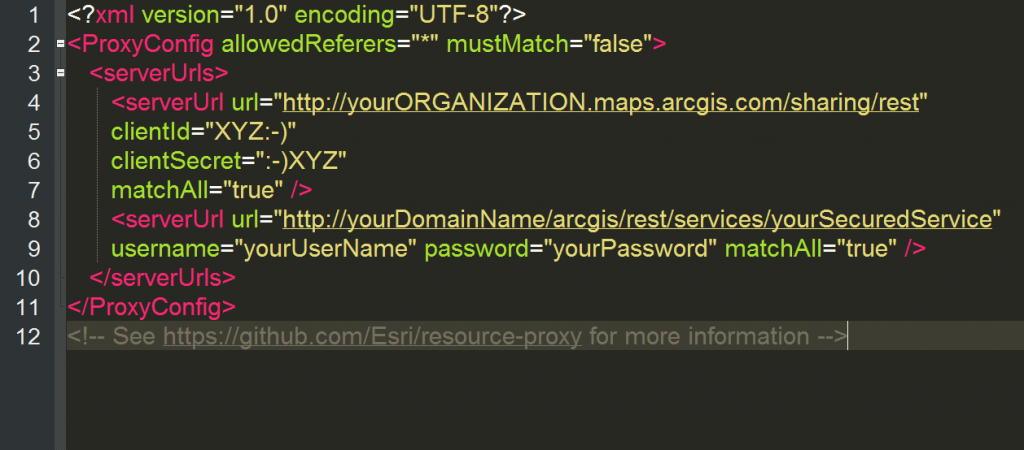
4. Set up the serverUrls in the proxy.config file. Since we have two rules, we will also have two serverUrls.

When working with content secured in ArcGIS Online (such as a secured web map or a secured hosted feature service), it is highly recommended to use a client id and client secret to authenticate. We will be using an ArcGIS for Server username and password for services hosted on ArcGIS for Server.


Need help registering an application to get a client id and client secret? There are two ways to do this! The choice is yours, and yours alone...they produce the same results; it’s just your personal preference.
serverURL-1024x450.png

serverUrl in the proxy.config


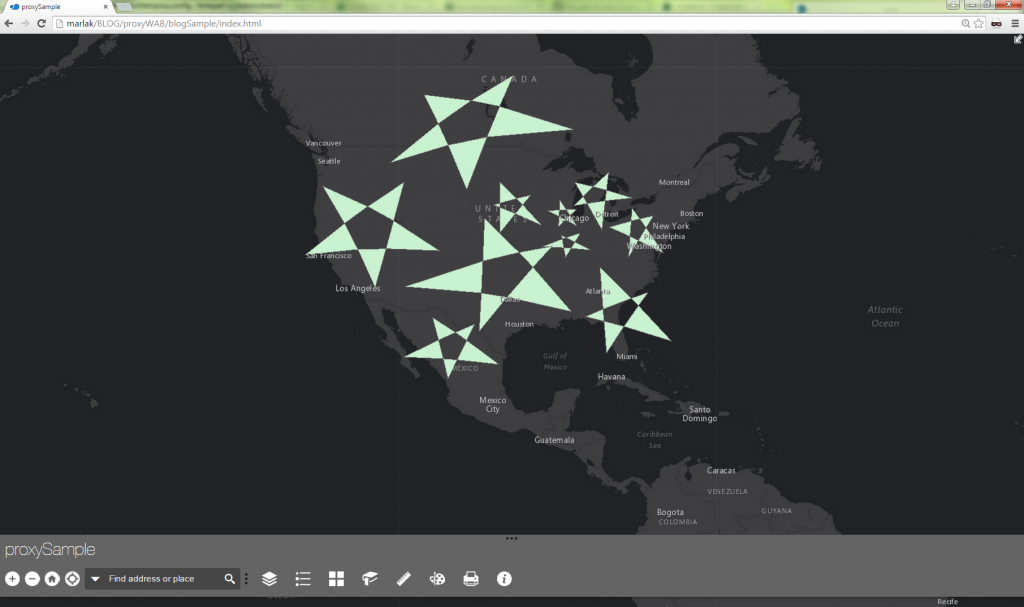
Beauty! We added the proxy rules in the config.json and configured the serverUrl in the proxy.config. Make sure to save those two files and run the application in a web browser!runApp-1024x540.png

Look at that, you’re a *S*T*A*R* ! Now you’re a pro at setting up a proxy with Web AppBuilder! Have fun creating and designing beautiful apps!starApp1-1024x607.png
Marla K. & Akshay H. - SDK Support Services

more
3 8 32.2K
by Anonymous User
Not applicable

We are proud to announce that Esri Support is now on GitHub!

octoEsri.png

Esri Support and GitHub


We recently released a Developer Support repository on GitHub that contains resources for troubleshooting, as well as proof of concept samples to support developers and those who are interested in development.

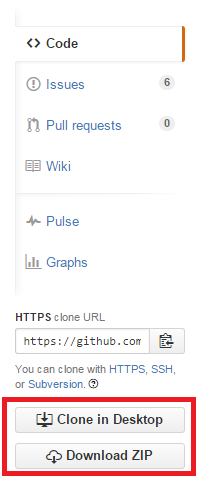
Most of us know that Esri is on GitHub. Many of our products live on GitHub, such as Esri Leaflet and the Resource Proxy. For those unacquainted with GitHub, it can be thought of as a social network for programming, which is an entirely open-source and collaborative environment. This is an amazing resource for developers to share applications, APIs, and code snippets. Anyone can download code from a repository by clicking Download ZIP or Clone in Desktop (with GitHub Desktop) in the right-hand pane. The best way to contribute is to set up a free account and install a Git client like GitHub Desktop or SourceTree.
clone_download.png

Clone or Download a Repository


A repository is the most basic element of GitHub. Imagine a repository as a project's folder. A repository contains all of the project files, including documentation, and stores each file's version history. Like "repository", there are many terms you may not be familiar with in the context of GitHub. Here is a great glossary to get you started.

The magic of GitHub is that it is an open environment; it's open to developers, open to moonlighters, and even open to teenagers or adult learners who are looking for a new challenge. To promote this idea, GitHub created a free initiative to help people learn computer science. Esri's Developer Support repository is exactly the same, welcoming any and all to take a look around and download some sample code and apps.

Another magic of GitHub is crowdsourcing; anyone can collaborate on our projects. If you find a problem or would like the repository collaborators to be aware of something, please submit an issue. This is a great way to contribute without even signing up. There are many other Esri GitHub pages that members of Esri Support often reference. The most common resource we use is the Esri Resource Proxy. It is mainly used for accessing secured services, cross-domain resources, and large requests, such as printing. Esri also has repositories that host samples for our APIs and SDKs, even including the new AppStudio.

If you would like to know more about GitHub, best practices, tips and tricks, etc., we have a slew of resources available to help you on your way. Here are links to our repository official Readme and Contributing documentation. Contribute today and make our GitHub repository yours.
Brad S. & Noah S. - SDK Support Services

more
1 0 4,639
54 Subscribers