Turn on suggestions
Auto-suggest helps you quickly narrow down your search results by suggesting possible matches as you type.
Cancel
- Home
- :
- All Communities
- :
- Services
- :
- Esri Technical Support
- :
- Esri Technical Support Blog
- :
- Top 10 Tips for Troubleshooting Model Builder
Top 10 Tips for Troubleshooting Model Builder
Subscribe
9218
0
03-10-2014 03:06 AM
- Subscribe to RSS Feed
- Mark as New
- Mark as Read
- Bookmark
- Subscribe
- Printer Friendly Page
03-10-2014
03:06 AM
Using Model Builder? Looking for some quick troubleshooting tips? Try these in the order they're listed below. You can use these to document the steps you take, and if a tech support call becomes necessary, you'll have a better understanding of what may or may not be causing the problem.1. Isolate the Geoprocessing tool you believe to be causing the error.
2. Isolate a section of the model that is causing the error.
3. Validate!
6. Check the data inputs of the model to make sure you are connecting to the data source on disk.
7. Be aware of the input and output parameters.
8. For larger, more complicated models, check your outputs using the Make Feature Layer tool.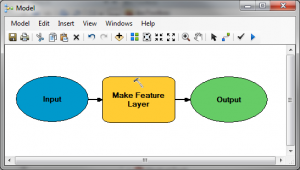
9. Test with ‘Add results to display’.
10. Review the details of the Model window after running.
- Run the stand-alone tool outside the model. Does it work with the same inputs and outputs?
2. Isolate a section of the model that is causing the error.
- Create a new model and rebuild the troublesome section to determine if isolating a string of processes helps clarify the issue being faced.
3. Validate!
- Make sure to validate your model before running to ensure the processes are in a ‘ready-to-run’ state.

4. Recreate your model.
- It is possible for an element of your model to become corrupt over time. The best practice for testing a corrupt element is to delete it completely, and add it back in. Do not copy or paste elements between models, as this can carry over the corruption.
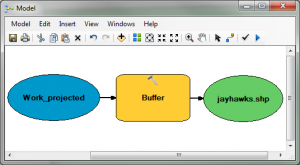
5. Alter the output location and type of your results.
- You may be experiencing a data type or data storage location conflict. Make sure to test this by saving the output to your local machine if the outputs are failing over a network.
6. Check the data inputs of the model to make sure you are connecting to the data source on disk.
- During the creation of your model in ArcMap, you can click the input drop-down to select an active map layer. These inputs only work if you run the model in an open map document with the associated layers added to the map. If you intend to run the model via ArcCatalog, you will need to update these data source paths to the location on disk where the data is saved.
7. Be aware of the input and output parameters.
- When creating a model, be sure to label the model parameters. This will be reflected in the tool dialog and allow a clear understanding of what variables are required.
8. For larger, more complicated models, check your outputs using the Make Feature Layer tool.

- You can check the progress of each successful output by adding the tool after each output.
9. Test with ‘Add results to display’.
- If you right-click any output, you can check 'Add results to display'. This adds the table, feature, or results of your model to the Table of Contents of the open map document, allowing you to review the results.
10. Review the details of the Model window after running.
- Use this tool to better understand where the model failed, and to learn more about a documented error in ArcMap (highlighted in blue).

Matt P. and Julia G. - Desktop Support Analysts
Labels
You must be a registered user to add a comment. If you've already registered, sign in. Otherwise, register and sign in.
Related Articles
Top 10 Tips for Troubleshooting Model Builder
JuliaGuard
Esri Contributor
0 Kudos
0 Comments
Labels
-
Announcements
70 -
ArcGIS Desktop
87 -
ArcGIS Enterprise
43 -
ArcGIS Mobile
7 -
ArcGIS Online
21 -
ArcGIS Pro
14 -
ArcPad
4 -
ArcSDE
16 -
CityEngine
9 -
Geodatabase
25 -
High Priority
9 -
Location Analytics
4 -
People
3 -
Raster
17 -
SDK
29 -
Support
3 -
Support.Esri.com
60
- « Previous
- Next »