Turn on suggestions
Auto-suggest helps you quickly narrow down your search results by suggesting possible matches as you type.
Cancel
- Home
- :
- All Communities
- :
- Services
- :
- Esri Technical Support
- :
- Esri Technical Support Blog
- :
- Setting up a Proxy
by
Anonymous User
Not applicable
4
1
30.2K
- Subscribe to RSS Feed
- Mark as New
- Mark as Read
- Bookmark
- Subscribe
- Printer Friendly Page
04-07-2015
02:54 AM
A proxy page stands between a server and an application. By using a proxy, you allow an application to authenticate on your behalf, bypassing a challenge and accessing secured services inside of an application. While the token is hidden, an application can access secured services with token-based authentication; a proxy handles massive post requests over 2,048 characters. Additionally, you can use a proxy when a resource and an application are on separate domains, as well as when cross-origin resource sharing (CORS) support is unavailable.
Today, we'll walk through the steps of downloading, setting up, and hosting a proxy page on an IIS7 server. For a programming language, we use Esri's JavaScript API. In addition to setting up the proxy page, we will add a proxy rule to the Directions widget sample.
To download the Directions widget sample, click here.
Our journey begins at the glorious GitHub site.
Note: The proxy page must be located on the same server as your JavaScript application.
Note: When using ArcGIS Online services the recommended workflow is to use a client id and client secret. The client id and client secret are obtained from developers.arcgis.com. If secured services from ArcGIS for Server used, then we would input a username and password. For this example, we use services from ArcGIS Online serverUrls.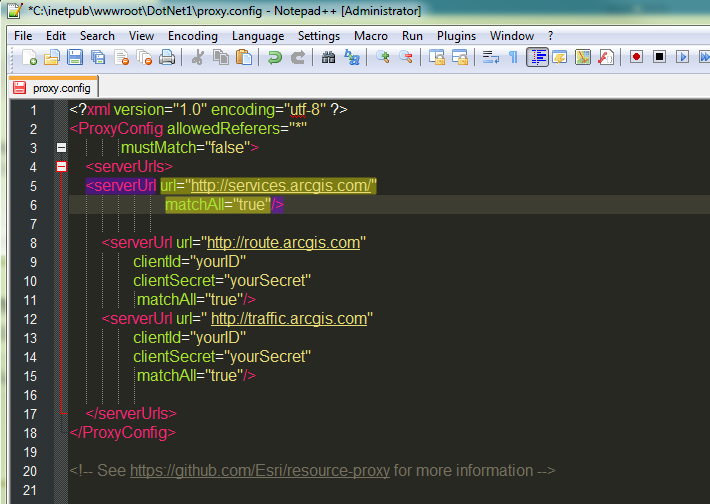
Happy travels!
Marla K. and Akshay H. - SDK Support Analysts
Today, we'll walk through the steps of downloading, setting up, and hosting a proxy page on an IIS7 server. For a programming language, we use Esri's JavaScript API. In addition to setting up the proxy page, we will add a proxy rule to the Directions widget sample.
To download the Directions widget sample, click here.
Our journey begins at the glorious GitHub site.
Note: The proxy page must be located on the same server as your JavaScript application.
- Navigate to https://github.com/Esri/resource-proxy/releases to obtain the most recent release of the proxy.
- Click 'Source code(zip)' to download the .zip file to your local drive.
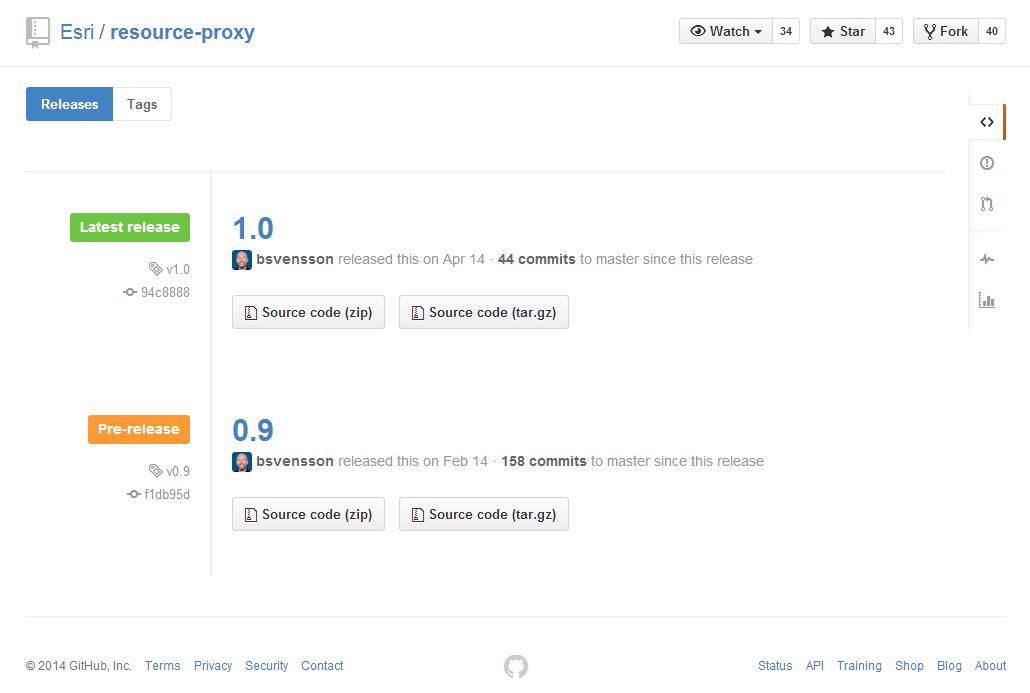
Download a proxy from GitHub.
- Extract the files to your server (in this case, IIS Server), and navigate to the resource proxy folder, 'C:\\inetpub\wwwroot\resource-proxy-master', where you extracted the files. There are three sub-folders inside, each containing a proxy for the respective server type:

- DotNet - Internet Information Services (IIS) server
- Java - Apache Tomcat server
- PHP - Apache server
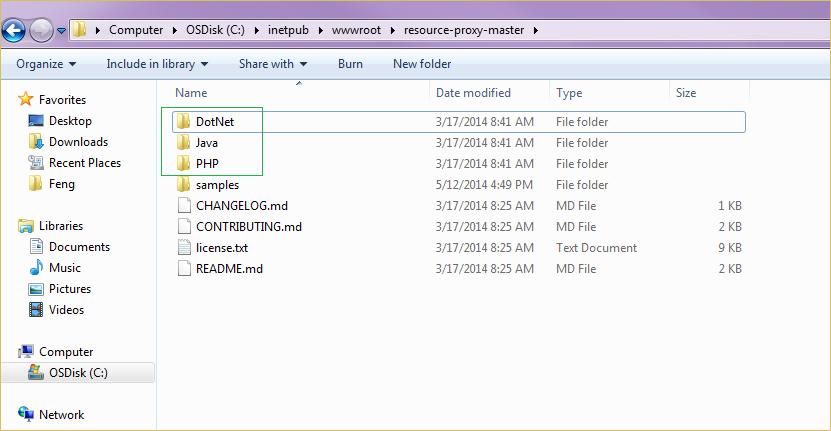
- Folders under resource-proxy-master

- Depending on the server, copy one of the three folders. In this example, we use an IIS server. Copy the DotNet folder, and place it in your wwwroot folder.
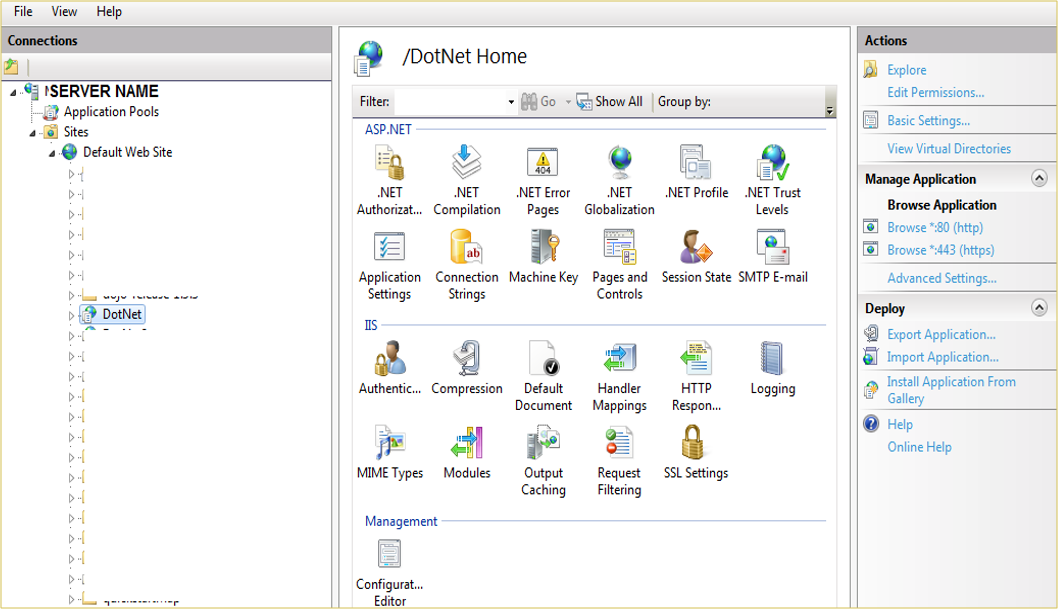
- Click Start. In the ‘search for programs and files’ box, type IIS, and open the IIS Manager.
- Expand the server name, the Sites folder, and Default Web Site.
Internet Information Services (IIS) Manager
- Right-click the DotNet folder in the directory, and select Convert to Application.

Convert proxy to an application
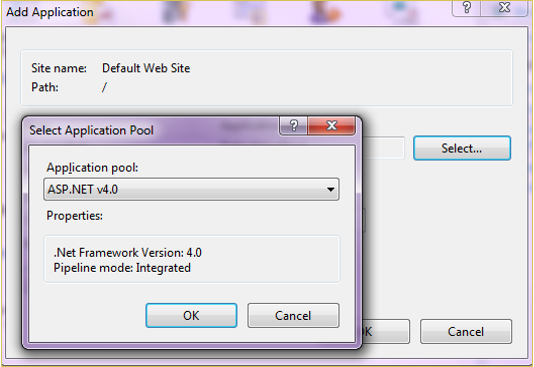
- Ensure the application pool is 4.0 or greater. In this example, we use ASP.NET v4.0. Ensure the folder icon is a globe.

- In Windows Explorer, open the DotNet folder, and right-click proxy.config. Open the file in Notepad++ or a preferred IDE.
- Inside the proxy.config file, you see the following in XML format:
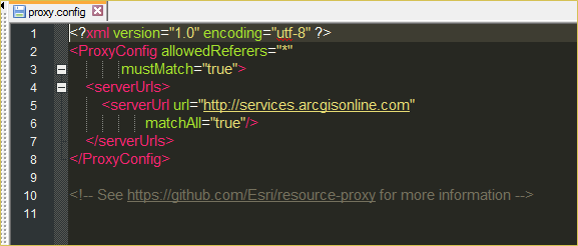
proxy configuration file
We recommend keeping the global mustMatch="true". When this is true, all requests made to the proxy can only go through specified serverUrls.
For testing purposes, you can change the global mustMatch="false"; this allows any proxy requests to pass through. - Since the direction's sample uses http://route.arcgis.com and http://traffic.arcgis.com, we add two <serverUrl> tags.


Note: When using ArcGIS Online services the recommended workflow is to use a client id and client secret. The client id and client secret are obtained from developers.arcgis.com. If secured services from ArcGIS for Server used, then we would input a username and password. For this example, we use services from ArcGIS Online serverUrls.

Input client id and secret inside the proxy.
- The following steps demonstrate how to configure the proxy in your JavaScript application. There are a couple of ways to configure the proxy inside of a JavaScript application. For this particular example, we use the proxy rule.
- In the JavaScript application, add two proxy rules:
esri.addProxyRule({urlPrefix: "http://route.arcgis.com", proxyUrl:"http://<yourServer>/<pathToProxy>/proxy.ashx" });
esri.addProxyRule({ urlPrefix: "http://traffic.arcgis.com", proxyUrl: "http:// <yourServer>/<pathToProxy>/proxy.ashx" }); - As another possibility, add the "esri/urlUtils" module in the require statement, and add the following rule: urlUtils.addProxyRule(urlPrefix: "route.arcgis.com", proxyUrl: "http://<yourServer>/<pathToProxy>/proxy.ashx" });urlUtils.addProxyRule({urlPrefix: "traffic.arcgis.com", proxyUrl: "http://<yourServer>/<pathToProxy>/proxy.ashx"});
- Here is another way to configure the proxy.
esriConfig.defaults.io.proxyUrl = "<url_to_proxy>"esriConfig.defaults.io.alwaysUseProxy = false; The proxyUrl is the path to your proxy page hosted on IIS.
- Run the hosted application, and open the Developer tools.
- Type in an origin and destination. Our journey ends with step by step directions accompanied by a map visual.
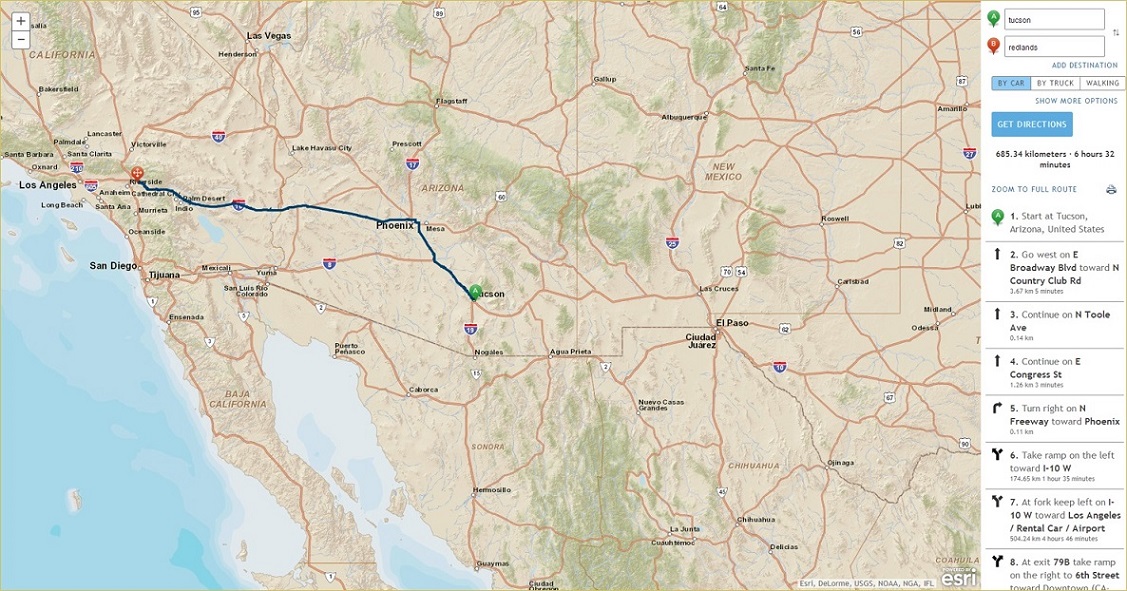
Get Directions

Happy travels!
Marla K. and Akshay H. - SDK Support Analysts
Labels
1 Comment
You must be a registered user to add a comment. If you've already registered, sign in. Otherwise, register and sign in.
Related Articles
Setting up a proxy with Web AppBuilder for ArcGIS (Developer Edition)
Anonymous User
Not applicable
3 Kudos
0 Comments
Labels
-
Announcements
70 -
ArcGIS Desktop
87 -
ArcGIS Enterprise
43 -
ArcGIS Mobile
7 -
ArcGIS Online
21 -
ArcGIS Pro
14 -
ArcPad
4 -
ArcSDE
16 -
CityEngine
9 -
Geodatabase
25 -
High Priority
9 -
Location Analytics
4 -
People
3 -
Raster
17 -
SDK
29 -
Support
3 -
Support.Esri.com
60
- « Previous
- Next »