Esri Technical Support Blog - Page 3

cancel
Showing results for 
Show  only  | Search instead for 
Did you mean: 

Latest Activity

(383 Posts)
MeganSingleton
Occasional Contributor III

You may have already noticed some of the changes at 10.0 with the upgrade process for ArcSDE geodatabase no longer using the Post Installation wizard. This was discussed in an earlier blog written on "The Evolution of the ArcSDE Geodatabase Upgrade Process at 10.0". The ArcSDE Post Installation Wizard has made its grand exit and is no longer installed as part of ArcSDE at 10.1. Let’s take a look at the Post Installation steps and compare with the new geoprocessing tools that were created at 10.1 to perform similar tasks.

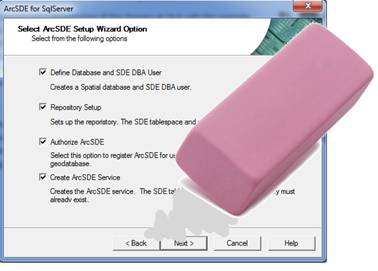
Post Installation Wizard Steps (Pre 10.1)

image0022.jpg
  • Define SDE User Environment/Define Database and SDE DBA User
  • Repository Setup
  • Authorize ArcSDE
  • Create ArcSDE Service

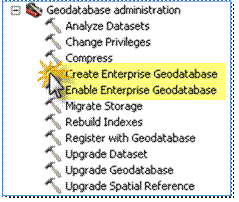
New Geoprocessing tools within Geodatabase Administration Toolbox at 10.1

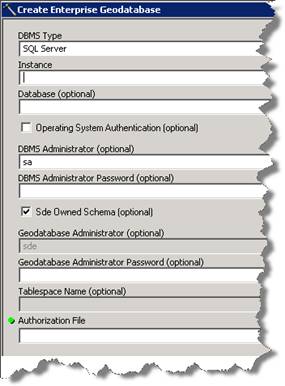
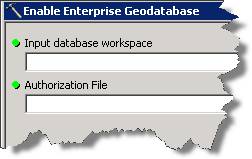
image004.gifThe following geoprocessing tools are within the Data Management Tools > Geodatabase Administration toolbox at 10.1:Create Enterprise Geodatabase – Create a database and geodatabase administrator in PostgreSQL or SQL Server and enable enterprise geodatabase functionality in it, or create a tablespace and geodatabase administrator in an existing Oracle database and enable enterprise geodatabase functionality in it. This tool also authorizes the software.image0061.jpgEnable Enterprise Geodatabase – Enable geodatabase functionality in an existing DB2, Informix, Oracle, PostgreSQL, or SQL Server database. This tool also authorizes the software.image0082.jpg

Application Server Services


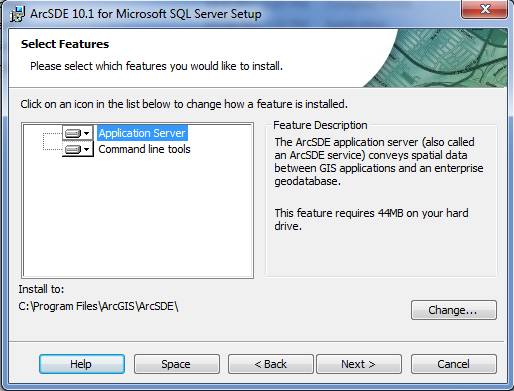
With the Post Installation Wizard no longer part of the ArcSDE install at 10.1, this also means that there is no wizard to create ArcSDE services. The ArcSDE install includes the application server along with command line tools.  If there is a need for an application server service at the 10.1 release, one can be manually created and registered (depending on DBMS) using the ArcSDE administration commands. See the ArcSDE Administration commands to reference the sdeservice commands.image0101.jpgMelissa J. - Geodata Support Analyst

more
0 0 1,089
by Anonymous User
Not applicable

So you have built a Geometric Network and encountered some errors in the process. Enter the NET_BUILDERR table, a resource to help you correct any potential problems uncovered during the build.The NET_BUILDERR table is a table that is output during the creation of the geometric network. The table is generated if errors are encountered and if the geometric network is owned by the user or the schema that builds the geometric network. This table is created n the same Feature Dataset where your network resides and can be easily previewed in ArcCatalog.When previewing this table in ArcCatalog, you will be able to see the Object ID, Class ID, and Errortype for each error encountered. In ArcGIS 9.x, the ClassID field corresponds with the ClassID found in the GDB_OBJECTCLASSSES table and identifies which feature class the ObjectIDs corresponded via the Layers table ‘Layer_id’. In ArcSDE 10 using the simplified geodatabase schema, this field now refers to the ObjectID in the ‘GDB_ITEMS’ table which will also enable you to determine which feature class the error corresponds with in the same way.Same functionality, same ID, different table…
The Net_BUILDERR table is used by the Network Build Errors command in ArcMap to identify and select the features with invalid geometries for review and correction. It can also be used for manual review. Remember that this table is user managed, so it will not automatically update after an error has been corrected.
Related Links
- Identifying geometric network build errors
- Network build errors table- Repairing network feature geometry
Jon D. - Geodata Support Analyst


more
1 0 1,542
by Anonymous User
Not applicable

How to add different-sized rasters with NoData Values 


One of the most common forum topics is on how to add two rasters with different spatial extents and get a result more than just where the two rasters overlap. Well, the reason the result is only those areas has to do with null values.

There are environment variables to modify to ensure that the rasters line up (snap raster) and the extent is preserved during the process (Spatial Extent). Fixing the environment setting alone will still not fix the output of the process. If you modify the spatial extent to match the "union of inputs", the output raster will have the correct spatial extent, but the only values will be the values where the two rasters overlapped. So what is going wrong?

Obviously it is the pixel values ... or, wait, I guess it isn't that obvious. Try this piece of wisdom provided by forum poster and Product Engineer, Eric R.

Pixel value + NoData Pixel = NoData Pixel
Pixel value + 0 = Pixel value
Pixel value + Nothing (because your extents are different) = Nothing.

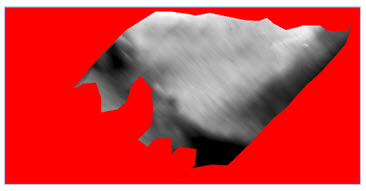
Two different rasters used in calculation (NoData is red).

Sum of Rasters


You may be asking, "What is actually happening? Are the values being used in the analysis or not?" Well, the answer is they will be as long as part of that equation doesn't include a null value. If there is a null value present that will make the output null, then the output will not be correct. 

The next question is how to fix it. Bear in mind, both solutions require you to make the rasters that are being used as the inputs match in spatial extent, pixel registration and cell size. You can use the Copy Raster tool and set the appropriate environment settings to accomplish this. Once you have corrected the rasters, then there are two options depending on the desired output,1. Set the NoData values to a value of zero, so that when they're added together, the output will have the correct spatial extent and values from both rasters.

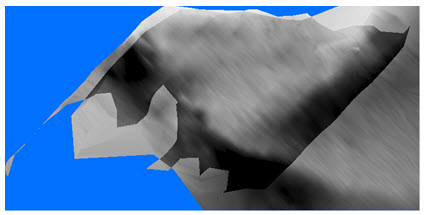
Output from Setting the NoData value (blue pixels = 0)

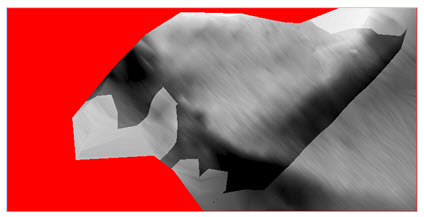
2. Utilize the Con( IsNull ) workflow to include all of the pixels and add them where appropriate.

Con(IsNull("RasterSMALL"),"RasterBIG, ("RasterSMALL" + "RasterBIG"))

Output from Con Tool


To recap, there are options to handle the NoData cells. Depending on what output you're trying achieve, there are different techniques. It's also important to understand the effect that NoData has when used in raster calculation. 

There is a related forum post that discusses using Python to sum multiple rasters together: Calculate sum of 2334 raster layers.Jeff S. - Geodata Raster Support Analyst

more
0 0 972
by Anonymous User
Not applicable

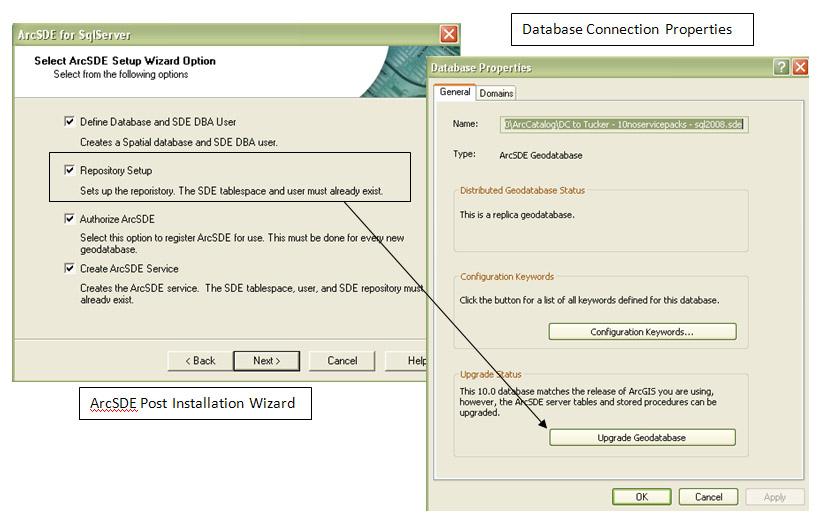
When using ArcSDE geodatabases, you may have noticed a change within the 10.0 release in how the upgrade process is now handled. Instead of using the Post Installation Wizard and selecting Repository Setup, as in previous releases, there is a new upgrade process. Upgrading your geodatabase is now performed within ArcCatalog using the new Upgrade Geodatabase (Data Management) tool.
The Upgrade Geodatabase (Data Management) Tool can be accessed in ArcCatalog via the Database Properties of a database connection under the General tab > Upgrade Status or within the Upgrade Geodatabase geoprocessing tool referencing an existing connection. For ArcSDE geodatabases, a direct connection to the geodatabase is necessary to run the upgrade.
 Post Installation Wizard at 10.0:
The Post Installation Wizard in 10.0 can be used for the following:

  • Defining Database and SDE DBA User - Creating new ArcSDE enterprise geodatabases
  • Repository Setup - Populate system repository tables (for new geodatabases only)
  • Authorize ArcSDE - Perform Software Authorization of the geodatabase
  • Create ArcSDE Service - If using application server service (when not using direct connections)

More changes are on the horizon to incorporate Post Installation functionality into the client tools for the 10.1 release, so stay tuned!

more
0 0 337
TimothyHales
Esri Notable Contributor

Imagine you're the GIS Data Manager for New York City and receive a request for data from a consultant for Central Park. The data request included roads, streams, soils, buildings and other feature classes that are stored in the master geodatabase for the city. Instead of providing the entire geodatabase, you clip the data down to just the park boundary.

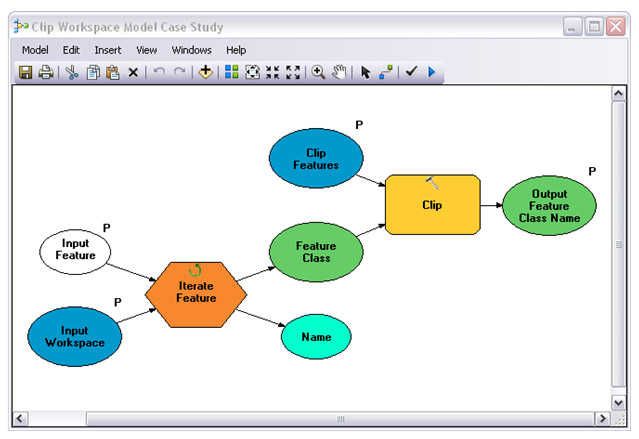
In order to clip the data, you have the options to clip the features individually or set up a batch clip. However, there's a more efficient way. With the iterator functionality available in ArcGIS 10, a simple model using the Iterate Feature Class iterator and the Clip tool can provide an efficient way to extract the subset of data.

Within ModelBuilder add the Iterate Feature iterator (Insert Menu > Iterators > Feature Classes) and the Clip tool.  Connect the iterator output feature class as the input to the Clip tool.

Below are the parameters that can be specified for each of the components.

    • Iterate Feature Classes
      • Workspace or Feature Dataset
      • Wildcard
      • Feature Type
      • Recursive
    • Clip
      • Input Features
      • Clip Features
      • Output Feature Class
    • XY Tolerance

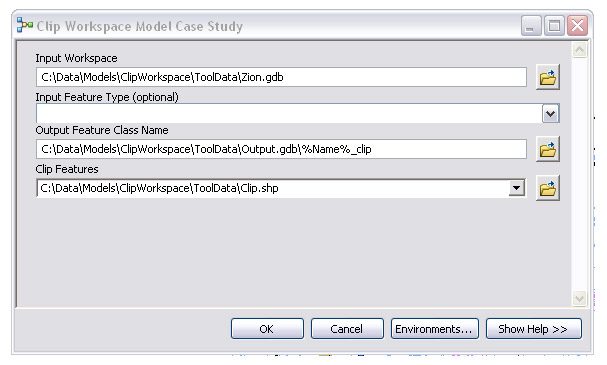
For the clip output feature class, you can use a variable based upon the name being generated from the iterator.   An example of this can be seen in the interface below with the percent symbols.Examples of inline model variable substitution

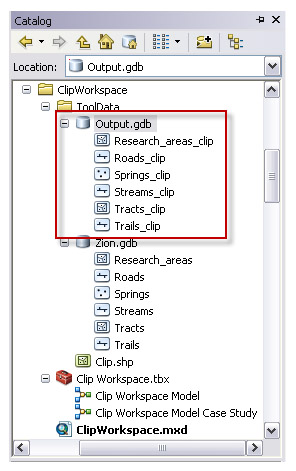
Based upon the variable for the output feature class name, the output of the model keeps the original name with ‘_clip' added on.

After setting up the model and defining the desired parameters, this process can be accessed from your toolbox to easily clip a workspace or feature dataset for any project requiring you to work with only a subset of you master data.

The above model example can be downloaded from the ArcGIS Geoprocessing Model and Script Tool Gallery: Clip Workspace.Timothy H., Support Analyst - Geodata Raster Group, Esri Support Services

more
1 0 3,365
42 Subscribers