- Home
- :
- All Communities
- :
- Services
- :
- Esri Technical Support
- :
- Esri Technical Support Blog
- :
- Using Windows 7 Problem Steps Recorder
Using Windows 7 Problem Steps Recorder
- Subscribe to RSS Feed
- Mark as New
- Mark as Read
- Bookmark
- Subscribe
- Printer Friendly Page
When creating an Online Support Incident, it is often cumbersome to fully document exactly what you are doing. Whether you don’t know the correct terminology or don’t feel like sending an e-mail that rivals epic novels such as War and Peace and Horton Hears a Who!, the Problems Steps Recorder is here to help you. This very helpful feature was added to the Windows 7 operating system and will soon become your best friend!
To open the Problems Steps Recorder, follow the steps below:
1. Click on the ‘Start’ button.
2. In the search dialog type ‘psr’ and press ‘Enter’.
Launching the psr.exe opens a new toolbar that appears on the desktop.
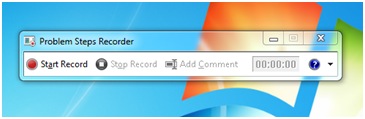
This easy-to-use tool allows you to begin recording screen shots as soon as you click ‘Start Record’. Once the recording has begun, navigate through the issue you would like to report. When you are done, click ‘Stop Record’ on the Problem Steps Recorder toolbar. After clicking the ‘Stop Record’ button on the toolbar, you will be prompted to name the .zip file that will contain your screen captures. The next step will be to include this .zip file when you create your new ESRI Support Services request online.
*Note there is a 10 megabyte file size limitation on uploads. If the file is larger than 10 MB, simply ask the Support Analyst you work with for instructions on using the FTP site.
- Andrew S., Server Support Analyst, ESRI Support Services
You must be a registered user to add a comment. If you've already registered, sign in. Otherwise, register and sign in.
-
Announcements
70 -
ArcGIS Desktop
87 -
ArcGIS Enterprise
43 -
ArcGIS Mobile
7 -
ArcGIS Online
21 -
ArcGIS Pro
14 -
ArcPad
4 -
ArcSDE
16 -
CityEngine
9 -
Geodatabase
25 -
High Priority
9 -
Location Analytics
4 -
People
3 -
Raster
17 -
SDK
29 -
Support
3 -
Support.Esri.com
60
- « Previous
- Next »