In this blog post I will introduce a handful XLSForm functions that will help you work with user selections on lists. If you are not familiar with the basics of publishing smart forms in Survey123 using XLSForms, or with selection questions, then I suggest you take a tour of the basic Video Tutorials in our Survey123 YouTube Playlist. Below you will find a introductory video tutorial on selection questions and lists.
Using XLSForm expressions you can process user selections on lists and implement data validation rules, conditional statements to show and hide portions of your forms, and more. Here are some of the most common XLSForm functions you will be able to use:
selected(question, value)
The selected() function is used to check if a particular choice has been selected from a list. Here is an example:
| type | name | label | relevant |
|---|
| select_one yes_no | repair_needed | Are repairs needed? | |
| text | repairs_comment | Repairs needed: | selected(${repair_needed},'yes') |
The selected() function returns a boolean value. In the example above, I am using the function within the relevant column, to define if the repairs_comment question will be shown to the end user, or kept hidden.
The first parameter passed to this function is the question on which the user made the selection. You can only pass questions of type select_one or select_multiple.
The second parameter represents your test choice value. It is important to remember that the test choice value represents the name of your choice, not its label. This makes sense because otherwise, it would be tricky to write expressions in multi-language surveys.
Do not pass the label of a choice to the selected() function. The selected() function expects the name value of your choice. Also keep in mind that this function is case sensitive. 'Yes' is not the same as 'yes'.
The selected() function is particularly useful when working with multiple-choice questions (select_multiple). In the example below, I use the function to populate hidden questions with a value of 1, if a particular choice has been selected, or 0 if not selected.
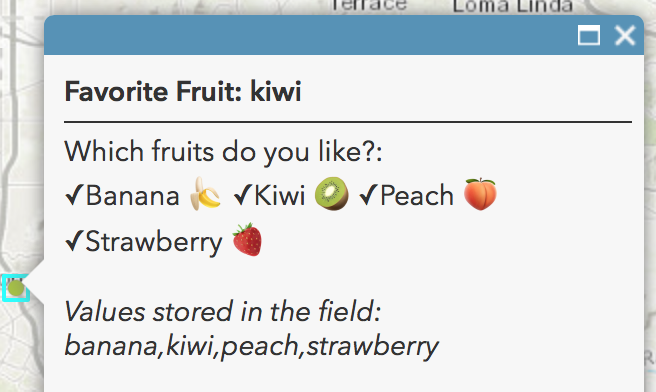
The violations question is a select_multiple. In it, the end-user can select one or more choices from the violations list. The output of select_multiple questions is a comma separated string representing all the choices selected. That is not very useful if I want to query the data later... For each type of violation presented in the select_multiple question, I have created a corresponding hidden question. Using a calculation, hidden questions get populated with 1s and 0s based on the user selections.
| type | name | label | calculation | bind:esri:fieldType |
|---|
| select_multiple violations | violations | Violations observed | | null |
| hidden | overwatering | Overwatering | if(selected(${violations},'10'),1,0) | esriFieldTypeInteger |
| hidden | brokenpipe | Broken Pipe | if(selected(${violations},'20'),1,0) | esriFieldTypeInteger |
| hidden | wrongtime | Time | if(selected(${violations},'30'),1,0) | esriFieldTypeInteger |
| hidden | wrongday | Day | if(selected(${violations},'40'),1,0) | esriFieldTypeInteger |
| hidden | waterfeature | Water Feature | if(selected(${violations},'50'),1,0) | esriFieldTypeInteger |
As I indicated before, the output of the selected() function is a boolean. That is, either true or false. In my example, I wanted to store numbers (0 and 1) so I can more easily count values later or use the data in Operations Dashboard. That is achieved by complementing the selected() function with an if() statement. When selected() returns true, signifying that the choice was selected, I store a value of 1 and otherwise a 0.
The column bind:esri:fieldType plays an important role here too. For my select_multiple question I chose null. This indicates that the output of the question (the comma separated list of selected values) will not have a corresponding field in the target ArcGIS feature layer. In other words, a null esri:fieldType says that we are not interested in persisting the output of that question. After all, the values in the hidden questions are really what we want to persist.
For the hidden questions, I explicitly set the esri:fieldType to esriFieldTypeInteger, because hidden questions by default are mapped to text fields. Since I know that my calculation is either going to output a 1 or a 0, and I want the output values as numbers, I set the esri:fieldType correspondingly.
To learn more about how XLSForm questions get mapped to Esri fields, check the https://community.esri.com/groups/survey123/blog/2015/08/24/xlsform-mappings-to-arcgis-feature-servi... blog post.
There are some other tempting options for figuring out what choices have been selected in a list. I strongly recommend that you do not get tempted by them:
One bad habit is using a straight value comparison on select_one questions:
| type | name | label | relevant |
|---|
| select_one yes_no | repair_needed | Are repairs needed? | |
| text | repairs_comment | Repairs needed: | ${repair_needed}='yes' |
Technically, it is going to work, but if you get used to that you may be led into this...
| type | name | label | calculation | bind:esri:fieldType |
|---|
| select_multiple violations | violations | Violations observed | | null |
| hidden | overwatering | Overwatering | if(${violations}='10',1,0) | esriFieldTypeInteger |
| hidden | brokenpipe | Broken Pipe | if(${violations}='20',1,0) | esriFieldTypeInteger |
| hidden | wrongtime | Time | if(${violations}='30',1,0) | esriFieldTypeInteger |
And that is definitively not going to work! As you may remember, the output of a select_multiple is a comma separated list of values, so if someone selects more than one option in the violations question, your calculations will not work correctly.
Another temptation, for select_multiple questions, is the use of contains(). For example:
| type | name | label | calculation | bind:esri:fieldType |
|---|
| select_multiple violations | violations | Violations observed | | null |
| hidden | overwatering | Overwatering | if(contains(${violations},'10'),1,0) | esriFieldTypeInteger |
| hidden | brokenpipe | Broken Pipe | if(contains(${violations},'20'),1,0) | esriFieldTypeInteger |
| hidden | wrongtime | Time | if(contains(${violations},'30'),1,0) | esriFieldTypeInteger |
The use of contains() could actually work in some cases, but it is not worth the risk.
The function selected() works beautifully for both select_multiple and select_one. Use it consistently if you want to check what options were selected in them.
count-selected(question)
The count-selected() function returns the number of selected choices in a select_multiple question.
| type | name | label | constraint | constraint_message |
|---|
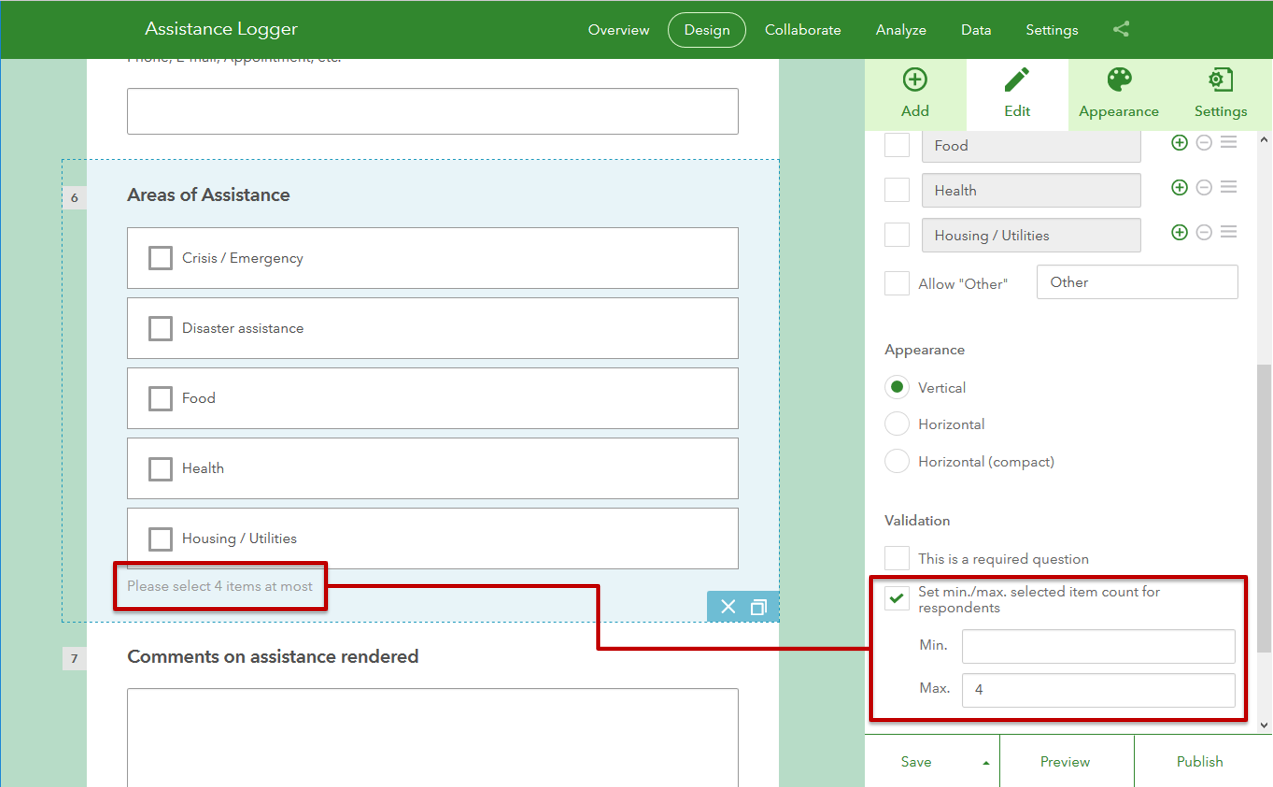
| select_multiple toppings | toppings | Select up to 2 toppings | count-selected(${toppings})<3 | Pick no more than 2! |
In this example I built a constraint to prevent people from getting too greedy with pizza toppings. If the number of toppings selected is not below 3, a warning message will appear and the user will not be able to submit data.
You can also use count-selected() in a relevant statement, for example to present a comments field if any issues have been found during an inspection.
| type | name | label | relevant |
|---|
| select_multiple comps | issues | Check manhole components with issues | |
| text | comments | Enter comments relevant for repair effort | count-selected(${components})>0 |
Pretty handy!
jr:choice-name(choice, 'question')
jr:choice-name() is useful when you need to retrieve the label of a list choice. The syntax goes as follows:
jr:choice-name(${activity},'${activity}')
In the example above, I am passing with the first parameter the user selection in the 'activity' question. The second parameter is the question in the form using the list where the choice has been made. Very often, the first and second parameters will reference the same XLSForm question, but note that the second parameter is enclosed with quotes, because it does not refer to the value (response) of the question, but to the actual question itself.
This is a very useful function in several scenarios:
- When you want to include the label of a selected item in the payload of a webhook.
- When you want to store the label of a selected item in your target feature layer.
- When you want to display the selected item's label in a note, or use it within a label (dynamic label).
Take this example:
| type | name | label | calculation |
|---|
| select_one priority | priority | Priority of the incident | |
| hidden | priority_label | Repairs needed: | jr:choice-name(${priority},'${priority}') |
The hidden question, obviously, will not be shown in the form to the user, but will keep the label of the selected choice in the priority question. This value will be stored in the target feature layer of the survey, and will also be part of the payload sent in any webhooks you configure.
If working with multi-language surveys, the jr:choice-name() function will return the label in the language active when the user submits the data.
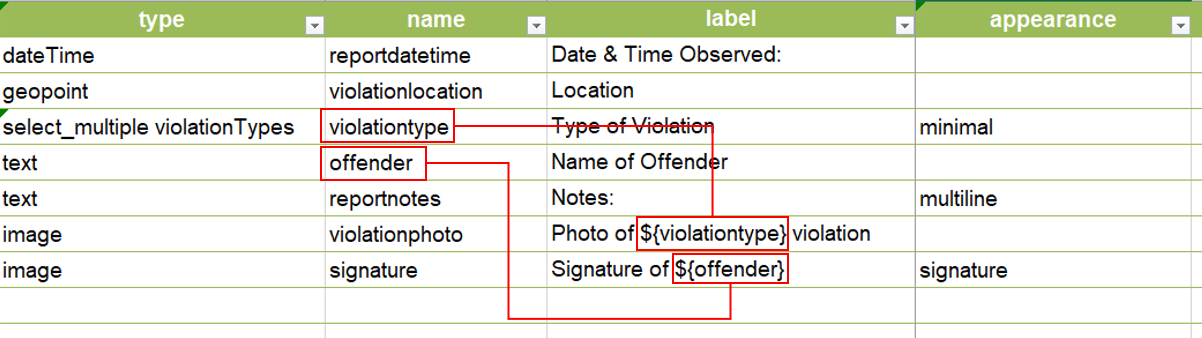
A common use case for jr:choice-name() is dynamic labels. Dynamic labels are discussed in more detail in the https://community.esri.com/groups/survey123/blog/2018/11/01/understanding-dynamic-labels-in-survey12... blog post. In short, dynamic labels allow you to embed user responses and the result of calculations within labels in your survey. This is a pretty useful technique to help end users navigate along very large surveys for example, because you can bring more context to your questions, using prior responses.
| type | name | label | calculation |
|---|
| select_one priority | priority | Priority of the incident | |
| calculate | priori_label | Priority Label | jr:choice-name(${priority},'${priority}') |
| text | comments | Describe why the priority is ${priori_label) | |
When using dynamic labels, you cannot include expressions within the label. You can only perform simple variable replacements. This is why in the example below I first add a calculate question to get the label, and then I embed the variable within the label of the comments question. Just for clarity, the following will not work:
| type | name | label |
|---|
| select_one priority | priority | Priority of the incident |
| text | comments | Describe why the priority is jr:choice-name(${priority},'${priority}') |
I always wonder why the jr:choice-name has the jr: prefix in front of it. I am sure there is an obscure explanation somewhere for that. I also wonder why if the function was named jr:choice-name instead of choice-label, since the output is the label, and not the name. Oh well... the function works nicely, so I would not dig to much into this mystery of the XLSForm specification.
selected-at(question, number)
The selected-at() function is unique to select_multiple questions. It is kind of an exotic function but I am including it for completeness. It returns the choice name selected at a specific index within the selection. This is best explained with pizza:
| type | name | label | calculation |
|---|
| select_multiple toppings | toppings | Select your top 3 favorite toppings | |
| hidden | most_favorite | | selected-at(${toppings},0) |
Above, the selected-at() function is first passed the output of our toppings question. That is, a comma separated list with 3 pizza toppings selected by the user. The second parameter indicates the zero-based index in that list for which we want to know the value. Since we are passing 0, the output will be the pizza topping that the user selected in the first place. If we pass an index 2, it will give us the last topping that the user selected, assuming that we have limited the number of favorite toppings to 3.
This function is particularly useful when you want to know the exact order in which the user selected choices within a select_multiple question. If the index you pass in the second parameter is not within the range of the user selection, the function returns an empty string. For example, selected-at(${toppings},4) will return an empty string if the user only selected 3 items.
All XLSForm functions described in this document are compatible with both the Survey123 field app as well as with web forms.