- Home
- :
- All Communities
- :
- Products
- :
- ArcGIS Web AppBuilder
- :
- ArcGIS Web AppBuilder Questions
- :
- Create Custom Report for Public Notification Widge...
- Subscribe to RSS Feed
- Mark Topic as New
- Mark Topic as Read
- Float this Topic for Current User
- Bookmark
- Subscribe
- Mute
- Printer Friendly Page
Create Custom Report for Public Notification Widget
- Mark as New
- Bookmark
- Subscribe
- Mute
- Subscribe to RSS Feed
- Permalink
- Mark as New
- Bookmark
- Subscribe
- Mute
- Subscribe to RSS Feed
- Permalink
@mthompson
I'm so sorry for the delay.
Unfortunately I don't have good news for you at this point. I need to think it through a bit and see whether I can come up with some workaround.
Here are the big issues that you will face right off the bat:
- Apparently the Public Notification widget does not use print service, nor does it allow you to change its configuration to use a print service.
- that could be an enhancement request for the widget
- Because of the above limitation, you need to do it in 2 steps
- use the Public Notification widget to select abutting properties, and
- then use the Print widget to generate a map and a report
- That leads to the next issue
- after selecting all parcels using the Public Notification widget,
- if you open the Print widget,
- all selection gets cleared out
- I found a workaround albeit very odd though
- once Print widget is open, apparently you can still click on a parcel and perform the selection.
- Since the Public Notification widget and the Print widget are two different widgets, and they are disjointed, clicking the Print widget is not going to solve your problem.
- The print service on your server side, needs to be a custom arcpy based service.
- because of #5, the request that comes to the print service, does not have all the information that you need for your report.
- basically they need to be done again in the arcpy code
- let me see whether I can come up with some solution very quick
- basically they need to be done again in the arcpy code
- because of #5, the request that comes to the print service, does not have all the information that you need for your report.
Finally, would you mind share your .rptx file - the report file that you generated in ArcGIS Pro here. I can use that as a starting point.
Thanks
- Mark as New
- Bookmark
- Subscribe
- Mute
- Subscribe to RSS Feed
- Permalink
Okay, I got something for you try. There are few hoops that we need to jump thru. That is because all the limitations that I mentioned above.
I will try my best to explain:
Here are two things that I have attached here:
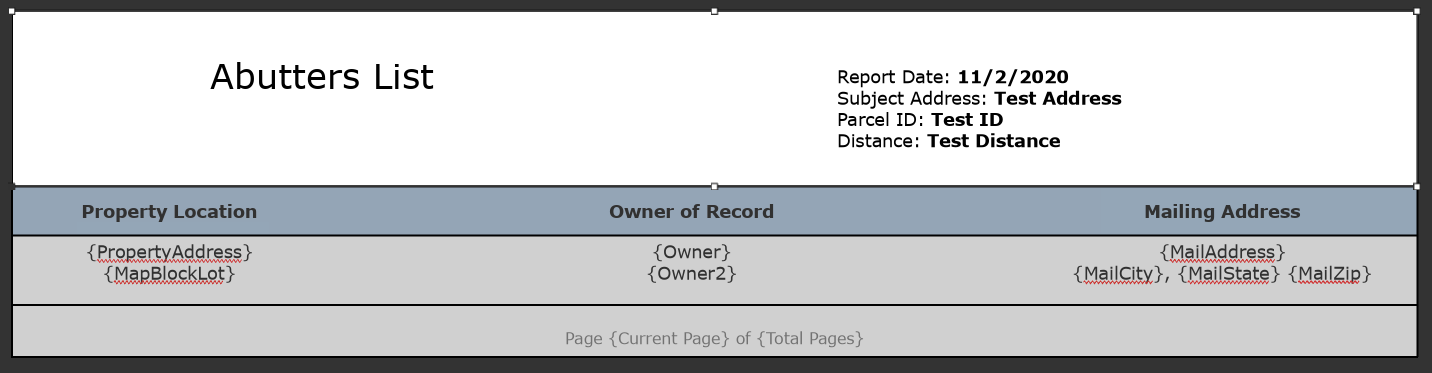
- a sample output pdf containing a map and abutters list that will looks like this
- a zip file containing:
- a gp tool with python files
- a .pagx file (ArcGIS Pro layout file)
- a .rptx file (ArcGIS Pro report file)
- both pagx and rptx files are named the same
- :warning:this is requirement.
- both pagx and rptx files are named the same

What changes I made in .pagx & .rptx files:
- In layout template file (.pagx)
- added a new text element
- that is outside of the page to make sure it does not show up in the output
- the report generation process use this later
- this is named "{Buffer Distance}" - note it is embedded within a setup of curly braces
- :warning: if you ever change its name, you need to update the python code
- you will see later how and where it shows up in this workflow
- that is outside of the page to make sure it does not show up in the output
- if you want to use your own layout, that is okay, just make sure (a) it has one text element like this one, and (b) the pagx file must be named same as the rptx file
- added a new text element
- In report file (.rptx)
- The highlighted text below are like keywords that the python code looks for and replace them with correct values during a job.
- :warning:if you ever wanted to replace them, you would need to update the python code too.
- The highlighted text below are like keywords that the python code looks for and replace them with correct values during a job.


What do you need to do:
- Download the zip file and unzip in a local folder on your machine
- Update the .rptx file
- open it in ArcGIS Pro
- remove the layer in the map that will be imported in the Pro session as part of importing the .rptx file
- add your parcel layer off your map or feature service
- update field list used in the report's details section
- Save it as a Report File -- over write the existing one
- Add the folder where you unzipped the zip file in Pro
- Open the Export Web Map script tool inside the Printing.tbx
- choose the folder that has both .pagx and rptx file for Layout Template Folder
- you will see the pagx file name showing up in Layout Template drop down
- Run it
- Open Get Layout Template Info tool
- choose the same folder that you selected in the step above
- Run it
- Publish/share both gp results as a gp service
see https://enterprise.arcgis.com/en/server/latest/create-web-apps/windows/tutorial-publish-additional-l... for more info - Once published, use the service in a web app builder Print widget
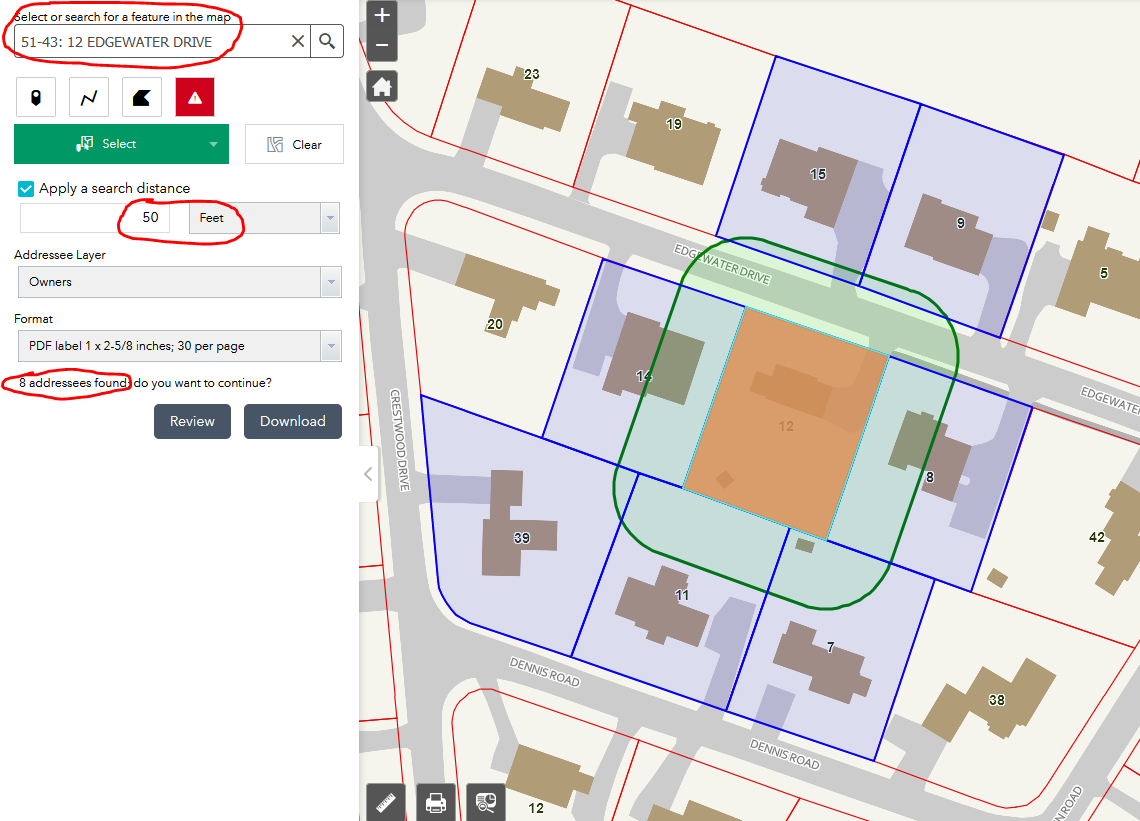
- Once your web app is all setup correctly with a Public Notification widget and a Print widget, here is what you need to do:
- click the Public Notification widget
- click a parcel and let the selection process finish
- click the Print widget - you will see all selection are cleared out
- if you click on the parcel again, you will see the Public Notification process will still work 🙂
- select AbuttersList Map and Report template
- click Advanced button
- you will see Buffer Distance text box
- enter the buffer distance you used in the Public Notification widget
this is the only thing you need to do manually. Unfortunately I didn't find any automated way to retrieve that info.
- enter the buffer distance you used in the Public Notification widget
- click Print button
- now wait.... hopefully it will work fine on your side and you will get a pdf containing a map and abutters list 🙂
- click the Public Notification widget


Please let me if you run into any issues.
- Mark as New
- Bookmark
- Subscribe
- Mute
- Subscribe to RSS Feed
- Permalink
Would this also work if you had related tables?
- Mark as New
- Bookmark
- Subscribe
- Mute
- Subscribe to RSS Feed
- Permalink
@LucasMNDNR
would you mind explain a bit more on your requirements?
- Mark as New
- Bookmark
- Subscribe
- Mute
- Subscribe to RSS Feed
- Permalink
I have worked through several of your examples now and i can get them to work with just hosted features, but when i try to add related tables to my report the published tool fails to print. I have hosted features with 4 related tables. Link to RPTX file
Just curious if you think related tables would be supported?
- Mark as New
- Bookmark
- Subscribe
- Mute
- Subscribe to RSS Feed
- Permalink
hi @LucasMNDNR,
Sorry for the delayed response. Unfortunately it is not supported out of the box, as you have already figured out. I'm working on to find any workarounds. I will update you once I figure something out (or not).
thanks for sharing the rptx file.
- Mark as New
- Bookmark
- Subscribe
- Mute
- Subscribe to RSS Feed
- Permalink
Any chance related tables have been incorporated yet?
- Mark as New
- Bookmark
- Subscribe
- Mute
- Subscribe to RSS Feed
- Permalink
I'm also interested in an answer about related tables. My widget is similar to the example, but I the fields from a related table do not display.