ArcGIS Maps SDKs Native Blog - Page 20

cancel
Showing results for 
Show  only  | Search instead for 
Did you mean: 

Latest Activity

(238 Posts)
by Anonymous User
Not applicable

You've been asking and we listened. The Runtime Example Apps team is thrilled to announce the release of Data Collection for iOS, the newest member of the ArcGIS Runtime Example Apps family. 

We built the app as the springboard for your organization's iOS data collection solution. The app is designed to consume your organization's web maps, out of the box. Written in Swift, this app demonstrates best practices for consuming the ArcGIS Runtime iOS SDK.

A user can view and edit data (including related records) in both connected and disconnected work environments and easily synchronize changes between an offline map and its corresponding web map.

To demonstrate the app, we curated a sample web map named Trees of Portland. Let's take a quick look at the app in action.

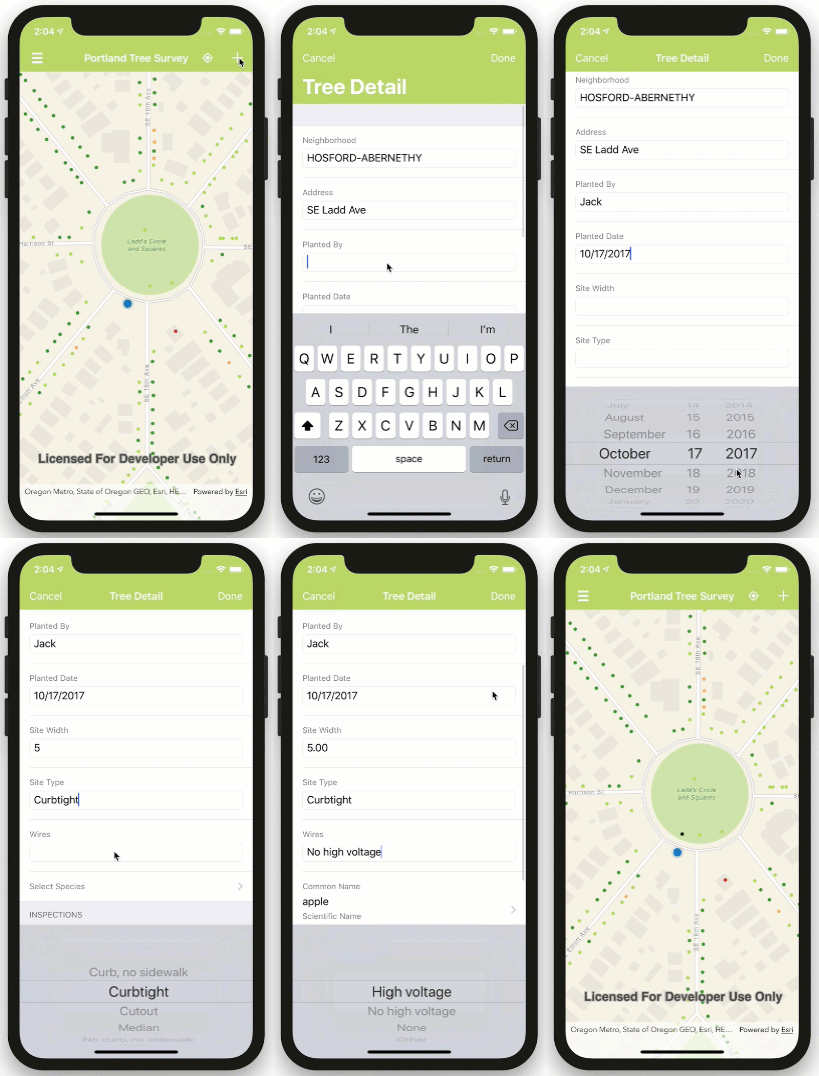
Collect Data

To add a new feature, tap the plus button located in the navigation bar at the top-right and pan the map until the pin is in the correct location. Tap the green check button and you're presented with a form to fill out the tree's attributes.

Add feature

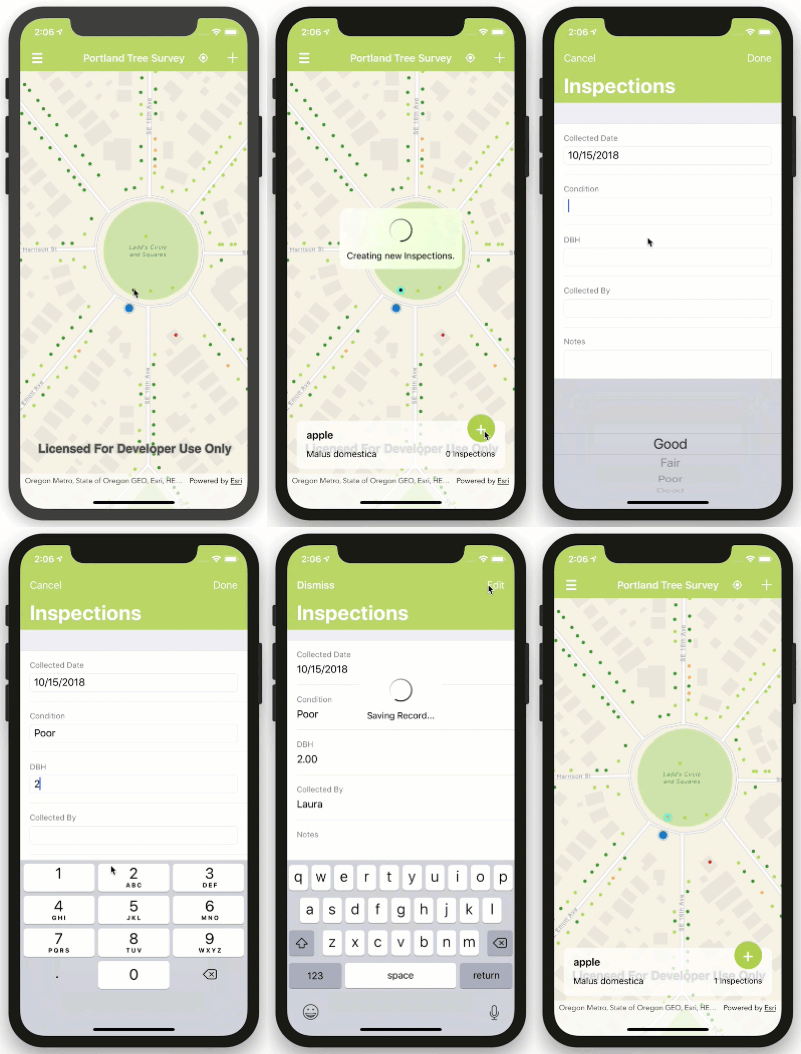
Complete the form and your new feature is added to the map. You can then add related records, if your web map is configured accordingly.

Add related record

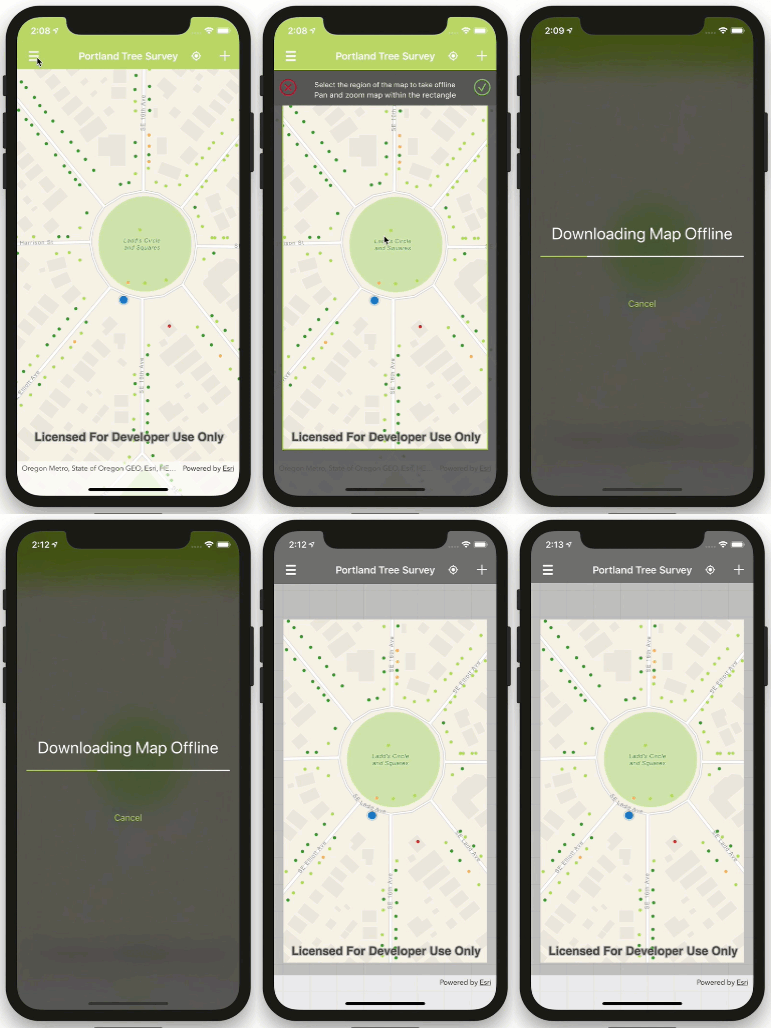
Take Map Offline

Select an extent of the map to take offline and the app kicks off a generate offline map task. Once downloaded a user can toggle between working offline and . Tap to synchronize changes bi-directionally.

Generate offline map

For the complete picture, have a look at the documentation. We encourage you to clone or fork the open source app which you can download from GitHub and build using the Runtime iOS SDK (v 100.3 or later). Contributions to the project are welcome as is general feedback. 

more
4 1 1,001
EricBader
Honored Contributor

We're pleased to introduce for the first time the ArcGIS Runtime SDK Sample Viewer! This application is a great tool for demonstrating the new and powerful capabilities in ArcGIS Runtime SDK 100.3 for Android. Install it for free today!

ArcGIS Runtime SDK Sample Viewer - Apps on Google Play 

You'll also find the .apk on arcgis.com, publicly available today.

Enjoy!

more
0 0 816
EricBader
Honored Contributor

Today, we are happy to announce the release of ArcGIS Runtime SDK 100.3 (Update 3)! Please have a look at all that is new across all of the SDKs, as well as the specific items in the release notes for Java

We are looking to release another update in Fall 2018, Update 4, that will focus on another small collection of enhancements, most notably support for reading KML. Notice that we are announcing the deprecation of Java 8 support after Update 3 (Update 3 is supported through July 2022), and will stop supporting it in Runtime in a near future release. We want your feedback on this plan. Java 8's commercial end of life is January 2019, and so our focus will soon be on supporting the next LTS version of Java, Java 11. If you'd like to comment, please drop us a line here on GeoNet.

Sincerely,

The ArcGIS Runtime SDK for Java Team

more
0 0 747
EricBader
Honored Contributor

It's Update 3 release time! On top of the many exciting new features that are supported across the Runtime SDKs (web scenes, 3D distance measurement analysis, identifying and selecting web scene features, new WMS capibilities, etc), the Qt team has been hard at work adding some new features unique to this SDK for 100.3.

Here are some of the highlights...


Runtime API

  • Transactional edit support. This allows the developer to commit or rollback a set of edits as one transaction. Other APIs introduced this at Update 2, and Qt now supports this feature with Update 3.
  • Pagination of query results. This allows developers to set a result offset in the QueryParameters so that results can easily be paginated. Other APIs introduced this at Update 2, and Qt now supports this feature with Update 3.
  • Time aware layers. The TimeAware interface was added and implemented by FeatureLayer, RasterLayer, ArcGISMapImageLayer, and WmsLayer. The new API allows you to set a time extent on the GeoView, and all layers participating will be filtered by the time extent. Other APIs introduced this at Update 2, and Qt now supports this feature with Update 3.
  • The Runtime Error object is now creatable. This means that you can create custom Errors throughout your application and utilize the same error handling logic throughout your application, as well as provide additional details for any known issues.
  • Support for OpenGL rendering on Windows. Qt has two different rendering engines for the Windows platform : OpenGL and DirectX via ANGLE. By default, Qt will try and render using OpenGL and if the proper drivers are not available, it will fall back to using ANGLE. Previous releases of ArcGIS Runtime only supported ANGLE. Update 3 fully supports both OpenGL and ANGLE so that you can fully utilize either rendering engine and Qt's fallback mechanism for when OpenGL cannot be utilized on a given system. For more information on this, please see Qt's documenation - https://wiki.qt.io/Qt_5_on_Windows_ANGLE_and_OpenGL
  • Ability to get size and ID properties as either a string or int type in QML. Previously, these properties always returned as strings due to a limitation of the QML integer type being a 32-bit integer as opposed to 64-bit. You can now request the property as an int and get an actual QML int back.


Toolkit API

  • TimeSlider toolkit component. Coinciding with our new TimeAware support is a ready-to-use Toolkit component that allows you easily filter data based on time. The TimeSlider also allows you to play and pause an animation of your spatiotemporal data.
  • CoordinateConversion toolkit component. An easy-to-use UI component is now available to help you convert a given coordinate to one or more different formats. For example, you could convert from Decimal Degrees to MGRS with this tool. This tool has a slick new UI making use of the modern Qt Quick Controls 2 module.


SDK improvements

  • Improved API documentation details added, as well as additional code snippets added throughout the documentation.
  • Dozens of new samples have been added, with an extra emphasis placed on providing more fundamental samples, such as Geometry and GeometryEngine samples, as opposed to only new features.

We are looking forward to hearing about your experience with this exciting release. Happy coding!

- The Qt SDK Development Team

more
0 1 1,217
Nicholas-Furness
Esri Regular Contributor

At their annual developer's conference a couple of weeks ago, Apple announced that they will be deprecating OpenGL and OpenGL ES with the releases of macOS 10.14 and iOS 12 later this year. What does this mean for the ArcGIS Runtime SDKs, which use these technologies, and for your apps built on top of them?

Short version: just carry on as normal. Work is already underway at Esri to adopt Metal well in advance of Apple removing OpenGL and OpenGL ES. As a Runtime developer, you'll simply download an updated version of the Runtime SDK.

For the longer version, read on.

Runtime Engineering

The ArcGIS Runtime engineering team here at Esri began planning for Metal support earlier this year as part of a broader review of Runtime GPU performance and capabilities. Once complete this work will dispense with the need for OpenGL on iOS and macOS.

That said, it's also important to understand what Apple mean by "deprecation"…

Apple Deprecations

When Apple deprecates a technology, it's a warning that the technology will be removed in "some future version of the OS" (see Apple's notices here for OpenGL and here for OpenGL ES). That means it will work until at least Fall 2019 when iOS 13 and macOS 10.15 will be released.

But in Apple's own words, they take it even further:

Deprecated APIs typically remain present and usable in the system for a reasonable time past the release in which they were deprecated.

This means it's quite possible we'll see OpenGL and OpenGL ES stick around through iOS 13 and macOS 10.15, taking us to Fall 2020. Although Apple could always opt for a more aggressive timeline, experience tells us that's unlikely.

Update from WWDC 2019: As predicted, Apple will continue to include OpenGL in iOS 13. We continue to make great progress on Metal implementation in Runtime and will keep you posted.

Cross Platform ArcGIS Runtimes

What about the ArcGIS Runtime SDKs that target iOS and macOS as part of a cross-platform strategy? Well, thanks to the encapsulation of functionality in the common Runtime core, all of the above considerations and timelines also apply to the ArcGIS Runtime SDK for .NET (Xamarin.iOS) and to the ArcGIS Runtime SDK for Qt.

Your Apps

Once Esri releases a version of the Runtime SDK that includes support for Metal, you should plan on updating the Runtime SDK used by your apps before Apple removes support for OpenGL.

more
1 0 1,966
EricBader
Honored Contributor

The Java Runtime Development Team is proud to announce the first release of the opensource Java Toolkit for ArcGIS Runtime SDK 100! This toolkit is a significant addition to the ArcGIS Runtime SDK for supporting developers in rapid application development.

The Java Toolkit initially contains 3 JavaFX components at this release to help simplify your app development:

  1. Compass - for showing the current viewpoint heading
  2. Overview Map - for use with a map view or scene view
  3. Scalebara ruler with units proportional to the map's current scale.

You'll notice that the toolkit release is not tied to the normal twice-a-year Runtime release cadence. We will release new additional tools to the GitHub repo and Bintray as the development team completes them, so users don't have to wait for the next major release to start programming with them.

To get started right away, go to GitHub - Esri/arcgis-runtime-toolkit-java: Runtime Java SE toolkit and follow the instructions for download and use. 

Please feel free to clone the repo, contribute and create issues. Your ideas and creativity make our products better all the time. Continue to share your feedback and questions here on GeoNet as well.

Happy coding!

Sincerely,

ArcGIS Runtime SDK for Java Team

more
1 4 2,387
MichaelBranscomb
Esri Frequent Contributor

Beta 3 of the Toolkit for ArcGIS Runtime SDK for .NET is now available on NuGet.org. The latest beta has been updated to reference the v100.2.1 release of ArcGIS Runtime SDK for .NET and includes the following new features and enhancements:

  • Compass for Xamarin.Android, Xamarin.iOS, and Xamarin.Forms (Android, iOS, and UWP)
  • Legend, LayerLegend, and SymbolDisplay for Xamarin.Android, Xamarin.iOS, and Xamarin.Forms (Android, iOS, and UWP)
  • ScaleLine for Xamarin.Android, Xamarin.iOS, and Xamarin.Forms (Android, iOS, and UWP)
  • TimeSlider for UWP, WPF, and Xamarin.iOS
  • MeasureToolbar for UWP, and WPF
  • Enhanced Toolbox support for Visual Studio
  • Sample apps for Xamarin.Android, Xamarin.iOS, and Xamarin.Forms (Android, iOS, and UWP)
  • API review
  • Numerous bug fixes!
  • Coming soon: TimeSlider for Xamarin.Android and Xamarin.Forms


See the repo readme for the full list of feature availability by API platform.

The previous beta was delivered as multiple platform-specific NuGet packages (at the time just UWP and WPF). The project has been reorganized to consolidate those into the Esri.ArcGISRuntime.Toolkit package for UWP, WPF, Xamarin.Android, and Xamarin.iOS development and a Esri.ArcGISRuntime.Toolkit.Xamarin.Forms package. Use the NuGet Package Manager UI, Console, or CLI tools to update your projects. You can always get the latest build of the Master branch anytime by adding a new NuGet Package Source referencing the CI server.

Please submit an issue if you find a bug!

Cheers

The ArcGIS Runtime .NET Team

more
4 0 804
EricBader
Honored Contributor

We've identified an issue with the templates provided with the SDK installation. You'd get these added to Qt Creator if you run the post installer and select the Qt Creator option. The issue is minor. However, with Qt Creator 4.6.0, Qt Creator will crash if you attempt to create any of the templates after the first page of the template wizard.

We've fixed the templates for the upcoming Summer release (100.3) of the ArcGIS Runtime SDK for Qt.

The issue is the same for all the templates. There's a section in the wizard.json file that references an invalid index.

If you change that value to 0 or 1 it will fix the issue. If you've already run the post installer then the templates will be installed on your system. For example, on Windows, the templates are found in this path:

C:\Users\<user>\AppData\Roaming\QtProject\qtcreator\templates\wizards\ArcGISRuntime*

On Linux:

/<user_home>/.config/QtProject/qtcreator/templates/wizards/ArcGISRuntime*

In those template directories, you can find the wizard.json file and make the updates. You'll need to restart Qt Creator after you've made the changes.

We apologize for any disruptions in your development this may have caused.

Sincerely,

The ArcGIS Runtime SDK for Qt Development Team

more
1 0 1,080
ThadTilton
Esri Contributor

The good newsFeatures and graphics in your ArcGIS Runtime SDK for .NET app can be labeled using a combination of attribute values, text strings, and values calculated with an expression. You can set font characteristics, determine how labels are positioned and prioritized, and how conflicts between overlapping labels are automatically and dynamically resolved. By creating one or more label classes, you can define distinct labels for groups of features.

The bad news: As of the 100.2.1 release, there's no API exposed for this. To implement labeling for a feature layer, graphics overlay, or map image sub-layer, you need to craft the appropriate JSON definition (text) to define your label classes (as described here). Bummer.

But don't worry, a simple JSON serializable class is all it takes to simplify your labeling code. I'll walk you through the basic process in the steps below. If that's still too much work for you, feel free to simply download the attached code and try it out. The labeling class in the project (LabelClassInfo.cs) can be brought into any ArcGIS Runtime for .NET project and used to create labels for your layers.

  1. Start Visual Studio and create a new ArcGIS Runtime SDK for .NET app. 
  2. Add a new class to the project. Let's name it LabelClassInfo.cs. Add the following using statements at the top of the class.
    using Esri.ArcGISRuntime.Geometry;
    using Esri.ArcGISRuntime.Symbology;
    using System;
    using System.IO;
    using System.Runtime.Serialization;
    using System.Runtime.Serialization.Json;‍‍‍‍‍‍‍‍‍‍‍‍‍‍‍‍‍‍

  3. Decorate the class with the DataContract attribute. This indicates that the class will be serializable. 
        [DataContract]
        public class LabelClassInfo
        {‍‍‍‍‍‍‍‍‍‍‍‍‍‍‍

  4. Create properties for everything expected in the JSON definition of the label class. This information is defined under labelingInfo in the Web map specification. The specification defines an "allowOverrun" value, for example. This could be implemented with the following simple bool property. Note that the name of the property in the class does not need to match the name in the specification.
            public bool AllowOverrun { get; set; }‍‍‍‍‍
    Based on the specification, here are the properties (and corresponding data type) needed for the label class: allowOverrun (bool), deconflictionStrategy (string), labelExpression (string), labelExpressionInfo (object), labelPlacement (string), minScale (int), maxScale (int), name (string), priority (int), removeDuplicates (string), removeDuplicatesDistance (int), repeatLabel (bool), repeatLabelDistance (int), stackLabel (bool), stackAlignment (string), symbol (TextSymbol), useCodedValues (bool), where (string).
  5. OK, the list above looks pretty straightforward, except for the two properties that don't return primitive data types. Go ahead and create properties for everything except labelExpressionInfo and symbol (we'll circle back to those). 
  6. After you've defined the properties, in order to make them serializable you'll need to decorate them with the DataMember attribute. The string you supply for "Name" will be used in the output JSON and must match the name used in the Web map specification. Add the appropriate DataMember attribute to all properties.
            [DataMember(Name = "deconflictionStrategy")]
            public LabelPosition LabelPosition { get; set; }‍‍‍‍‍‍

  7. The labelExpressionInfo property, returns object. What kind of object do we need here? In the specification, the JSON describes a class with a single property (not counting the deprecated "value" property). You'll therefore need to create a new private class (nested under your main class) with a single property that holds a (string) expression. This class will also be serializable, so you need the DataContract and DataMember attributes. 
            [DataContract]
            private class ExpressionInfo
            {
                [DataMember(Name = "expression")]
                public string Expression { get; set; }
    
                public ExpressionInfo(string expression)
                {
                    Expression = expression;
                }
            }‍‍‍‍‍‍‍‍‍‍‍‍‍‍‍‍‍‍‍‍‍‍‍‍‍‍‍‍‍‍‍‍‍‍‍‍‍‍‍‍‍‍‍‍‍‍‍‍‍‍‍‍‍

  8. The labelExpressionInfo property should be based on the new ExpressionInfo type. To simplify the API, you might want to expose just the expression property (ArcadeExpression in the example below) and build the ExpressionInfo object that contains it internally. 
            [DataMember(Name ="labelExpressionInfo")]
            private ExpressionInfo _labelExpressionInfo = new ExpressionInfo("");
    
            public string ArcadeExpression
            {
                get { return _labelExpressionInfo.Expression; }
                set { _labelExpressionInfo = new ExpressionInfo(value); }
            }‍‍‍‍‍‍‍‍‍‍‍‍‍‍‍‍‍‍‍‍‍‍‍‍‍‍‍‍‍‍‍

  9. What about the symbol property that returns TextSymbol? You can handle this is much the same way: expose a public Symbol property of type TextSymbol, then use an internal property to get its JSON representation (yes, Esri.ArcGISRuntime.Symbology.Symbol is serializable!).
            public TextSymbol Symbol { get; set; }
    
            [DataMember(Name = "symbol")]
            private string SymbolString
            {
                get { return this.Symbol.ToJson(); }
                set { this.Symbol = (TextSymbol)TextSymbol.FromJson(value); }
            }‍‍‍‍‍‍‍‍‍‍‍‍‍‍‍‍‍‍‍‍‍‍‍‍‍‍‍‍‍‍‍

  10. Finally, create a method on LabelClassInfo to return the JSON representation of the object.
            public string GetJson()
            {
                // Create a JSON serializer for the label class.
                DataContractJsonSerializer jsonSerializer = new DataContractJsonSerializer(typeof(LabelClassInfo));
    
                // Write the object to a memory stream.
                MemoryStream stream = new MemoryStream();
                jsonSerializer.WriteObject(stream, this);
    
                // Read the stream to a string.
                stream.Position = 0;
                StreamReader reader = new StreamReader(stream);
                string json = reader.ReadToEnd();
    
                // HACK: clean up the json a bit.
                json = json.Replace("\"{", "{").Replace("}\"", "}").Replace("\\", "\"").Replace("\"\"", "\"");
    
                // Return the serialized string.
                return json;
            }‍‍‍‍‍‍‍‍‍‍‍‍‍‍‍‍‍‍‍‍‍‍‍‍‍‍‍‍‍‍‍‍‍‍‍‍‍‍‍‍‍‍‍‍‍‍‍‍‍‍‍‍‍‍‍‍‍‍‍‍‍‍‍‍‍‍‍‍‍‍‍‍‍‍‍‍‍‍‍‍‍‍‍‍‍‍‍‍‍‍‍‍‍‍‍‍‍‍‍‍‍‍‍‍‍‍

  11. You should now be able to use the new LabelClassInfo class to write code like the following to apply labels to a feature layer!
                TextSymbol textSymbol = new TextSymbol
                {
                    FontFamily = "Arial",
                    FontWeight = weight,
                    Size = (int)TextSizeComboBox.SelectedValue,
                    HorizontalAlignment = Esri.ArcGISRuntime.Symbology.HorizontalAlignment.Left,
                    VerticalAlignment = Esri.ArcGISRuntime.Symbology.VerticalAlignment.Bottom,
                    Color = (Color)ColorComboBox.SelectedValue
                };
    
                // Create a new LabelInfo object and set the relevant properties (including the text symbol).
                LabelClassInfo labelInfo = new LabelClassInfo()
                {
                    LabelPosition = "static",
                    ArcadeExpression = "return $feature['" + LabelFieldComboBox.SelectedItem + "'];",
                    MinScale = 0,
                    MaxScale = 0,
                    Priority = 30,
                    RemoveDuplicateLabels = "featureType",
                    StackLabel = true,
                    Symbol = textSymbol
                };
    
                // Get the raw JSON from the label info object.
                labelJson = labelInfo.GetJson();
    
                // Create a new label definition from the JSON string.
                LabelDefinition labelDef = LabelDefinition.FromJson(labelJson);
    
                // Clear existing label definitions.
                _parcelsLayer.LabelDefinitions.Clear();
    
                // Add the new label definition.
                _parcelsLayer.LabelDefinitions.Add(labelDef);‍‍‍‍‍‍‍‍‍‍‍‍‍‍‍‍‍‍‍‍‍‍‍‍‍‍‍‍‍‍‍‍‍‍‍‍‍‍‍‍‍‍‍‍‍‍‍‍‍‍‍‍‍‍‍‍‍‍‍‍‍‍‍‍‍‍‍‍‍‍‍‍‍‍‍‍‍‍‍‍‍‍‍‍‍‍‍‍‍‍‍‍‍‍‍‍‍‍‍‍‍‍

OK, so it might not be the easiest thing to code, but once you have it you can reuse this class anytime you need to add labels for a layer.

Apologies if the steps above were too vague or if you got stuck because I left something out! I've attached a project with the LabelClassInfo class and a WPF app for testing. The attached example also includes some enums for defining label position, placement, and handling of stacking and duplicates.

Update (2018 March 13):

  • I've attached a much cleaner version of the LabelClassInfo class ("LabelClassInfo2.cs") that uses Newtonsoft.Json (thanks to Matvei Stefarov on the ArcGIS Runtime SDK for .NET team).
  • Including a link to a a utility that helps create your serializable class from JSON: Instantly parse JSON in any language | quicktype 

more
4 2 3,981
ThadTilton
Esri Contributor

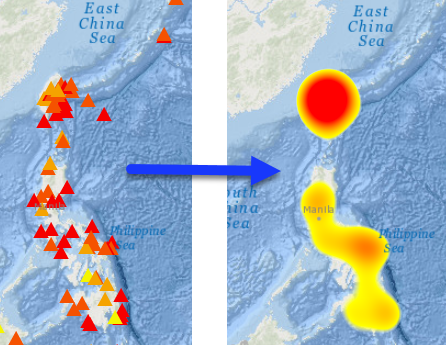
If you've ever had to show the density of point features on a map, you may already be familiar with the concept of a heat map, which allows you to generalize the display of points according to their density. A heat map provides an excellent tool for discovering patterns in your data. In addition to looking at density of point location, you can also provide a field in your dataset with which to weight the density. This allows you to look at the density of things like sales (dollars, for example) instead of just the density of customers over an area.

Heat maps are displayed with a color ramp that usually shows dense areas with a darker color (red, for example) and sparse areas with a light color (such as yellow). You may have used a heat map renderer to display your point data in the ArcGIS Online map viewer or ArcGIS Pro. The heat map below shows the density of earthquakes weighted with a field that contains the magnitude.

Unique value points to heat map renderer

"Sounds great". You might be saying. "I'm excited to try it in my ArcGIS Runtime for .NET app"!
"Um, yeah. About that." I would say, sheepishly looking at my shoes.

While there is support in ArcGIS Runtime for reading things like a heat map renderer from a web map, there's no API exposed (as of v100.2.1) that allows you to construct one and apply it to a point layer without crafting the raw JSON definition. Fortunately, with a little effort, there's a way to make it much easier to work with.

In a previous blog, I described how to create a serializable class to define labeling properties to apply to a layer. I'll describe the same technique here to define a heat map renderer class that can be serialized to JSON and applied to your point layer. If you don't really care about the details and just want to start using it, you can download the completed class and sample project and give it a try.

  1. Start Visual Studio and create a new ArcGIS Runtime SDK for .NET app. 
  2. Use the NuGet Package Manager to add the Newtonsoft.Json package to the project.
  3. Add a new class to the project. Let's name it HeatMapRenderer.cs. Add the following using statements at the top of the class.
    using Newtonsoft.Json;
    using System;
    using System.Collections.Generic;
    using System.Windows.Media;‍‍‍‍‍‍‍‍‍‍‍‍‍‍‍‍‍‍‍‍‍‍‍‍‍‍‍‍‍‍‍‍‍‍‍‍‍‍‍‍‍‍‍‍‍‍‍‍‍‍‍‍‍‍‍‍
  4. Create properties for everything expected in the JSON definition of the heat map renderer class. This information is defined under heatmapRenderer in the Web map specification. The specification defines a "blurRadius" value, for example. This could be implemented with the following simple long property. Note that the name of the property in the class does not need to match the name in the specification. 
    public long BlurRadius { get; set; }‍‍‍‍‍‍‍‍‍‍‍‍‍
    Based on the specification, here are the properties (and corresponding data type) needed for the heat map renderer class:
    • blurRadius (long)
    • colorStops (list of objects)
    • field (string)
    • maxPixelIntensity (double)
    • minPixelIntensity (double)
    • type (string).
  5. OK, the list above looks pretty straightforward, except for the property that returns a list of objects. Go ahead and create properties for everything except colorStops (we'll circle back to that one). 
  6. The Type property needs to be set with "heatmap" as the default, as shown here.
    public string Type { get; set; } = "heatmap";‍‍‍‍‍‍‍‍‍‍‍‍‍
  7. After you've defined the properties, in order to make them serializable you'll need to decorate them with the  JsonProperty attribute. The string you supply will be used in the output JSON and must match the name used in the Web map specification. Add the appropriate JsonProperty attribute to all properties, as shown below for the BlurRadius property.
    [JsonProperty("blurRadius")]
    public long BlurRadius { get; set; }‍‍‍‍‍‍‍‍‍‍‍‍‍‍‍‍‍‍‍‍‍‍‍‍
  8. The colorStops value is defined with a list of objects. What kind of object do we need here? In the specification, the JSON describes a colorStop class with two properties: color and ratio. You'll therefore need to create a new class with those properties. Let's call the class ColorStop.
    public partial class ColorStop
    {
        [JsonProperty("ratio")]
        public double Ratio { get; set; }
    
        [JsonProperty("color")]
        public int[] Color { get; set; }
    }‍‍‍‍‍‍‍‍‍‍‍‍‍‍‍‍‍‍‍‍‍‍‍‍‍‍‍‍‍‍‍‍‍‍‍‍‍‍‍‍‍‍‍‍‍‍‍‍‍‍‍‍‍‍‍‍‍‍‍‍‍‍‍‍‍‍‍‍‍‍‍‍‍‍‍‍‍‍‍‍‍‍‍‍‍‍‍‍
  9. The ratio property is a double. Color is a four value array (R, G, B, A). The constructor for ColorStop will accept a ratio (double) and a Color. The color values are used to set the array.
    public ColorStop(double ratio, Color color)
    {
        Ratio = ratio;
        Color = new int[] { color.R, color.G, color.B, color.A };
    }‍‍‍‍‍‍‍‍‍‍‍‍‍‍‍‍‍‍‍‍‍‍‍‍‍‍‍‍‍‍‍‍‍‍‍‍‍‍‍‍‍‍‍‍‍‍‍‍‍‍
  10. Return to the HeatMapRenderer class and add a property to hold the color stops. Initialize the property with an empty list of color stops.
    [JsonProperty("colorStops")]
    public List<ColorStop> ColorStops { get; set; } = new List<ColorStop>();‍‍‍‍‍‍‍‍‍‍‍‍‍‍‍‍
  11. Add some helper methods to add or clear color stops in the collection.
    public void AddColorStop(double ratio, Color color)
    {
        if (ratio > 1.0 || ratio < 0.0) { throw new Exception("Argument 'ratio' must be a value between 0 and 1."); };
    
        ColorStop stop = new ColorStop(ratio, color);
        ColorStops.Add(stop);
    }
    
    public void ClearColorStops()
    {
        ColorStops.Clear();
    }‍‍‍‍‍‍‍‍‍‍‍‍‍‍‍‍‍‍‍‍‍‍‍‍‍‍‍‍‍‍‍‍‍‍‍‍‍‍‍‍‍‍‍‍‍‍‍‍‍‍‍‍‍‍‍‍‍‍‍‍‍‍‍‍‍‍‍‍‍‍‍‍‍‍‍‍‍‍‍‍‍‍‍‍
  12. Finally, add a ToJson method that returns the JSON representation of the class.
    public string ToJson()
    {
        return JsonConvert.SerializeObject(this);
    }‍‍‍‍‍‍‍‍‍‍‍‍‍‍‍‍‍‍‍‍‍‍‍‍‍‍‍‍‍‍‍‍‍‍‍‍
  13. You should now be able to use the new HeatMapRenderer class to write code like the following to apply a heat map renderer to a point feature layer!
    // Create a new HeatMapRenderer with info provided by the user.
    HeatMapRenderer heatMapRendererInfo = new HeatMapRenderer
    {
        BlurRadius = blurRadius,
        MinPixelIntensity = minIntensity,
        MaxPixelIntensity = maxIntensity
    };
    
    // Use a selected field to weight the point density if the user chooses to do so.
    if (UseFieldCheckBox.IsChecked == true)
    {
        heatMapRendererInfo.Field = (FieldComboBox.SelectedValue as Field).Name;
    }  
    
    // Add the chosen color stops (plus transparent for empty areas).
    heatMapRendererInfo.AddColorStop(0.0, Colors.Transparent);
    heatMapRendererInfo.AddColorStop(0.10, (Color)StartColorComboBox.SelectedValue);
    heatMapRendererInfo.AddColorStop(1.0, (Color)EndColorComboBox.SelectedValue);
    
    // Get the JSON representation of the renderer class.
    string heatMapJson = heatMapRendererInfo.ToJson();
    
    // Use the static Renderer.FromJson method to create a new renderer from the JSON string.
    var heatMapRenderer = Renderer.FromJson(heatMapJson);
    
    // Apply the renderer to a point layer in the map.
    _quakesLayer.Renderer = heatMapRenderer;‍‍‍‍‍‍‍‍‍‍‍‍‍‍‍‍‍‍‍‍‍‍‍‍‍‍‍‍‍‍‍‍‍‍‍‍‍‍‍‍‍‍‍‍‍‍‍‍‍‍‍‍‍‍‍‍‍‍‍‍‍‍‍‍‍‍‍‍‍‍‍‍‍‍‍‍‍‍‍‍‍‍‍‍‍‍‍‍‍‍‍‍‍‍‍‍‍‍‍‍‍‍‍‍‍‍‍‍‍‍‍‍‍‍‍‍‍‍‍‍‍‍‍‍‍‍‍‍‍‍‍‍‍‍‍‍‍‍‍‍‍‍‍‍‍‍‍‍‍‍‍‍‍‍‍‍‍‍‍‍‍‍

I'd agree with you if you think this is a lot of code to write to implement a heat map renderer. But remember, this class can be used in all your ArcGIS Runtime for .NET apps when you want to apply heat map rendering.

Apologies if you were unable to successfully follow the steps above. Fortunately, the attached project contains the HeatMapRenderer class, as well as a WPF app for testing the heat map renderer.

more
3 0 3,370
123 Subscribers