How to Administer Students on My Esri
- Subscribe to RSS Feed
- Mark as New
- Mark as Read
- Bookmark
- Subscribe
- Printer Friendly Page
- Report Inappropriate Content
Your school offers classes that use Esri training courses as part of its curriculum.
As a professor, one of your responsibilities is to set up your students’ accounts so that they have access to the Esri Academy, Esri’s training site. In order to take training, your students need to be connected to your organization in My Esri. This connection lets the Esri Academy know which organization your students belong to.
Here’s how you accomplish this.
Become a Training Sub Admin
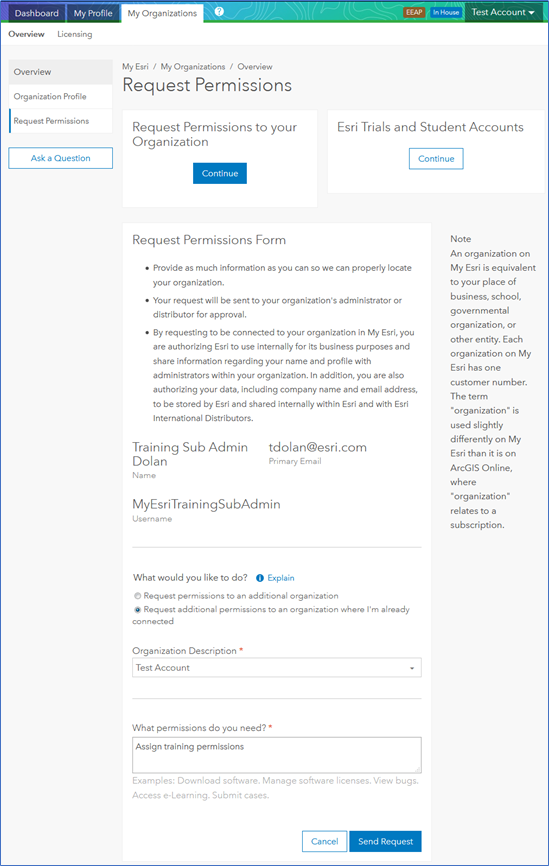
Request permission from your organization’s My Esri administrator using the form on My Organizations > Overview > Request Permissions. You only need to do this if you do not have full administration permission to My Esri already (that is, you do not have Assign permissions Administrator permission).
Ask them to grant you the Assign training permissions permission, which will allow you to manage students. We call users with this permission Training Sub Admins.
Why do you need permissions? On My Esri, permissions drive how you and your students interact with the site. Permissions are what connect you to your organization.
Your organization’s My Esri administrator will be notified of your request and grant you permission. You will receive an email with a token with instructions on how to use the token to connect to My Esri. After you follow the instructions, you’ll be connected to your organization, and you can go on to the next step.
Invite Your Students
Now that you are the Training Sub Admin for your organization on My Esri, use My Organizations > Users > Invite Users to send invitations to your students.
Enter the email addresses of each student you want to invite.
You can enter each address one at a time, or cut-and-paste a list into the input field. Or you can upload an comma separate value (CSV) or Microsoft Excel (XLXS) file using Upload Users. For best results, your file should only have one column in it, with an email address on each line or row.
You may invite up to 1000 students at a time.
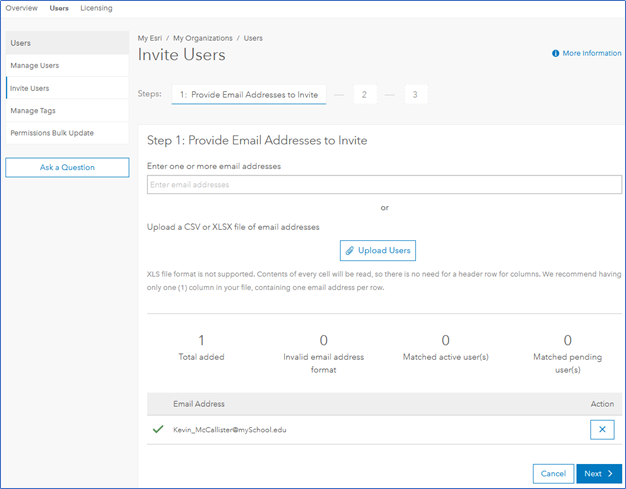
If any of the email addresses aren’t formatted properly, they will be flagged as invalid. You can click the X to remove each one one-at-a-time, or you can click Remove invalid email addresses to remove all invalid addresses at one time. Note that Next is disabled until all the addresses are valid.

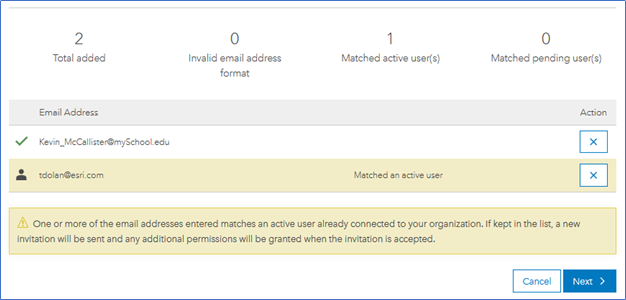
If you’ve entered an email address of a user who is already connected to your organization, My Esri will let you know. It’s OK to leave these matched users on the list; they will be granted the e-Learning permission if they didn’t have it already.
You can both add addresses from a file and input them manually until you are satisfied with the list.
Once all of the email addresses are valid, click Next.
Step 2 is for specifying which permissions to grant. However, since you are a Training Sub Admin, you can only set one permission to your students: Access e-Learning. Since this is the only permission you can grant, the other permissions aren’t shown.
Most students only need to be connected to the school’s account for the duration of the class. If you want to limit the time frame in which your students can take classes for your school, set a time limit.
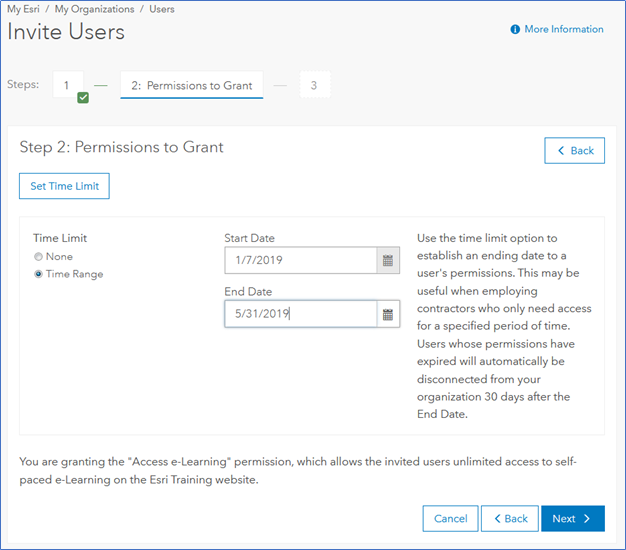
As it states on this step, users whose permissions have expired will automatically be disconnected from your organization 30 days after the End Date. This relieves you from having to disconnect possibly hundreds of students at the end of each term. Should your class be extended, or should your students continue on in another class, you can update all of their time limits at once. More on that below.
Once you have the time limit set, it’s on to Step 3.
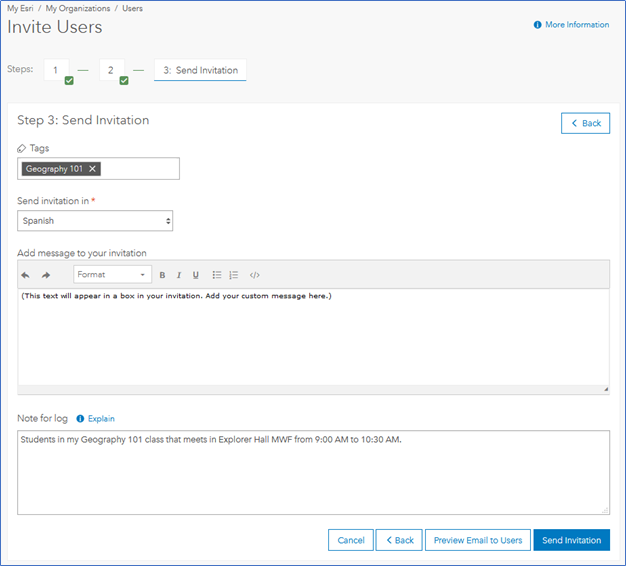
Here’s your chance to add a Tag. These tags can help you keep your student lists organized. Later on, when you view your list of students on My Organizations / Users / Manage Users, you’ll be able to distinguish one set of students from another. However, this is optional.
If your students use a different language than the one you are using in My Esri, you can select any of the supported languages for your invitation.
You can include a custom message in your invitation. This message will appear in a separate box in the invitation. This is optional.
You can add a note that will appear in the My Organizations / Users / Permissions Log for full admins to see. This is also optional.
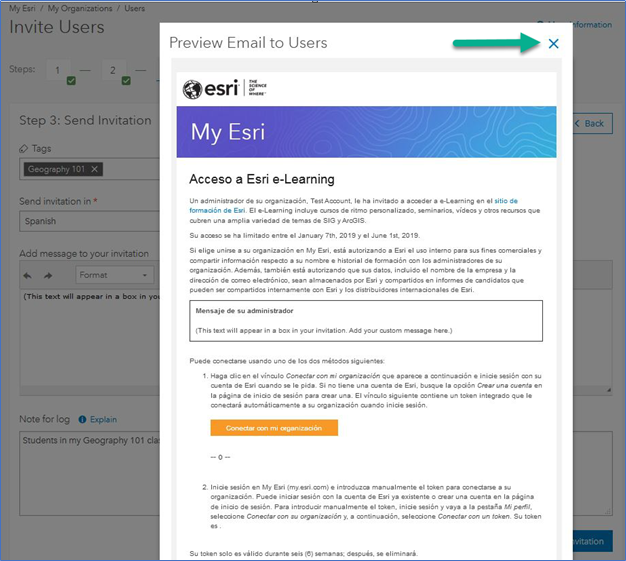
Use Preview Email to Users to see the full text of the invitation email, along with any custom message your provide, in the language you selected. When you’re doing looking over the Preview, click the X in the upper corner of the popup preview window.
You can go back to a previous step at any time to make changes if you missed anything. Either click Back or click the step number along the top of the form.
Once you are satisfied with all the parameters, send the invitations.
About Tokens and Esri Accounts
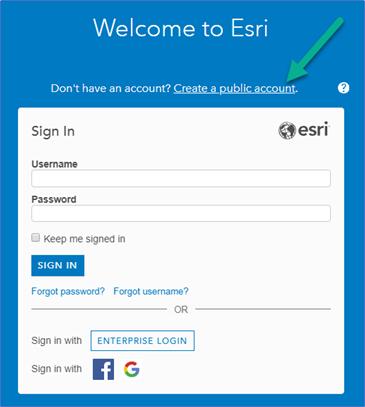
To take training on the Esri Academy, each student must have a public Esri Account.
The username and password for that account is what they’ll use to accept the token in the invitation email. They should create this public account in advance by visiting Esri’s website at esri.com and clicking Sign In in the upper corner.
Later, your students may use this same Sign In link to sign in to the Esri Academy to take their course.

Each invitation email includes a unique token, which My Esri uses to identify each student. If students share computers, they must ensure they are signed in with the account they want to assign to the token.
Each token may be used only once; they cannot be shared.
The email explains the way for them to manually enter the token after they sign in.
Tokens must be accepted within 6 weeks of issuance; unused tokens that are older than 6 weeks are deleted. The email that your students receive will tell them this, but you may need to remind them not to wait until the last week of class to accept their tokens.
The semester has ended. Now what?
When your semester or quarter or class has ended, and the students no longer need access to your organization, you have several options to manage their access.
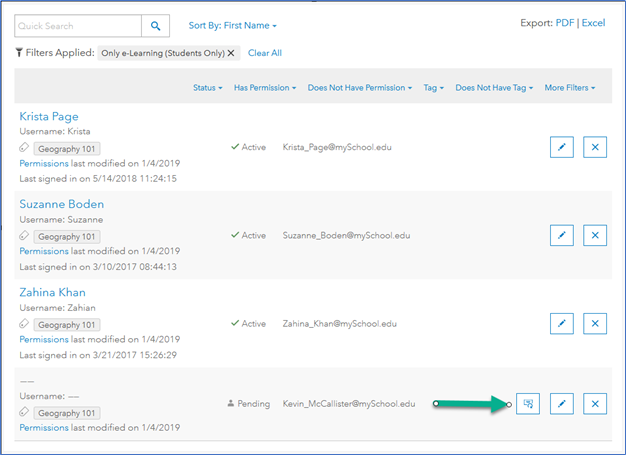
From My Organizations > Users > Manage Users, you’ll see a prefiltered list of your students. You can further filter the list by filtering on a tag, or on whether the permission is active or pending, for example.
From here, you can edit each student individually.
An active account is one where the student has accepted the token; a pending invitation means that the student hasn’t accepted the token yet. If their token is still pending, you can use Resend Invitation.
Remember that the student’s connection to your organization will be removed 30 days after the last day in the time limit you set.
A connection is removed when all of the permissions to an organization are removed. Note that this does not delete their public Esri Account – the Account remains. The student can use that account for other purposes – it belongs to them.
If you want all those students removed on that day, no further action is needed.
If only a few students will carry over into a new class, use Edit Permissions (click the pencil icon) to extend their time limits. Then their connection won’t be disconnected until 30 days after the new end date.
If a student drops your class, you can disconnect them by clicking the X at any time.
To update all the students at one time, use Permission Bulk Update. This tool is found on the same Users sub tab as Manage Users and Invite Users.
The list of users you can edit are limited to those with the e-Learning permission. Use the wizard-based form to perform any of these actions on your student’s permissions.
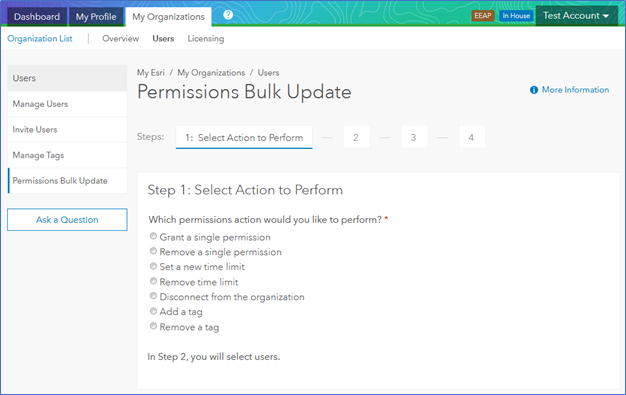
For example, say the class was extended, and you want to add a week to the time limit for all of your students in your Geography 101 class.
Click Set a new time limit. You’ll be prompted for the new time range. Supply that, then go on to the next step.
Since you tagged all these users, use the Tag Filter to narrow the list. Check the boxes next to the students you want to update. Note that you do not have to select all the students – you can only do a few if you want. But also note that if you click the checkbox in the filter bar to select all the students, you are only selecting all the students on the current page; navigate to each page to ensure you’ve selected all the students.
Step 3 of this wizard is very similar to Step 3 of Invite Users – you can specify a note for the log, send a custom message to the user. Here you can also decide if you want to send the students an email at all. If you select No for Send email to user, no emails will be sent.
Review the choices you made on Step 4, the Summary page. Use the steps at the top of the form, or use Back to go back and change anything if necessary. Then click Set Time Limit to make the specified changes.
Troubleshooting and Tips
Your organization does not have an admin. If your organization lacks a full My Esri admin, your permission request is sent to your organization’s Esri Customer Service Representative (CSR) if you belong to an organization in the United States, or to your distributor if you belong to an organization outside the US. They will process your request.
What permissions do I have? You can see all the permissions you’ve already been granted from My Profile > Profile Overview. In the Connected Organizations section, you’ll see a card for each organization you are connected to. Expand the permissions within each card (or Expand/Collapse All) to see what permissions you have.
Your students sign in on the Esri Academy, but get an error about maintenance. Contact your CSR or distributor to ensure your organization’s maintenance is up-to-date. You can use the Ask a Question form on My Esri to contact them.
A student’s token has expired. If a student waits too long to accept the token they were sent, you’ll need to send them a new token. Invite them again.
I’m a full admin – can I do this, too? Absolutely! All of the instructions in this document work for both Training Sub Admins and full admins (those with Assign Permissions Administrator permission). The only difference is that you will see more tools and permissions along the way.
I use more than My Esri to manage my students. Where I can get more info about this? These resources may help you understand more about managing an enterprise-wide solution, and explain how you manage students from ArcGIS Online.
- Managing Enterprisewide Access to Esri E-Learning
- Education edition: How do students access ArcGIS Online with EVA code?
- Get Started with e-Learning
What do you mean by “organization”? An organization on My Esri is equivalent to your place of business, school, governmental organization, or other entity. Each organization on My Esri has one customer number. The term "organization" is used slightly differently on My Esri than it is on ArcGIS Online, where "organization" relates to a subscription.
[UPDATED 4/25/2019 to change the permission formerly known as "Assign Permissions" to "Administrator".]
- Tags:
- admin
- administrator
- assign permissions
- certification
- class
- e-learning
- edit permissions
- esri academy
- esri account
- esri accounts
- invite users
- inviting users
- manage users
- my esri
- my esri administrators
- organization
- permissions
- permissions bulk update
- students
- time limit
- token
- tokens
- training
- training sub admin
- upload users
You must be a registered user to add a comment. If you've already registered, sign in. Otherwise, register and sign in.
-
Developer Subscriptions
2 -
Downloads
3 -
Licensing
25 -
Manage Users
10 -
My Esri Accounts
10 -
My Esri Release Notes
61 -
Profile
10 -
Reports
1 -
Support
7 -
Training
2 -
Transactions
3