- Home
- :
- All Communities
- :
- Products
- :
- Geoprocessing
- :
- Geoprocessing Questions
- :
- Re: Create fishnet with row iterator - why does ex...
- Subscribe to RSS Feed
- Mark Topic as New
- Mark Topic as Read
- Float this Topic for Current User
- Bookmark
- Subscribe
- Mute
- Printer Friendly Page
Create fishnet with row iterator - why does extent not update?
- Mark as New
- Bookmark
- Subscribe
- Mute
- Subscribe to RSS Feed
- Permalink
Let's say I am dealing with a shapefile that contiains only one square. There is no issue here. I set the extent of the fishnet to match the extent of the file that contains one square only. I specify the numbers of rows and columns and cell size. This is easy.
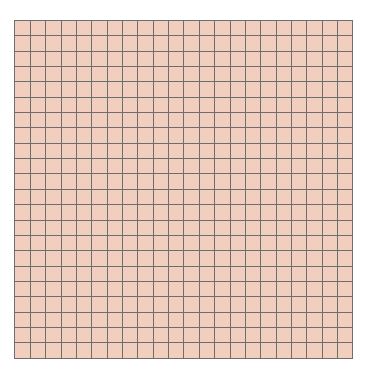
Now let's say i want to do the same thing but for a file that contains 68 square. Each square corresponds to a row in the attribute table. This is what I mean, one shapefile in the TOC and 68 squares:
[ATTACH=CONFIG]32498[/ATTACH]
The attribute table contains 68 rows where each row corresponds to a square. All quite normal
When I input the 68 row file to the "itereate row selection tool" and connect that to the create fishnet tool, like so (below) I get a pop-up box that wants me to choose between "template extent," "environments," or "precondition." I choose template extent thinking that this means: "treat each feature represented by each of the 68 rows as having unique extents to be used in creating 68 different fishnets."
[ATTACH=CONFIG]32500[/ATTACH]
When I double click on the fishnet box, I see this:
[ATTACH=CONFIG]32501[/ATTACH]
This is where things start to get a little fishy (pardon the pun!), because I would like the have the extent of each fishnet update to reflect each feature in each of the rows. Nevertheless, there are coordinates already entered for the extent of the fishnet. As I have found out, these coordinates correspond to the extent of the data frame - the extent when all 68 households are visible. For example when I hit ok and run the model:
I see this:
[ATTACH=CONFIG]32503[/ATTACH]
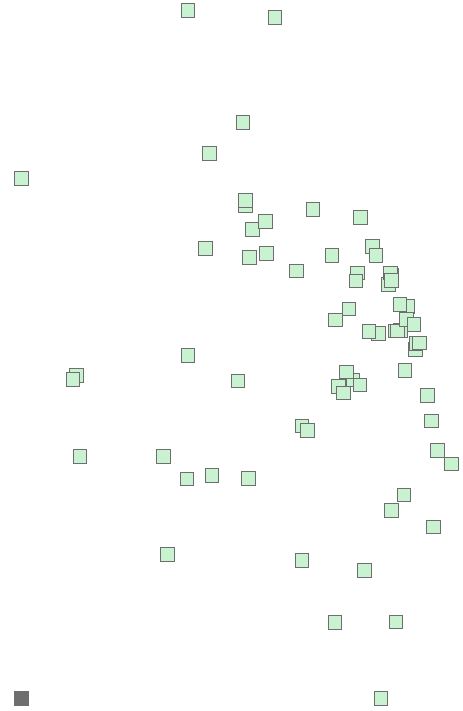
There was a fishnet created in the lower left hand corner, it has 22 rows and 22 columns, each 100 x 100 meters, just as i would like. Unfortunately, this location does not correspond to any of the squares in the file. And there is only one fishnet, not 68. This is what it looks like when I zoom to the extent of the fishnet that was created. This fishnet looks alright, the problem is I need 68 of them to match the extents of the 68 squares in the top image.
[ATTACH=CONFIG]32504[/ATTACH]
I have a vague notion of what is going wrong. ArcGIS does not understand, or I am not properly inputting, the fact that one fishnet should be created for each row of the input table. Moreover, the extent each fishnet that is created should match the extent of the feature in each row.
What I would like to have: At the very least, 68 fishnets, each 22 rows by 22 columns, 100 x 100 meter cells. 22 x 22 = 484, so there will be 484 polygons associated with a square. Since there are 68 squares, there should be 484 x 68 = 32,912 rows when all is said in done. This can be in one file with 32,912 rows or each square can be it's own file, meaning there would be 68 files, each with 484 rows.
Any suggestions, tips, solutions, would be immensely appreciated. My sincere thanks.
Solved! Go to Solution.
Accepted Solutions
- Mark as New
- Bookmark
- Subscribe
- Mute
- Subscribe to RSS Feed
- Permalink
Can you provide a copy of your data? Don't need any attributes, just the geometry.
I just did a quick test and this code worked perfectly for me:
import arcpy, os
arcpy.env.overwriteOutput = True

def CreateFishnetsForFeats(in_polys, out_loc, cell_x=0, cell_y=0, n_rows=0, n_cols=0):
    '''
    in_polys: input polygon feature class
    out_loc: folder location for new file gdb containing fishnet feature class
    cell_x: cell width
    cell_y: cell height
    n_rows: number of rows
    n_cols: number of columns
    '''

    # Create file gdb to store data
    gdb = str(arcpy.CreateFileGDB_management(out_loc, 'Fishnets.gdb').getOutput(0))

    # spatial reference
    arcpy.env.outputCoordinateSystem = arcpy.Describe(in_polys).spatialReference

    # Loop thru rows of input polygons
    with arcpy.da.SearchCursor(in_polys, ['SHAPE@', 'OID@']) as rows:
        for row in rows:
            ext = row[0].extent
            st = '%f %f' %(ext.XMin, ext.YMin)
            orien = '%f %f' %(ext.XMin, ext.YMax)

            # Create fishnet
            out = os.path.join(gdb, 'fish_{0}'.format(row[1]))
            arcpy.CreateFishnet_management(out, st, orien, cell_x,
                                           cell_y, n_rows, n_cols,
                                           labels='NO_LABELS',
                                           geometry_type='POLYGON')

    # set workspace to new gdb
    arcpy.env.workspace = gdb
    fishnets = arcpy.ListFeatureClasses()
    targ = fishnets[0]
    for i, fish in enumerate(fishnets):

        # Add field for original polygon ID
        fid = fish.split('_')[1]
        arcpy.AddField_management(fish, 'POLY_ID', 'LONG')
        with arcpy.da.UpdateCursor(fish, ['POLY_ID']) as rows:
            for row in rows:
                row[0] = fid
                rows.updateRow(row)

        # append fishnets into one feature class
        if i > 0:
            arcpy.Append_management([fish], targ, 'NO_TEST')
            arcpy.Delete_management(fish)
            print 'Appended: {0}'.format(fish)

    print 'Done'
    return

if __name__ == '__main__':

    polys = r'C:\TEMP\test_polys.shp'
    loc = r'C:\TEMP'

    CreateFishnetsForFeats(polys, loc, 100, 100, 22, 22)
All you should have to change is what is highlighted in red. The polys variable needs to point to the full path of your feature class and the loc variable is just the folder for the new file gdb that will contain the fishnet feature class.
You can paste this code into a text file and once you have changed the appropriate variables you can save it with a .py extension (example: fishnets.py). Once you close it you should be able to double click on it to run or you can right click > choose "Edit with IDLE". Once you are in IDLE you can either hit F5 to run the script or you can click on the Run tab and choose Run to execute the code.
- Mark as New
- Bookmark
- Subscribe
- Mute
- Subscribe to RSS Feed
- Permalink
CreateFishnet accepts a feature class or layer or coordinate pairs for extent and orientation as the template input.
I don't know that it can use an extent object or shape object directly.
Instead of iterating rows, try looping through the features
creating a feature layer of each to pass individually to the fishnet tool.
In any event, you will have to create seperate outputs for each input feature,
and append them together after.
Writting the script directly in python would be simpler than using the model builder tinker-toys.
- Mark as New
- Bookmark
- Subscribe
- Mute
- Subscribe to RSS Feed
- Permalink
I tried your suggestion but unfortunately could not solve the problem. After searching the web some more, it appears my problem, although rare, has been brought up in the past by others and there is essentially no solution absent coding.
I believe the problem has to do with how Create Fishnet deals the output of the iterate tool and extent. To illustrate my point, consider that I want to create random points in several squares rather than fishnets. If this is the case, when I go to connect the output of the iterate tool to the Create Random Points tool, Model Builder asks me to specify whether the input is a constraining feature class or constraining extent. Already, this is different than were I connecting to Create Fishnet
[ATTACH=CONFIG]32615[/ATTACH]
I choose constraining extent, not really knowing what this means. Then when I double-click the Create Random Points tool there is an option to choose a 'constraining feature class'. I select the output of the iterator. This step grays out the coordinates of the constraining extent. I interpret this graying out to mean that the tool understands that the extent for random point creation will match the input of each feature supplied by the iterator. I can run the model successfully and the specified number of random points are created in each of the features.
[ATTACH=CONFIG]32616[/ATTACH]
When I want to use Create Fishnet instead of Create Random Points it's a different story. Create Fishnet will not run unless extent coordinates are filled in. Despite my best efforts, there is no way to make the extent values in Create Fishnet gray out.
If someone knows otherwise about this matter, please respond to this thread!
Thanks!
PS. I'm pretty sure that if I knew how to script in Python I could solve this problem fairly easily. But since I don't; I am resigned to dealing with the tinker toy as you say :).
- Mark as New
- Bookmark
- Subscribe
- Mute
- Subscribe to RSS Feed
- Permalink
Can you provide a copy of your data? Don't need any attributes, just the geometry.
I just did a quick test and this code worked perfectly for me:
import arcpy, os
arcpy.env.overwriteOutput = True

def CreateFishnetsForFeats(in_polys, out_loc, cell_x=0, cell_y=0, n_rows=0, n_cols=0):
    '''
    in_polys: input polygon feature class
    out_loc: folder location for new file gdb containing fishnet feature class
    cell_x: cell width
    cell_y: cell height
    n_rows: number of rows
    n_cols: number of columns
    '''

    # Create file gdb to store data
    gdb = str(arcpy.CreateFileGDB_management(out_loc, 'Fishnets.gdb').getOutput(0))

    # spatial reference
    arcpy.env.outputCoordinateSystem = arcpy.Describe(in_polys).spatialReference

    # Loop thru rows of input polygons
    with arcpy.da.SearchCursor(in_polys, ['SHAPE@', 'OID@']) as rows:
        for row in rows:
            ext = row[0].extent
            st = '%f %f' %(ext.XMin, ext.YMin)
            orien = '%f %f' %(ext.XMin, ext.YMax)

            # Create fishnet
            out = os.path.join(gdb, 'fish_{0}'.format(row[1]))
            arcpy.CreateFishnet_management(out, st, orien, cell_x,
                                           cell_y, n_rows, n_cols,
                                           labels='NO_LABELS',
                                           geometry_type='POLYGON')

    # set workspace to new gdb
    arcpy.env.workspace = gdb
    fishnets = arcpy.ListFeatureClasses()
    targ = fishnets[0]
    for i, fish in enumerate(fishnets):

        # Add field for original polygon ID
        fid = fish.split('_')[1]
        arcpy.AddField_management(fish, 'POLY_ID', 'LONG')
        with arcpy.da.UpdateCursor(fish, ['POLY_ID']) as rows:
            for row in rows:
                row[0] = fid
                rows.updateRow(row)

        # append fishnets into one feature class
        if i > 0:
            arcpy.Append_management([fish], targ, 'NO_TEST')
            arcpy.Delete_management(fish)
            print 'Appended: {0}'.format(fish)

    print 'Done'
    return

if __name__ == '__main__':

    polys = r'C:\TEMP\test_polys.shp'
    loc = r'C:\TEMP'

    CreateFishnetsForFeats(polys, loc, 100, 100, 22, 22)
All you should have to change is what is highlighted in red. The polys variable needs to point to the full path of your feature class and the loc variable is just the folder for the new file gdb that will contain the fishnet feature class.
You can paste this code into a text file and once you have changed the appropriate variables you can save it with a .py extension (example: fishnets.py). Once you close it you should be able to double click on it to run or you can right click > choose "Edit with IDLE". Once you are in IDLE you can either hit F5 to run the script or you can click on the Run tab and choose Run to execute the code.
- Mark as New
- Bookmark
- Subscribe
- Mute
- Subscribe to RSS Feed
- Permalink
I have little clue what things like f%, targ, if__name__ == __main__, etc.. mean. I guess I will figure these things out in due time as I make my way through the Python Scripting for ArcGIS book.
A sincere thank you once again.
- Mark as New
- Bookmark
- Subscribe
- Mute
- Subscribe to RSS Feed
- Permalink
Dear Caleb, a million thanks for posting the code and your instructions. This is the first time I have ever worked with Python script and it will not be the last. I got your code to work so problem solved.
Since this is my first time working with Python and I have little experience with programming, I have little clue what things like f%, targ, if__name__ == __main__, etc.. mean. I guess I will figure these things out in due time as I make my way through the Python Scripting for ArcGIS book.
A sincere thank you once again.
You're welcome...As for explaining some of those things, I will do my best but the function definition stuff may be difficult to understand for someone who is completely new to Python, I know it took me a while when I first started learning.
so this line:
st = '%f %f' %(ext.XMin, ext.YMin)
Is simply casting the float values for the XMin and YMin extents to strings. Just imagine the ext.XMin and ext.YMin variables inside the single quotes instead of the "%f". Just a simple string substitution of a float value.
"targ" was just the target feature class for the append...It will be easier if I just back up right here and explain the steps the script took.
First, I created a file geodatabase to store all the outputs, this comes in handy later. Next, I just go through the attribute table grabbing the geometry using a search cursor with the 'SHAPE@' token. This is the actual geometry as it is stored in the table. From that, I grab the necessary extent points to generate the fishnet for each row.
At this point there are 68 feature classes in the geodatabase (in your case) with one fishnet for each polygon. I set the environment to the geodatabase and list all the feature classes in the geodatabase.
Once the list is generated, next it just loops through each one adding a field to grab the FID/OID of the original polygons. This probably wasn't necessary, I just added that in case you wanted the FID's of the original polygons tied to each fishnet. At each iteration, it also checks for the feature class's index in the list. If the index is greater than 0 (meaning starting from the second feature class because python starts at 0), it will append each feature class to the first one which is named "fisnet_0". This "fishnet_0" becomes the target feature class to append all other fishnets to. This was the "targ" variable.
There are a lot of ways this could have been done, that's just the way I chose.
As for the tricky part, the "if __name__ == '__main__' ", this is done for code portability/re-usability. Since I created this tool as a python [url=http://www.tutorialspoint.com/python/python_functions.htm]function[/url], this means that is is dynamic. You can use this tool over and over again with different variables which are defined in the function assignment line (the line with the def statement). This is now a function like any tool available in the arcpy module. You can use the syntax and pass in your own parameters. I could have left the if name = main part out and just had it execute the parameters that were set at the bottom of the script.
However, by wrapping the function call under the if name = main, the function with those particular variables will only be executed when this module (i.e. the actual python script itself) is ran. Therefore, if you import that script into another script, you can use the "CreateFishnetForFeats" function in another script. It will not execute the variables or anything under the if name = main because once this module is imported into another script, it's name is changed from "__main__" to whatever the script is called (the name of the .py file).
I hope some of that makes sense, but don't feel bad if it doesn't. It took me a very long time before I knew what I was doing with that stuff. Once you get the hang of functions, it is a lot of fun! I make functions for any bit of code I think I will reuse again so I don't have to keep rewriting stuff.
Good luck!
- Mark as New
- Bookmark
- Subscribe
- Mute
- Subscribe to RSS Feed
- Permalink
Hi GeoNet Admin
I have the same problem as Alejandro and I'd love to use your script to solve it. Unfortunately I know next to nothing about Python and can't see which parts of your script are highlighted in red. What should I change in order for your script to run with my data?
Thanks in advance!!
- Mark as New
- Bookmark
- Subscribe
- Mute
- Subscribe to RSS Feed
- Permalink
Hi
I reposted the code using the syntax highlighting available at GeoNet:
The very last line (62) is where the code starts to run and uses 6 parameters:
CreateFishnetsForFeats(polys, loc, 100, 100, 22, 22)
It will use the featureclass and folder on lines 59 and 60.
The parameters are:
- in_polys: input polygon feature class
- out_loc: folder location for new file gdb containing fishnet feature class
- cell_x: cell width in the example 100
- cell_y: cell height in the example 100
- n_rows: number of rows in the example 22
- n_cols: number of columns in the example 22
import arcpy, os
arcpy.env.overwriteOutput = True

def CreateFishnetsForFeats(in_polys, out_loc, cell_x=0, cell_y=0, n_rows=0, n_cols=0):
    '''
    in_polys: input polygon feature class
    out_loc: folder location for new file gdb containing fishnet feature class
    cell_x: cell width
    cell_y: cell height
    n_rows: number of rows
    n_cols: number of columns
    '''

    # Create file gdb to store data
    gdb = str(arcpy.CreateFileGDB_management(out_loc, 'Fishnets.gdb').getOutput(0))

    # spatial reference
    arcpy.env.outputCoordinateSystem = arcpy.Describe(in_polys).spatialReference

    # Loop thru rows of input polygons
    with arcpy.da.SearchCursor(in_polys, ['SHAPE@', 'OID@']) as rows:
        for row in rows:
            ext = row[0].extent
            st = '%f %f' %(ext.XMin, ext.YMin)
            orien = '%f %f' %(ext.XMin, ext.YMax)

            # Create fishnet
            out = os.path.join(gdb, 'fish_{0}'.format(row[1]))
            arcpy.CreateFishnet_management(out, st, orien, cell_x,
                                           cell_y, n_rows, n_cols,
                                           labels='NO_LABELS',
                                           geometry_type='POLYGON')

    # set workspace to new gdb
    arcpy.env.workspace = gdb
    fishnets = arcpy.ListFeatureClasses()
    targ = fishnets[0]
    for i, fish in enumerate(fishnets):

        # Add field for original polygon ID
        fid = fish.split('_')[1]
        arcpy.AddField_management(fish, 'POLY_ID', 'LONG')
        with arcpy.da.UpdateCursor(fish, ['POLY_ID']) as rows:
            for row in rows:
                row[0] = fid
                rows.updateRow(row)

        # append fishnets into one feature class
        if i > 0:
            arcpy.Append_management([fish], targ, 'NO_TEST')
            arcpy.Delete_management(fish)
            print 'Appended: {0}'.format(fish)

    print 'Done'
    return

if __name__ == '__main__':

    polys = r'C:\TEMP\test_polys.shp'
    loc = r'C:\TEMP'

    CreateFishnetsForFeats(polys, loc, 100, 100, 22, 22)
- Mark as New
- Bookmark
- Subscribe
- Mute
- Subscribe to RSS Feed
- Permalink
Great! Thank you very much!
One last question-what do I enter instead of 100 for cell width and height if I don't want it to limited the size of the polygons (i.e. I only want to use the number of rows and columns to create the cells)
- Mark as New
- Bookmark
- Subscribe
- Mute
- Subscribe to RSS Feed
- Permalink
The ArcGIS website says to just put 0 in as a value, but when I tried that I got giant polygons more or less the size of the whole Earth. I would like the fishnets to be the size of the polygons.