Turn on suggestions
Auto-suggest helps you quickly narrow down your search results by suggesting possible matches as you type.
Cancel
- Home
- :
- All Communities
- :
- Services
- :
- Esri Training
- :
- Esri Training Matters Blog
- :
- ModelBuilder 220: Add Flexibility
ModelBuilder 220: Add Flexibility
Subscribe
2630
0
07-17-2014 04:04 AM
- Subscribe to RSS Feed
- Mark as New
- Mark as Read
- Bookmark
- Subscribe
- Printer Friendly Page
07-17-2014
04:04 AM
This is the second post in a three-part series on creating geoprocessing models in ArcGIS. ModelBuilder 101 covered five steps to create a basic model. One of the main advantages of building a model is the ability to quickly test multiple scenarios. This post shows how to support scenario testing when a model is run as a tool.
In ModelBuilder, you can open any tool, change its settings, and quickly run the model again to explore alternative scenarios. That's great, but convenience matters too. When running a model as a tool, you can explore alternative scenarios by changing model parameters—all at once, in one place. Let's talk the P-word. "P" Is the Key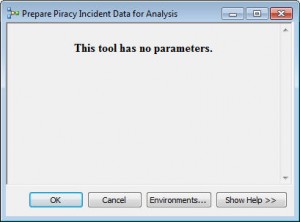
Have you ever opened a model tool and seen the statement, "This tool has no parameters"? Maybe you closed the dialog box thinking the model had a fatal error.
Time to clear up the confusion. That statement is information, not an error message.
The model will run fine as-is, meaning it will run using the inputs and criteria specified by the model creator. You can't change anything. Go ahead and click OK to run the model.
Model parameters are things that can be changed. If they exist, you will see them when you open a model tool.
So what can be changed using a parameter? Just about anything—inputs, outputs, and tool-specific parameters. A good way to learn how to work with model parameters is to create a model, add its tools, and set the tool parameters as usual.
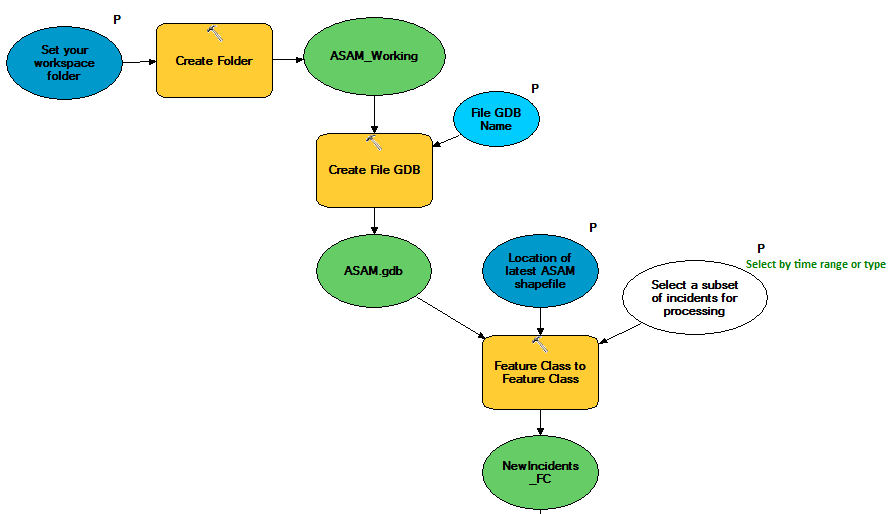
After the model is built (and saved), think about what criteria you would want to change when running it in the future. Running a model using different input data is a common need. Adding a parameter can meet that need. Allow for ChangeTo make a tool's input a parameter, in the ModelBuilder window right-click the input element and choose Model Parameter. It's that easy. The letter "P" above an element indicates it's a model parameter.
Here, the Create Folder tool input was renamed to "Set your workspace folder" (the original name was a folder path). With the new name, it will be clear that you can browse to a different workspace if you don't want to use the default location.
To make a tool parameter into a model parameter, first make the tool parameter a variable, then set the variable to be a model parameter. The Create File GDB tool has three parameters: Location, File GDB Name, and Version.
Suppose you want the ability to assign a different geodatabase name each time the model is run (perhaps you'll be creating multiple geodatabases as part of your project).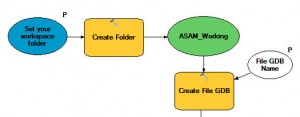
In the model window, right-click Create File GDB, click Make Variable > From Parameter > File GDB Name.
The variable is added to the diagram with an arrow connecting it to the Create File GDB tool. To make the variable a model parameter, right-click it and choose Model Parameter. Now it too has a "P" above it.
In this case, "File GDB Name" is self-explanatory, so there's no need to rename the element.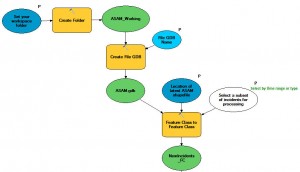
To support testing multiple scenarios, now suppose you want to be able select subsets of features for processing. In the example model, the Feature Class to Feature Class tool is used to convert a shapefile of ASAM incidents to a geodatabase feature class.
The tool has two parameters that make sense to designate as model parameters: Input Features (required) and an optional Expression parameter used to define a subset of features. Input Features is the location of the shapefile on disk, which could vary.
Right-click the Feature Class to Feature Class tool and click Make Variable > From Parameter > Input Features. Right-click the Input Features variable element and choose Model Parameter.
Repeat this process for the Expression parameter. Both of these model parameters will benefit from being renamed.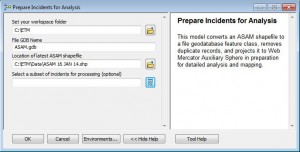
After saving the model, close ModelBuilder and open the model as a tool to see the parameters.
Notice the help text on the right side of the model tool. This is the Description text from the Model Properties dialog box.Less Is More
By allowing certain criteria to be changed, parameters increase model usability and are a valuable technique to explore what-if scenarios. However, as with anything, it's important to exercise restraint. Setting too many parameters defeats the other main advantage of a model—to simplify and speed up a geoprocessing workflow.
Remember, you can always open a model in ModelBuilder to tinker with individual tool settings and run the model to explore the result of your tinkering. Add parameters only for items you or others are likely to find most useful, such as the option to specify different input data or modify a key analysis tool setting. Put the rest of the model elements on auto-pilot.
In the next installment, you will go beyond basic techniques and learn some model power moves.
Related posts:
- Confused about what running a model as a tool means? In the ModelBuilder application a model appears as a visual diagram. Outside of ModelBuilder you can run a model from a tool dialog box (double-click the model in the ArcMap Catalog window).
In ModelBuilder, you can open any tool, change its settings, and quickly run the model again to explore alternative scenarios. That's great, but convenience matters too. When running a model as a tool, you can explore alternative scenarios by changing model parameters—all at once, in one place. Let's talk the P-word. "P" Is the Key

Uh oh. Now what?
Have you ever opened a model tool and seen the statement, "This tool has no parameters"? Maybe you closed the dialog box thinking the model had a fatal error.
Time to clear up the confusion. That statement is information, not an error message.
The model will run fine as-is, meaning it will run using the inputs and criteria specified by the model creator. You can't change anything. Go ahead and click OK to run the model.
Model parameters are things that can be changed. If they exist, you will see them when you open a model tool.
So what can be changed using a parameter? Just about anything—inputs, outputs, and tool-specific parameters. A good way to learn how to work with model parameters is to create a model, add its tools, and set the tool parameters as usual.
After the model is built (and saved), think about what criteria you would want to change when running it in the future. Running a model using different input data is a common need. Adding a parameter can meet that need.

The input to the Create Folder tool is a model parameter.
- Tip: When you make an element a model parameter, the element name will display in the model tool. Element names can be cryptic, so a good practice when adding a parameter is to rename its element so that model users will understand what is expected. To rename an element, right-click it and choose Rename.
Here, the Create Folder tool input was renamed to "Set your workspace folder" (the original name was a folder path). With the new name, it will be clear that you can browse to a different workspace if you don't want to use the default location.
To make a tool parameter into a model parameter, first make the tool parameter a variable, then set the variable to be a model parameter. The Create File GDB tool has three parameters: Location, File GDB Name, and Version.
Suppose you want the ability to assign a different geodatabase name each time the model is run (perhaps you'll be creating multiple geodatabases as part of your project).

File GDB Name is now a model parameter.
In the model window, right-click Create File GDB, click Make Variable > From Parameter > File GDB Name.
The variable is added to the diagram with an arrow connecting it to the Create File GDB tool. To make the variable a model parameter, right-click it and choose Model Parameter. Now it too has a "P" above it.
In this case, "File GDB Name" is self-explanatory, so there's no need to rename the element.

Descriptive parameter names help model users know what to do.
To support testing multiple scenarios, now suppose you want to be able select subsets of features for processing. In the example model, the Feature Class to Feature Class tool is used to convert a shapefile of ASAM incidents to a geodatabase feature class.
The tool has two parameters that make sense to designate as model parameters: Input Features (required) and an optional Expression parameter used to define a subset of features. Input Features is the location of the shapefile on disk, which could vary.
Right-click the Feature Class to Feature Class tool and click Make Variable > From Parameter > Input Features. Right-click the Input Features variable element and choose Model Parameter.
Repeat this process for the Expression parameter. Both of these model parameters will benefit from being renamed.

Model parameters exposed in the model tool.
After saving the model, close ModelBuilder and open the model as a tool to see the parameters.
- Tip: If you don't like the display order of the parameters in the model tool, you can reorder them in ModelBuilder (Model menu > Model Properties > Parameters tab).
Notice the help text on the right side of the model tool. This is the Description text from the Model Properties dialog box.Less Is More
By allowing certain criteria to be changed, parameters increase model usability and are a valuable technique to explore what-if scenarios. However, as with anything, it's important to exercise restraint. Setting too many parameters defeats the other main advantage of a model—to simplify and speed up a geoprocessing workflow.
Remember, you can always open a model in ModelBuilder to tinker with individual tool settings and run the model to explore the result of your tinkering. Add parameters only for items you or others are likely to find most useful, such as the option to specify different input data or modify a key analysis tool setting. Put the rest of the model elements on auto-pilot.
In the next installment, you will go beyond basic techniques and learn some model power moves.
Related posts:
Labels
You must be a registered user to add a comment. If you've already registered, sign in. Otherwise, register and sign in.
About the Author
Suzanne is a Maryland native who enjoys writing about Esri technology, GIS professional development, and other topics. She is the Marketing Manager for Esri Training Services in Redlands, California.
Labels
-
ArcGIS Desktop
28 -
ArcGIS Step by Step
46 -
Class Resources
25 -
e-Learning
63 -
MOOCs
30 -
Software Demos
11 -
Technical Certification
16