ArcGIS Maps SDKs Native Blog - Page 5

cancel
Showing results for 
Show  only  | Search instead for 
Did you mean: 

Latest Activity

(213 Posts)
EricBader
Honored Contributor

Today, The Qt Company announced the release of Qt 5.12 LTS. This release brings with it support for Xcode 10 for the first time. ArcGIS Runtime SDK for Qt 100.4 was built with Qt version 5.9, which for iOS builds, utilizes Xcode 9. 

What does this mean?

If you develop iOS apps with ArcGIS Runtime SDK for Qt 100.4, you should continue to use Xcode 9. We have performed some ad-hoc testing with Xcode 10, and have not found any new issues, but it is possible that there are some binary compatibility issues, and we therefore do not recommend this. Starting in March 2019, Apple's App Store will require that all submission be built with Xcode 10. We recommend pushing any required updates before this date and waiting for the 100.5 release of ArcGIS Runtime, which will support Xcode 10. We are planning on releasing 100.5 near the end of Q1 2019, so we hope this will cause minimal issues.

Thanks!

The ArcGIS Runtime SDK for Qt Development Team

more
1 1 756
EricBader
Honored Contributor

Today, The Qt Company announced that Qt 5.12 LTS has been released! LTS. This stands for "Long-Term Support". There are some important changes in this release that could affect current ArcGIS Runtime Qt developers who build for Android. We would like to bring these to your attention.

Prior to Qt 5.12, the Qt Android kits were built using the GCC compiler. Starting with Qt 5.12, the Android kits are now built with the Clang compiler and a newer version of the NDK, which no longer supports GCC. What does this mean to you? If you develop Qt Android apps and use ArcGIS Runtime SDK for Qt versions 100.0-100.4, you will not be able to use 5.12, as the currently released Android binaries support GCC only. If you require Android and Qt 5.12, you will need to wait for our 100.5 release, which will be built with 5.12 and Clang. Other platforms are not affected, and you can use 5.12 with our previous releases of ArcGIS Runtime without any known issues.

As always, we are keen to hear about your experiences.

Happy coding!

The ArcGIS Runtime SDK for Qt Development Team

more
0 0 1,079
EricBader
Honored Contributor

It's Update 3 release time! On top of the many exciting new features that are supported across the Runtime SDKs (web scenes, 3D distance measurement analysis, identifying and selecting web scene features, new WMS capibilities, etc), the Qt team has been hard at work adding some new features unique to this SDK for 100.3.

Here are some of the highlights...


Runtime API

  • Transactional edit support. This allows the developer to commit or rollback a set of edits as one transaction. Other APIs introduced this at Update 2, and Qt now supports this feature with Update 3.
  • Pagination of query results. This allows developers to set a result offset in the QueryParameters so that results can easily be paginated. Other APIs introduced this at Update 2, and Qt now supports this feature with Update 3.
  • Time aware layers. The TimeAware interface was added and implemented by FeatureLayer, RasterLayer, ArcGISMapImageLayer, and WmsLayer. The new API allows you to set a time extent on the GeoView, and all layers participating will be filtered by the time extent. Other APIs introduced this at Update 2, and Qt now supports this feature with Update 3.
  • The Runtime Error object is now creatable. This means that you can create custom Errors throughout your application and utilize the same error handling logic throughout your application, as well as provide additional details for any known issues.
  • Support for OpenGL rendering on Windows. Qt has two different rendering engines for the Windows platform : OpenGL and DirectX via ANGLE. By default, Qt will try and render using OpenGL and if the proper drivers are not available, it will fall back to using ANGLE. Previous releases of ArcGIS Runtime only supported ANGLE. Update 3 fully supports both OpenGL and ANGLE so that you can fully utilize either rendering engine and Qt's fallback mechanism for when OpenGL cannot be utilized on a given system. For more information on this, please see Qt's documenation - https://wiki.qt.io/Qt_5_on_Windows_ANGLE_and_OpenGL
  • Ability to get size and ID properties as either a string or int type in QML. Previously, these properties always returned as strings due to a limitation of the QML integer type being a 32-bit integer as opposed to 64-bit. You can now request the property as an int and get an actual QML int back.


Toolkit API

  • TimeSlider toolkit component. Coinciding with our new TimeAware support is a ready-to-use Toolkit component that allows you easily filter data based on time. The TimeSlider also allows you to play and pause an animation of your spatiotemporal data.
  • CoordinateConversion toolkit component. An easy-to-use UI component is now available to help you convert a given coordinate to one or more different formats. For example, you could convert from Decimal Degrees to MGRS with this tool. This tool has a slick new UI making use of the modern Qt Quick Controls 2 module.


SDK improvements

  • Improved API documentation details added, as well as additional code snippets added throughout the documentation.
  • Dozens of new samples have been added, with an extra emphasis placed on providing more fundamental samples, such as Geometry and GeometryEngine samples, as opposed to only new features.

We are looking forward to hearing about your experience with this exciting release. Happy coding!

- The Qt SDK Development Team

more
0 1 811
EricBader
Honored Contributor

We've identified an issue with the templates provided with the SDK installation. You'd get these added to Qt Creator if you run the post installer and select the Qt Creator option. The issue is minor. However, with Qt Creator 4.6.0, Qt Creator will crash if you attempt to create any of the templates after the first page of the template wizard.

We've fixed the templates for the upcoming Summer release (100.3) of the ArcGIS Runtime SDK for Qt.

The issue is the same for all the templates. There's a section in the wizard.json file that references an invalid index.

If you change that value to 0 or 1 it will fix the issue. If you've already run the post installer then the templates will be installed on your system. For example, on Windows, the templates are found in this path:

C:\Users\<user>\AppData\Roaming\QtProject\qtcreator\templates\wizards\ArcGISRuntime*

On Linux:

/<user_home>/.config/QtProject/qtcreator/templates/wizards/ArcGISRuntime*

In those template directories, you can find the wizard.json file and make the updates. You'll need to restart Qt Creator after you've made the changes.

We apologize for any disruptions in your development this may have caused.

Sincerely,

The ArcGIS Runtime SDK for Qt Development Team

more
1 0 829
EricBader
Honored Contributor

Early next week, we will be announcing the release of 100.2.0, also known as Update 2, for you to download. We're very excited about this release for a number of reasons. 100.2 is the culmination of what we envisioned the Quartz 100 Runtime platform to be. It also brings us closer to functional parity with the 10.2.x versions of Runtime. Here are some highlights to look forward to:

  • Display and identify WMS layer
  • Display and identify ENC layers (Electronic Navigational Charts)  
  • Read and edit shapefiles
  • Read rasters from GeoPackage
  • Read and edit vector data from GeoPackage
  • Support for multi-layered symbology
  • Analysis - viewshed and line of sight on the GPU
  • Statistical queries
  • Improved support for geotransformations and custom geotransformations
  • Offline mapping enhancements - Preplanned workflows
  • A few additional tools: Compass and Coordinate Conversion tools
  • A new topic that indicates which classes invoke which Runtime license level (extremely useful!)

These are just a few.


We'll be announcing the release very soon, so keep watch! As always, thank you for using ArcGIS Runtime SDK for Qt.

more
0 0 376
LucasDanzinger
Esri Frequent Contributor

ArcGIS Pro is a powerful desktop application that allows you to perform many essential GIS tasks, such as designing maps and symbols. One common requirement that many organizations have is to use a standardized set of symbols in their maps, so that they have a consistent look and feel associated with their maps and their brand. The best way to handle this is to create a Style and to store all of your symbols in the Style. You can then share this Style file with anyone in your organization so they can access the same symbols. This is not a new workflow - Styles have been around in ArcMap for quite some time. But one really cool new things you can do with ArcGIS Pro is create Mobile Style Files, which are style files that can be shared with ArcGIS Runtime based applications. This means that you can create your custom symbol sets in ArcGIS Pro, and then apply those same symbols to graphics and features in ArcGIS Runtime Apps. If you have ever wanted to create and display intricate custom symbols that are beyond what the Runtime API will allow you to programmatically create, then this workflow is for you.

Step 1: Create a Mobile Style File in Pro

  • Open Pro and create a new Project
  • Open your Catalog Window and find the "Styles" section
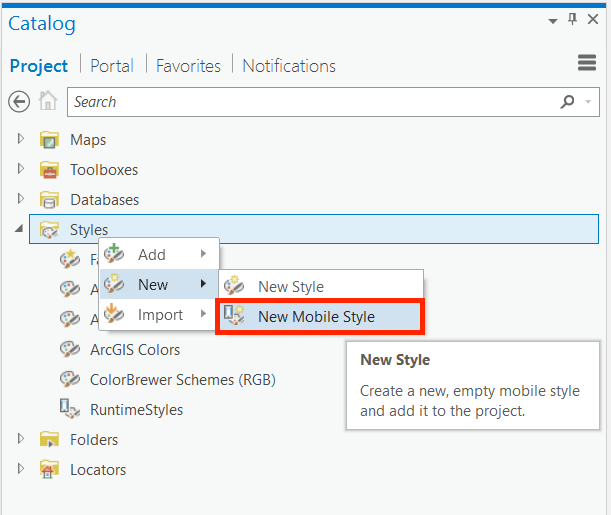
  • Right click Styles and select New > New Mobile Style.
  • Give a name and location to create the style file.
  • More details on the specs and limitations of a Mobile Style file can be found here.

Step 2: Create and save a custom symbol into the Style File

  • Insert a new map and add some vector data to your map
  • Select the layer in the Contents pane, right click, and select Symbology
  • This will open the Symbology pane and display the current symbol for the layer. You can modify this by changing color, size, and adding additional symbol layers. This allows you to make a completely customized symbol. Modify the symbol to your liking, and press Apply to see the symbol applied to the map.
  • Once you have the desired output, click the "hamburger" icon in the top right of the Symbology pane and select Save Symbol to Style.
  • Fill in the Name and Category and optionally give it a Key. This key will be used for fetching the Symbol in Runtime. (You could also query for all symbols and sort through the results programmatically, but retaining and fetching from a Key is the most straight forward way to get started)
  • From the Style dropdown, select your newly created Style file.
  • Click OK, and your symbol is now saved to your Style file and is ready for use in ArcGIS Runtime.
  • More details about the process of creating symbol styles can be found here.

Step 3: Consume in Runtime

  • Create a GraphicsOverlay object to display Graphics in a MapView
  • m_graphicsOverlay = new GraphicsOverlay(this);‍‍
  • Create a SimpleRenderer and set this to the GraphicsOverlay. A SimpleRenderer will display the same symbol for every graphic in the overlay
m_simpleRenderer = new SimpleRenderer(this);
m_graphicsOverlay->setRenderer(m_simpleRenderer);‍‍‍‍
  • Create a SymbolStyle object by passing in the path to the constructor 
m_symbolStyle = new SymbolStyle("/Users/<username>/Desktop/RuntimeStyles.stylx", this);‍‍‍
  • Connect to the SymbolStyle::fetchSignalCompleted signal. This will emit when a symbol has been asynchronously fetched from the Style. A Symbol object is passed through as a parameter, and this symbol object can then be used to set the symbol used by the SimpleRenderer
connect(m_symbolStyle, &SymbolStyle::fetchSymbolCompleted, this, [this](QUuid, Symbol* symbol)
{
  m_simpleRenderer->setSymbol(symbol);
});‍‍‍‍‍‍‍‍‍‍‍‍
  • Fetch the symbol by the unique Key defined in Pro 
  • m_symbolStyle->fetchSymbol(QStringList{"RuntimeArrow"});‍‍
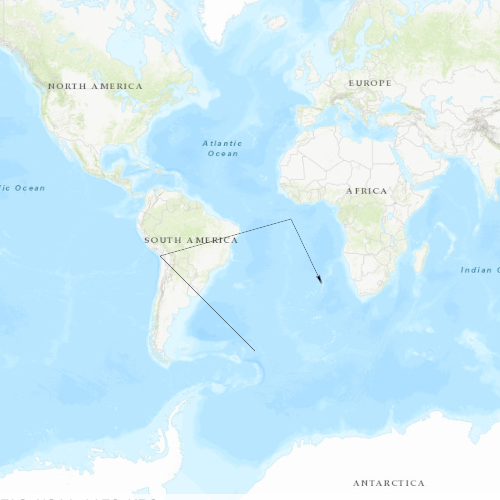
  • Add graphics to your graphics overlay, and they will be symbolized with the custom symbol. In the below example, a simple black line with an arrow at the end of the line was created in Pro and consumed in ArcGIS Runtime.

An example ArcGIS Runtime project can be found here. You will need to update the path to your style file and any keywords that you may be searching for.

more
2 5 3,239
LucasDanzinger
Esri Frequent Contributor

Geofencing is a concept in location aware apps that is used to determine if your current location is approaching, entering, dwelling, or leaving a point of interest (POI). For example, you may want to alert drivers of upcoming road closures, home buyers of newly available houses nearby, or tourists of an attraction they are approaching. This can be done with ease using ArcGIS Runtime's GeometryEngine. The GeometryEngine provides several static functions that allow you to ask questions about the spatial relationship of 2 or more geometries. For example, some questions you can ask are "does geometry 1 intersect geometry 2", "does geometry 1 completely contain geometry 2", and "how many meters is it from geometry 1 to geometry 2". The great thing about the GeometryEngine is that this works completely client side without any network connectivity, which means there is no internet usage, and thus limited battery consumption. By using the GeometryEngine, you can perform Geofencing with the following workflow:

  • Obtain your device's current location from the location display, and project it to the map's spatial reference
connect(m_mapView->locationDisplay(), &LocationDisplay::locationChanged, this, [this](Location location)
{
  Point currentLocation = GeometryEngine::project(location.position(), SpatialReference::webMercator());
  ...‍‍‍‍‍‍‍‍
  • Obtain a POI polygon. This could be created programatically and displayed as a Graphic, or it could be stored in a FeatureTable and displayed as a FeatureLayer
  • Once you have access to the Geometry object, perform the GeometryEngine function. The following code assumes you have created a polygon Graphic named m_graphic. 
    m_within = GeometryEngine::intersects(currentLocation, m_graphic->geometry());
  • If the GeometryEngine function returns true, alert the user. 
    if (m_within)
      alertUser("within");‍‍
  • From here, you can take it further, and keep track of if the previous location was within the POI or not, which will tell you if you are entering, dwelling, or leaving the POI. You could also use the GeometryEngine::distance function to send an alert when you get near the POI.

A basic sample of this workflow can be found on GitHub. Give it a try, and see if you can enhance it to fit your organization's needs and use cases.

more
1 0 1,611
LucasDanzinger
Esri Frequent Contributor

ArcGIS Runtime SDK for Qt 100 brought many new features to the SDK, such as Raster support, 3D, Vector Tiles, and much more. Beyond many of these big ticket items, there were also lots of architectural and design improvements to the API that make it much easier and more convenient to develop apps with the SDK. One of my favorite new features of the ArcGIS Runtime SDK for Qt (version 100) is the extensive use of list models throughout the API. List models are data structures similar to to lists or vectors that can be used directly in any of the various views that Qt supports (i.e. ListView, GridView, etc). What this means to you as a developer is that you can very easily take the data returned to you from the Runtime API (like features, graphics, maps, layers, attributes, symbols, attachments, and so on), and display them in a view with no data manipulation or massaging. For example, if I wanted to build a table of contents (TOC) for the operational layers in a map, I could access the Map::operationalLayers property, and this would return to me a list model of the layers in the map. I could then take that list model and pass it directly into a ListView component, and display the data in the ListView. This has many benefits including:

  • It is good practice to separate your UI from your business logic
  • The models and views are dynamic, so if a list model gets updated (e.g. a new layer gets added to the map), the View will update automatically without you writing any code to handle this.
  • For QML, it greatly reduces the amount of imperitive JavaScript code, allowing you to write almost exclusively declarative QML code. Writing as declarative of code as possible is something you should always strive for with QML.

Model/view, MVC, MVVM, and other similar concepts have endless resources explaining the benefits of the pattern and how to best architect your application using these patterns. Because of this, this article will not discuss that type of information, but will instead focus on the fundamentals of working with list models coming from ArcGIS Runtime, and how you can integrate them with Qt's various view types.

There are 3 main concepts that you will need to understand in order to display your data from a list model in a view: Models, Views, and Delegates.

Models
Models are lists of data and are found throughout the ArcGIS Runtime. Some examples include a LayerListModel, LegendInfoListModel, AttachmentListModel, and AttributeListModel. Models have a couple of important things to know about as an application developer. The first thing you need to know is what the model contains. In the example of a LayerListModel, you can read in the documentation that it is a list of Layers available in the map. The second important thing to note are the roles available on the model. For example, the LayerListModel has a name and layerVisible role (among many others). These roles are basically the properties that you can access for each item in the list model. With this information, you should begin to see how one could start building a table of contents.

Views
Views are the UI elements that actually display the data. ListViews and GridViews are some of the most common types. Your phone's music app will likely make heavy use of these types of views, as they might display a list of songs by a particular artist, or they might show a grid of a particular artist's album covers. One important thing to understand is that the View determines what will be shown, but it will not determine how something is shown. For example, in the example of the TOC control, we might know that we want to have a list of layers shown in a view, but the view does not dictate how each element in that list of layers looks (i.e. the text to display, the color of text, the type face, etc). Rather, the delegate controls this information.

Delegates
Delegates describe what each element in the list will look like. Going back to the TOC example, we know that we want each item show a Checkbox/Switch, so that the user can toggle visibility, and then have the layer name to the right of that. This is where the list model's roles come into play. The delegate can access any of the roles that are exposed and documented in the API reference. The view will use the defined delegate as a template for how to display the data coming out of the model.

A simple example

To see this all in practice, I suggest you look at the various samples on GitHub. A good, simple example of this is the "Change Sublayer Visibility" sample. This sample has a basemap and a map image layer that contains 3 sublayers: Cities, Continent, and World.

We can use the ArcGISSublayerListModel to build a simple TOC where you can see the sublayer name, and toggle the visibility. This section of code contains all of the code related to the TOC control that you see in the upper left of this screenshot. Going back to the previous discussion, there are 3 important things we need: a model, a view, and a delegate.

In this case, a ListView is declared, and some anchoring and sizing properties are set. All this is doing is saying that we are going to display a list of something.

ListView {
 id: layerVisibilityListView
 anchors.margins: 10 * scaleFactor
 width: parent.width
 height: parent.height
 clip: true‍‍‍‍‍‍

Next you see a model property. This is setting the View's model property to the map service's sublayer list model. 

model: mapImageLayer.mapImageSublayers‍‍

Finally, we need a delegate to define how each item in the list will appear. In this case, we want text displaying the layer's name, and a Switch component for toggling visibility. These name and visibility properties are available as the roles "name" and "sublayerVisible" (this can be found the in the documentation for ArcGISSublayerListModel).

delegate: Item {
    id: layerVisibilityDelegate
    width: parent.width
    height: 35 * scaleFactor

    Row {
        spacing: 5
        anchors.verticalCenter: parent.verticalCenter
        Text {
            width: 75 * scaleFactor
            text: name // "name" is a role in the list model
            wrapMode: Text.WordWrap
            font.pixelSize: 14 * scaleFactor
        }
        Switch {
            checked: sublayerVisible // "sublayerVisible" is a role in the list model
            onCheckedChanged: {
                sublayerVisible = checked;
            }
        }
   }
}‍‍‍‍‍‍‍‍‍‍‍‍‍‍‍‍‍‍‍‍‍‍

All together, this results in the following code for building a basic TOC:

// Create a list view to display the items
ListView {
    id: layerVisibilityListView
    anchors.margins: 10 * scaleFactor
    width: parent.width
    height: parent.height
    clip: true

    // Assign the model to the list model of sublayers
    model: mapImageLayer.mapImageSublayers

    // Assign the delegate to the delegate created above
    delegate: Item {
        id: layerVisibilityDelegate
        width: parent.width
        height: 35 * scaleFactor

        Row {
            spacing: 5
            anchors.verticalCenter: parent.verticalCenter
            Text {
                width: 75 * scaleFactor
                text: name
                wrapMode: Text.WordWrap
                font.pixelSize: 14 * scaleFactor
            }

            Switch {
                checked: sublayerVisible

                onCheckedChanged: {
                    sublayerVisible = checked;
                }
            }
        }
    }
}‍‍‍‍‍‍‍‍‍‍‍‍‍‍‍‍‍‍‍‍‍‍‍‍‍‍‍‍‍‍‍‍‍‍‍‍‍

The above example focuses on Qt Quick, but you can utilize these model types  with Qt Widgets as well. Many of the same concepts apply, but the workflow differs slightly when working in a QWidgets based UI. To use these with widgets, you can bind the model types to a QAbstractItemView (for example a QTableView) by calling setModel. In order to customise the data you wish to display in the view, a good approach is to create your own QIdentityProxyModel to expose those parts of the underlying model data you wish to use. For example, when using a BasemapListModel you could create your own "BasemapsProxyModel” which takes a BasemapListModel as the sourceModel and returns two columns of data from the full list in the BasemapRoles enum (the basemap title and the snippet which describes it). Your proxy model should then override QIdentityProxyModel::columnCount to return a count of 2. For QIdentityProxyModel::data you should return data from the underlying model based on the column of the supplied QModelIndex. Your code could look something like this:

QModelIndex srcIdx = sourceModel()->index(index.row(), 0);
if (role == Qt::DisplayRole)
{
    switch (index.column())
    {
    case 0:
      return sourceModel()->data(srcIdx, Esri::ArcGISRuntime::BasemapListModel::BasemapItemTitleRole);
      break;
    case 1:
      return sourceModel()->data(srcIdx, Esri::ArcGISRuntime::BasemapListModel::BasemapItemSnippetRole);
      break;
    default:
      break;
    }
}

This is only a small introduction to a very large topic. Once these concepts become clear to you, I encourage you to start creating more views for the various models that are exposed in the Runtime API. Here are some additional helpful resources that should help explain model/view programming with Qt.

Additional Resources:

QML:
- QML Book - http://qmlbook.github.io/ch06/
- Models and Views in Qt Quick - http://doc.qt.io/qt-5/qtquick-modelviewsdata-modelview.html
- Using C++ Models with Qt Quick Views - http://doc.qt.io/qt-5/qtquick-modelviewsdata-cppmodels.html

Qt Widgets Resources:
- Model/View Programming - http://doc.qt.io/qt-5/model-view-programming.html

more
4 2 2,068
EricBader
Honored Contributor

We hope you are finding ArcGIS Runtime SDK 100.1 for Qt (Update 1) to be useful and productive for you. As always, please continue to use GeoNet and share your feedback. We're here to help you in any way we can.

Now, regarding support for Qt 5.9.0:

During our certification of Update 1 we discovered a critical Qt 5.9.0 bug specific to iOS and macOS in the Qt 5.9.0 final release. All https requests report an SSL handshake error so not even Esri basemaps will draw on iOS or macOS devices. There is no viable workaround for this issue that we are aware of that will ensure the security of your applications. You can read the bug report (QTBUG-61053) here, which indicates that it was fixed in 5.9.1. Also, you will encounter compilation errors using 5.9.0 Qt Creator (4.3.0) on El Capitan v.10.11.16 when compiling any of the Esri template projects.

In light of these issues, we strongly advise that you avoid using the Qt 5.9.0 for development with the ArcGIS Qt SDK. Instead, use Qt 5.9.1. Keep in mind, ArcGIS Runtime SDK 100.1 also supports Qt 5.6.2 and Qt 5.8.

Please let us know if you have any questions. Thank you.

The ArcGIS Runtime SDK for Qt Team

more
0 0 613
LucasDanzinger
Esri Frequent Contributor

We are very pleased to announce that the latest release of the ArcGIS Runtime SDK for Qt is now released and available for download. Details about the new features that we have included in version 100.1 are highlighted here, and the developer's site is up to date with all of the latest information. We are excited to see what you build with this release!

- The ArcGIS Runtime SDK for Qt Development Team 

more
1 0 682
108 Subscribers