Landsat Lens 2

2804
9
04-24-2017 03:28 PM
RichieCarmichael
Esri Contributor
7 9 2,804

Landsat Lens

Landsat Lens is a touch and mouse friendly application for browsing past and present Landsat satellite imagery hosted by Esri.

Click here for the live app.

Click here for the source code.

Using a mouse, a lens can be moved around the map with a standard left mouse click and drag operation. Scrolling the mouse wheel will enlarge or decrease the size of a lens depending on the direction.

With a touch device like an iPad, a lens can moved with an intuitive press and drag. To resize, pinch or expand two or more fingers within a lens. Likewise, rotating a lens is achieved by twisting two or more fingers. Unlike with a mouse, touch screens allow the user to manipulate two or more lenses concurrently.

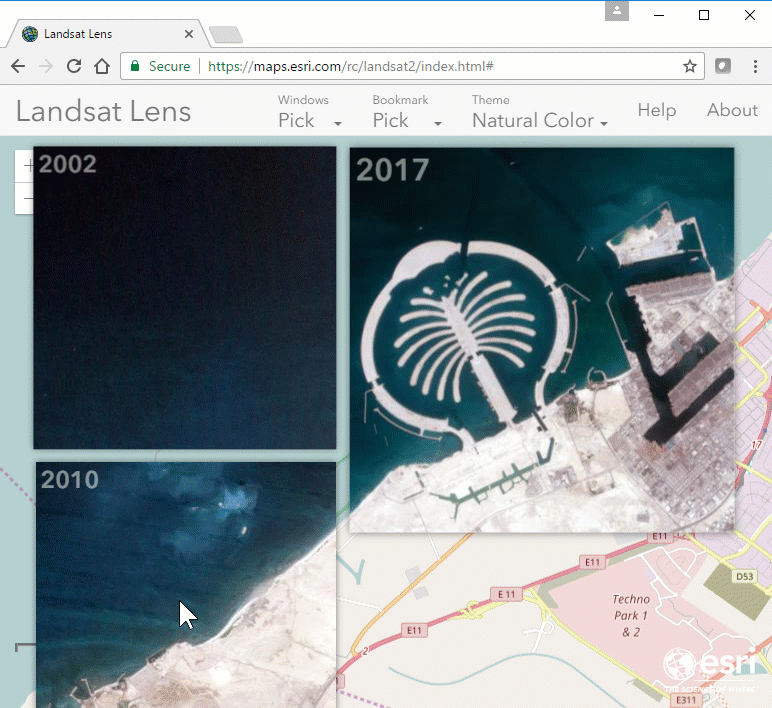
By default, the app starts with a lens dated 2017 located close to the Palm Jebel Ali in Dubai. To pick a preset location choose from one of the entries from the Bookmarks dropdown menu. Alternative you can pan or zoom to any area of interest.

For one of the preset locations, or your own area of interest, you may want to view changes over time. To do so, use the Windows dropdown menu to add a window showing 2002, 2005, 2010, 2015 or 2017 imagery. By swiping lenses over the basemap and one another you can easily see changes in vegetation, coastlines, rivers and human activity. Use the last option in the dropdown menu to removal all lenses from the map.

Known Issues:

  • Support for W3C's touch events is extremely varied across browsers and operating systems. However the author notes that the most consistent behavior has been with Chrome browsers.
  • The Esri hosted Landsat image services ms and ps currently contain imagery from the year 2000 til present. However the imagery is not uniformly distributed over time. Imagery prior to 2014 is fairly sparse. This will likely change over time.
9 Comments
JosephKerski
Esri Notable Contributor

Thank you sir!  This is an INCREDIBLE tool for teaching and learning and research and I will write about this for the education community which I serve.  Wonderful! 

RickeyFight
MVP Regular Contributor

rcarmichael-esristaff‌ Thank you for sharing this map! 

I was wondering how difficult it would be to add my own aerial layers to it?

I want to change the functionality a little and just display aerials from my server? 

RichieCarmichael
Esri Contributor

Hi Rickey,

Yes, it is fairly easy to accommodate alternative imagery. The most significant change would be to the user interface to reflect the display options you want (if any). As a quick test, try the following modifications to "test drive" the app with your imagery.

  1. Download the source code from here,
  2. At line 307 of index.js, substitute the following:
    var url = $('.rc-theme li.active a').attr('data-url');
    ...with...
    var url = 'https://<url to your image service>';
  3. Uncomment lines in the code block, starting at line 301 of index.js, that are not relevant to your image service. For example, comment out lines 324, 330 and 331 that specify time, mosaic rule and the rendering rule respectively.

Hope this helps.

RickeyFight
MVP Regular Contributor

Thank you for the quick reply. 

I have tried all that you have suggested. I cannot get the layer to display. 

Here is the sample Aerial Viewer 

There are no errors in the console log so I cannot tell what is wrong. 

RichieCarmichael
Esri Contributor

Your imagery is published as map service rather than an image service. This means that some of the url parameters are slightly different.  Copy and replace the getImageUrl code block below to show an Ashland imagery lens in your app.

function getImageUrl(year) {

    // Calculate scale (if image width or height exceeds maximum).

    var max = Math.max(_view.width, _view.height);

    var scale = max <= MAX_IMAGE ? 1 : MAX_IMAGE / max;


    // Get url/function from user defined selection.

    var url = 'http://gis.ashland.or.us/arcgis/rest/services/pictometry3inch_jason/MapServer';

    url += '/export?f=image';

    url += string.substitute('&bbox=${xmin},${ymin},${xmax},${ymax}', {

        xmin: _view.extent.xmin,

        ymin: _view.extent.ymin,

        xmax: _view.extent.xmax,

        ymax: _view.extent.ymax

    });

    url += '&bboxSR=' + _view.spatialReference.wkid;

    url += '&imageSR=' + _view.spatialReference.wkid;

    url += string.substitute('&size=${w},${h}', {

        w: Math.min(Math.round(scale * _view.width), MAX_IMAGE),

        h: Math.min(Math.round(scale * _view.height), MAX_IMAGE)

    });

    url += '&format=' + 'jpg';

    return url;


    //var url = $('.rc-theme li.active a').attr('data-url');

    //var fxn = $('.rc-theme li.active a').attr('data-function');


    //// Construct map request url.

    //url += '/exportImage?f=image';

    //url += string.substitute('&bbox=${xmin},${ymin},${xmax},${ymax}', {

    //    xmin: _view.extent.xmin,

    //    ymin: _view.extent.ymin,

    //    xmax: _view.extent.xmax,

    //    ymax: _view.extent.ymax

    //});

    //url += '&bboxSR=' + _view.spatialReference.wkid;

    //url += '&imageSR=' + _view.spatialReference.wkid;

    //url += string.substitute('&size=${w},${h}', {

    //    w: Math.min(Math.round(scale * _view.width), MAX_IMAGE),

    //    h: Math.min(Math.round(scale * _view.height), MAX_IMAGE)

    //});

    //url += string.substitute('&time=${f},${t}', {

    //    f: 0,

    //    t: Date.UTC(year, 0, 1)

    //});

    //url += '&format=' + 'jpg';

    //url += '&interpolation=' + 'RSP_BilinearInterpolation';

    //url += '&mosaicRule=' + '{mosaicMethod:\'esriMosaicAttribute\',sortField:\'AcquisitionDate\',sortValue:\'2017/02/06, 12:00 AM\',ascending:true,mosaicOperation:\'MT_FIRST\',where:\'CloudCover<=0.1\'}';

    //url += '&renderingRule=' + string.substitute('{rasterFunction:\'${rasterFunction}\'}', {

    //    rasterFunction: fxn

    //});

    //return url;

}

RickeyFight
MVP Regular Contributor

That works perfectly! Thank you! 

I am now planning to add more years imagery and some old maps. 

RickeyFight
MVP Regular Contributor

rcarmichael-esristaff   How difficult would it be to change the text on the lens? 

I am using data-year to define the lens source. This results in a random folder name being put into the title

Could we use the same text as the drop down or add a new variable? 

RichieCarmichael
Esri Contributor

Hi dafiter,

Below is an example of using the text in the dropdown menu as the label in an imagery window.

Hope this helps.

Cheers,

Richie

line ~152 of index.js

if ($(this).parent().parent().hasClass('rc-year')) {

    // Get year.

    var year = $(this).attr('data-year');

    var label = $(this).html();


    // Close all popups if user picks last entry.

    if (year === 'close-all'){

        $('.rc-window').remove();

        return;

    }


    // Add new lens.

    addLens(

        year,

        DEFAULT_SIZE,

        label

    );

}

line ~180 of index.js

// Function that adds a new lens.

function addLens(year, size, label) {

line ~278 of index.js

// Add year text

window.append(

    $(document.createElement('div')).css({

        position: 'absolute',

        left: '0',

        top: '0',

        color: 'rgba(255, 255, 255, 0.5)',

        'font-size': '24px',

        'font-weight': 700,

        'pointer-events': 'none',

        'margin-top': '1px',

        'margin-left': '5px'

    }).html(label)

);

RickeyFight
MVP Regular Contributor

rcarmichael-esristaff

That is exactly what I needed thank you

-Rickey