- Home
- :
- All Communities
- :
- Developers
- :
- Python
- :
- Python Documents
- :
- Schedule a Python Script using Windows Task Schedu...
- Subscribe to RSS Feed
- Mark as New
- Mark as Read
- Bookmark
- Subscribe
- Printer Friendly Page
Schedule a Python Script using Windows Task Scheduler
Schedule a Python Script using Windows Task Scheduler
Note: ArcGIS Pro 2.5 users can easily automate scripts and models within Pro. See the documentation here.
Here are the steps to execute a python script using Windows Task Scheduler. This is very useful when you need to execute a script at a prescribed time, or when you need to continuously execute a script (i.e. every 15 minutes). The below steps must be run from a server that has python installed.
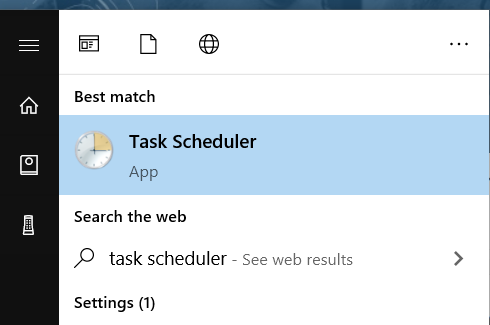
1. Go Start and search for Task Scheduler
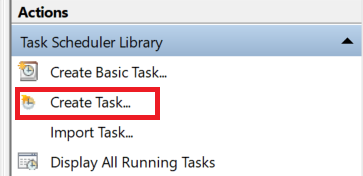
2. Under the Actions pane on the right, click Create Task
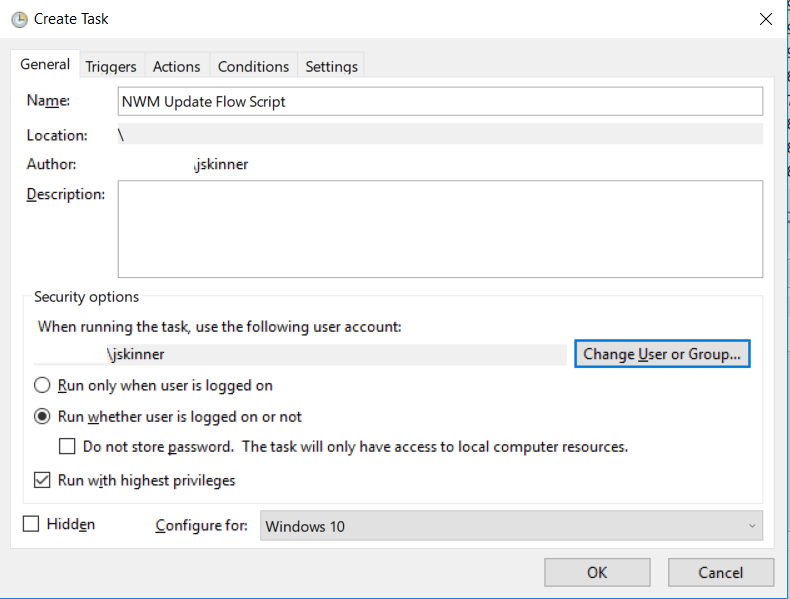
3. Specify a Name for the task, Security Options, and set the Configure for to the appropriate Operating System
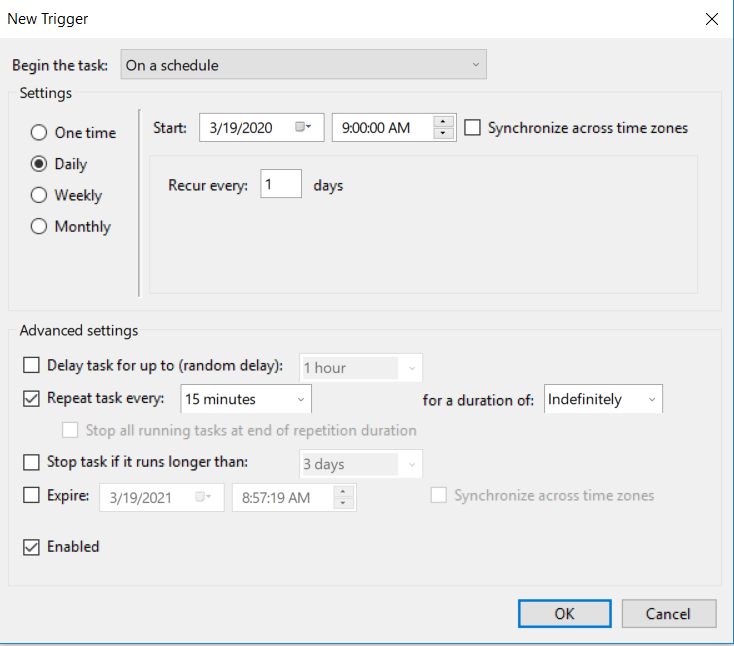
4. Click the Triggers tab and then click New
5. Specify the schedule properties. For example, if you wanted to execute a python script every 15 minutes, set the Settings to Daily, then specify a Start date and time. Under the Advanced settings, check Repeat task every and set this to a value. Then set the for a duration of setting. The below example will execute the script every 15 minutes indefinitely starting on 3/19/2020 at 9:00:00 AM.
6. Click the Actions tab and click New
7. Set the Action to Start a program. The Program/Script needs to be set to the path of your python executable (python.exe). In the below example, the script will be executed using Python 3.x, so I will specify the path to the python.exe for my ArcGIS Pro install. This is generally located at: "C:\Program Files\ArcGIS\Pro\bin\Python\envs\arcgispro-py3\python.exe".
The Add argument will be the path to my script: "C:\Projects\Scripts\NWM_UpdateFlow.py"
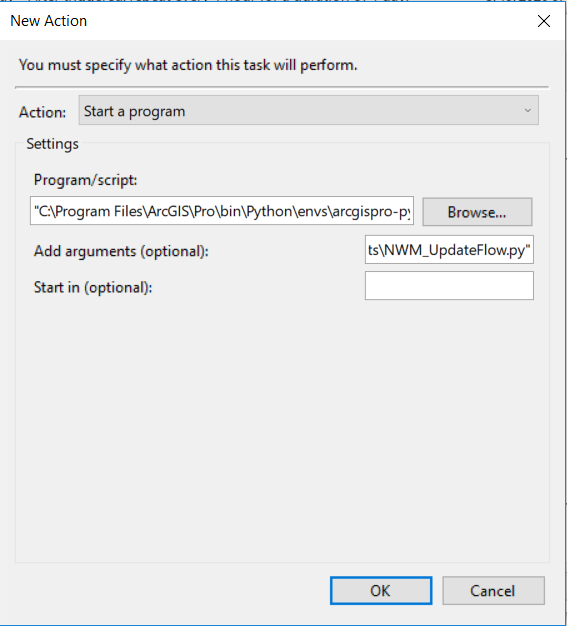
8. Optionally, set any settings on the Conditions and Settings tab, then click OK to create the task. If you chose the option to have the task execute whether the user is logged on or not, you will be presented with a dialog to enter your credentials. The task will then be ready to execute at the Start time:

A video of the workflow can be found at the link below:
If your scheduled task completes successfully (code 0x0), but nothing seems to happen as the result of your code, the cause may be how you are using relative paths in your script. Yes, you may have entered fully qualified paths to python.exe and your script (and maybe filled the "start in" item too) when configuring the scheduled task BUT the scheduled task itself starts from C:\windows\system32 and certain relative path syntax that works in an IDE (e.g., IDLE, pyCharm, etc.) will not work as a scheduled task. For example, a script containing a relative path of /pathToItem works just fine in IDLE. However, if you print out the path (to a txt file) that is created from when executed from Task Scheduler you can see that the script is actually looking for the resource in C:\windows\system32\pathToItem. Obviously, this isn't going to work. Changing the relative path to ./pathToItem is a simple fix that may allow your script to truly execute successfully from Task Scheduler.
Do you have any other suggestions for another reason why a scheduled task would complete successfully, but nothing seems to happen? Per your suggestion above @bspivey, I have tried both absolute file paths and relative file paths formatted as you suggested above in my python script and neither seem to make a difference. I am not getting an error message of any kind but rather it shows that the task was completed within 7 seconds. The script runs correctly outside of Task Scheduler and the task was configured exactly as shown in the original post. Thanks!
@JesseHandler, that's tough to answer without specifics but my suggestion, although a bit painful, would be to start super simple and iteratively add functionality. In other words, comment out all of the code except for your import statements and add a simple function that writes 'hello world' to a file. Get that to work and then build from there. Good luck!
@JesseHandler We had a similar issue that was caused by running the script as a different user. The issue was caused by the licensing of ArcGIS Pro being saved in a user's profile and the user running the script had not opened ArcGIS Pro and set the licensing.
Blake - How were to able to determine "The issue was caused by the licensing of ArcGIS Pro being saved in a user's profile and the user running the script had not opened ArcGIS Pro and set the licensing."
I am interested in knowing what tools you used to determine that this was the root cause of the issue. Which type of licensing were you useing for Pro - Named User or Concurrent Use?
The Python scripts were scheduled to run with Windows Task scheduler. We chose the option to run the script even if the user is logged out and saved the credentials of the service account user to run as. This is how I knew what user is accessing concurrent use ArcGIS Pro licenses from our license manager on an internal server. As a troubleshooting step, I logged in with that user and attempted to launch ArcGIS Pro and immediately noticed the app was not configured with concurrent use licensing from our license server (despite having already logged in as myself on the same machine and configured concurrent use licensing for ArcGIS Pro.
I have also experienced this issue on other users' machines on which I am installing ArcGIS Pro. When I log in as myself to install and configure ArcGIS Pro, the configurations (like setting concurrent use licensing) are not there when the user logs in.
Does the user that runs the script have to be the same user that published the scheduled task in Pro? The reason I ask is that I don't want the scheduled task to run as my Windows user account, where the password changes on a quarterly basis. I want it to run with a Windows user account that has a static password (one that is not tied to a specific person). Does this static-password user account have to be assigned a license of Pro or can it just be an account that has privileges to run the script in Windows? Thank you for any responses.
@MatthewStull1, yes, it can run as a service account (different from the author of the task). The service account does need to have the appropriate ArcGIS Pro license configured.
Great, thanks for the feedback.
We're having a similar issue. I've checked that there's a license available within arcpy, and I don't have any issues when I start up pro on our server, everything is configured the way it should be. Any other ideas why task manager might not be running the script? (I've run the script through task manager successfully off my workstation computer, but we cannot get it to run off the server using the the service account. My user does not have permissions on the server or I would try that.)
One thing that was stopping ours from working was not having the quotes (like this example "xyzx") around our "Add arguments (optional): input box. Ours looks like this:
@JakeSkinner Can you please verify if this is true and the only way to run the task as a Service Account? This seems like a wild work around - "yes, it can run as a service account (different from the author of the task). The service account does need to have the appropriate ArcGIS Pro license configured."
i.e. creating an ArcGIS account & ArcGIS Pro license for the service account, logging into ArcGIS Pro with it
@AndreaB_ make sure you can successfully open Pro with the user account executing the python script. I've seen error's "Product is not Initialized" when Pro has never been opened with the user account.
@JakeSkinner Thank you.
I have read that some people use a Single Use license for the Service Account. Single Use licenses are going away/being retired etc. With Named User licensing, the ArcGIS Pro license will be reset about every 2 weeks and that service account will be signed out of Pro on the server. What is the recommended workflow for scheduling tasks with this new Pro licensing model?
@AndreaB_ I've heard that concurrent use licensing is going away, but not single use. When you say the ArcGIS Pro license will be reset every 2 weeks, is the license being revoked from the Service Account?
Hi @JakeSkinner ,
"As a software license administrator, you can convert ArcGIS Pro add-on licenses acquired through ArcGIS Desktop to Single Use licenses if the corresponding ArcGIS Desktop license is Single Use. Licenses are converted in My Esri. ArcGIS Pro Named User licenses that are included with the Creator, Professional, and Professional Plus user types can't be converted to Single Use licenses." Desktop is already gone for us so I can't convert a license to Single Use. https://pro.arcgis.com/en/pro-app/latest/get-started/convert-named-user-licenses-to-single-use.htm
I haven't been using my script for more than 2 weeks yet - but I assume if I don't open ArcGIS Pro on the server as the Service Account then the license will be revoked. License Timeout posts: https://community.esri.com/t5/arcgis-pro-questions/sop-for-automating-tasks-under-arcgis-pro-python-...
I think I'll have to investigate using code like that. This is a bit of a stretch for my current python skills, but I'm up for the challenge.
What do you think - any other ideas? Have you seen the license timeout behavior?
