- Home
- :
- All Communities
- :
- Developers
- :
- Python
- :
- Python Blog
- :
- Creating Labels with Related Table Data
Creating Labels with Related Table Data
- Subscribe to RSS Feed
- Mark as New
- Mark as Read
- Bookmark
- Subscribe
- Printer Friendly Page
Performance Issue of Past Solutions
The subject of creating labels that include data from related feature classes/tables in a One-To-Many or Many-To-Many relationship has come up many times over the years, and while there have been a few solutions proposed, all have suffered from poor performance. However, I have discovered a way to overcome the performance issues after further experimentation with the techniques I described in my Turbo Charging Data Manipulation with Python Cursors and Dictionaries.
Previous solutions were slow, because they kept processing queries for each label being generated by building an SQL expression from the relate value of each feature being labeled to return the set of related records one label at a time from the related feature class/table. This is an extremely inefficient and slow way to process look-ups against a relate.
Solving Performance Issues by Using Global Dictionaries for Related Data
Dictionaries are the perfect solution for handling relate look-ups. The reason is that the insert/delete/look-up time of items in the dictionary is amortized constant time - O(1) - which means no matter how big the dictionary gets, the time it takes to find something remains relatively constant. This is highly desirable for high-speed look-ups. Therefore it is much more efficient to read an entire related feature class/table into a dictionary and process the related value of each label against a dictionary key value than it is to repeatedly process SQL queries against the related feature class/table for each label relationship.
However, a dictionary would also be no good if the entire related feature class/table had to be reloaded into the dictionary as each label was being processed. Fortunately there is no need to do that, and the entire related feature class/table can be loaded into the dictionary once when the first label is created. To do that the dictionary is created as a global variable of the label function that is only loaded by the first label. All other labels just check to see if the dictionary has already been loaded. If it has, the related feature class/table will not be queried again. As long as the labels are being generated, all subsequent labels will just use the already loaded global dictionary to get the related feature class/table data.
Each time the map is refreshed, the global dictionary is rebuilt for just the first label again and then that dictionary is used until all of the labels are refreshed. Therefore, edits to the related feature class/table will be reflected each time the labels are refreshed. Editing a related feature class will cause the map to refresh as edits are posted. However, editing a related standalone table will not cause the map to automatically refresh the labels as each edit is posted. You will have to manually refresh the map to see the standalone table updates. However, I consider that a good thing, since waiting for map refreshes after editing one record at a time is very time consuming and there is no need to refresh the labels at all if the related standalone table is only edited in fields that do not participate in the label expression.
Example 1: The Fundamental Code to Create Labels Using this Technique
The labels shown in this picture were created by the code below. The related intersection event table used to create these labels contains over 130,000 records, all of which are read into the dictionary when the first label is processed. These labels took less than 9 seconds to draw.
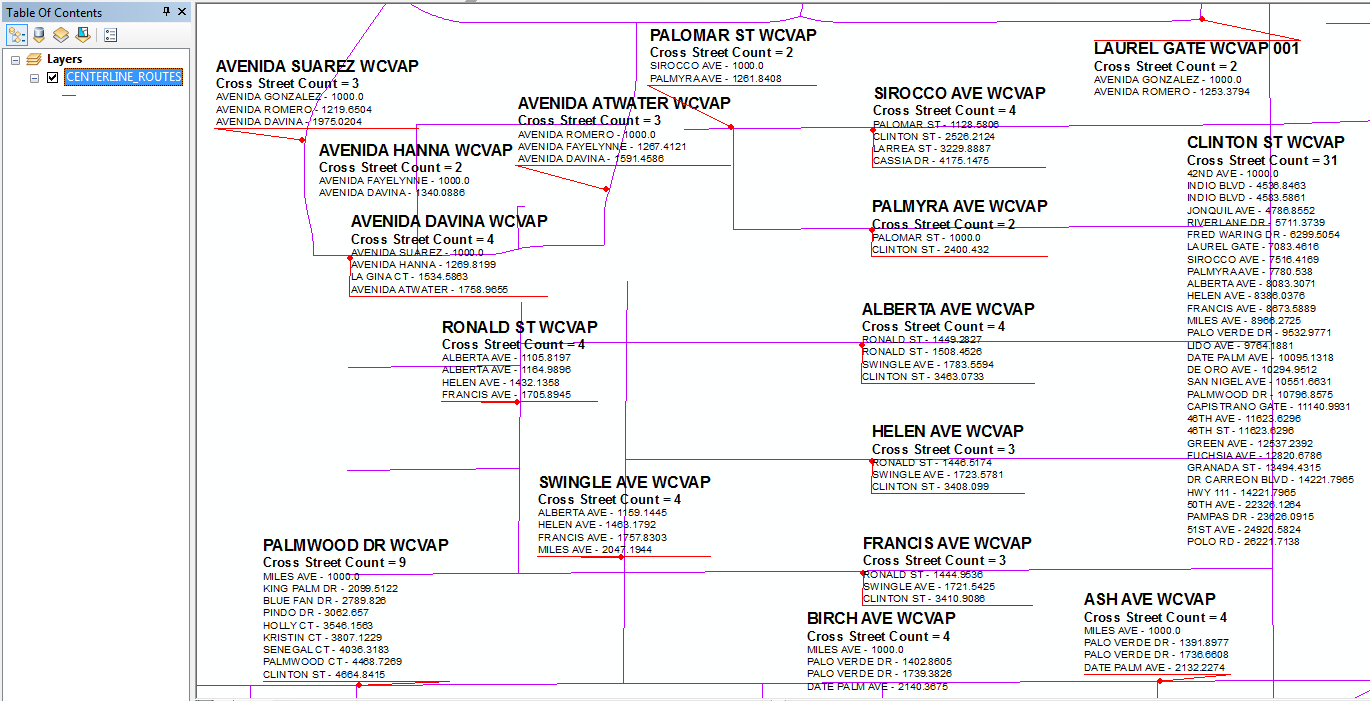
To use the code below I went to the Label tab of the Routes and checked the Label check box. Then I pressed the Expression button for the labels, I changed the Label Parser from VBScript to Python. After checking the Advanced expression option, I placed the code below in the expression editor. This expression creates a label for my layer of linear referenced Routes shown above and includes data from a related table of intersection linear reference events. It lists the Route ID (ROUTE_NAME) in the header of the label in 12 point Bold font. Under that I show a summary count value of the number of intersection cross street names contained in the related table in 10 point Bold font. Then I list the related cross street names and their event measure value for each intersection in the regular 8 point font. The list of cross streets is sorted as a list based on the measures so that they appear in driving order going in the direction of the route's measure orientation.
# Initialize a global dictionary for a related feature class/table
relateDict = {}
def FindLabel ( [ROUTE_NAME] ):
# declare the dictionary global so it can be built once and used for all labels
global relateDict
# only populate the dictionary if it has no keys
if len(relateDict) == 0:
# Provide the path to the relate feature class/table
relateFC = r"C:\Users\OWNER\Documents\ArcGIS\Centerline_Edit.gdb\CL_INTERSECTIONS_PAIRS"
# create a field list with the relate field first (ROUTE_NAME),
# followed by sort field(s) (MEASURE), then label field(s) (CROSS_STREET)
relateFieldsList = ["ROUTE_NAME", "MEASURE", "CROSS_STREET"]
# process a da search cursor to transfer the data to the dictionary
with arcpy.da.SearchCursor(relateFC, relateFieldsList) as relateRows:
for relateRow in relateRows:
# store the key value in a variable so the relate value
# is only read from the row once, improving speed
relateKey = relateRow[0]
        # if the relate key of the current row isn't found
        # create the key and make it's value a list of a list of field values
        if not relateKey in relateDict:
          # [searchRow[1:]] is a list containing
          # a list of the field values after the key.
          relateDict[relateKey] = [relateRow[1:]]
        else:
          # if the relate key is already in the dictionary
          # append the next list of field values to the
          # existing list associated with the key
          relateDict[relateKey].append(relateRow[1:])
# delete the cursor, and row to make sure all locks release
del relateRows, relateRow
# store the current label feature's relate key field value
# so that it is only read once, improving speed
labelKey = [ROUTE_NAME]
# start building a label expression.
# My label has a bold key value header in a larger font
expression = '<FNT name="Arial" size="12"><BOL>{}</BOL></FNT>'.format(labelKey)
# determine if the label key is in the dictionary
if labelKey in relateDict:
# sort the list of the list of fields
sortedList = sorted(relateDict[labelKey])
# add a record count to the label header in bold regular font
expression += '\n<FNT name="Arial" size="10"><BOL>Cross Street Count = {}</BOL></FNT>'.format(len(sortedList))
# process the sorted list
for fieldValues in sortedList:
# append related data to the label expression
# my label shows a list of related
# cross streets and measures sorted in driving order
expression += '\n{} - {:.4f}'.format(fieldValues[1], fieldValues[0])
# clean up the list variables after completing the for loop
del sortedList, fieldValues
else:
expression += '\n<FNT name="Arial" size="10"><BOL>Cross Street Count = 0</BOL></FNT>'
# return the label expression to display
return expression
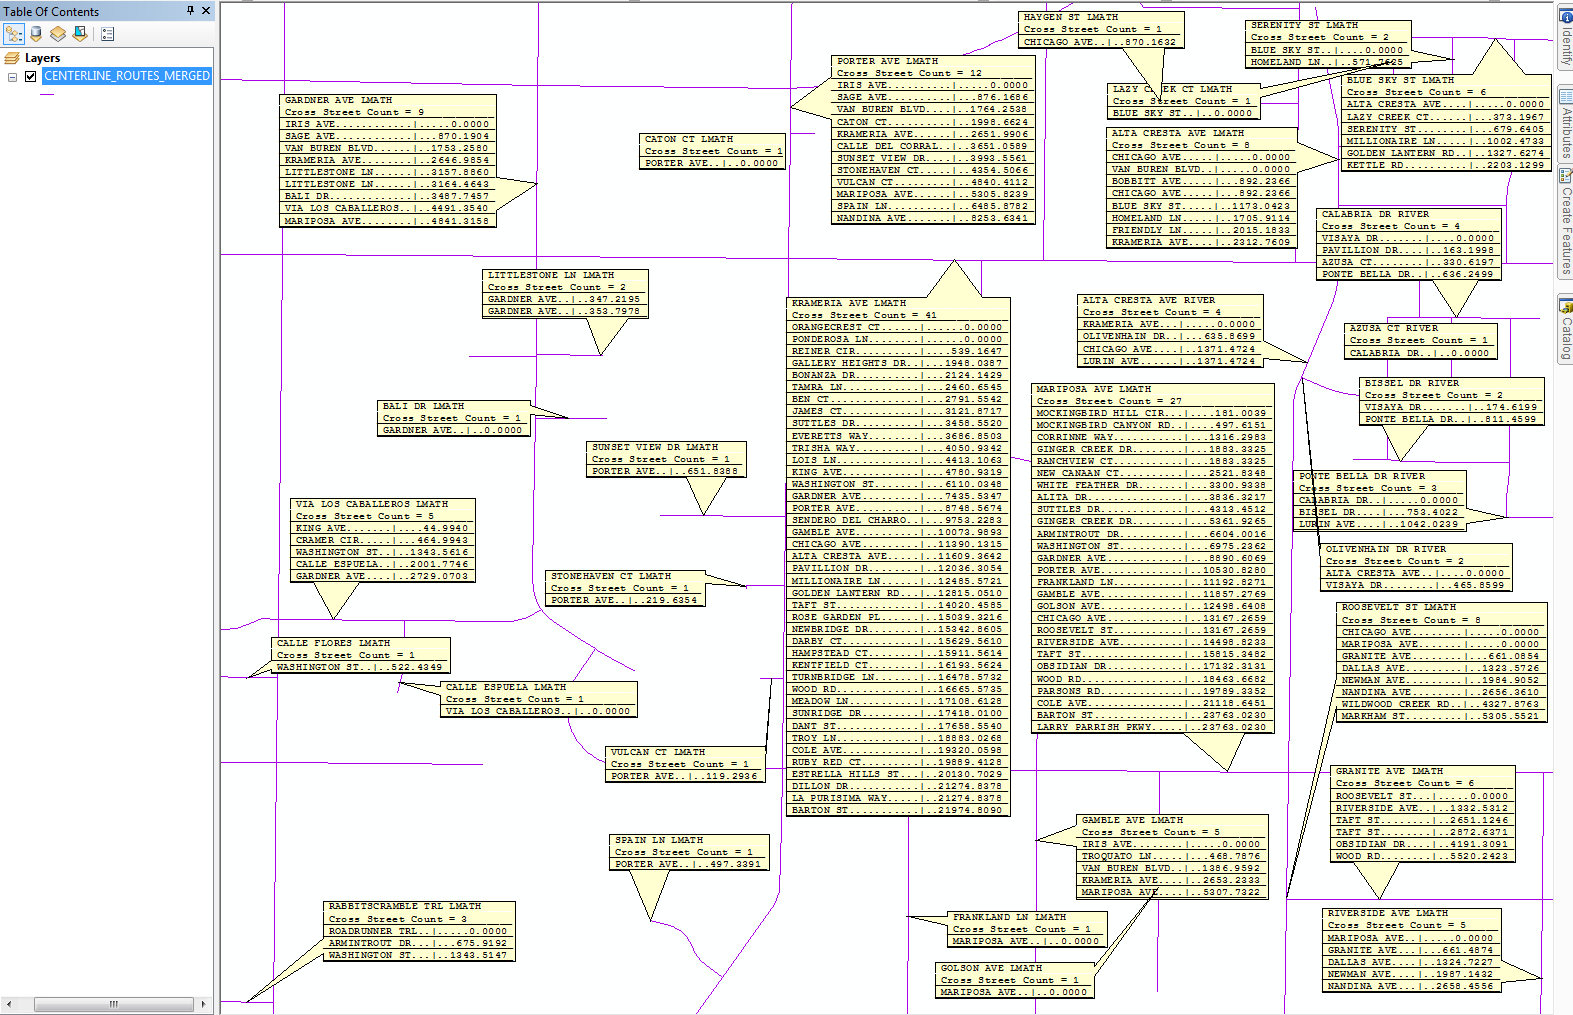
Example 2: Adapting the Code to Produce Table Style Labels
The labels shown represent only one of the possible ways I could have summarized and/or listed the related feature class/table data. A semi-tabular presentation is possible if I use a fixed-spaced font like Courier New. A method for making a tabular style label was given in this post by Jennifer Horsman; however, her code used VBScript and used an inefficient search cursor algorithm. Below I have adapted her code to use Python and the much more efficient dictionary algorithm shown above.
# Initialize a global dictionary for a related feature class/table
relateDict = {}
def FindLabel ( [ROUTE_NAME] ):
# declare the dictionary global so it can be built once and used for all labels
global relateDict
# only populate the dictionary if it has no keys
if len(relateDict) == 0:
# Provide the path to the relate feature class/table
relateFC = r"C:\Users\OWNER\Documents\ArcGIS\Centerline_Edit.gdb\CL_INTERSECTIONS_PAIRS"
# create a field list with the relate field first (ROUTE_NAME),
# followed by sort field(s) (MEASURE), then label field(s) (CROSS_STREET)
relateFieldsList = ["ROUTE_NAME", "MEASURE", "CROSS_STREET"]
# process a da search cursor to transfer the data to the dictionary
with arcpy.da.SearchCursor(relateFC, relateFieldsList) as relateRows:
for relateRow in relateRows:
# store the key value in a variable so the relate value
# is only read from the row once, improving speed
relateKey = relateRow[0]
# if the relate key of the current row isn't found
# create the key and make it's value a list of a list of field values
if not relateKey in relateDict:
# [searchRow[1:]] is a list containing
# a list of the field values after the key.
relateDict[relateKey] = [relateRow[1:]]
else:
# if the relate key is already in the dictionary
# append the next list of field values to the
# existing list associated with the key
relateDict[relateKey].append(relateRow[1:])
# delete the cursor, and row to make sure all locks release
del relateRows, relateRow
# store the current label feature's relate key field value
# so that it is only read once, improving speed
labelKey = [ROUTE_NAME]
# variables to adjust table cell sizes
iMaxLbl1Sz = 0
iMaxLbl2Sz = 0
iSpace = 5
# determine if the label key is in the dictionary
if labelKey in relateDict:
# sort the list of the list of fields
sortedList = sorted(relateDict[labelKey])
# process the sorted list to determine cell spacing
for fieldValues in sortedList:
strLabel1 = fieldValues[1]
strLabel2 = '{:.4f}'.format(fieldValues[0])
if (len(strLabel1) > iMaxLbl1Sz):
iMaxLbl1Sz = len(strLabel1)
if (len(strLabel2) > iMaxLbl2Sz):
iMaxLbl2Sz = len(strLabel2)
# clean up the fieldValues variable once the for loop is done
del fieldValues
# My label has a key value header followed by a record count
expression = labelKey
expression += '\n<UND>Cross Street Count = {}</UND>'.format(len(sortedList)) + '_' * (iMaxLbl1Sz + iMaxLbl2Sz + iSpace + 1 - len('Cross Street Count = {}'.format(len(sortedList))))
# process the sorted list
for fieldValues in sortedList:
strLabel1 = fieldValues[1]
strLabel2 = '{:.4f}'.format(fieldValues[0])
k1 = (iMaxLbl1Sz - len(strLabel1)) + 2
k2 = iSpace + (iMaxLbl2Sz - len(strLabel2)) - 3
# append related data to the label expression
# my label shows a list of related
# cross streets and measures sorted in driving order
expression += '\n' + strLabel1 + "." * k1
expression += "|"
expression += "." * k2 + strLabel2 + "|"
# clean up all list variables after completing the for loops
del sortedList, fieldValues
else:
# My label has a key value header followed by a record count
expression = labelKey
expression += '\n<UND>Cross Street Count = 0</UND>'
# return the label expression to display
return expression
The code above results in this output:

Example 3: Another Table Style Label Alternative
Here is an alternative table style layout. The code below includes all of the code shown in the previous example through line 36, but replaces the code that began in line 37 in the code for example 2 as follows:.
# variables to adjust table cell sizes
iMaxLbl1Sz = 0
iMaxLbl2Sz = 0
iSpace = 5
# determine if the label key is in the dictionary
if labelKey in relateDict:
# sort the list of the list of fields
sortedList = sorted(relateDict[labelKey])
# process the sorted list to determine cell spacing
for fieldValues in sortedList:
strLabel1 = fieldValues[1]
strLabel2 = '{:.4f}'.format(fieldValues[0])
if (len(strLabel1) > iMaxLbl1Sz):
iMaxLbl1Sz = len(strLabel1)
if (len(strLabel2) > iMaxLbl2Sz):
iMaxLbl2Sz = len(strLabel2)
# clean up the fieldValues variable once the for loop is done
del fieldValues
# My label has a key value header followed by a record count
expression = "<CLR red='255' green='255' blue='255'>_</CLR>" + labelKey + "<CLR red='255' green='255' blue='255'>" + '_' * (iMaxLbl1Sz + iMaxLbl2Sz + iSpace + 2 - len("_"+labelKey)) + "</CLR>"
expression += "\n_<UND>Cross Street Count = {}</UND>".format(len(sortedList)) + '_' * (iMaxLbl1Sz + iMaxLbl2Sz + iSpace + 2 - len('_Cross Street Count = {}'.format(len(sortedList))))
# process the sorted list
for fieldValues in sortedList:
strLabel1 = fieldValues[1]
strLabel2 = '{:.4f}'.format(fieldValues[0])
k1 = (iMaxLbl1Sz - len(strLabel1)) + 2
k2 = iSpace + (iMaxLbl2Sz - len(strLabel2)) - 3
# append related data to the label expression
# my label shows a list of related
# cross streets and measures sorted in driving order
expression += '\n_<UND>' + strLabel1 + "." * k1
expression += "|"
expression += "." * k2 + strLabel2 + "</UND>_"
# clean up all list variables after completing the for loops
del sortedList, fieldValues
else:
# My label has a key value header followed by a record count
expression = "<CLR red='255' green='255' blue='255'>_</CLR>" + labelKey
expression += '\n_<UND>Cross Street Count = 0</UND>'
# return the label expression to display
return expression
With some adjustments to the label style and using the Maplex Label Engine, the example 3 code variation can produce an output that looks like the example below:
Considering Other Possibilities Supported by this Technique
More complex relationship primary and foreign keys can also be handled by modifying the code above. A dictionary works for almost anything where exact values shared between the parent feature class and related feature class/table can be looked-up, even when a join or relate is not possible in ArcMap. For example, the dictionary key could be used to do look-ups based on a sub-string from a field or on many fields in the parent feature class and/or related feature class/table to create a multi-field key look-up without having to parse or concatenate the values of those fields into a new field in the original feature classes/tables. Look-ups based on portions of dates or numeric calculations could also be done without creating fields to hold those values, as long as an exact match between the two sources can be made.
A limited set of spatial look-ups can also be handled by a dictionary, such as finding exact matches or duplicates of shapes or finding extracted coordinates that are shared by the two geometries (for example, a dictionary look-up of points can be done against the from or to end point coordinates of a line where the points overlap the line ends). However, dictionaries cannot be used to speed up inexact value matching or near proximity spatial relationships.
Additionally, I could have used multiple global dictionaries to build labels from more than one relate look-up. This is useful in situations where the parent feature class has several fields relating to more than one related feature class/table, or where multi-level feature class/table relationships exist (i.e., the parent feature class relates to a child feature class/table, and the child feature class/table relates to another child feature class/table through one or more of its fields).
Situations Where the Technique Shown Might Not Work and Possible Solutions
The primary reason that this technique may not work will occur when the related feature classes/tables are too large to fit in memory after being loaded into a dictionary. In these cases, applying some sort of query filter on the related feature class/table based on the entire set of parent features in the current map extent would be required before loading it into the dictionary to keep the dictionary from becoming too large. While it may be possible to do this with arcpy mapping code, I have not tried that to see if it works, but that is something that I may look into later.
Memory management of this code is also important to avoid memory leaks, since this code can bypass the normal memory management processes of the label engine. For example, memory issues may occur after several label refreshes if variables used to process the lists of listed fields in for loops are not deleted after the loops complete and the list variables are no longer needed.
How I Configured the Labels Shown in the Examples
In case you like the label style layout shown in my screen shot above, here are the settings I used:
I used the Standard Label Engine. The initial label symbol was set to be the Bullet Leader symbol from the predefined symbol list. I modified the font from 10 point to 8 point. For the labels in screen shot 1 I used Arial font and for the table style labels in screen shot 2 I used Courier New (or some other fixed space font). The Placement Properties are set to Horizontal Placement. I pressed the Symbol button, then I pressed the Edit Symbol button, then I chose the Advanced Text tab and pressed the Text Background Properties Button. On the Text Background Properties dialog I changed the leader style to the angled line type associated with the fifth radio button. I pressed the Symbol button under the Leader check box and changed the line and arrow symbol shown as a dot to red. After returning to the Text Background Properties dialog, I checked the Border option for the background and then pressed the Symbol button under the Border check box to set the border fill and border line style to No Fill. After pressing OK on all child dialogs, I set the horizontal alignment on the General tab on the first Symbol dialog to Left.
You must be a registered user to add a comment. If you've already registered, sign in. Otherwise, register and sign in.