<\/HEAD>
The requirements are changing. Whereas in the past digital data processing was exclusively limited to the office, today there is more and more the possibility to also perform this work on the go.<\/SPAN><\/P><\/P>In many scenarios, this is also necessary: for example, the inspection of road damage by the road maintenance department – no more post-processing of information recorded on paper. Instead, location-based data collection enriched with damage images and an immediate flow of information that a dispatcher can react to instantly.<\/SPAN><\/P><\/P>Or using the example of a forestry administration: where no address data is available, GPS data is needed to manage and locate timber storage sites. This also enables truck drivers unfamiliar with the area to be offered a location description or even route guidance.<\/SPAN><\/P><\/P>The technology for this has existed for several years and is offered by Esri in various products that fit ideally depending on the requirement. One of the newest members of this product family is the ArcGIS Runtime SDK for .NET<\/A>. This is a developer tool for the Microsoft platform with which applications can be created for Windows Desktop, Windows Store, and Windows Phone – thus covering the entire spectrum from phone through tablet to classic desktop. And all with just one framework.<\/SPAN><\/P><\/P>
All "ArcGIS Runtime" SDKs share offline functionality. This core functionality introduced with 10.2.3 provides all tools to manage data locally and without a network connection and then synchronize it with a central data repository (such as
ArcGIS Online Cloud<\/A>). Architectures are possible that combine different ArcGIS products: In a Collector Light Demo<\/A><\/STRONG> implemented by Esri Germany, it is shown that a .Net client and a Java client – each based on an ArcGIS Runtime SDK – can manage data offline. This demo even goes so far that the offline cache is uniformly structured and thus equally usable for both clients.<\/SPAN><\/P><\/P>
Using the example of the .NET demo, a few workflows will be explained and some tips given that can help realize your own application. All shown code parts and screenshots you will find again in this or similar form in the demo project.<\/SPAN><\/P><\/P>The demo project is built according to the MVVM concept and uses a 3rd party toolkit called
MVVM Light<\/A>. The concept envisages decoupling the UI from business logic, making interfaces interchangeable and allowing reuse of the logic layer in different applications on various platforms.<\/SPAN><\/P><\/P>
Briefly about the idea of the demo application: You can log in to the Esri Cloud via an ArcGIS Online account and then search for maps set up for offline use. If you move within an organization with your account, you not only see your own maps but all those shared for joint use by colleagues. You can select any map and make a version available offline, which you can then use without a network connection. Editing data is also possible.<\/SPAN><\/P><\/P>
Does anyone have a map? <\ / SPAN ><\ / H1 >< P >< SPAN style = " font - family : trebuchet ms , geneva ; " > This was the first part of preparations, so we have a user account and we have a Client ID for our application. But what’s still missing are maps that we can then also use offline. Because if we were to work with the demo now, we could successfully log in but would have no hits when searching afterwards.<\ / SPAN ><\ / P >< P ><\ / P >< P >< SPAN style = " font - family : trebuchet ms , geneva ; " > So now we create a map, more precisely, a Web Map. Go to “My Content”. Here you already see your registered application.<\ / SPAN ><\ / P >< P >< SPAN style = " font - family : trebuchet ms , geneva ; " >< IMG __jive_id = " 55825 " alt = " 3.png " class = " image-3 jive-image " src = " https : \/ \/ us.v-cdn.net \/ 6038851 \/ uploads \/ legacyfs \/ online \/ 55825_3.png " style = " height : auto ; " \/ ><\ / SPAN ><\ / P >< P >< SPAN style = " font - family : trebuchet ms , geneva ; " > You create a new map now with “Create->Map”. In the following input window we give the map a title (to maintain a consistent scheme: “My cool Map”) and define tags. Tags are again necessary here because maps can later be found by keywords through these tags. Thematic and local keywords such as “offline” and “Munich” are recommended.<\ / SPAN ><\ / P >< P ><\ / P >< P >< SPAN style = " font - family : trebuchet ms , geneva ; " > When you finally create the map with “Ok”, you next see an empty world map. Here you can change the base map as desired but above all add map layers with data. These can be your own data or publicly available data.<\ / SPAN ><\ / P >< P >< SPAN style = " font - family : trebuchet ms , geneva ; " > Go to “Add->Search Layers”. Enter Enter "Damage Report Freising" in the search and "ArcGIS Online" for location. Remove the checkmark at "Within map extent" if you do not get a result. Add this data to your map with "Add". Select the damage layer and click on "Zoom to", which will change the current and future start map extent. Save the map and switch back to the view "My Content".<\/SPAN><\/P><\/P>You will now see another entry of type Web Map, the newly created map. Click on the name of the map to go to the property view. One of these properties is called "Offline Mode", which already says "Enabled" behind it. This setting is necessary to use the map offline. If it says "Disabled" for you, click on "Edit" and check "Enable Offline Mode".<\/SPAN><\/P><\/P>Who am I? <\/SPAN><\/H1>The necessary preparations are now complete, we can now focus on the demo application. When started for the first time, it asks for an App ID. Enter here the Client ID that we received when registering the application.<\/SPAN><\/P> <\/SPAN><\/P>After saving the App ID, you will reach the start screen.<\/SPAN><\/P><\/P>The first path leads to login, where it gets exciting for the first time. Here a login page appears:<\/SPAN><\/P>
 <\/SPAN><\/P>What is interesting about this? Well, the login page is dynamically loaded web content displayed in a browser control. Depending on the requested URL, the content will differ somewhat from the screenshot shown, for example regarding application title, author, or language. Essentially, however, the structure is the same.<\/SPAN><\/P><\/P>A standard procedure for login is used here, which is described in more detail on the ArcGIS Developer pages<\/A>. Only an ArcGIS URL is requested:<\/SPAN><\/P>
https:\/\/www.arcgis.com\/sharing\/oauth2\/authorize?client_id=P61TE38ydg2L7y30&response_type=code&redirect_uri=urn:ietf:wg:oeee<\/A><\/SPAN><\/P><\/P>
This is a REST endpoint that authorizes the user against ArcGIS. It requires a Client ID that we registered under our account at the beginning and which is passed as part of the URI. The rest of the URL is fixed and explained on the developer website.<\/SPAN><\/P><\/P>This has several advantages: This procedure saves a lot of development effort because the page is automatically generated server-side and adapts to configuration. The login area is also included; as a developer I do not have to handle error handling for incorrect login attempts, and whether I want to authorize against ArcGIS Cloud or a Portal solution does not matter.<\/SPAN><\/P><\/P>Once authorization has taken place, the token returned by the ArcGIS platform as a response is stored in a central, overarching (=static singleton) object called IdentityManager:<\/SPAN><\/P> <\/SPAN><\/P>It acts – as its name suggests – as central identity management. As soon as an ArcGIS service is requested, it automatically checks here whether there is already stored authorization for this service. If not, or if an authorization has expired, access to the service is not granted.<\/SPAN><\/P><\/P>
Show me what you got<\/SPAN><\/H1>So we are now able to log in with the application. Now we want to get to the bottom of the actual purpose of the application: the possibility to use maps offline.<\/SPAN><\/P><\/P>First we have to search for available objects that can be used by our application. This happens in the method SearchArcgisOnline()<\/SPAN> of class ArcGisPortalWebMapItemsViewModel<\/SPAN>. First, an ArcGIS Portal instance is created which generally serves requests against the ArcGIS platform (i.e., ArcGIS Online or Portal for ArcGIS):<\/SPAN><\/P>
Looking at the _arcGisPortal object after executing this statement shows that login took place under our previously used login:
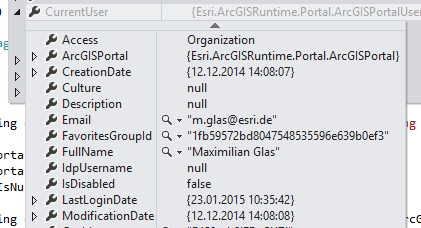
The assignment was done here by IdentityManager which found suitable credentials for requests against ArcGIS Online.
Next we want to see all maps in the application that can be saved offline. The following query searches for all maps (=Web Maps) intended for offline storage. To demonstrate how to further restrict search, only maps within organization are searched for. The SearchText is a search text from UI that can further restrict search:
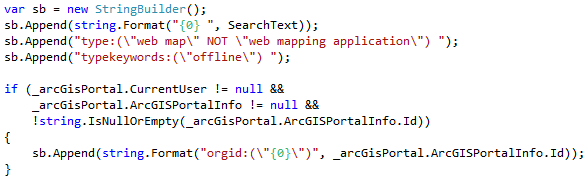
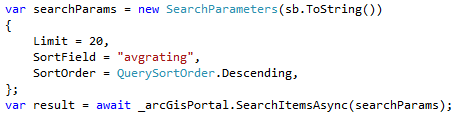
Finally some search settings are given and search request sent:
Since we initially created a Web Map named "My cool Map", let's search for keyword "cool." The search returns exactly one result in our case:
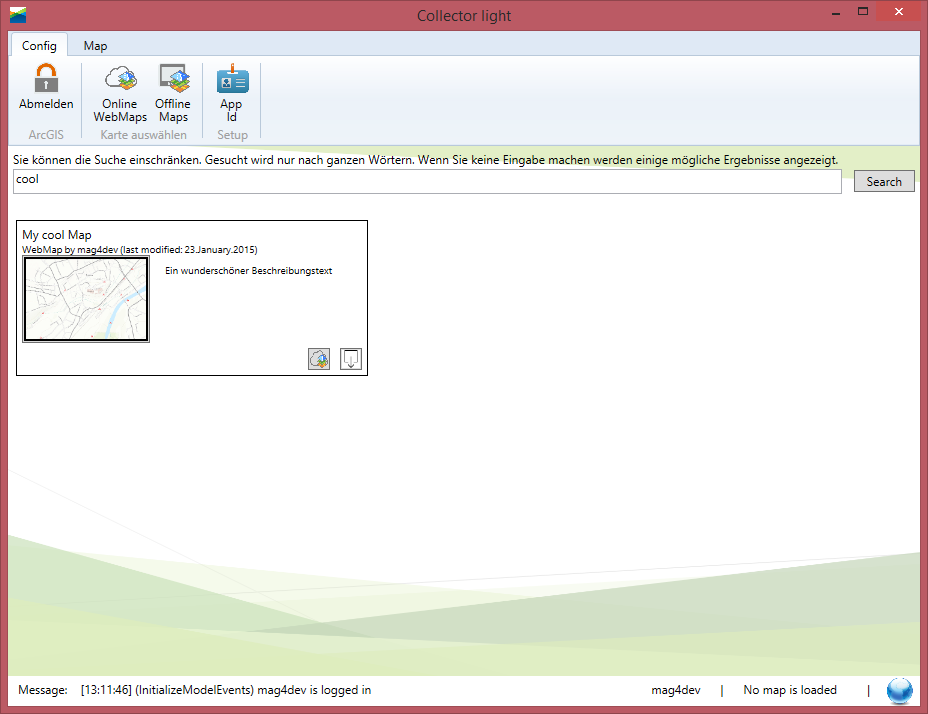
Why exactly one result? Well, of course we see our own map that we created. Surely many others find working with ArcGIS "cool," so there would probably be several "cool maps." However, these are not shown in search because part of our search criteria limits results to all objects of our own organization. Even if we are not part of a large company but just a "one-man" business, we are listed as our own organization.
Give it here!
So – let's go. Now we download this Web Map locally. To do this click on button "Get the map offline" within map object and immediately switch to a new page where content of Web Map is displayed. In three steps we get our offline map: First, we give our future cache a unique name, then mark a (partial) area that should be available offline and start the download with the button "Export Map":<\/SPAN><\/P> <\/SPAN><\/P>Another page change automatically brings us to the view of all offline available caches. This collection is – depending on how much you have already worked with the application – more or less extensive; in my case, there are already some caches. Caches are displayed grouped by Web Maps, because it is quite possible to load different caches for the same Web Map (for example, with different map sections). The group can be minimized so that only a few pieces of information about the Web Map are visible.<\/SPAN><\/P><\/P>The new cache currently downloading is marked as active by a progress bar; additionally, a status bar in the cache object provides information about the current process. Each cache object also has buttons for deleting, synchronizing, and loading the cache.<\/SPAN><\/P>
 <\/SPAN><\/P>While we wait for the cache, let's briefly look at what actually happens in the code.<\/SPAN><\/P><\/P>The main action takes place especially in the class CreateOfflineMapViewModel<\/SPAN>. This is responsible for creating the caches. The central entry point is the method ExportMap()<\/SPAN>, which was triggered when clicking "Export Map". Of course, here you find the central functions that save the most important parts of the Web Map:#_msocom_1<\/A> <\/SPAN>the geographic data, i.e., the base map and the feature data.<\/SPAN><\/P>
 <\/SPAN><\/P>Anyone who has already worked with Esri Offline Data (e.g., ArcGIS for Windows MobileSDK or the App Collector for ArcGIS) basically knows this process. Base maps and vector data are stored separately. This is partly due to the different processing of raster and feature data but also due to their different data structures: The base map is provided as a so-called Tiled Package, a zipped folder with a structure of tile images. The vector data, on the other hand, is stored in a database structure, more precisely in an SQLite format. In our case, the SQLite database ends in the filesystem as "geodatabase", but this is freely selectable.<\/SPAN><\/P>
 <\/SPAN><\/P>But before the actual geodata export starts, something else happens:<\/SPAN><\/P>
 <\/SPAN><\/P>Here, information from the Web Map is stored locally. You need to know that a Web Map is basically
a configuration file in JSON format<\/A> that itself contains no data but rather information about where the data is located. Also, information about the map definition itself such as Id, title, owner, creation date etc. are stored. These two pieces of information come from the Web Map, an online defined object which you do not have access to when working offline. To make this information available offline anyway, a mechanism was built into the demo that saves the Web Map definitions locally during export and thus makes them available in any situation.<\/SPAN><\/P><\/P>
The app makes everything new<\/SPAN><\/H1>So, meanwhile the cache is fully loaded. Now we can do three things with it: We can display it on a map, synchronize it, and delete it.<\/SPAN><\/P><\/P>We first focus on displaying the loaded cache and therefore click on "Load map".<\/SPAN><\/P> <\/SPAN><\/P>A new tab named "Map" opens and in the display we see a map and a list of all editable layers. If you select a layer, you can click on a point on the map and thus create new objects in this layer. For simplicity's sake, attribute input is omitted in the demo; only geometry is created, but this would be the next step in a complete application.<\/SPAN><\/P><\/P>That changes have been made to a layer is indicated by a number of edits shown behind affected layers in the layer list. As soon as there are changes to a cache it makes sense to synchronize it, which is also the last step that this demo wants to show.<\/SPAN><\/P><\/P>To do this, we switch back to the "Config" tab and select the "Sync" function on our cache. Again, a loading bar appears, but this time not with an export description but with a synchronization title. Unlike export, synchronization compares what changes have occurred and applies them centrally. Local changes are uploaded while changes from other clients are downloaded.<\/SPAN><\/P>
 Finale, oh oh
What was this article intended to achieve? On one hand, some typical questions and processes of an offline application should be illustrated. Combined with reference to the Collector Light Demo application you are thus able to look at and understand each step individually. This may help you solve your questions but at least gives you some ideas on how you might approach certain things.
Regarding the demo note this as well: Development already began based on an ArcGIS Runtime for .NET Beta version. Thus Esri Germany already got early insights into development and could gain experience early on. Since these early beta versions several new versions have appeared bringing numerous valuable changes. Additionally there are now extra Toolkits and Samples showing many solution approaches. So do not be surprised if you find different solutions for one and the same problem sometimes they are equivalent sometimes solutions have different advantages.
If you have further questions beyond this information and want individual advice please feel free to contact Esri Germany our Consulting Team will competently assist you.