- Home
- :
- All Communities
- :
- Products
- :
- ArcGIS Web AppBuilder
- :
- ArcGIS Web AppBuilder Questions
- :
- Web AppBuilder: Add Tab Container to Splash Widget
- Subscribe to RSS Feed
- Mark Topic as New
- Mark Topic as Read
- Float this Topic for Current User
- Bookmark
- Subscribe
- Mute
- Printer Friendly Page
Web AppBuilder: Add Tab Container to Splash Widget
- Mark as New
- Bookmark
- Subscribe
- Mute
- Subscribe to RSS Feed
- Permalink
Using Web AppBuilder for ArcGIS, how would I go about modifying the Splash widget to add a tab container with several content panes? I tried including script in the JSON file, but found script will not run from a JSON file.
I found the example below on dojo and created an html template and javascript file, but I don't know how to include them in the main Splash widget.
I am new to Javascript and Dojo, so any help would be much appreciated. Thank you.
==========
tabs.html
<div data-dojo-attach-point="tabsNode">
<div id="tc1-prog"></div>
</div>
==========
tabs.js (the content is just what was in the example on dojo)
require(["dijit/layout/TabContainer", "dijit/layout/ContentPane", "dojo/domReady!"], function (TabContainer, ContentPane) {
var tc = new TabContainer({
style: "height: 100%; width: 100%;"
}, "tc1-prog");
var cp1 = new ContentPane({
title: "Food",
content: "We offer amazing food"
});
tc.addChild(cp1);
var cp2 = new ContentPane({
title: "Drinks",
content: "We are known for our drinks."
});
tc.addChild(cp2);
tc.startup();
});
- Mark as New
- Bookmark
- Subscribe
- Mute
- Subscribe to RSS Feed
- Permalink
William,
This is going to be much more difficult then you think. You can ad the html portion to the Widgets.html. then add the requires to the Widget.js and then the other code dealing with the contentPanes to the _resizeContentImg function. The hard part will be how to not loose all the functionality that the splash widget has now. as you will have to manage which tabs content pane will get the content that is normally in the splash widget.
- Mark as New
- Bookmark
- Subscribe
- Mute
- Subscribe to RSS Feed
- Permalink
Hi Robert,
Sorry I didn't respond sooner. For some reason I was unable to reply or comment on GeoNet until this week.
I added some html to Splash/Widget.html (see below), but I'm not sure about the javascript.
Splash/Widget.html:
====================================================================
<div>
<div class="overlay" data-dojo-attach-point="overlayNode"></div>
<div class="envelope" data-dojo-attach-point="envelopeNode">
<div class="splash-container" data-dojo-attach-point="splashContainerNode">
<div class="custom-content">
<div data-dojo-attach-point="customContentNode" id="tc1-prog"></div>
</div>
<div class="footer" data-dojo-attach-point="footerNode">
<div data-dojo-attach-point="confirmCheck"></div>
<div class="jimu-btn jimu-float-trailing" data-dojo-attach-point="okNode" data-dojo-attach-event="onclick:onOkClick">${nls.ok}</div>
</div>
</div>
</div>
</div>
====================================================================
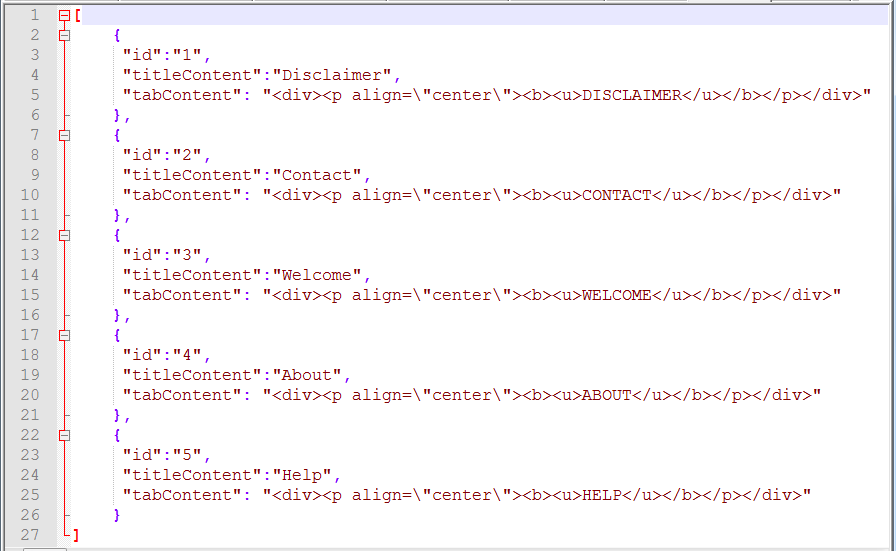
I modified the Splash/config.json and configs/Splash/config_Splash.json files so I have splashContent, splashContent2, splashContent3, splashContent4 and splashContent5, one for each of the five tabs.
Here is what I have for the Splash/Widget.js, specifically the class inclusions and postCreate function (modifications bolded):
====================================================================
define([
'dojo/_base/declare',
'jimu/BaseWidget',
'dijit/_WidgetsInTemplateMixin',
'dijit/layout/TabContainer',
'dijit/layout/ContentPane',
'dojo/_base/lang',
'dojo/_base/html',
'dojo/on',
'dojo/query',
'dojo/io-query',
'dojo/cookie',
'jimu/dijit/CheckBox',
'jimu/tokenUtils',
'jimu/utils',
'dojo/domReady!'
],
function (declare, BaseWidget, _WidgetsInTemplateMixin, TabContainer, ContentPane, lang, html, on, query, ioquery, cookie, CheckBox, TokenUtils, utils) {
var clazz = declare([BaseWidget, _WidgetsInTemplateMixin], {
baseClass: 'jimu-widget-splash',
_hasContent: null,
_hasContent2: null,
_hasContent3: null,
_hasContent4: null,
_hasContent5: null,
_requireConfirm: null,
_isClosed: false,
postCreate: function () {
this.inherited(arguments);
this._hasContent = this.config.splash && this.config.splash.splashContent;
this._hasContent2 = this.config.splash && this.config.splash.splashContent2;
this._hasContent3 = this.config.splash && this.config.splash.splashContent3;
this._hasContent4 = this.config.splash && this.config.splash.splashContent4;
this._hasContent5 = this.config.splash && this.config.splash.splashContent5;
this._requireConfirm = this.config.splash && this.config.splash.requireConfirm;
this._showOption = this.config.splash && this.config.splash.showOption;
this._confirmEverytime = this.config.splash && this.config.splash.confirmEverytime;
tc = new TabContainer({
style: "height: 600px; width:600px;"
}, "tc1-prog");
var cp1 = new ContentPane({
title: "Disclaimer",
content: this._hasContent
});
tc.addChild(cp1);
var cp2 = new ContentPane({
title: "Contact",
content: this._hasContent2
});
tc.addChild(cp2);
var cp3 = new ContentPane({
title: "Welcome",
content: this._hasContent3
});
tc.addChild(cp3);
var cp4 = new ContentPane({
title: "About",
content: this._hasContent4
});
tc.addChild(cp4);
var cp5 = new ContentPane({
title: "Help",
content: this._hasContent5
});
tc.addChild(cp5);
tc.startup();
this.customContentNode.innerHTML = tc;
if (!this._requireConfirm && !this._showOption) {
html.setStyle(this.confirmCheck, 'display', 'none');
html.addClass(this.okNode, 'enable-btn');
} else {
var hint = "";
if (this._requireConfirm) {
hint = this.config.splash.confirmText;
html.addClass(this.okNode, 'disable-btn');
} else {
hint = this.nls.notShowAgain;
html.addClass(this.okNode, 'enable-btn');
}
this.confirmCheck = new CheckBox({
label: utils.stripHTML(hint),
checked: false
}, this.confirmCheck);
this.own(on(this.confirmCheck.domNode, 'click', lang.hitch(this, this.onCheckBoxClick)));
html.setAttr(this.confirmCheck.domNode, 'title', utils.stripHTML(hint));
this.confirmCheck.startup();
}
if (this.config && this.config.splash && this.config.splash.backgroundColor) {
html.setStyle(
this.splashContainerNode,
'backgroundColor',
this.config.splash.backgroundColor
);
}
this.urlParams = this.getUrlParams();
},
====================================================================
I wasn't sure what to do with the _resizeContentImg function that you mentioned.
I contacted ESRI Support Services about modifying the Splash widget to include tabs and was directed to the following thread: https://community.esri.com/thread/122299.
I've been going through the tutorials on dojotoolkit.org and have looked at various ESRI resources, but I haven't found a textbook like guide to learning dojo. Do you have any recommendations?
Thanks in advance for any assistance you can provide.
William
- Mark as New
- Bookmark
- Subscribe
- Mute
- Subscribe to RSS Feed
- Permalink
William,
There are a couple of things I see wrong in your code right off.
var cp5 = new ContentPane({
title: "Help",
content: this._hasContent5
});
"this._hasContent5" is a boolean I think you are wanting
this.config.splash.splashContent5
You would not want this line this.customContentNode.innerHTML = tc; or 'dojo/domReady!'
The big thing though is that even with those fixes you will continue to struggle with using the Splash widget for this as many things positional and height and width are calculated in the code.
Sorry to be the bearer of bad news.
- Mark as New
- Bookmark
- Subscribe
- Mute
- Subscribe to RSS Feed
- Permalink
Hi Robert,
It's William, from my company account. (I set up the other account before this one was created for me.)
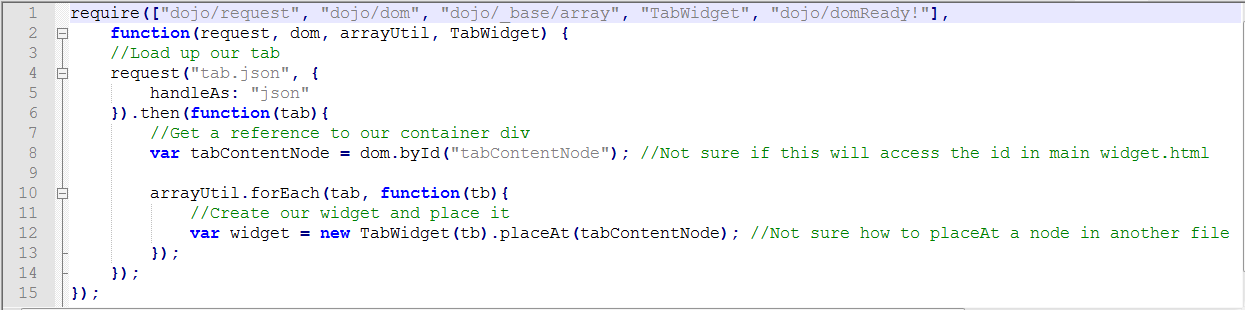
What if I use something similar to this dojo example to implement tabs in the splash widget:
https://dojotoolkit.org/documentation/tutorials/1.10/recipes/custom_widget/
That is create a separate json file with an array and have each item contain information for a different content pane,
create a javascript widget for the content pane (not sure if this is right),
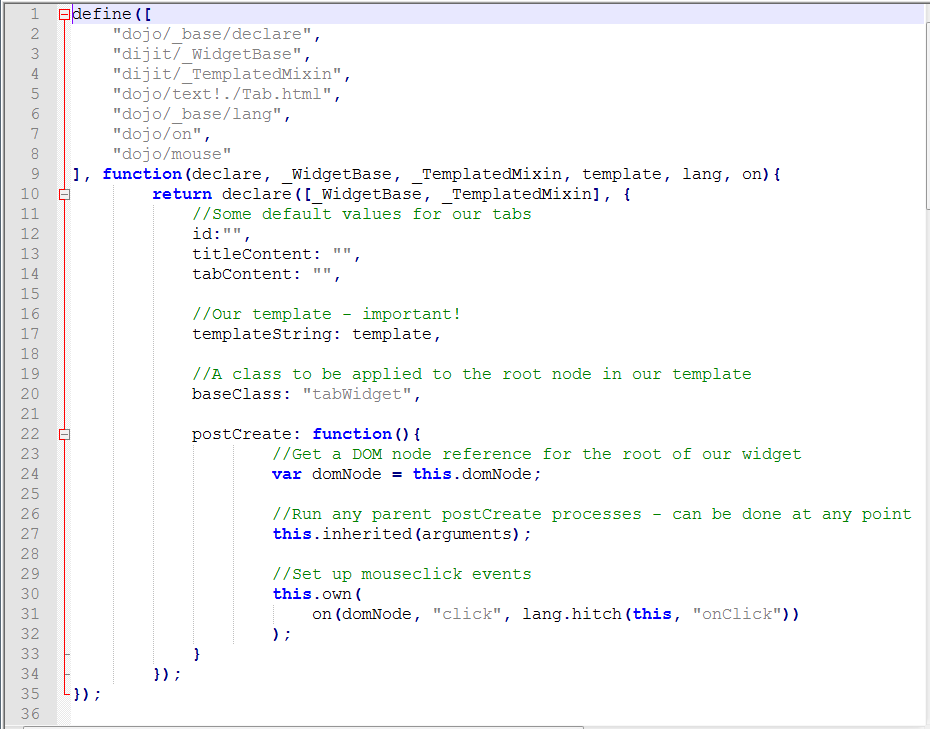
create an html template for the content pane,

use the script below to create each content pane from the json and attach it to the main Widget.html.
I don't know if this would solve the problem with the splashContent in the config.json or not.
Thanks again for any assistance you can give.
William
- Mark as New
- Bookmark
- Subscribe
- Mute
- Subscribe to RSS Feed
- Permalink
William,
Bottom line is I am unsure. If it were me I would ditch the splash widget altogether and start a new custom widget like Larry did.
- Mark as New
- Bookmark
- Subscribe
- Mute
- Subscribe to RSS Feed
- Permalink
Hi William, did you make it work?

I need something like this too..
Thanks!!
Naty
- Mark as New
- Bookmark
- Subscribe
- Mute
- Subscribe to RSS Feed
- Permalink
Hi Natasha,
I didn't get it to work the way I had hoped, but I did get something fairly comparable. I modified the foldable theme by adding a modal panel and a new default layout (using the modal panel), adding a custom widget with tabs, and calling the widget to open in a modal panel after the splash screen's "OK" button is click. If you are interested, let me know what version of Web AppBuilder (WAB) developer's edition you are using, and I can attach the relevant files, along with some instructions.
William
- Mark as New
- Bookmark
- Subscribe
- Mute
- Subscribe to RSS Feed
- Permalink
Hi William, I am using the 2.1 version...
Yes, I am interested
Thanks in advance!
Naty
- Mark as New
- Bookmark
- Subscribe
- Mute
- Subscribe to RSS Feed
- Permalink
Hi Natasha,
Attached is a zip file with the following items: eFoldableTheme, Welcome and Widget.js.
Here is what to do once the zip file is downloaded and its files extracted:
(Note: ... represents the location of WebAppBuilderForArcGIS on your PC)
- Add the eFoldableTheme folder to ...\client\stemapp\themes
- Add the Welcome folder to ...\client\stemapp\widgets
- In the Welcome folder, go to the nls\strings.js file and add your own tab labels and contents. See notes in the code for further instructions.
- Once you have added your content, start Web AppBuilder and create a new app
- Select the eFoldableTheme and save the app
- Go to ...\server\apps\#ofTheAppYourJustCreated\widgets\Splash. Replace the existing Widget.js with the Widget.js from the zip file.
- To change the icon of the Welcome widget, go to Welcome\images and replace the icon.png with a different .png image and name it icon
With this solution, put any disclaimer in the Splash widget. Once the user clicks "OK", the Welcome widget opens. After "closing" the Welcome widget, it is still available in the header and can be opened later in the life of the web page.
I hope this helps.
William
Note: The following files in the eFoldableTheme were modified from FoldableTheme:
- FoldableTheme\images\icon.png
- FoldableTheme\layouts\default\config.json
- FoldableTheme\nls\string.js
- FoldableTheme\common.css
- FoldableTheme\manifest.json
ModalPanel and all its contents were added to eFoldableTheme\panels. (The files with the -Orig suffix are the result of completing the Create a New Panel sample code tutorial and are not needed.)