- Home
- :
- All Communities
- :
- Developers
- :
- ArcGIS Pro SDK
- :
- ArcGIS Pro SDK Questions
- :
- Re: How to construct marker line symbology in ArcG...
- Subscribe to RSS Feed
- Mark Topic as New
- Mark Topic as Read
- Float this Topic for Current User
- Bookmark
- Subscribe
- Mute
- Printer Friendly Page
How to construct marker line symbology in ArcGIS Pro SDK
- Mark as New
- Bookmark
- Subscribe
- Mute
- Subscribe to RSS Feed
- Permalink
Hi,
I'd like to construct the Marker line symbology perpendicular to the route layer, which should look like the attached screenshot.
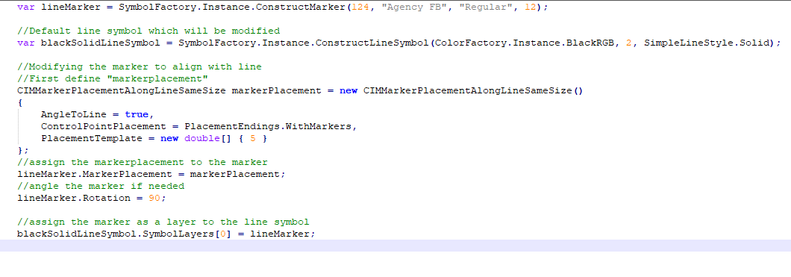
However, I tried the code below, but I'm not sure if I'm on the right track.
Expected Output :
Could anyone please guide me here, how can I achieve this through C#.
Thanks in advance!
- Mark as New
- Bookmark
- Subscribe
- Mute
- Subscribe to RSS Feed
- Permalink
Working with symbology can be a bit tricky. A good way to discover the inner makings of a symbol is to use the CIMViewer add-in: Esri/arcgis-pro-sdk-cim-viewer (github.com)
You can download the CIMViewer source and build the add-in. Next you have to construct the desired symbology using the Pro User Interface and then use the CIMViewer to examine the makings of your symbol. The CIMViewer readme.md provides some help on usage. Once you have the XML for your symbol using the CIMViewer you can then implement your symbology in code.
- Mark as New
- Bookmark
- Subscribe
- Mute
- Subscribe to RSS Feed
- Permalink
yes, I think you are on the right track. Look at AngleToLine in your code. If true then the marker will follow the direction of the line (this is the default). If false then the marker is placed perpendicular to the line.
scratch that, that's not accurate. false just means that the marker orientation is not affected by the line slope. I think you have to design your marker symbol with a rotation on its symbol layers such that, when angletoline=true, it appears perpendicular to the line.
- Mark as New
- Bookmark
- Subscribe
- Mute
- Subscribe to RSS Feed
- Permalink
Yes, I see your point, but my question is how to construct the marker symbol using code. Do you have a snippet for this? It would be extremely beneficial to me.
Thanks.
- Mark as New
- Bookmark
- Subscribe
- Mute
- Subscribe to RSS Feed
- Permalink
I think Wolf gives an excellent suggestion - in many cases, the best way to figure out the CIM is to _deconstruct_ an object that already has the desired behavior - in this case a symbol.
So, if I go to the symbology dockpane, I do see a few of the predefined symbols that have similar behavior to what you are after - in ArcGIS 2D, the Railroad symbol, Hatch Line symbol, and Line with Marker, Continuous symbol all look like good candidates.
So, using the Railroad symbol, for example: if I apply a Perpendicular offset of 3 pt and change the placement template to 5 (like u have in your code), I get:
Which is similar to what u are after.
If I view the symbol in the CIM Viewer (with the CIM Viewer dockpane open, just click on the layer in the TOC and scroll down to its renderer) I see this as the definition for the MarkerPlacement on the marker in the line symbol corresponding to those UI settings:
This gives u a clue about how to code the symbol and u can apply the relevant settings, etc. I have a whole session on the CIM and use of the CIM Viewer here and another session on CIM symbology here.
For example, this XML in the CIM Viewer tells me that the marker, from railRoadSymbol.SymbolLayers[0] has a MarkerPlacement defined as follows:
var marker = lineSymbol.SymbolLayers[0] as CIMVectorMarker;
marker.MarkerPlacement = new CIMMarkerPlacementAlongLineSameSize(){
  PlacePerPart = true,
  AngleToLine = true,
  Offset = 3,//<-- Perpendicular offset
  ControlPointPlacement = PlacementEndings.WithMarkers,
  PlacementTemplate = new double[] { 5 }
};
and so on and so on........ The idea is to fiddle with the UI to tweak your symbol and get it the way u want it. Then deconstruct in the CIM Viewer and transfer what u observe in the XML structure to your code. This is an iterative process.


