- Home
- :
- All Communities
- :
- Products
- :
- ArcGIS Pro
- :
- ArcGIS Pro Questions
- :
- Re: How to force ArcGIS Pro to exactly overlay 2 l...
- Subscribe to RSS Feed
- Mark Topic as New
- Mark Topic as Read
- Float this Topic for Current User
- Bookmark
- Subscribe
- Mute
- Printer Friendly Page
How to force ArcGIS Pro to exactly overlay 2 label classes within one feature class?
- Mark as New
- Bookmark
- Subscribe
- Mute
- Subscribe to RSS Feed
- Permalink
Hello,
I suppose the question posted is rather counter-intuitive but yeah... I need it.
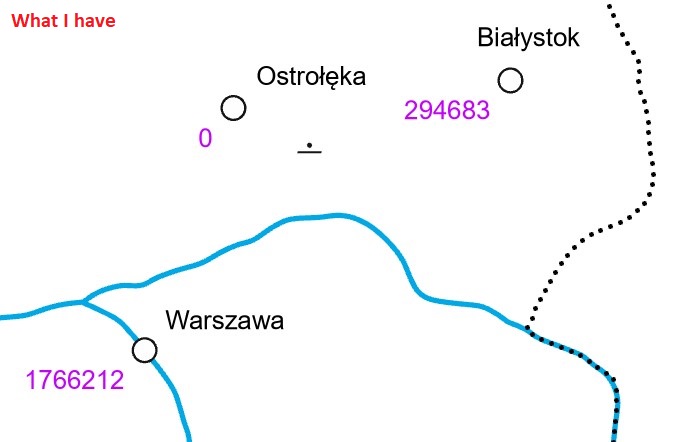
I wanted to ask, whether it's possible, using automatic label placement (e.g. Maplex), to force ArcGIS to generate two labels for one feature (based on 2 different attributes) in the very same place - also with proper alignment. For example, I have a city and I want to put label of its name and population in the very same place.
This might sound weird but is exactly what I need right now. The problem is that the engine tries to find best placement and at all cost avoid the contact.
I tried converting one of the label classes to annotation but since the two classes have different sizes, the placement is always different. I tried all (I think) options within Labelling section with no success.
I would like to avoid manual placement of labels. I am attaching the screenshots to show what I want to achieve. Hope this is clear 🙂
Take care!
Jakub
- Mark as New
- Bookmark
- Subscribe
- Mute
- Subscribe to RSS Feed
- Permalink
- Make sure that your label classes have the same placement style. For best results choose a style that is fixed, such as "Top of Point". Set "maximum offset" to 0% so that the labels have no ability to shift.
- In the conflict resolution tab, check the "never remove" option under "unplaced labels".


See if that works for you!

Kendall County GIS
- Mark as New
- Bookmark
- Subscribe
- Mute
- Subscribe to RSS Feed
- Permalink
Hey Josh,
thanks for your suggestion. The problem here is that I can't select a fixed placement style due to clutter on the map - not really visible on the screenshot but true for other parts of the map. Also, there have to be an offset between feature and its label.
- Mark as New
- Bookmark
- Subscribe
- Mute
- Subscribe to RSS Feed
- Permalink
You can set the actual offset distance to anything you want, just set the "max offset" percentage to 0. But to keep the "best placement" setting and get the labels to overlay...
Could you turn on just one label class, use "convert labels to annotation", then turn the other and repeat?
Kendall County GIS
- Mark as New
- Bookmark
- Subscribe
- Mute
- Subscribe to RSS Feed
- Permalink
I tried all you suggested before but your post suggested something I missed before. Well, for some reason labelling treats annotations as potential bareers. The key is to set Barrier Weight parameter of the graphic annotation layer to 'None' and there it is 🙂 It's not perfectly aligned but sufficient for me.
- Mark as New
- Bookmark
- Subscribe
- Mute
- Subscribe to RSS Feed
- Permalink
Option 1:
You can achieve this using a Composite callout label style along with the PART text formatting tags along with other formatting tags to control properties such as color and font. Here's an example:
Create a single label class with multiple fields that uses the PART tag to define where each field is placed. Add position and v_align attributes to the PART tags.
The example arcade expression below defines a PART for the POPULATION field that is in the top position, vertically aligned (v_align) to the top. It's also wrapped in a CLR tag to change that part to magenta.
Then it adds another PART for the NAME field that is in the middle position, vertically aligned to the bottom.
"<PART position='top' v_align='top'>" +
"<CLR magenta='100'>" + $feature.POPULATION + "</CLR></PART>" +
"<PART position='middle' v_align='bottom'>" +
$feature.NAME + "</PART>"
The styles of this Composite callout use no fill no stroke and 0 margins to effectively remove the callout while utilizing the other features of a composite callout label.


Result:

Option 2:
I just realized you could also do this with the CLR formatting tag to modify the color of 1 field's label and modify the Line spacing (leading) to make them overlap.
Here's the label expression:
"<CLR magenta='100'>" + $feature.POPULATION + "</CLR>" +
TextFormatting.NewLine + $feature.NAME
Here's the Line spacing setting:

And the result:
