- Home
- :
- All Communities
- :
- Products
- :
- ArcGIS Parcel Fabric
- :
- ArcGIS Parcel Fabric Questions
- :
- Traverse Tool, Layer option greyed out after start...
- Subscribe to RSS Feed
- Mark Topic as New
- Mark Topic as Read
- Float this Topic for Current User
- Bookmark
- Subscribe
- Mute
- Printer Friendly Page
Traverse Tool, Layer option greyed out after starting traverse
- Mark as New
- Bookmark
- Subscribe
- Mute
- Subscribe to RSS Feed
- Permalink
If I start a traverse using my Connection lines layer, once the first traverse is made, I'm unable to go back and change the layer option to my TaxParcel_lines layer to continue the traverse. I'm using Pro 3.0.3. I didn't seem to have this problem in my earlier version 2.9.5. Is this in fact the case with the new version, or I'm I missing something?
My data is in a sql 2019 instance, geodatabase is 10.9.1
My Fabric is in a feature service, AGE version 11
My fabric is version is 5
Thank you,
Robert.
Solved! Go to Solution.
Accepted Solutions
- Mark as New
- Bookmark
- Subscribe
- Mute
- Subscribe to RSS Feed
- Permalink
Hi Robert
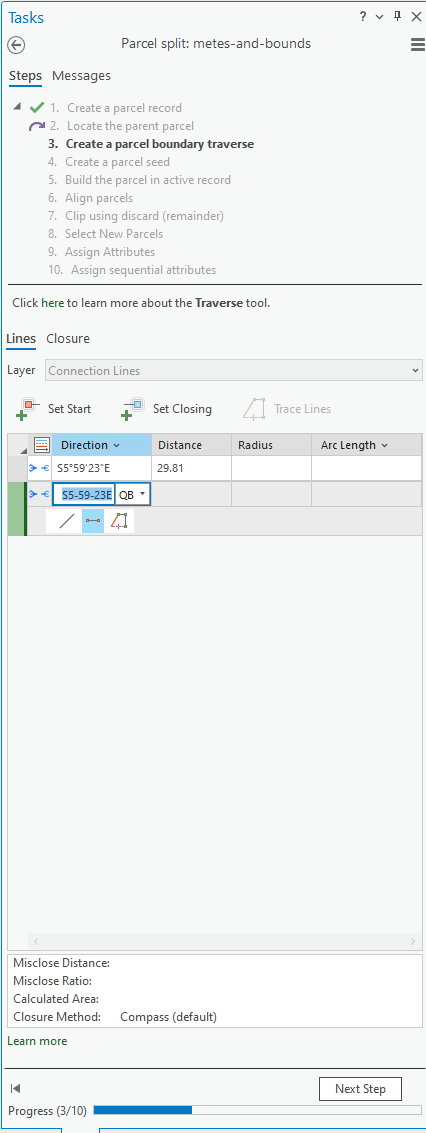
Now that I have embedded the traverse tool in the Tasks pane, I see the problem - the New button is not there (it has been replaced by the Next Step button). I will log the issue. The workaround is to not embed the Traverse tool or use 2 steps, each with a different layer preset to create parcels with a connection line. The first step that creates the connection line traverse, should be optional so it can be skipped.
Christine
- Mark as New
- Bookmark
- Subscribe
- Mute
- Subscribe to RSS Feed
- Permalink
Hi Robert
In 3.0, we are doing things slightly differently. Please see this help link for creating a traverse that starts with a connection line:
Christine
- Mark as New
- Bookmark
- Subscribe
- Mute
- Subscribe to RSS Feed
- Permalink
Christine,
Thanks for your reply. I understand the concept described in the article. One issue I'm having is not seeing the New button when the Traverse is embedded in my Task\Step. If I run the Traverse outside of the Task, the New button is available. Any ideas on why this would be happening?
Thanks,
Robert.
- Mark as New
- Bookmark
- Subscribe
- Mute
- Subscribe to RSS Feed
- Permalink
Hi Robert
Now that I have embedded the traverse tool in the Tasks pane, I see the problem - the New button is not there (it has been replaced by the Next Step button). I will log the issue. The workaround is to not embed the Traverse tool or use 2 steps, each with a different layer preset to create parcels with a connection line. The first step that creates the connection line traverse, should be optional so it can be skipped.
Christine
- Mark as New
- Bookmark
- Subscribe
- Mute
- Subscribe to RSS Feed
- Permalink
Christine,
I've taken your suggestion and implemented a second traverse step just for the Parcel Lines. I'll continue this until a fix is implemented.
Thanks again,
Robert.
- Mark as New
- Bookmark
- Subscribe
- Mute
- Subscribe to RSS Feed
- Permalink
I would enter the connection lines from the commencement point to the point of beginning simply using the Create Features tool.
After creating the first point you can use one of these 2 options:
1. Use the 'on screen' editing constraints:

2. Right click and choose 'Direction and Distance' or use the shortcut by pressing the 'G' key:

You can enter 1 to many connection lines until you are at the POB (Poing of beginning), then move to the next step (entering a traverse).
Would this work for you?
- Mark as New
- Bookmark
- Subscribe
- Mute
- Subscribe to RSS Feed
- Permalink
Amir, Yes your suggestion will work. However, I'm trying to setup tasks\steps for our clients who will be migrating to Pro and the parcel fabric in the near future, and I'm wanting to make this transition as simple as possible for them. Eventually, as they become more comfortable in the Pro and the parcel fabric environment, we'll expand outside of the predefined workflows.
- Mark as New
- Bookmark
- Subscribe
- Mute
- Subscribe to RSS Feed
- Permalink
It would be good to educate users that are new to ArcGIS Pro, especially those who were used to working in the ArcMap parcel fabric, that they can utilize any editing tool.
Sometimes the easiest way to create a parcel is to digitize a polygon and press build.
Sometimes editing constraints are easier for users that are used to editing in CAD software.
Sometimes a task can provide a tool palette - providing multiple optional tools instead of one, letting the user decide which one works best for them against their specific data / circumstances.