- Home
- :
- All Communities
- :
- Products
- :
- ArcGIS CityEngine
- :
- ArcGIS CityEngine Questions
- :
- Re: CityEngine Attribute Reporting
- Subscribe to RSS Feed
- Mark Topic as New
- Mark Topic as Read
- Float this Topic for Current User
- Bookmark
- Subscribe
- Mute
- Printer Friendly Page
- Mark as New
- Bookmark
- Subscribe
- Mute
- Subscribe to RSS Feed
- Permalink
I am trying to export object attributes along with models in a scene package layer. After using the following rules (here, attributes are simplified), I am still receiving a 'name' attribute associated with shape number (see attached snip) when the models are ingested and interacted with in a web scene (uploaded manually to our Portal for ArcGIS). Any recommendations on how to get these attributes to export properly in the scene layer package? I am using CityEngine Basic 2017.
Thanks in advance!
/**
* File: reportAttr.cga
* Created: 18 Oct 2017 21:50:40 GMT
* Author: GARDTESS
*/
version "2017.0"
attr BL_ID = ""
attr TYPE = ""
@StartRule
Report -->
report("BL_ID", BL_ID)
report("TYPE", TYPE)This is the code I appended to the end of the rule I am using to generate the models:
import Report : "rules/reportAttr.cga"
attr BL_ID = ""
attr TYPE = ""
@StartRule
Generate -->
Report.Report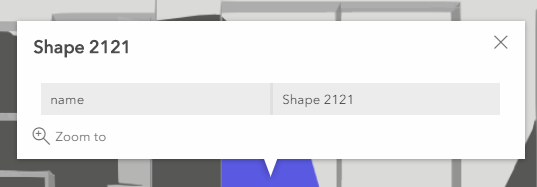
Solved! Go to Solution.
Accepted Solutions
- Mark as New
- Bookmark
- Subscribe
- Mute
- Subscribe to RSS Feed
- Permalink
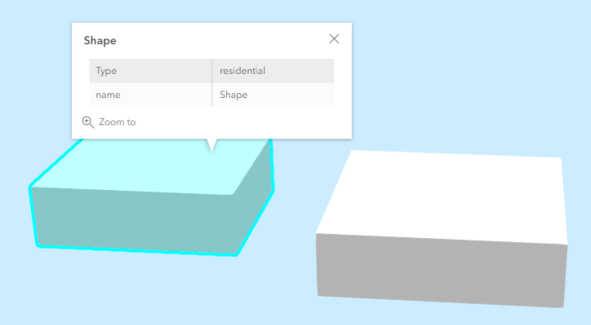
I made an even simpler example for you, which works for me. Does this work for you?
1) Create a new scene
2) Draw two rectangles
3) Add an object attribute called type to both shapes and set one shape's value to "residential" and the other shape's value to "office". (Inspector -> Object Attributes)
4) Apply this rule to the shapes.
attr type = ""
Lot -->
extrude(10)
report("Type", type)5) Note that, in the Inspector, the rule attribute called 'type' is connected to the object attribute called 'type'. If it is not connected, connect them. Click on drop down arrow next to type -> Connect Attribute -> Object attribute. Also note that the report Type appears in the Reports section of the Inspector with the correct value for each shape.
6) Select both shapes
7) File -> Export models -> Esri Scene Layer Package -> Make sure 'Emit Reports' is checked -> Next -> Feature Granularity = One Feature Per Shape -> Finish
😎 Right click on slpk file in models folder -> Share As -> Upload package to my ArcGIS Online or Portal account -> Share
9) In Navigator, click on second icon along the top to go to your account and see the slpk you just made. Right click -> Open in browser. Or, sign on to ArcGIS Online in your web browser and view your Content to see the slpk file you just made. Select this file.
10) In the browser, in your ArcGIS Online account, click on the slpk file -> Publish -> Open in Scene Viewer
In the Scene Viewer, when a building is selected, the type reported is also displayed in the popup window.
- Mark as New
- Bookmark
- Subscribe
- Mute
- Subscribe to RSS Feed
- Permalink
Does the example in this post work for you?
Are the rule attributes connected to object attributes? (in Inspector, click on drop down arrow next to attribute -> Connect attribute -> Object attribute)
- Mark as New
- Bookmark
- Subscribe
- Mute
- Subscribe to RSS Feed
- Permalink
I actually used that post example to write the report rule file. The rule attributes are connected to the object attributes. These attributes are showing up in the inspector in the Shapes tab under 'Report' after I apply the rule to generate the shapes. However, after I export the generated models to the scene layer package, the attributes don't show up in the web scene from the uploaded scene layer package in Portal. If I import the scene layer package into Arc Pro, it loads correctly, but I also cannot view any attributes associated with it.
- Mark as New
- Bookmark
- Subscribe
- Mute
- Subscribe to RSS Feed
- Permalink
I made an even simpler example for you, which works for me. Does this work for you?
1) Create a new scene
2) Draw two rectangles
3) Add an object attribute called type to both shapes and set one shape's value to "residential" and the other shape's value to "office". (Inspector -> Object Attributes)
4) Apply this rule to the shapes.
attr type = ""
Lot -->
extrude(10)
report("Type", type)5) Note that, in the Inspector, the rule attribute called 'type' is connected to the object attribute called 'type'. If it is not connected, connect them. Click on drop down arrow next to type -> Connect Attribute -> Object attribute. Also note that the report Type appears in the Reports section of the Inspector with the correct value for each shape.
6) Select both shapes
7) File -> Export models -> Esri Scene Layer Package -> Make sure 'Emit Reports' is checked -> Next -> Feature Granularity = One Feature Per Shape -> Finish
😎 Right click on slpk file in models folder -> Share As -> Upload package to my ArcGIS Online or Portal account -> Share
9) In Navigator, click on second icon along the top to go to your account and see the slpk you just made. Right click -> Open in browser. Or, sign on to ArcGIS Online in your web browser and view your Content to see the slpk file you just made. Select this file.
10) In the browser, in your ArcGIS Online account, click on the slpk file -> Publish -> Open in Scene Viewer
In the Scene Viewer, when a building is selected, the type reported is also displayed in the popup window.
- Mark as New
- Bookmark
- Subscribe
- Mute
- Subscribe to RSS Feed
- Permalink
Thank you so much for your help with this Cheryl. I was able to get the attributes to export correctly using the methodology you have included here (i.e. naming attributes in the main rule file and reporting them within a rule, in my case, the pre-existing starting rule). I have two additional questions:
1) is there a way to change the pop-up window label in the Scene Viewer (it seems to default to a Shape number label)
2) I have been struggling with poor rendering quality in the Scene Viewer on our Portal. Colored faces appear patchy or as if there is face conflict. The white patchiness is dynamic and shifts as models are rotated in the scene viewer. The models render as solid color surfaces in CityEngine prior to exporting as a scene layer packages. Any tips on ways to have these colors stay solid when rendering in the SceneViewer? Attached are screenshots of this issue where colored faces are not rendering consistently. I posted this question here: https://community.esri.com/message/728604-face-rendering-in-scene-viewer
Thanks again!

- Mark as New
- Bookmark
- Subscribe
- Mute
- Subscribe to RSS Feed
- Permalink
I'm glad you were able to get it to work with the simple example. Once you have a simple example working, you could add more complexity a little at a time, and then hopefully, you'll be able to figure out at which step things stopped working.
1) Yes, you can change the name of the shape by reporting to a report called "name":
report("name", "MyNewNameToBeDisplayedInPopupWindow")2) See your other post:
https://community.esri.com/message/728604-face-rendering-in-scene-viewer#comment-728885
- Mark as New
- Bookmark
- Subscribe
- Mute
- Subscribe to RSS Feed
- Permalink
Awesome! This works perfectly:
report("name", "MyNewNameToBeDisplayedInPopupWindow")Thank you!