- Home
- :
- All Communities
- :
- Global
- :
- Europe
- :
- GeoDev Germany
- :
- GeoDev Germany Blog
- :
- Publish multiple layers in one feature service on ...
Publish multiple layers in one feature service on ArcGIS Online with ArcGIS API for Python
- Subscribe to RSS Feed
- Mark as New
- Mark as Read
- Bookmark
- Subscribe
- Printer Friendly Page
Introduction
Publishing one feature layer in ArcGIS Online or ArcGIS Enterprise in one feature service is a simple procedure, there is a native function for uploading data inside a Spatial Dataframe to one hosted feature layer inside a feature service available in ArcGIS API for Python.
However, publishing multiple layers with different geometries inside one feature service requires more effort. To make this process less complex and more convenient for all users we created a 10 step workflow. We attached a Jupyter Notebook to the end of this blog, which can be simply uploaded to Esri Jupyter Hub to test the workflow.
To simplify the written language of this article, we describe the workflow mentioning ArcGIS Online only. All steps performed within this article are also applicable to ArcGIS Enterprise.
The Data
Data is available from multiple sources on the web in various geospatial formats. The ArcGIS Spatial Dataframe is a pythonic data structure, that allows to import and include several other geospatial formats on the fly. The table like structure is merely based on a Pandas DataFrame, but incorporates several extensions for geodata elements.
We use the ArcGIS Spatial Dataframe object to store tabular and geometric data. Pandas DataFrames are also used, to store tabular data.
Step 1: Import of the needed modules and login to ArcGIS Online with your subscription
We will have to load a few modules to setup the publishing process, the getpass module allows us to interactively enter our password. Using this module we have a secure way to do the login process, as we do not need to type our password as plaintext. The second argument to the GIS function should be changed from "username" to your username for ArcGIS Online. We suggest the installation of the needed python modules including the python environment and the Jupyter Notebooks by using Anaconda Distribution. It features python environments, which are separated from the system wide python installations and therefore reduces complexity and enhances compatibility.
from arcgis import GIS
from arcgis import geometry
from arcgis import features as fs
from getpass import getpass as pwd
import pandas as pd
pwd = pwd()
gis = GIS("https://www.arcgis.com/home/index.html", "username", pwd)Step 2: Create the features and setup two geometry types
To demonstrate this workflow, we will now create some hard coded sample features with basic point and polyline geometries. To define the two features, we will also create some field values to visualize how field creation and setting attributes to features works in ArcGIS Online.
2.1 Creation of sample field values for features
We create two dictionaries for each geometry and two lists to contain the dictionaries. The list of dictionaries of each geometric element is then added to a Pandas DataFrame. If we had to create attributes for multiple features of one geometry, we would have to add as many dictionaries to the list of dictionaries as geometric features are available.
dictPointAttr = {}
dictPointAttrList = []
dictPointAttr["someint1"] = 123456789101112
dictPointAttr["sometext1"] = "Text"
dictPointAttr["somefloat1"] = 1.25
dictPointAttrList.append(dictPointAttr)
dfpnt = pd.DataFrame.from_dict(dictPointAttrList)
dictPolyLineAttr = {}
dictPolyLineAttrList = []
dictPolyLineAttr["someint2"] = 121110987654321
dictPolyLineAttr["sometext2"] = "Txet"
dictPolyLineAttr["somefloat2"] = 5.21
dictPolyLineAttrList.append(dictPolyLineAttr)
dfpll = pd.DataFrame.from_dict(dictPolyLineAttrList)2.2 Creation of a simple point geometry
To setup a simple point geometry we will need to create a dictionary containing the two point coordinates “x” and “y” as keys, as well as a sub dictionary with “spatialReference” as key, containing the spatial reference defined by EPSG codes. The dictionary object is then converted to an ArcGIS point geometry and appended to a list of geometries. To store the feature data, an ArcGIS Spatial Dataframe is used. It is capable of storing lists of geometries as well as Pandas DataFrames containing the attribute data for every feature.
listGeometryPoint = []
pnt = {"x": 11.0419520737521,"y": 48.4391156813199, "spatialReference" : {"wkid" : 4326,"latestWkid" : 4326}}
point = geometry.Point(pnt)
listGeometryPoint.append(point)
spatialDataFramePoint = fs.SpatialDataFrame(data=dfpnt, geometry=listGeometryPoint)2.3 Creation of a simple polyline geometry
The workflow of creating a simple polyline geometry is more or less the same as the creation of a simple point geometry, it differs in requirement of another syntax to define the vertices of the line.
listGeometryPolyLine = []
plyln = { "paths": [[[11.0419520737521,48.4391156813199],[11.0416097302404,48.4390815262157], [11.0414886646127,48.4392674452629]]], "spatialReference" : {"wkid" : 4326, "latestWkid" : 4326}}
polyline = geometry.Polyline(plyln)
listGeometryPolyLine.append(polyline)
spatialDataFramePolyLine = fs.SpatialDataFrame(data=dfpll, geometry=listGeometryPolyLine)
Step 3: Creation of the feature service and a feature layer collection
In this step we will setup a feature service and create a feature layer collection from a new (empty) service. The feature layer collection is used to store the definition of the feature service as well as the layer objects, which will be created in the following steps. To create the service we call the function “gis.content.create_service” from ArcGIS API for Python.
Feature services must have a unique name. If you like to repeat this workflow, please ensure to rename your feature service.
Provided function parameters are:
- A name for the resulting feature service via name=
- The spatial reference via wkid=
- The spatial extent via item_properties=
The extent setting is necessary to ensure, that layers inside the feature service are displayed correctly in maps on ArcGIS Online. Without the extent setting, the wrong initial area might be displayed and users need to zoom to the appropriate part of the map by using “zoom to layer”. In this example we use the extent of the whole world. The items inside the dictUpdate dictionary can be set to user defined values. We recommend setting the "objectIdField" key to a custom value. Therefore, we ensure:
- Every new feature object is provided with a new feature ID
- No conflicts with the default setting of "objectIdField" occur (default setting is "objectId")
The key "capabilities" is needed to define what users with access to the feature service item can do with the service. Information on capabilities is provided in the ArcGIS REST API documentation.
newService = gis.content.create_service(name="featureservice", wkid=4326, item_properties={"extent":[-180.0,-90.0,180.0,90.0]})
newFtLC = fs.FeatureLayerCollection.fromitem(newService)
dictUpdate = {"copyrightText": "copyrightText",
"objectIdField" : "FID",
"globalIdField" : "GlobalID",
"maxRecordCount": 25000,
"serviceDescription": "description",
"capabilities": 'Editing,Query,Update,Uploads,Delete,Sync,Extract',
"spatialReference": {"wkid": 4326,"latestWkid": 4326},
"initialExtent":{
"xmax": 180.0,"ymin": -90.0,"xmin": -180.0,"ymax": 90.0,
"spatialReference": {"wkid" : 4326, "latestWkid" : 4326}
},
"fullExtent":{
"xmax": 180.0,"ymin": -90.0,"xmin": -180.0,"ymax": 90.0,
"spatialReference": {"wkid" : 4326, "latestWkid" : 4326}
}
}
newFtLC.manager.update_definition(dictUpdate)Step 4: Setup of required and optional fields inside the feature layers
The fields required to describe a valid feature layer are the "objectIdField" and the "globalIdField", which we already defined by their name in the previous step. All fields can be provided with an alias if the field name is too short to provide a meaningful description of its content. The length attribute should be set to appropriate values to add the needed count of features to the layers. The field attributes ["nullable"] and ["editable"] should be set to False for both fields "objectIdField" and "globalIdField".
# General Fields
dictFieldOBJECTID = {}
dictFieldOBJECTID["alias"] = "FID"
dictFieldOBJECTID["name"] = "FID"
dictFieldOBJECTID["type"] = "esriFieldTypeOID"
dictFieldOBJECTID["sqlType"] = "sqlTypeOther"
dictFieldOBJECTID["length"] = 10
dictFieldOBJECTID["nullable"] = False
dictFieldOBJECTID["editable"] = False
dictFieldOBJECTID["domain"] = None
dictFieldOBJECTID["defaultValue"] = None
dictFieldGlobalID = {}
dictFieldGlobalID["alias"] = "GlobalID"
dictFieldGlobalID["name"] = "GlobalID"
dictFieldGlobalID["type"] = "esriFieldTypeGlobalID"
dictFieldGlobalID["sqlType"] = "sqlTypeOther"
dictFieldGlobalID["length"] = 38
dictFieldGlobalID["nullable"] = False
dictFieldGlobalID["editable"] = False
dictFieldGlobalID["domain"] = None
dictFieldGlobalID["defaultValue"] = NoneThe optional fields are defined to ensure all values we defined in step 2.1 are transferred to the appropriate fields in the layer.
For integer fields we need to pay attention to the required field lengths. If we have 64 bit numbers, we need to define a data type for the key ["sqlType"] named "sqlTypeBigInt" and set the key ["type"] to "esriFieldTypeInteger". By ignoring this fact we may cause data corruption in our layers in ArcGIS Online, the values which do not fit into a standard integer field are sometimes written on into the next field, overwriting values in the next field.

FYI: If you use the Spatial Dataframe workflow as mentioned in the introduction, you are not able to use 64 bit numbers in integer fields, they are automatically converted into string fields / strings or stored as 32 bit integers causing data corruption in the hosted feature layer.
Fields containing float values can be defined by setting the key ["type"] to "esriFieldTypeDouble" and the key ["sqlType"] to "sqlTypeOther".
Fields containing strings can be defined by setting the key ["sqlType"] to "sqlTypeOther", the key ["type"] to "esriFieldTypeString" and defining a field length by setting the key ["length"] to a numeric integer value like the number 10.
# Fields for point layer
dictFieldInt1 = {}
dictFieldInt1["alias"] = "someint1"
dictFieldInt1["name"] = "someint1"
dictFieldInt1["sqlType"] = "sqlTypeBigInt"
dictFieldInt1["type"] = "esriFieldTypeInteger"
dictFieldInt1["nullable"] = "yes"
dictFieldInt1["editable"] = "yes"
dictFieldInt1["visible"] = "yes"
dictFieldString1 = {}
dictFieldString1["alias"] = "sometext1"
dictFieldString1["name"] = "sometext1"
dictFieldString1["sqlType"] = "sqlTypeOther"
dictFieldString1["type"] = "esriFieldTypeString"
dictFieldString1["length"] = 10
dictFieldFloat1 = {}
dictFieldFloat1["alias"] = "somefloat1"
dictFieldFloat1["name"] = "somefloat1"
dictFieldFloat1["sqlType"] = "sqlTypeOther"
dictFieldFloat1["type"] = "esriFieldTypeDouble"# Fields for polyline layer
dictFieldInt2 = {}
dictFieldInt2["alias"] = "someint2"
dictFieldInt2["name"] = "someint2"
dictFieldInt2["sqlType"] = "sqlTypeBigInt"
dictFieldInt2["type"] = "esriFieldTypeInteger"
dictFieldInt2["nullable"] = "yes"
dictFieldInt2["editable"] = "yes"
dictFieldInt2["visible"] = "yes"
dictFieldString2 = {}
dictFieldString2["alias"] = "sometext2"
dictFieldString2["name"] = "sometext2"
dictFieldString2["sqlType"] = "sqlTypeOther"
dictFieldString2["type"] = "esriFieldTypeString"
dictFieldString2["length"] = 10
dictFieldFloat2 = {}
dictFieldFloat2["alias"] = "somefloat2"
dictFieldFloat2["name"] = "somefloat2"
dictFieldFloat2["sqlType"] = "sqlTypeOther"
dictFieldFloat2["type"] = "esriFieldTypeDouble"
Step 5: Create list of fields for each layer element and append field definitions
To store our field definitions in the following layer definitions, we create two lists, which store the dictionaries for every field. We need two lists to store the fields because we are not allowed to put the two different geometric objects, point and polyline, into the same layer.
The python list.append operation is applied for every field dictionary.
# Lists containing the fields
listFieldsPoint = []
listFieldsPolyLine = []
# Append fields to list of fields for points
listFieldsPoint.append(dictFieldOBJECTID)
listFieldsPoint.append(dictFieldGlobalID)
listFieldsPoint.append(dictFieldInt1)
listFieldsPoint.append(dictFieldString1)
listFieldsPoint.append(dictFieldFloat1)
# Append fields to list of fields for polylines
listFieldsPolyLine.append(dictFieldOBJECTID)
listFieldsPolyLine.append(dictFieldGlobalID)
listFieldsPolyLine.append(dictFieldInt2)
listFieldsPolyLine.append(dictFieldString2)
listFieldsPolyLine.append(dictFieldFloat2)Step 6: Create layer definitions for two layers
We need to define the layer definitions to provide information on what type of features we would like to add to the feature service and how the layers are named inside the service. As we defined fields via dictionary elements, we need to define the layer definition using dictionaries as well. The key ["geometryType"] defines the geometries, one layer contains. The layer definition also contains information, we already set in step 3, the definition of the ["objectIdField"] and the ["globalIdField"]. For every layer a separate extent, which matches the extent of all features in the layer and a separate name can be defined. Fields are defined by setting the key ["fields"] to the corresponding list of fields for the layer.
dictPolyLineLayer = {}
dictPolyLineLayer["geometryType"] = 'esriGeometryPolyline'
dictPolyLineLayer["globalIdField"] = 'GlobalID'
dictPolyLineLayer["objectIdField"] = 'FID'
dictPolyLineLayer["extent"] = {
"xmax": 180.0,"ymin": -90.0,"xmin": -180.0,"ymax": 90.0,
"spatialReference": {"wkid": 4326, "latestWkid": 4326}
}
dictPolyLineLayer["name"] = 'PolyLineLayer'
dictPolyLineLayer["fields"] = listFieldsPolyLinedictPointLayer = {}
dictPointLayer["geometryType"] = 'esriGeometryPoint'
dictPointLayer["globalIdField"] = 'GlobalID'
dictPointLayer["objectIdField"] = 'FID'
dictPointLayer["extent"] = {
"xmax": 180.0,"ymin": -90.0,"xmin": -180.0,"ymax": 90.0,
"spatialReference": {"wkid": 4326, "latestWkid": 4326}
}
dictPointLayer["name"] = 'PointLayer'
dictPointLayer["fields"] = listFieldsPointStep 7: Create a layer list, append layer definitions and update feature layer collection
This step will update the feature layer collection, by adding the layer definitions. They are added to a list and this list is then added to a dictionary as value for the key "layers". The feature layer collection is then updated by the dictionary.
layersList = []
layersList.append(dictPointLayer)
layersList.append(dictPolyLineLayer)
dictUpdate = {"layers": layersList }
newFtLC.manager.add_to_definition(dictUpdate)Step 8: Create FeatureSets from Spatial Dataframes and append FeatureSets to list
The Spatial Dataframes are converted to FeatureSet elements and then added to a list. The list is used to store the values for the next step, the creation of features using a feature layer collection.
dflist = []
featureSetPoint = spatialDataFramePoint.to_featureset()
featureSetPolyLine = spatialDataFramePolyLine.to_featureset()
dflist.append(featureSetPoint)
dflist.append(featureSetPolyLine)Step 9: Create features and add them to feature layer collection
The actual feature creation is performed in this step. We need to loop through our feature layer collection using a counter to add new features.
To improve readability and structure we create the function add_features, which performs the additions of features for each layer. The input values for the function are the current layer object and the current set of features. We define a variable result, which we set to the output of the edit function layer.edit_features of the given layer. As argument for the function layer.edit_features, we set (adds = featlist). The variable featlist matches our current set of features. We then return the result of our editing. The function add_features is called inside the for loop
for i in range(len(newFtLC.layers)):
were we loop through the feature layer collection by counter. The output of the function call is set to the variable status, which is then printed to the console.
The console output shows us, if our layer operation was successful. If this is the case, we will see two times an output containing: 'success': True.
def add_features(layer, featlist):
result = layer.edit_features(adds = featlist)
return result
for i in range(len(newFtLC.layers)):
status = add_features(newFtLC.layers[i],
dflist[i])
print (status)Step 10: Inspect results on ArcGIS Online
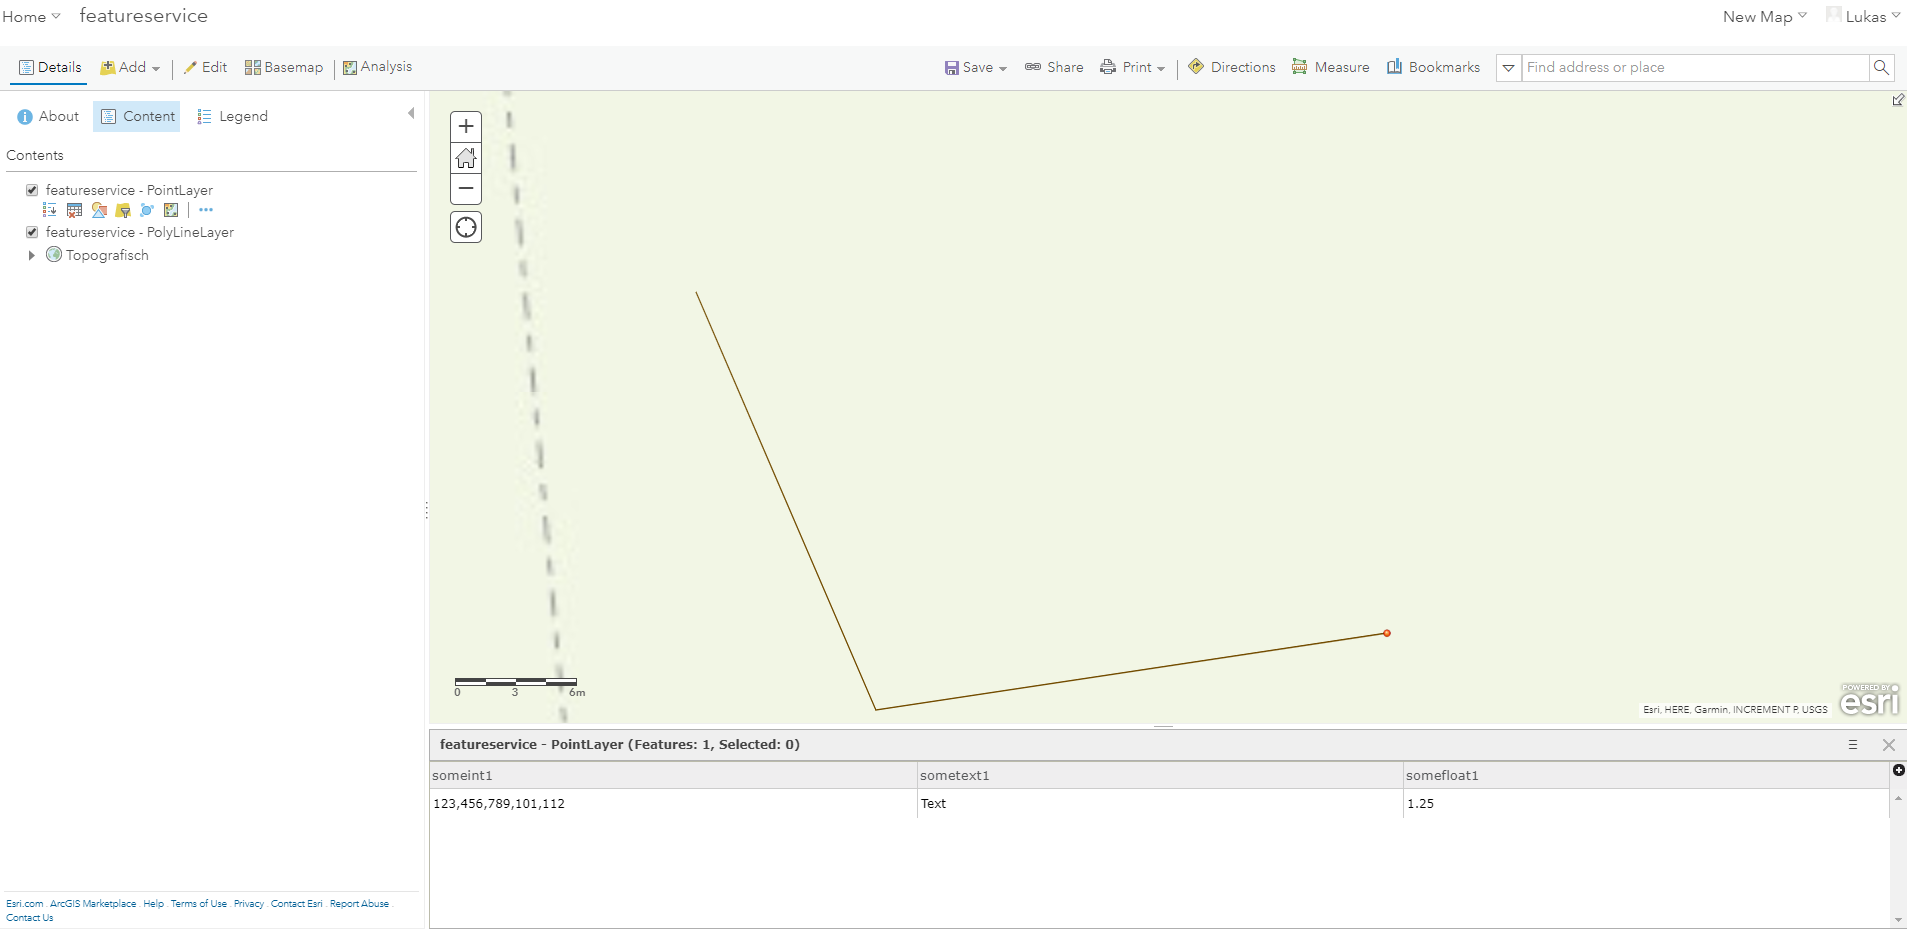
We created a sample feature service containing two different layers with two different layer types. To check if everything was created and all of the items work, we open another web browser window or tab and go to our portal. There should be an item in the list of items named “featureservice” if we click on the “content” tab. We can now click on the item and inspect it, there should be values in the attribute table and one point in the point layer as well as one polyline in the polyline layer when regarding the features inside the layers. When we add the feature service to a map we should see a result like this:
Conclusion
Setting up a feature service with multiple layers can be performed fast and efficiently using ArcGIS API for Python. There is no need to publish services from ArcGIS for Desktop, datasets can be easily published to ArcGIS Enterprise or ArcGIS Online using a few lines of python code. Though it is cool to publish a feature service with multiple layers in ten steps, it would be great if there was a function available, which makes the effort to publish multiple layers in one single feature service smaller and allows setting up a service and the creating layers and features within only a few steps. If you have any questions or comments please feel free to contact me or leave a comment in the comment section below.
Happy coding, Lukas 
You must be a registered user to add a comment. If you've already registered, sign in. Otherwise, register and sign in.