- Home
- :
- All Communities
- :
- Services
- :
- Esri Training
- :
- Esri Training Matters Blog
- :
- ModelBuilder 360: Amp Up the Automation
ModelBuilder 360: Amp Up the Automation
- Subscribe to RSS Feed
- Mark as New
- Mark as Read
- Bookmark
- Subscribe
- Printer Friendly Page
This is the third post in a three-part series on creating geoprocessing models in ArcGIS.
If you've read the previous posts in this series, you've got modeling basics down and you know how to add model parameters to support easy reuse and scenario testing. In this post, you'll learn some techniques to do more with less—effort, that is.
List Variables
In the last post, you learned how to make a tool parameter a variable, and turn a variable into a model parameter. By default, a variable stores a single value. However, it's possible to store multiple values in a variable. When you do, the variable is called a list variable.
When a list variable is connected to a geoprocessing tool, that tool and all downstream processes (all the processes that depend on the tool's output) will automatically execute once for each value in the list. That's right: when you define a list variable, model tools automatically know to process each list item.
Using list variables is like running geoprocessing tools in batch mode—with the major advantage that you have to enter the list of values only once to achieve multi-tool processing.
Consider the model below, which automates a typical data management workflow.

This model creates a file geodatabase, converts a shapefile to a geodatabase feature class, removes duplicate features, defines the coordinate system for the feature class, and outputs a layer with selected features. Notice the model even has two parameters. It's a complete workflow that works great when a single shapefile needs to be processed.
It falls short, though, when multiple shapefiles need to be processed. The model would have to be run manually multiple times to process all the shapefiles. Wouldn't it be better to run the model once and have all the work done?
Creating a list variable will accomplish this. To create a list variable for this example:
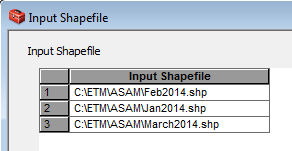
- Right-click the Feature Class to Feature Class tool input variable and click Properties, then click "A list of values." Click OK.
- Double-click the variable to open it and enter each value.
Inline variable substitution
With list variables, tools run multiple times to process each input. By default, however, the tool output names will be the same—which means all but the last list item's outputs will be overwritten. To overcome this, use inline variable substitution.
There are two types of variables that can be substituted in processes: model variables and system variables. To use a model variable for inline variable substitution, just enter the variable name surrounded by percent signs.
The system variable %i% is often used to add a unique, sequential number to the end of output names. List item numbering starts at 0 (the first item's output name will have a 0 appended).
For this example, you would open the Feature Class to Feature Class tool and add a lowercase i surrounded by percent signs to the end of the output feature class name (ASAM in this case).
![]()
Using the system variable ensures the model will correctly process and create the three outputs needed. However, the output names are not descriptive. You could rename them later, but why not automate that work now?
Model-Only Tools
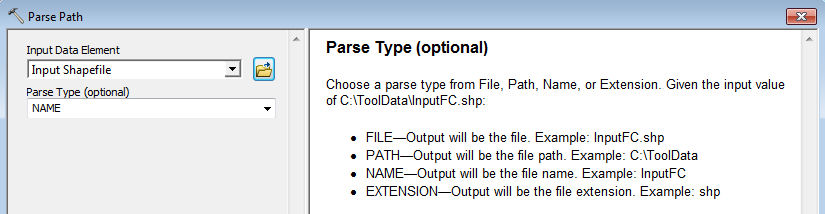
ModelBuilder includes a set of tools that are available only for models that will be run inside ModelBuilder (i.e., they won't work when the model is run as a tool). The Parse Path tool allows you to separate an input path into its component parts, then reference those parts in downstream processes.
In this example, the Parse Path tool is a better alternative to using a system variable for the model processes. It allows the input shapefile names to be used in the output names instead of cryptic numbers.
- Note: For processes that create intermediate data, using a system variable is a good solution when output names must have unique names but you don't need to worry about those names causing confusion.
To add the Parse Path tool: 
- Click the Insert menu > Model Only Tools > Parse Path.
- From the model window, open the Parse Path tool. For Input Data Element, choose Input Shapefile.
- For Parse Type, choose Name, then click OK.
- Connect the Parse Path output (Value) to the Feature Class to Feature Class tool as the Output Feature Class.

When you hover over the Feature Class to Feature Class output element, you can see that the three outputs now have names corresponding to the input shapefile names. This will make the model outputs immediately understandable to the people who need to work with the data.
Preconditions
Did you notice that the Input Shapefile element now links to two tools—Parse Path and Feature Class to Feature Class—and that Parse Path isn't part of the main model workflow? When a model contains separate but related processes, the order in which those processes execute is unpredictable. You can control processing order by setting a precondition.
In the example, the potential exists for the Feature Class to Feature Class process to run before the Parse Path process...which means the model outputs will be overwritten as each list item is processed.

To ensure the Parse Path tool always runs before Feature Class to Feature Class, make the Value element a precondition to the Feature Class to Feature Class tool.
To set a precondition:
- Right-click the Feature Class to Feature Class tool and click Properties.
- In the dialog box, click the Preconditions tab and check Value. Click OK.
Any model element can be set as a precondition to a model tool, and tools can have more than one precondition.
Go Ahead, Model It
By visually mapping workflows, automating time-consuming tasks, and supporting rapid "what if" scenario testing, models are a valuable tool to help GIS professionals work more efficiently and collaboratively. With a solid understanding of modeling basics and a few advanced techniques in your back pocket, you may find yourself jumping at opportunities to build models in ArcGIS. Because besides being geoprocessing workhorses, models are...fun.
Related posts:
For hands-on practice with ModelBuilder, this e-learning course is recommended.
You must be a registered user to add a comment. If you've already registered, sign in. Otherwise, register and sign in.
-
ArcGIS Desktop
28 -
ArcGIS Step by Step
46 -
Class Resources
25 -
e-Learning
63 -
MOOCs
30 -
Software Demos
11 -
Technical Certification
16