- Home
- :
- All Communities
- :
- Developers
- :
- Native Maps SDKs
- :
- Native SDKs Blog
- :
- Using Custom Pro Symbols in ArcGIS Runtime
Using Custom Pro Symbols in ArcGIS Runtime
- Subscribe to RSS Feed
- Mark as New
- Mark as Read
- Bookmark
- Subscribe
- Printer Friendly Page
ArcGIS Pro is a powerful desktop application that allows you to perform many essential GIS tasks, such as designing maps and symbols. One common requirement that many organizations have is to use a standardized set of symbols in their maps, so that they have a consistent look and feel associated with their maps and their brand. The best way to handle this is to create a Style and to store all of your symbols in the Style. You can then share this Style file with anyone in your organization so they can access the same symbols. This is not a new workflow - Styles have been around in ArcMap for quite some time. But one really cool new things you can do with ArcGIS Pro is create Mobile Style Files, which are style files that can be shared with ArcGIS Runtime based applications. This means that you can create your custom symbol sets in ArcGIS Pro, and then apply those same symbols to graphics and features in ArcGIS Runtime Apps. If you have ever wanted to create and display intricate custom symbols that are beyond what the Runtime API will allow you to programmatically create, then this workflow is for you.
Step 1: Create a Mobile Style File in Pro
- Open Pro and create a new Project
- Open your Catalog Window and find the "Styles" section
- Right click Styles and select New > New Mobile Style.
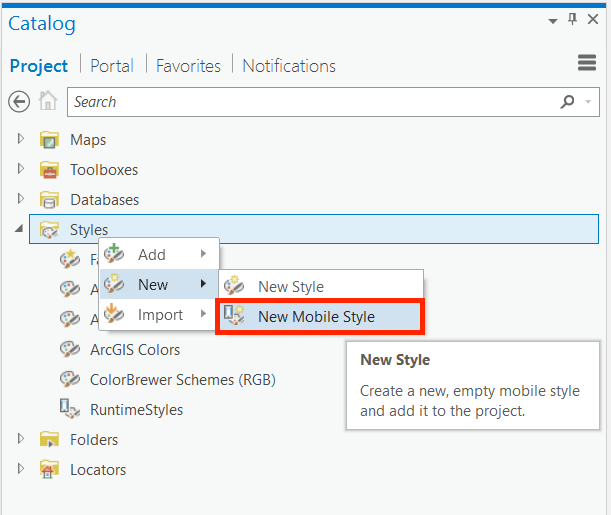
- Give a name and location to create the style file.
- More details on the specs and limitations of a Mobile Style file can be found here.
Step 2: Create and save a custom symbol into the Style File
- Insert a new map and add some vector data to your map
- Select the layer in the Contents pane, right click, and select Symbology
- This will open the Symbology pane and display the current symbol for the layer. You can modify this by changing color, size, and adding additional symbol layers. This allows you to make a completely customized symbol. Modify the symbol to your liking, and press Apply to see the symbol applied to the map.
- Once you have the desired output, click the "hamburger" icon in the top right of the Symbology pane and select Save Symbol to Style.

- Fill in the Name and Category and optionally give it a Key. This key will be used for fetching the Symbol in Runtime. (You could also query for all symbols and sort through the results programmatically, but retaining and fetching from a Key is the most straight forward way to get started)
- From the Style dropdown, select your newly created Style file.
- Click OK, and your symbol is now saved to your Style file and is ready for use in ArcGIS Runtime.
- More details about the process of creating symbol styles can be found here.
Step 3: Consume in Runtime
- Create a GraphicsOverlay object to display Graphics in a MapView
m_graphicsOverlay = new GraphicsOverlay(this);- Create a SimpleRenderer and set this to the GraphicsOverlay. A SimpleRenderer will display the same symbol for every graphic in the overlay
m_simpleRenderer = new SimpleRenderer(this);
m_graphicsOverlay->setRenderer(m_simpleRenderer);- Create a SymbolStyle object by passing in the path to the constructor
m_symbolStyle = new SymbolStyle("/Users/<username>/Desktop/RuntimeStyles.stylx", this);- Connect to the SymbolStyle::fetchSignalCompleted signal. This will emit when a symbol has been asynchronously fetched from the Style. A Symbol object is passed through as a parameter, and this symbol object can then be used to set the symbol used by the SimpleRenderer
connect(m_symbolStyle, &SymbolStyle::fetchSymbolCompleted, this, [this](QUuid, Symbol* symbol)
{
m_simpleRenderer->setSymbol(symbol);
});- Fetch the symbol by the unique Key defined in Pro
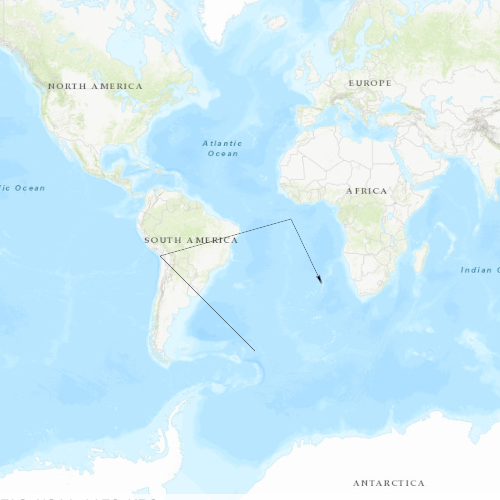
m_symbolStyle->fetchSymbol(QStringList{"RuntimeArrow"});- Add graphics to your graphics overlay, and they will be symbolized with the custom symbol. In the below example, a simple black line with an arrow at the end of the line was created in Pro and consumed in ArcGIS Runtime.
An example ArcGIS Runtime project can be found here. You will need to update the path to your style file and any keywords that you may be searching for.
You must be a registered user to add a comment. If you've already registered, sign in. Otherwise, register and sign in.