Turn on suggestions
Auto-suggest helps you quickly narrow down your search results by suggesting possible matches as you type.
Cancel
Python Blog - Page 18
Turn on suggestions
Auto-suggest helps you quickly narrow down your search results by suggesting possible matches as you type.
- Home
- :
- All Communities
- :
- Developers
- :
- Python
- :
- Python Blog
- :
- Python Blog - Page 18
Options
- Mark all as New
- Mark all as Read
- Float this item to the top
- Subscribe to This Board
- Bookmark
- Subscribe to RSS Feed
Subscribe to This Board
Latest Activity
(198 Posts)
MVP Emeritus
02-03-2016
03:30 AM
1
1
2,569
MVP Emeritus
01-20-2016
06:39 PM
0
2
2,204
MVP Emeritus
01-18-2016
06:02 AM
0
4
2,356
229 Subscribers
Popular Articles
Turbo Charging Data Manipulation with Python Cursors and Dictionaries
RichardFairhurst
MVP Alum
47 Kudos
91 Comments
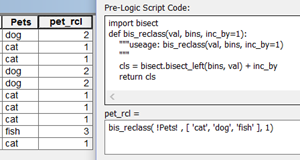
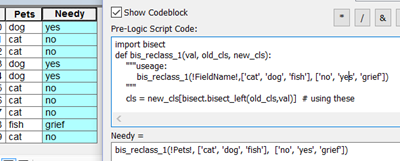
The ...py... links
DanPatterson_Retired
MVP Emeritus
18 Kudos
6 Comments
Code Formatting... the basics++
DanPatterson_Retired
MVP Emeritus
16 Kudos
0 Comments