- Home
- :
- All Communities
- :
- Products
- :
- Geoprocessing
- :
- Geoprocessing Questions
- :
- Re: How Does One Clip, Copy Or Export An Image And...
- Subscribe to RSS Feed
- Mark Topic as New
- Mark Topic as Read
- Float this Topic for Current User
- Bookmark
- Subscribe
- Mute
- Printer Friendly Page
How Does One Clip, Copy Or Export An Image And Preserve The Original Quality?
- Mark as New
- Bookmark
- Subscribe
- Mute
- Subscribe to RSS Feed
- Permalink
I have been trying to clip an image using ArcGIS Pro (2.3). I need to send this image to a 3rd party, so it's not going to be used in my system. I am simply trying to convert an ESRI GRID format image into a smaller ESRI GRID format image. I have tried various geoprocessing tools:
- Extract by Mask
- Clip (using a polygon)
- Copy Raster (after using clip in Raster Functions)
And have used various compression settings:
- LZ77
- JPEG
- LZW
I also always let the software build pyramids using the -1 option, and have tried setting "no data" to both "0" and "256". I have not changed the projection.
None of my methods seem to work and in every case the resulting image appears coarse and no like the original at all. All I want to be able to do is capture a piece of our high-res orthophoto and preserve the original image quality in the resulting image, which sounds fairly straight forward.
Because each iteration of my workflow takes about 15 minutes this project is starting to cost me hours...even days. Surely there's a smart way to deal with this, right?
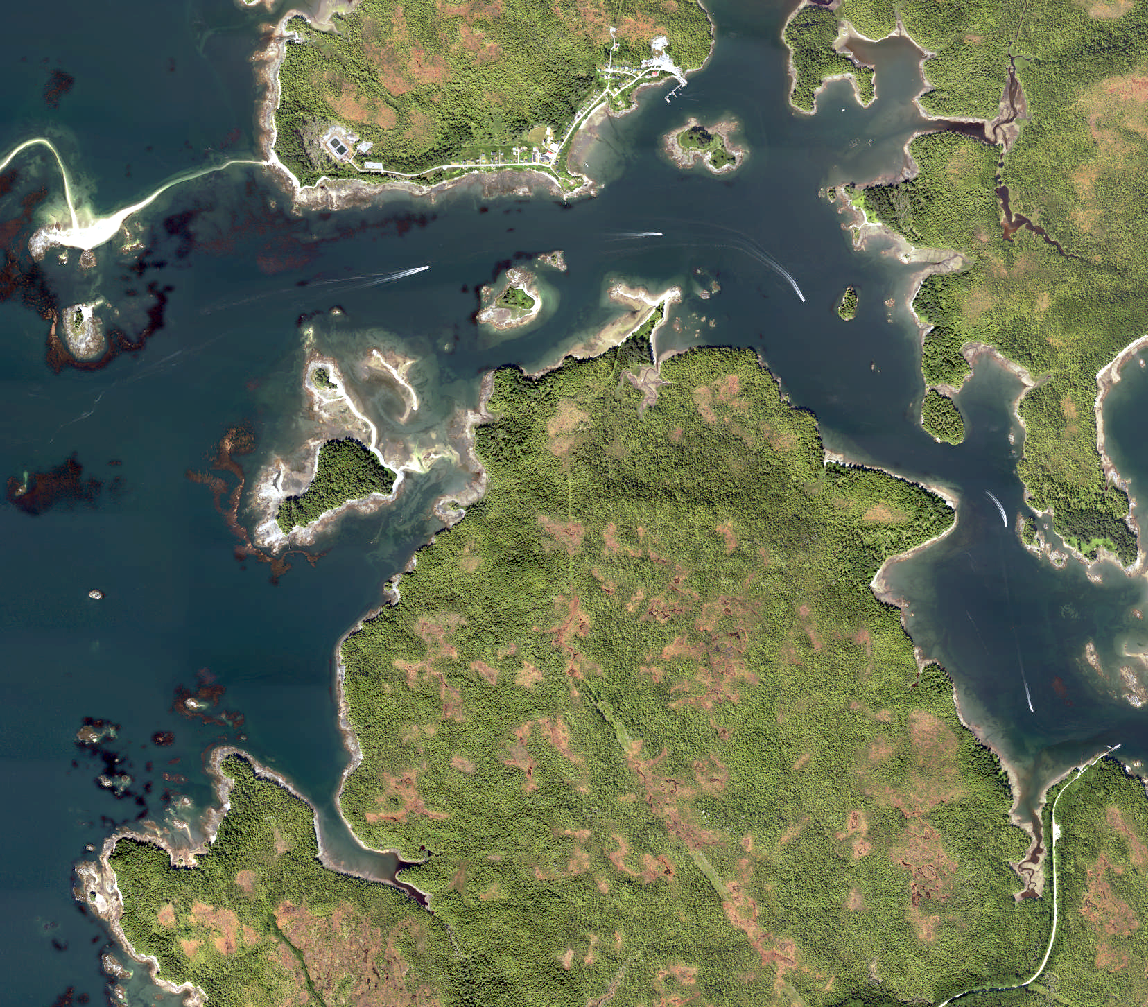
Original Image
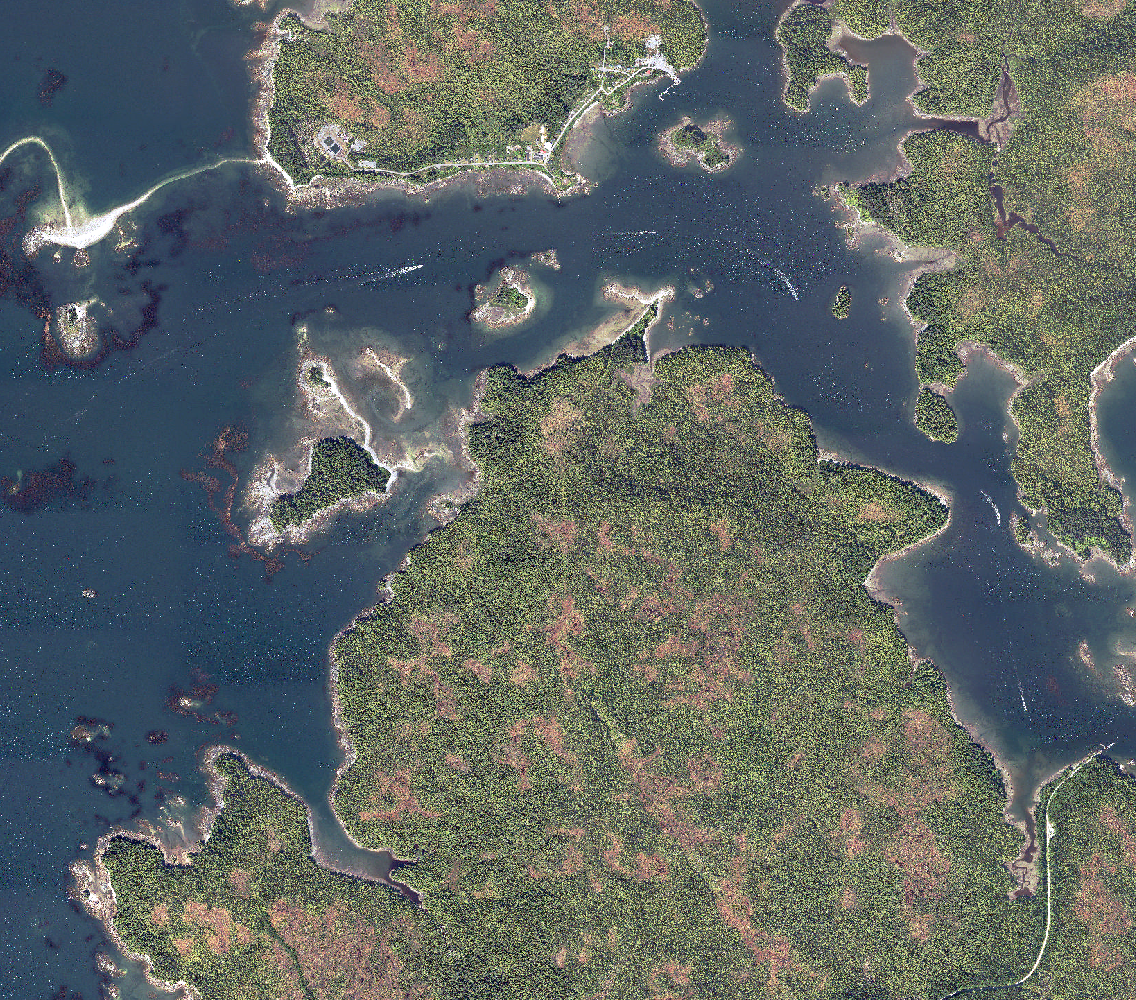
Resulting Image
Suggestions?
Thank you
- Mark as New
- Bookmark
- Subscribe
- Mute
- Subscribe to RSS Feed
- Permalink
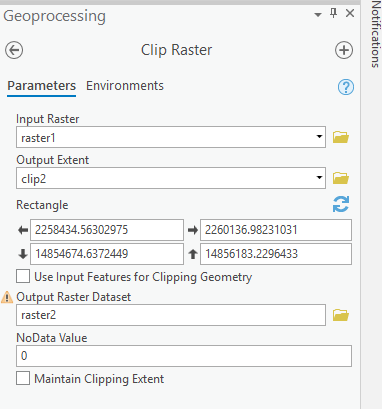
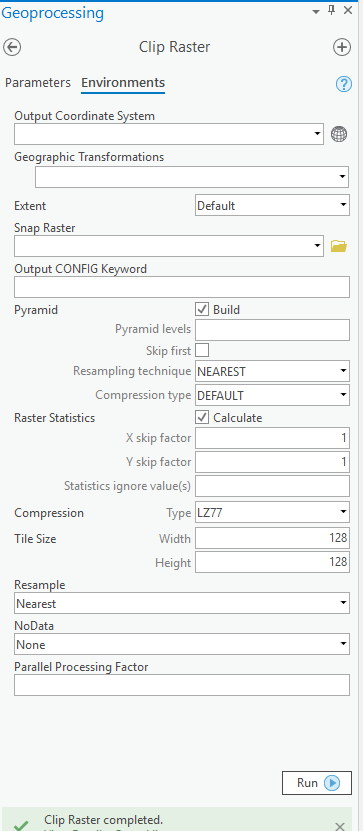
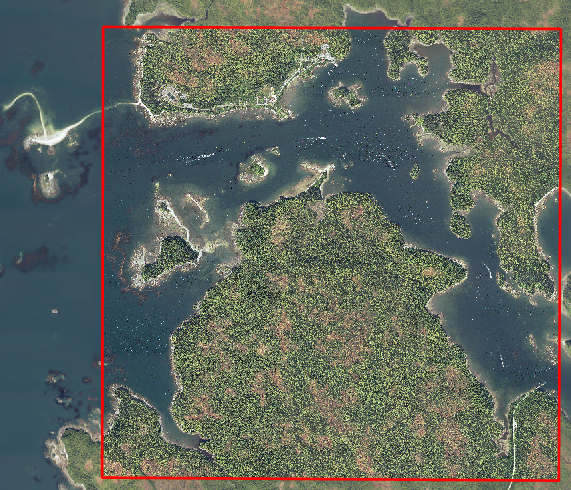
I just used #clip raster by polygon with default Environments settings on a GRID image and the clipped out put was indistinguishable from the original. In screen shot below, the area inside the yellow polygon is a clip raster output laying on top of the original raster - no visible difference.

I'd recommend trying NOT using 0 as a NoData value - that might be why you are getting those "speckles" in the dark water areas. Those look like they might be valid black 0 values within the image. Once you've done that, make sure that the #Raster Layer Appearance Stretch Type is set to None.
Good luck.
Washoe County GIS
- Mark as New
- Bookmark
- Subscribe
- Mute
- Subscribe to RSS Feed
- Permalink
Jay:
Thanks very much for your response...most appreciated. I took a little while to respond because I wanted to try this out a few times to make sure I could replicate your results.
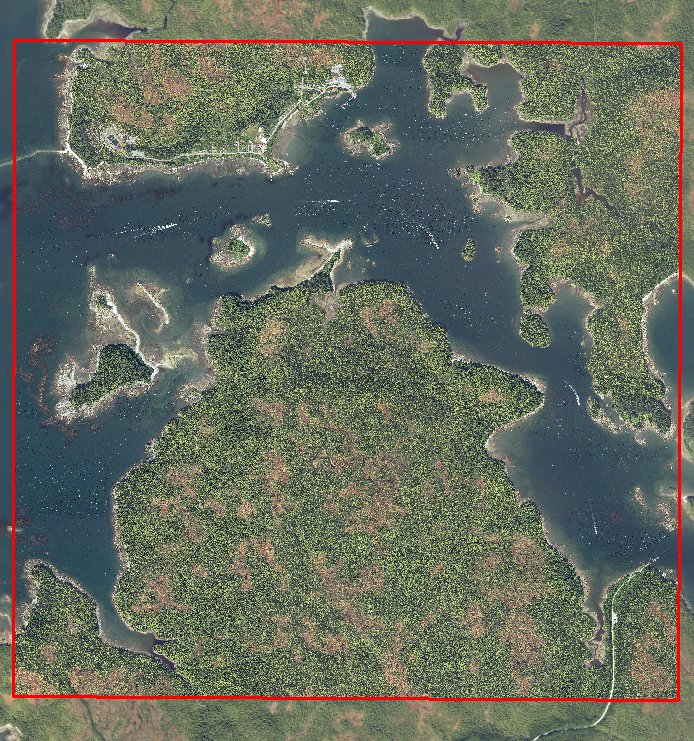
I tried processing this clipped imaged 3 different ways using just the default settings, but it sill produced the same grainy coarse results (as per below). This is very frustrating. I tried Clip Raster using my polygon, Copy Raster, and then Clip from Raster Functions using the Export Raster option...all with just the default settings, but nothing seems to change.
I'm wondering if there is a default setting somewhere that is overriding my process each time? I say this because no matter what settings I use the results never seem to change regardless of what compression method was selected, which to me seems odd.


- Mark as New
- Bookmark
- Subscribe
- Mute
- Subscribe to RSS Feed
- Permalink
Yeah - this is very puzzling.
Is your output actually a different pixel size than the input? Can't tell from the screen shots. Rt-click raster layer, Properties, Source, Raster Info:
![]()
There ARE other default Environment Settings under Analysis, Environments. Guess you could check those to make sure there is nothing weird set there, although I'd assume these would get over-ridden by whatever you set in the tool.

Have you tried doing the same operation in ArcGIS Desktop?
Washoe County GIS
- Mark as New
- Bookmark
- Subscribe
- Mute
- Subscribe to RSS Feed
- Permalink
Jay:
Thanks a lot for your time on this...this has me double-checking my entire workflow too, which is a good exercise.
The cell size in both original and resulting images are identical (x=0.1, y=0.1), which is a good thing to check as that could have this affect if these were different. I checked the general Environment settings too and those turned out to be the same as default settings when I use the tools in ArcGIS Pro. So I'm pretty sure that there was nothing there that could be affecting my output.
I also tried my workflow 3 different ways using ArcMap (Raster Clip, Raster Export and Extract by Mask), but all 3 returned the exact same results. In one method I tried using a different compression option, but that too made no difference.
Raster Clip using ArcMap in ArcGIS 10.6.1
I had this same issue when I originally created the image from 192 TIFF images, but what ended up resolving that (for some reason) was using JPEG compression (not sure why). That has no effect here though.
Interestingly, with exception to the resolution over the water, when I zoom in to a larger scale I cannot see the coarseness anymore...it's only at the smaller scales where this becomes more obvious.
This is quite baffling. One would think that one should just be able to clip the image while maintaining the quality of the original image...I wonder what's really going on in the background when I process this image?
Original Image
I hope this can be resolved...I would hate to quit on this.
The source data specs are:
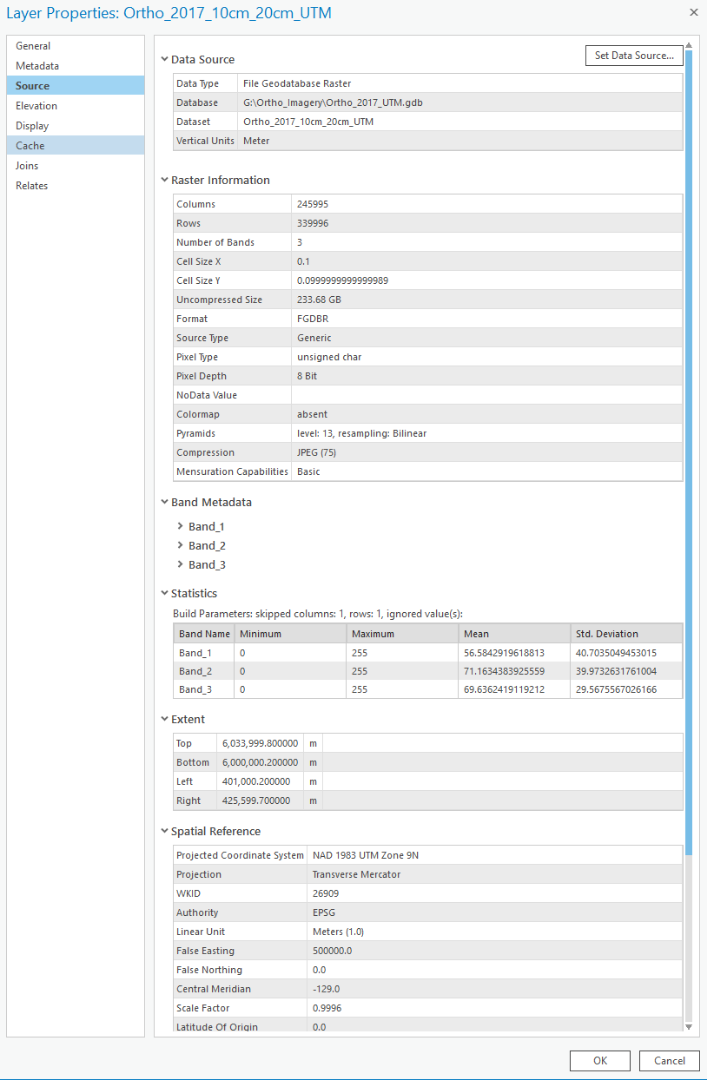
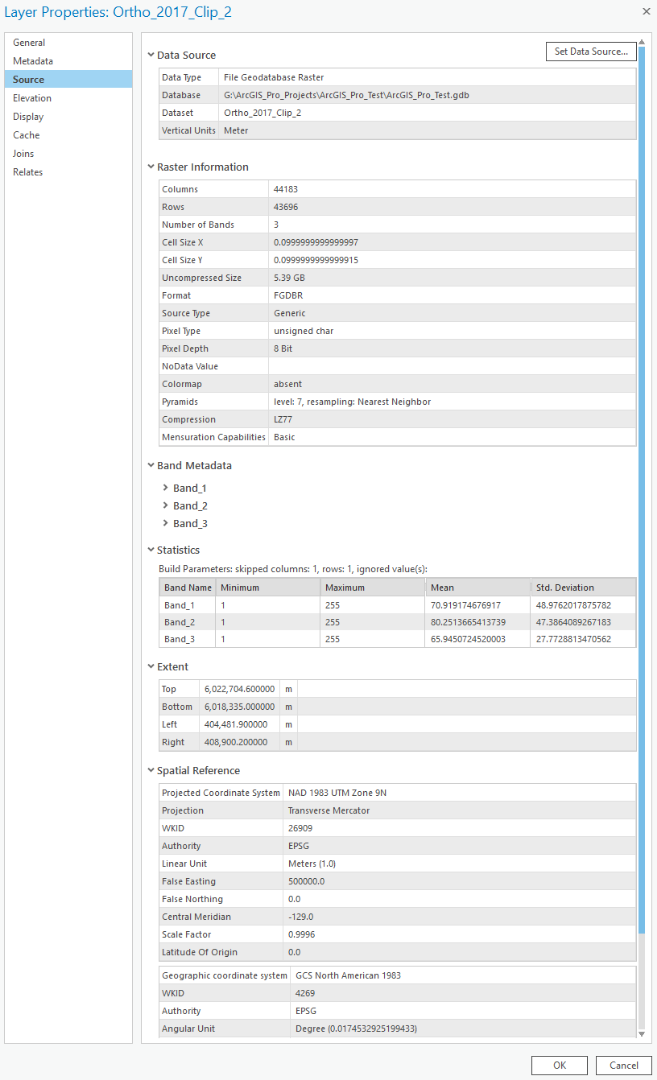
The specs on the clipped raster:
One question though...could this be a problem because my original raster image was created using JPEG compression? Just a thought.
Thanks
- Mark as New
- Bookmark
- Subscribe
- Mute
- Subscribe to RSS Feed
- Permalink
Mark,
"...when I zoom in to a larger scale I cannot see the coarseness anymore...it's only at the smaller scales where this becomes more obvious." Now that is very interesting and suggests that maybe the clipped raster is actually okay and the problem may lay with display of the image.
If you right-click the raster, click "Zoom to Source Resolution", and the clipped image looks good at that scale (indistinguishable from the original), then it seems possible this is a display re-sampling issue, not a data issue.
Maybe there is a problem with your pyramids. I'd suggest trying two things:
1) Delete the pyramids on the clipped raster and see what it looks like without pyramids. Right-click the raster in Catalog, Build Pyramids, then use "0" for Pyramid levels. This deletes the pyramids.
2) If deleting the pyramids is no good, try re-building them. Same steps as in 1), but use -1 for Pyramid levels to build full pyramids.
You might also make sure that you've calculated statistics on the clipped raster, which can affect some display options.
I suppose the clipped raster is too large to share?
Washoe County GIS
- Mark as New
- Bookmark
- Subscribe
- Mute
- Subscribe to RSS Feed
- Permalink
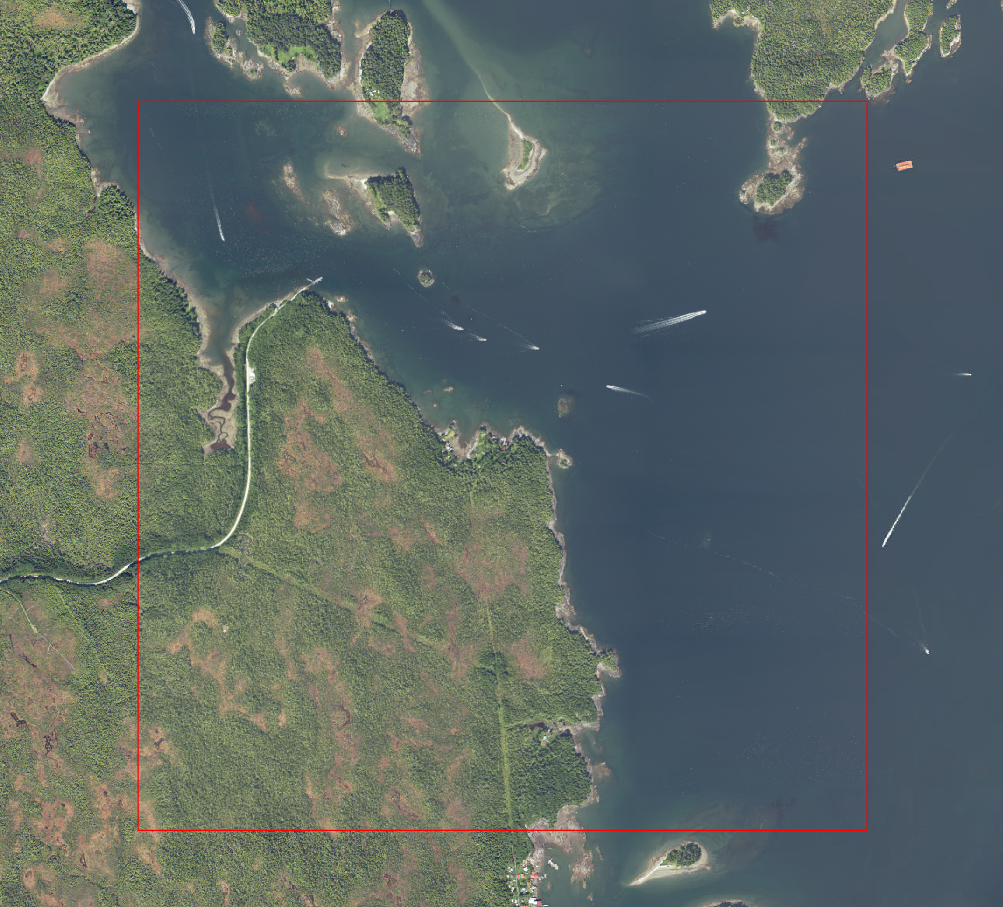
Jay:
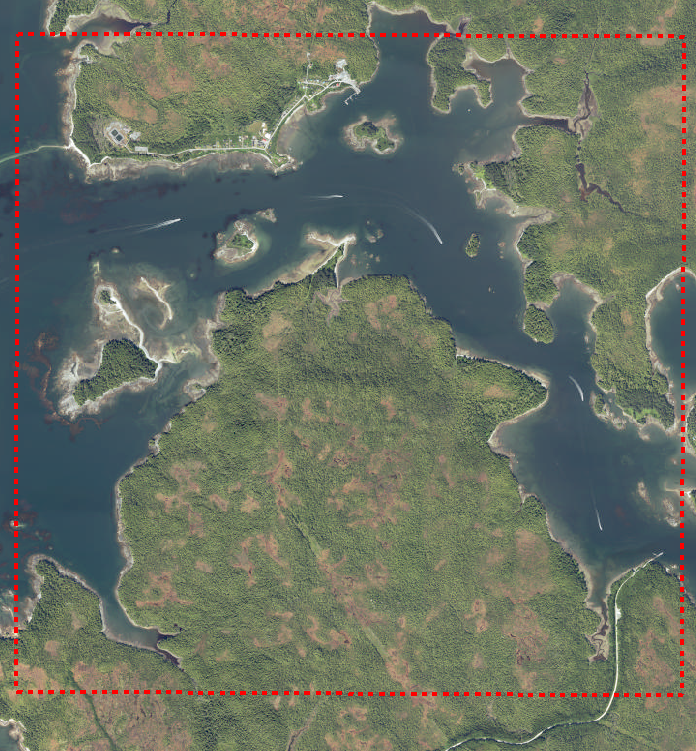
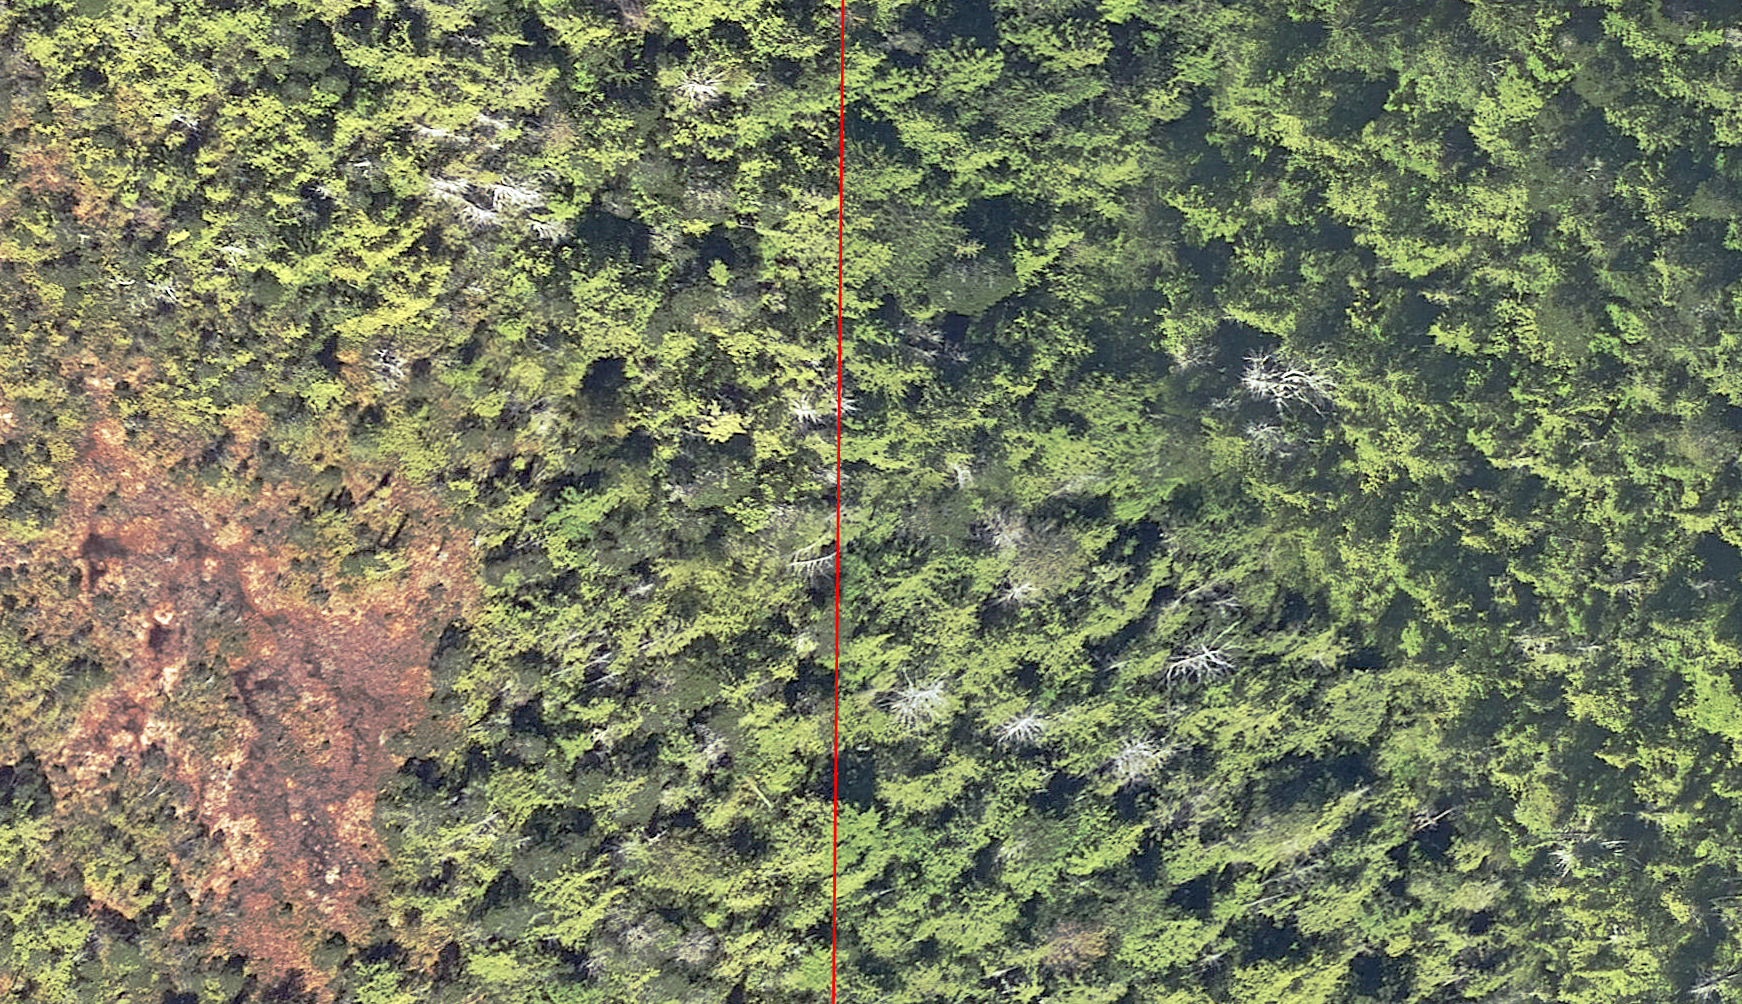
Thanks again...this gives me an opportunity to explore a different angle to this problem. I will work on this today and see what happens. The latest version of the clipped images is 1 GB...it's a fraction of the original (10 cm resolution), so if I could share that somehow I would. However, I did take a peek at it using the "Zoom to Source Resolution" and it pretty well substantiates my observation on the coarseness disappearing when zoomed in. The clipped image is to the right of the red line:
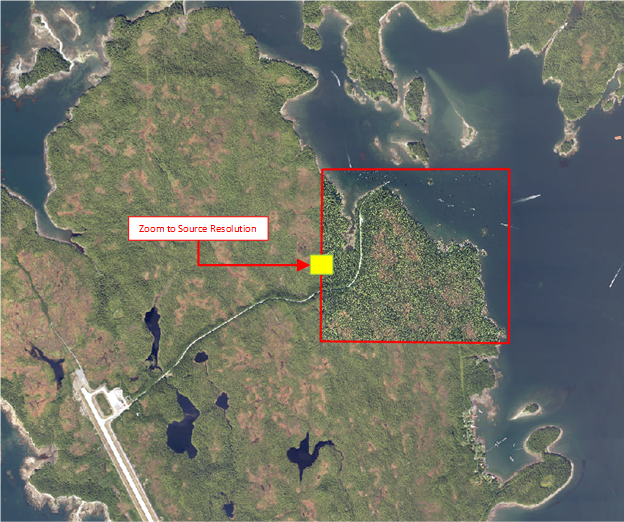
This is a snapshot of what it looks like when I zoom out to 1:30,000 scale:
Thanks again.
- Mark as New
- Bookmark
- Subscribe
- Mute
- Subscribe to RSS Feed
- Permalink
Jay:
I have 192 original TIFF files that pieced together form our orthophoto. Each TIFF is simply named after the NW corner of a UTM coordinate, so it was fairly simple to find the right TIFF files (there are 9 of them for the area I was trying to clip). Why I cannot clip or export the raster to a new GDB is beyond me.
So what I did was create a new Mosaic using those 9 TIFF images, but instead of using an 8-bit unsigned pixel type I used a 64-bit instead, and it works perfectly. The new image is virtually indistinguishable from the original:
Now I have a format that I can share with our 3rd party...a clip would have been so much easier though.
The one thing that bothers me about Mosaics though is that periodically the Mosaic path gets corrupted, and then one has to fix that, which can be a pain as it doesn't always work.
I tried clipping this image, exporting it as a GRID file, and using that Mosaic to New Raster tool, and none of them worked (i.e. they all produced the same coarse imagery as I was experiencing before).
It looks like I will have to go with this Mosaic and hope for the best.
- Mark as New
- Bookmark
- Subscribe
- Mute
- Subscribe to RSS Feed
- Permalink
Your pyramids (reduced resolution overviews) are being generated using "nearest" resampling. Use "bilinear" or "cubic" instead.
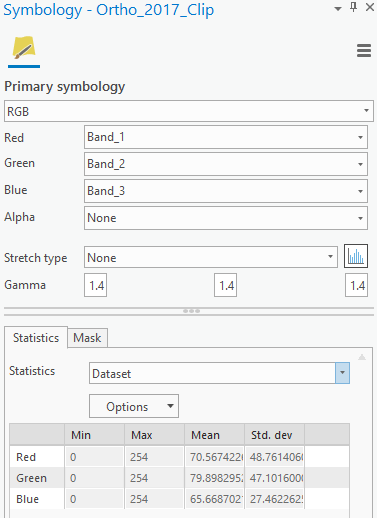
Your clipped data is probably also being displayed with a different stretch to your original data. If the data is 8bit RGB and doesn't need stretching, ensure the stretch type is set to None for the clipped layer symbology (it defaults to a percent clip stretch). If the data is 16bit or something else, it needs stretching for display and ArcGIS relies on band statistics to do the stretch, you'll have to manually set the clipped image statistics (for display only in the layer symbology) to be the same as the original layer. However, you don't really need to do this, if you're not going to be using the data, just sending it to someone else.
And I really don't recommend using ESRI GRID format, use a GeoTIFF instead (or a file GDB raster if you must) unless the third party absolutely requires GRID.
- Mark as New
- Bookmark
- Subscribe
- Mute
- Subscribe to RSS Feed
- Permalink
Luke:
Thanks for your advice. I will most definitely give these suggestions a try and see how it works, and post again as soon as I have done this. I have been putting the image into a GDB with success in the past...I just for the life of me couldn't get my head around why something as simple as a clip was not working. The original data are in GeoTIFF, and I used that to successfully create a Mosaic, and a static image as well...it's just the clipping, or masking that seems to be giving me grief. I will plug away at this this morning though.
Thanks