- Home
- :
- All Communities
- :
- Services
- :
- Esri Training
- :
- Esri Training Matters Blog
- :
- Working with Excel Data in ArcGIS Pro
Working with Excel Data in ArcGIS Pro
- Subscribe to RSS Feed
- Mark as New
- Mark as Read
- Bookmark
- Subscribe
- Printer Friendly Page
Microsoft Excel is a popular format for storing and analyzing tabular data. While you can't edit Excel data in ArcGIS Pro (worksheets are read-only), it’s easy to view Excel worksheets and do things like
- Join an Excel table to a layer attribute table, then use the Excel data for queries, field calculations, feature labels, or map symbols.
- Use Excel data as input to geoprocessing operations.
- Export Excel data to a geodatabase table so that it can be managed with and related to GIS data stored in the geodatabase.
ArcGIS Pro supports XLSX files (Excel 2007) and XLS files (Excel 2003 and earlier). Before working with Excel data in ArcGIS Pro, there are a few things you need to be aware of. Here are some common things to check.
- Note: If an Excel file is password-protected, you will not be able to access it in ArcGIS Pro.
Column Names
ArcGIS Pro converts the first row of Excel worksheet data to field names, so the first row in your Excel worksheet should contain column names. If the first row contains other content, modify the worksheet so that the first row contains column names.
- Depending on your organization’s data requirements, you may want to make a copy of the worksheet and modify the copy.
Column names must be 64 characters or less.
ArcGIS Pro field names can contain only letters, numbers, and underscores (no special characters). Best practice is for Excel column names to begin with a letter, especially if you want to join the Excel table to another table.
- Note: Column names that begin with a number will have an underscore appended in front of the number in ArcGIS Pro. Spaces and hyphens in Excel column names display as underscores in ArcGIS Pro.

Column Data Types
ArcGIS Pro scans the rows in each column to determine the data type. If there are mixed data types within a column, the ArcGIS Pro field data type will be text.
- Tip: Before opening the worksheet in ArcGIS Pro, in Excel, select the column, then use the Format Cells dialog box to apply the same data type to all the cells.
If your Excel column stores numeric data with decimals, in ArcGIS Pro the field will have a data type of double-precision floating-point number (AKA double).
ArcGIS Pro assigns the data type for a column containing only numbers to be numeric. This makes sense, but suppose you have a column of ZIP Codes?
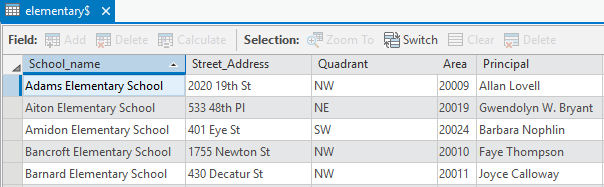
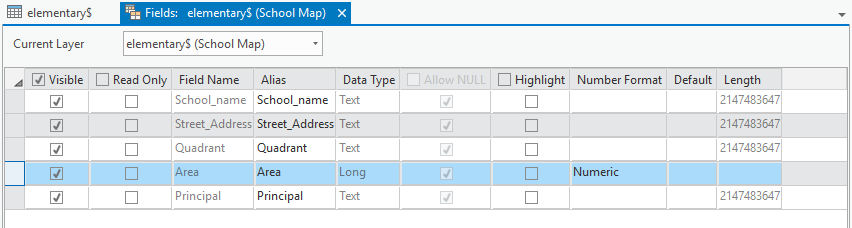
Items such as ZIP Codes, U.S. FIPS codes, NAICS, and SIC codes should be treated as text, since mathematical operations don’t apply to this data. In the table below, the Area field has been assigned the long integer data type. In fact, this field contains ZIP Codes.
If the data type assigned to a field is not desirable for your data, you can join the Excel table to another (editable) table in ArcGIS Pro, then add a new field of the desired data type to the joined table and calculate its values to be the data from the source Excel column.
- Learn about field data types in ArcGIS Pro.
- Learn more about working with table fields in ArcGIS Pro.
How to Access an Excel worksheet in ArcGIS Pro
- Start ArcGIS Pro, open a project, and insert a map if necessary.
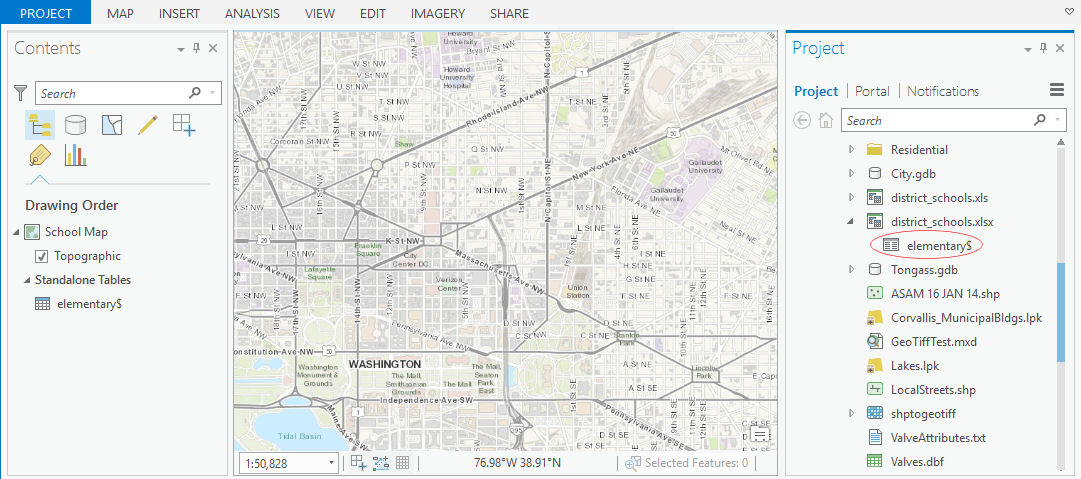
- In the Catalog pane, navigate to the folder containing the Excel file.
- Click the plus sign next to the Excel filename to expand it and display one or more worksheets. A dollar sign symbol ($) displays at the end of worksheet names.
- Drag the worksheet into the map area.
The worksheet displays in the Contents pane as a standalone table (this means it’s a nonspatial table that contains only tabular data).
To open the Excel table, in the Contents pane, right-click the table and click Open.
You can sort fields, turn fields off and on, assign field aliases, and export the data to a geodatabase table or CSV, DBF, or TXT file.
If you edit the data in Excel while the table is open in ArcGIS Pro, you’ll need to close ArcGIS Pro and restart it in order to see the updated Excel data.
Want more on this topic?
For more information about working with Excel files in ArcGIS Pro, see this help topic.
For hands-on practice with ArcGIS Pro, check out these training options:
You must be a registered user to add a comment. If you've already registered, sign in. Otherwise, register and sign in.
-
ArcGIS Desktop
28 -
ArcGIS Step by Step
46 -
Class Resources
25 -
e-Learning
64 -
MOOCs
31 -
Software Demos
11 -
Technical Certification
17