- Home
- :
- All Communities
- :
- Products
- :
- ArcGIS Survey123
- :
- ArcGIS Survey123 Blog
- :
- Survey123 Tricks of the Trade: Repeats
Survey123 Tricks of the Trade: Repeats
- Subscribe to RSS Feed
- Mark as New
- Mark as Read
- Bookmark
- Subscribe
- Printer Friendly Page
- Report Inappropriate Content
You can think of XLSForm repeats like sub-forms: A form within a form that can also be completed multiple times. Repeats are a very powerful feature in Survey123 because they can be configured in many different ways to support different business workflows. This article covers everything from the basics to the more advanced features of repeats.
Some use cases
Let's first review some common scenarios that scream for a repeat:
- In a door-to-door population survey, you will want to capture the location of the household and address, but also information about every member of the family. A repeat will help you model the form to be completed for each of the members of the household, including information about their name, age, gender, etc. The household survey will have a household member repeat in it, which will be completed for each person in the household.
- In an asset inspection form you may want to capture information about each defect found. The defects repeat (or sub-form) will include questions to let you document each defect with its own photo, a description of what needs to be repaired and estimated cost of repair.
- Repeats are also a great way to handle routine inspections. An asset form can include a repeat for the inspections: one form for the asset with its ID, location, etc and a sub-form (repeat) for every inspection ever made, with its date, issues found, etc. Since repeats can be nested, the inspection repeat form can also include its own repeat or sub-form for every defect found.
The basics
Repeats are supported through XLSForms via Survey123 Connect. If you are familiar with XLSForm groups, you have a lot of ground covered, because a repeat is really a type of group that lets you cycle through the questions in the group again and again.
To add a repeat to an XLSForm you need to enclose a set of questions within a begin repeat and end repeat set, as shown in this example:
| type | name | label |
| text | hh_id | Household ID |
| text | hh_address | Address |
| begin repeat | hh_members | Household Members |
| text | mbr_name | Name and last name |
| integer | mbr_age | Age |
| select_one gender | mbr_gender | Gender |
| end repeat | ||
| select_one yes_no | all_members_present | All household members present? |
In the survey above, the main body of the form is really about the household itself and is used to collect the household ID and address. The repeat block is all about household member information. We expect the enumerator to complete the Household Members repeat, or sub-form, once for each person in the household. The All household members present? question is outside the repeat, so it also belongs to the main form, but it will be presented right after the Household Members repeat.
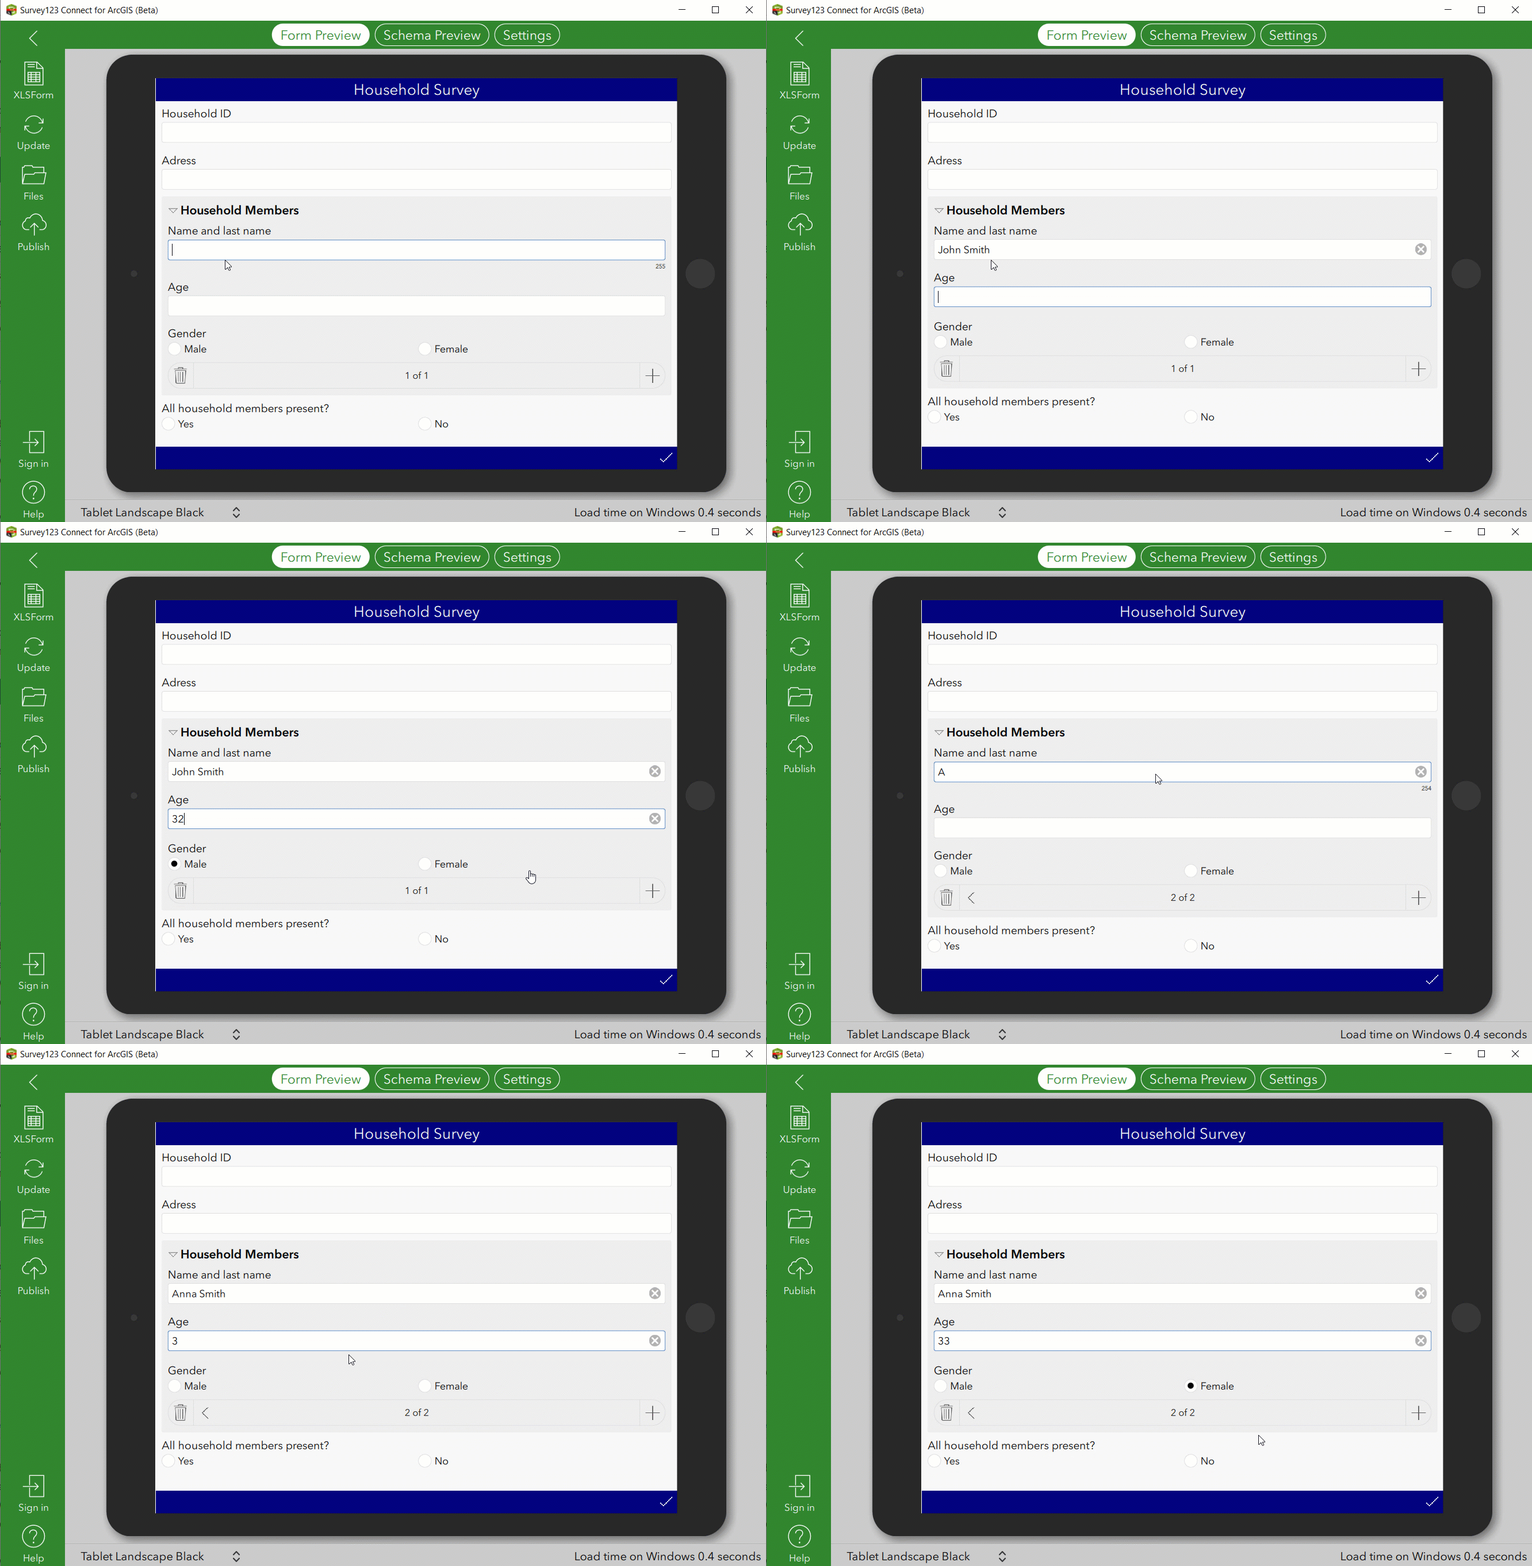
Below is what the survey above would look like in the Connect preview. Note that the repeat appears as a common question group, except that at the bottom there are multiple options to navigate records within the repeat: a plus button to add a new record as well as next and back buttons (once you have more than one household member).
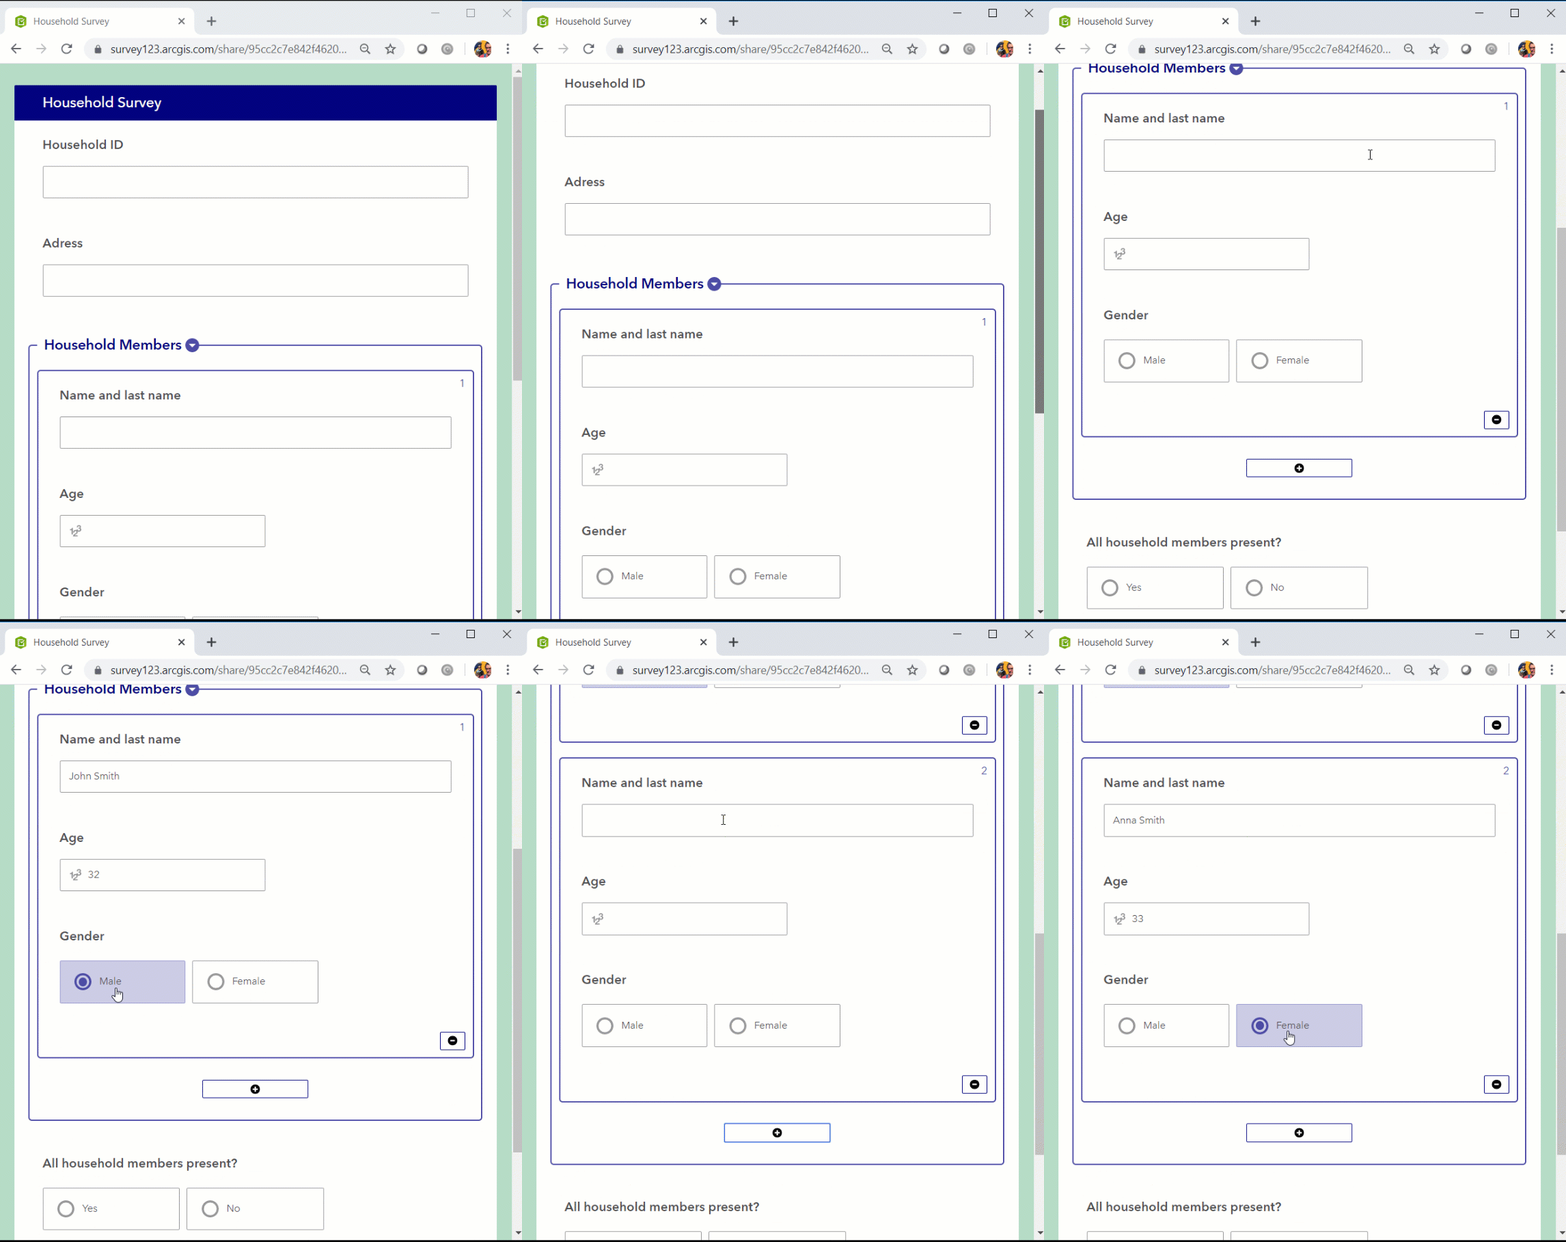
The user experience for repeats within the Survey123 web app is slightly different, presenting all the repeat records at once. You can navigate through them by scrolling up and down, as shown in the next animation.
You can add one or more repeats to your survey. For example, in a school survey, you could include a repeat to document all classes in the school, and a separate repeat to gather information about teachers, etc.
Understanding repeat data in your feature layer
Survey123 repeats are modeled in ArcGIS as related tables (or related layers if your repeat includes a geopoint, geoshape or geotrace question). In the example household survey above, the information about the household (id, address...) is kept in the main layer of a feature service, and the data from the household member repeat (name, age, gender) is modeled as a separate, but related table. The relationship between the tables/layers is kept through internally created global IDs.
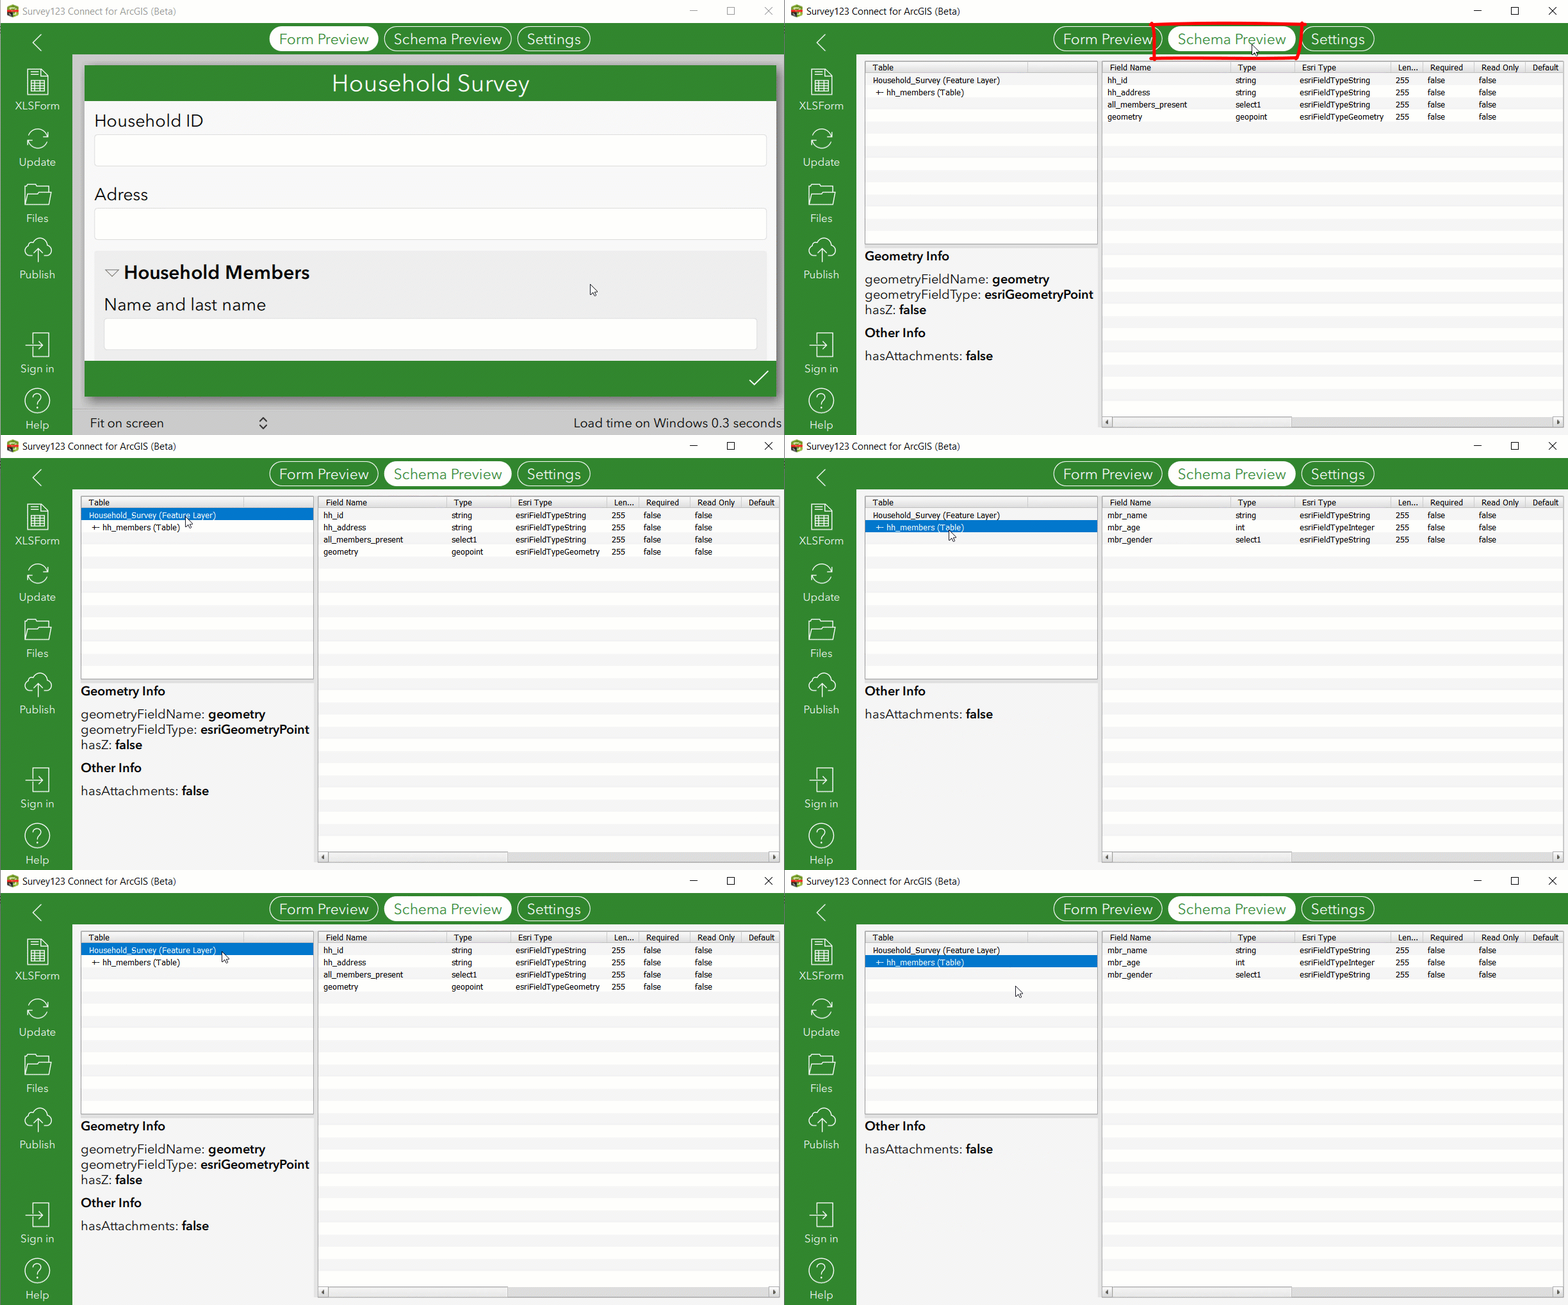
If you would like to preview what your geodatabase schema looks like you can use the Schema Preview option in Connect, as shown in the animation below. Note that the name of the repeat in XLSForm becomes the name of the related table.
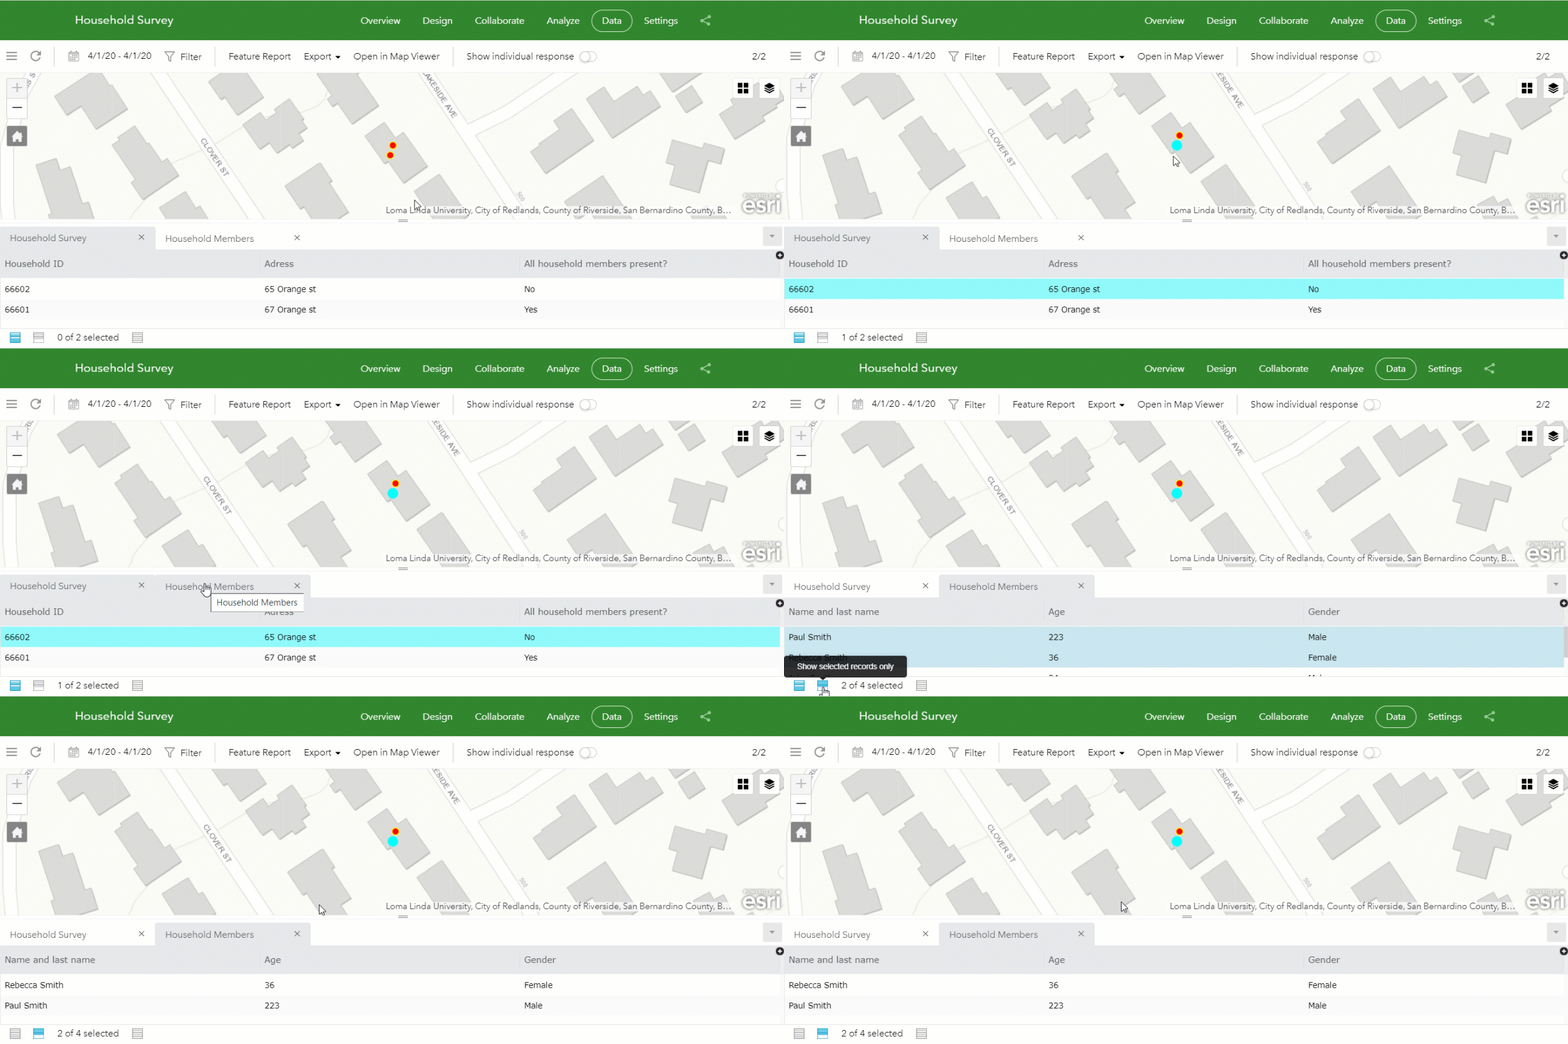
Using the Survey123 website, you can quickly explore data from repeats using the Data tab. The table will show records from the main layer of your survey as usual, and also extra tabs for every repeat in your form. You can propagate selections across the tabs for easier exploration of your data.
Repeat appearances (minimal and compact)
Through the appearance column in the XLSForm you can control how the repeat initially loads and appears in your form. By default, a repeat with no appearance value set is shown expanded, with one initial record showing. This can be good or bad. The good is that all questions within the repeat are ready for end-users to enter data right away. The bad is that if no data is entered, a new empty record will be added to your related table. I generally avoid using repeats with no appearance unless questions within the repeat are flagged as required.
If you want to avoid the repeat from having an initial record preloaded, use the minimal appearance. This will show your repeat group expanded, but with no records. To initialize data entry in the repeat, the end user will need to explicitly add a new record to the repeat by clicking the plus button.
The compact appearance simply collapses your repeat when the form initially loads. Of course, you can combine the minimal and compact appearances.

XLSForm expressions and repeats
XLSForm expressions allow you to bring sophisticated logic into your forms. Generally, XLSForm expressions are used to auto-calculate values (Calculations), define skip logic (Relevant), and to build data validation rules (Constraints). The XLSForm expression syntax for calculations in repeats is basically the same as with any other question in the form (more details at Formulas—Survey123 for ArcGIS | Documentation), but here are some important things to highlight.
When writing XLSForm expressions for a question within a repeat, you can reference other questions inside the repeat, but also questions outside! A common use is that where you want to bring data into your related table from the parent record. For example, in the example household survey you may want to store, along with every household member, their corresponding household ID. It would look something like this:
| type | name | label | calculation |
| text | hh_id | Household ID | |
| text | hh_address | Address | |
| begin repeat | hh_members | Household Members | |
| hidden | parent_hh_id | Parent Household ID | ${hh_id} |
| text | mbr_name | Name and last name | |
| integer | mbr_age | Age | |
| select_one gender | mbr_gender | Gender | |
| end repeat | |||
| select_one yes_no | all_members_present | All household members present? |
Note how the parent_hh_id question within the repeat is calculated to automatically fetch the value of the Household ID for that person. The Household ID is outside the repeat, but the calculation brings that value into the repeat record. This is a common use of calculations within repeats because it helps bringing more information into the repeat table that would otherwise require a join.
Styling
There are a few techniques you can use to style your repeat with custom colors and labels. This can be help users navigate your form more efficiently.
One technique is to dynamically set the label of your repeat to provide some context as to what information should be entered into the repeat. For example, in our household survey, you can include the address of the household in the header of the repeat. Instead of just reading 'Household Members', you can make it read 'Household Members at: <Address of the household comes here>. This is what is known as a dynamic label and it is described in more detail in the https://community.esri.com/groups/survey123/blog/2018/11/01/understanding-dynamic-labels-in-survey12... blog post. This is quite handy when working with long surveys, because it brings additional context for the person filling out the form. Here is what this would look like. Note how the label for the repeat is dynamically generated using a value from a question outside the repeat.
| type | name | label |
| ... | ||
| text | hh_address | Address |
| begin repeat | hh_members | Household Members at ${hh_address} |
| ... |
You can also use colors to make your repeats stand out better within the form, like in the following screenshot. The repeat block uses a darker background color than the rest of the form, clearly separating questions within the repeat, from those outside.
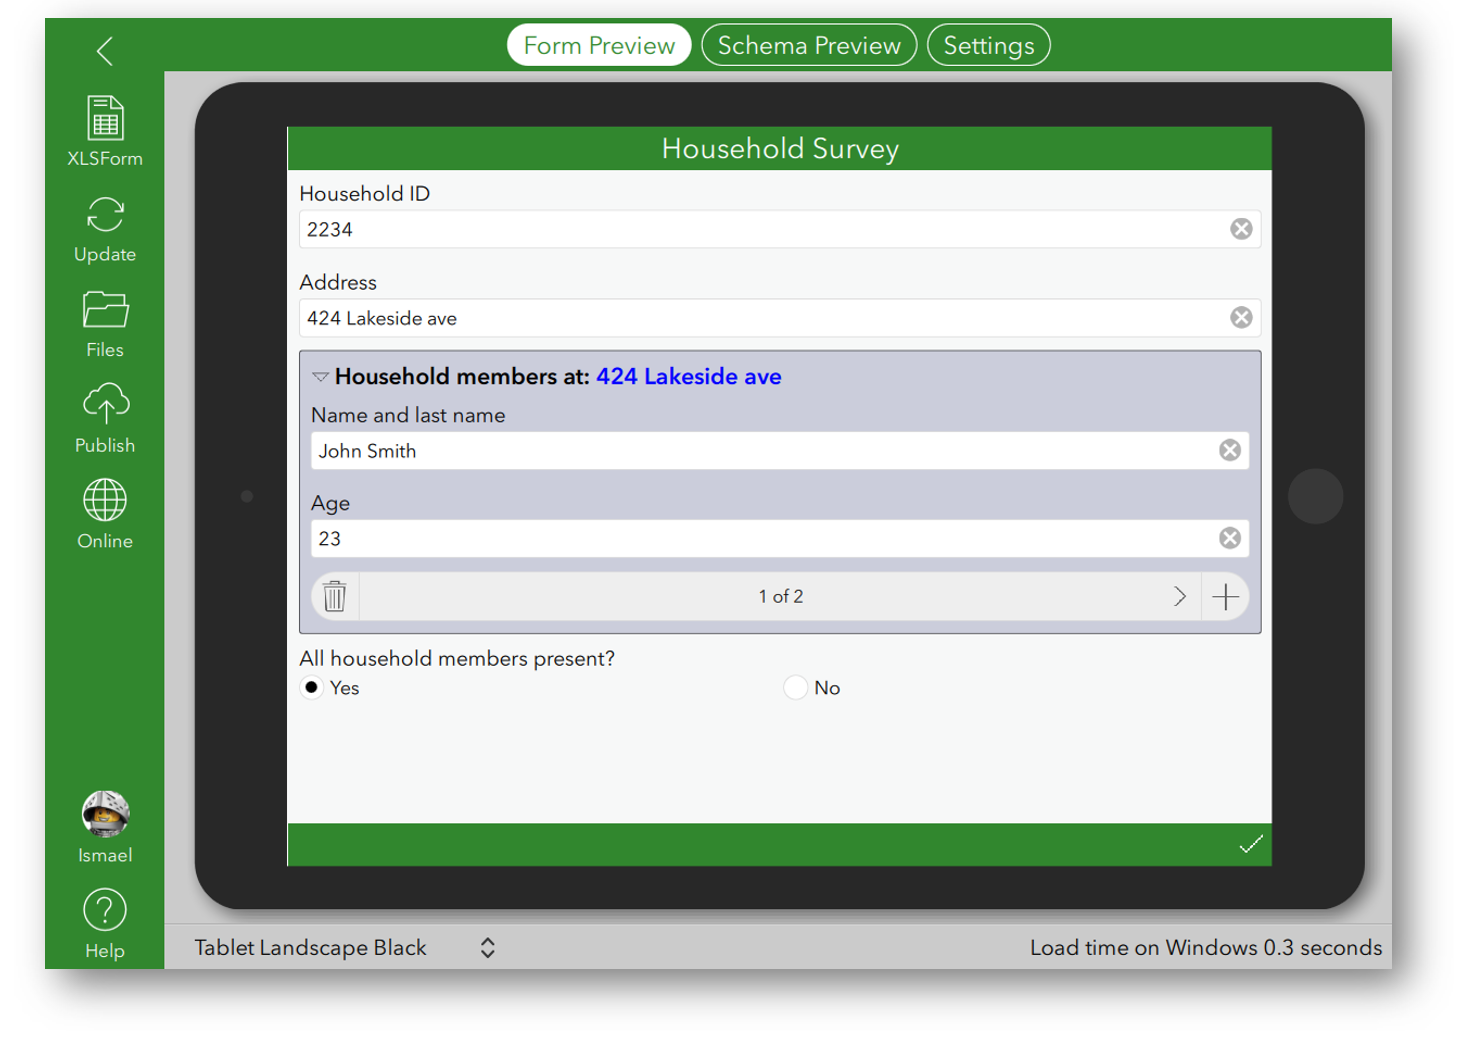
The background and border colors of your repeat can be controlled through the body::esri:style column. In the example above, the vale in this column for the begin_repeat question is: backgroundColor='#cbcddb' borderColor='#494a4f'. The color is expressed in hexadecimal format or HTML color name. You will generally not want to use bright colors for you repeat backgrounds. Try to be subtle using slight variations of the background color of your form.
The body::esri:style color parameters are only honored by the Survey field app.
Aggregation functions (max,min, count and sum)
XLSForms support a handful of functions specially built to work with repeats. Specifically: count, sum, min, and max. They are all pretty self-explanatory. The design below shows the max and count functions in action.
type name label calculation bind::esri:fieldType
| type | name | label | calculation | bind::esri:fieldType |
| text | hh_id | Household ID | ||
| text | hh_address | Address | ||
| begin repeat | hh_members | Household Members | ||
| text | mbr_name | Name and last name | ||
| integer | mbr_age | Age | ||
| end repeat | ||||
| hidden | max_age | Age of oldest person | max(${mbr_age}) | esriFieldTypeInteger |
| hidden | total_count | Total persons in house | count(${mbr_name}) | esriFieldTypeInteger |
The count function can get a bit tricky as it will only consider in the count records with a value in the question it references. For this reason, it is best to use the count function against a question within the repeat that is flagged as required.
The sum question is also an interesting one in that it can sum not only numbers, but also text and even geopoint questions as well. If you sum text, it will concatenate all responses to your question within the repeat. If you sum on a geopoint question within the repeat, it will generate a geotrace object.
Check the Repeat Aggregation Survey123 Connect survey sample for an example using aggregation functions.
Note: When used in the Survey123 field app, count() and max() can be placed inside or outside of the repeat. If the function is to be used in the Survey123 web app it must be placed outside of the repeat. Optionally, its value can be referenced in a calculation inside the repeat.
Aggregation functions (join)
There is one more aggregate function that may be of interest: join. The join function is used to create a single list including all responses to a particular question within the repeat. Its syntax looks as follows:
join (",",${questioname})
The first parameter defines a separator. You can use a comma ",", a hyphen "-", or other character. The second parameter is the question within your repeat from which you want to create the list.
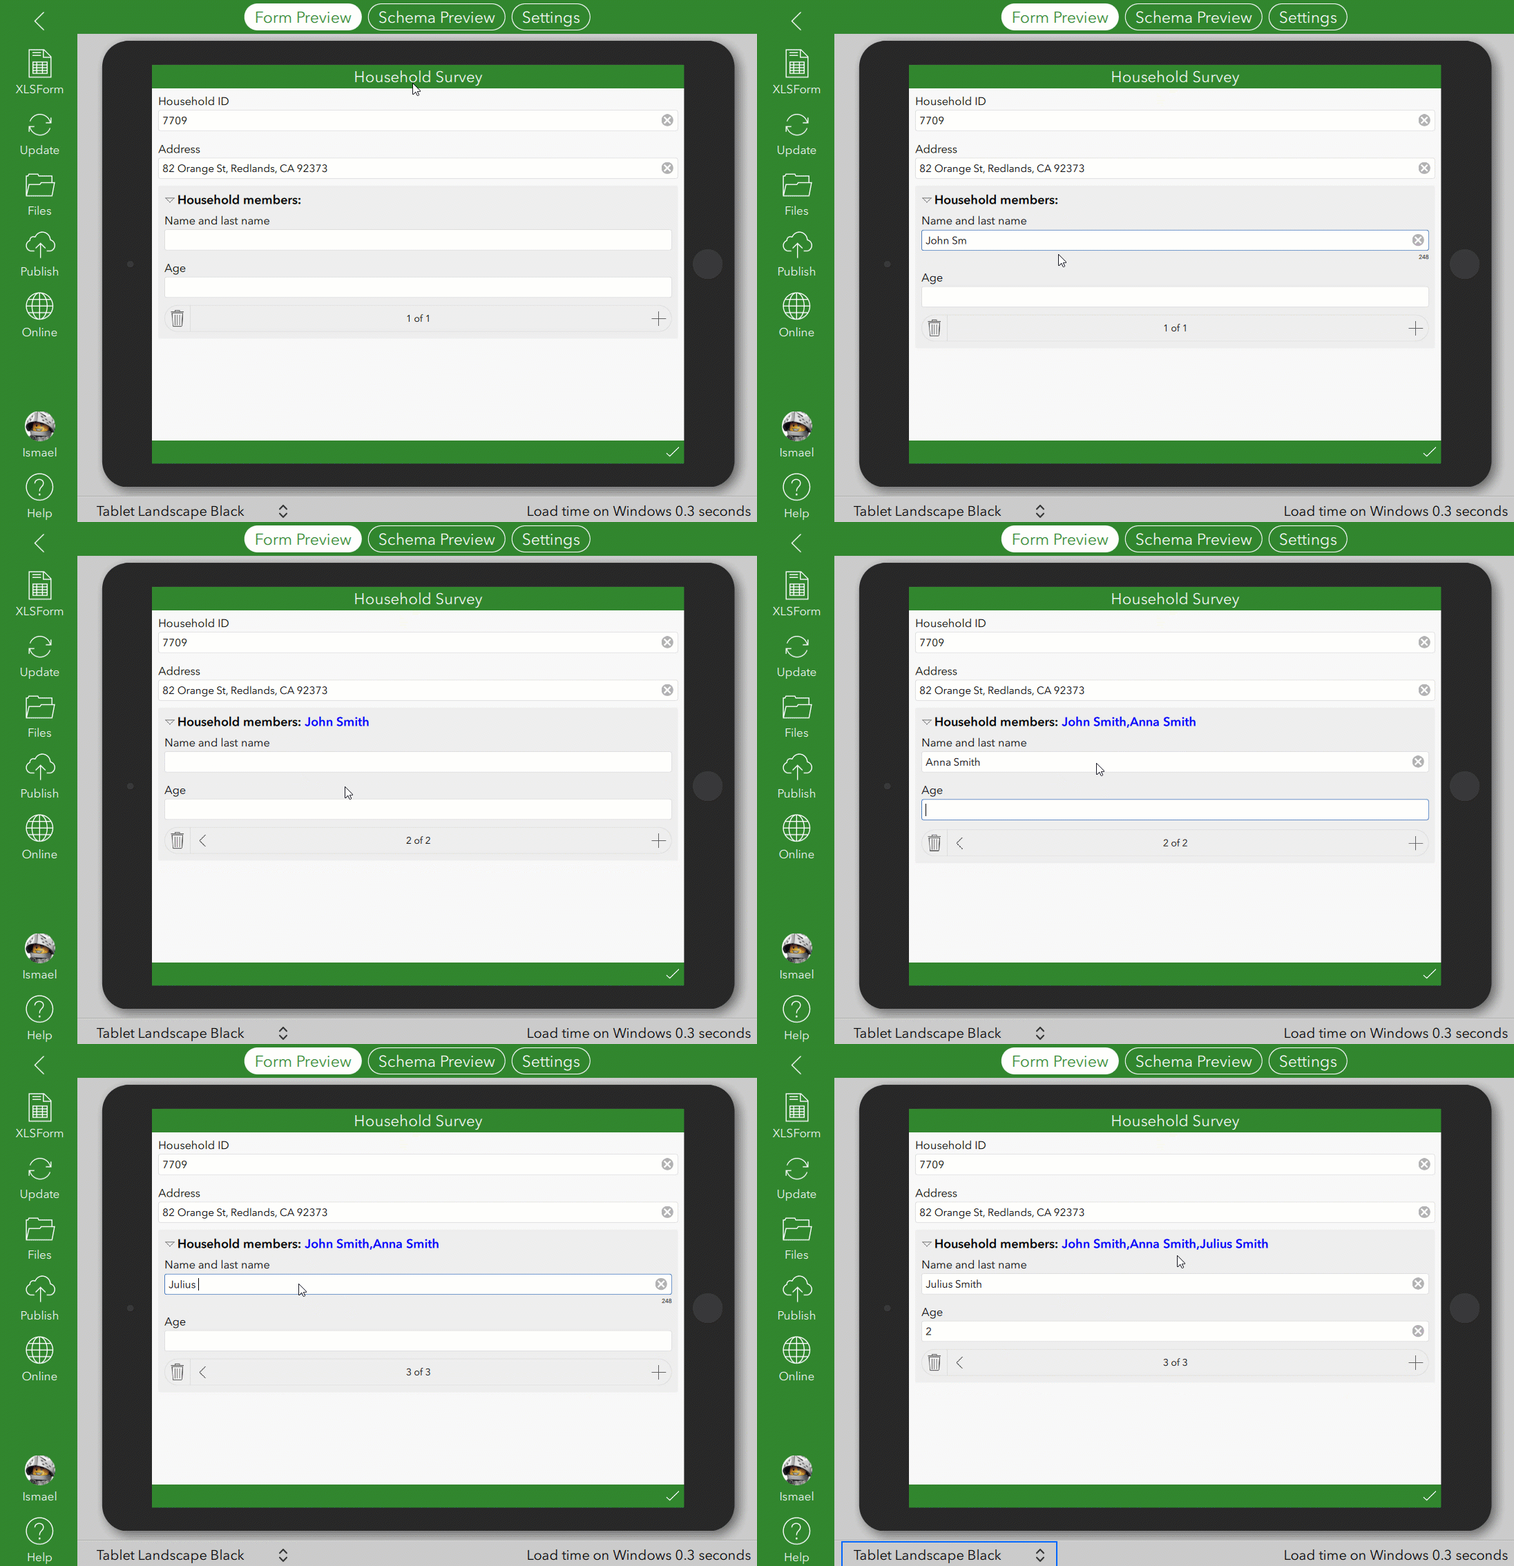
In our household survey example, we could use join to display a list of all people interviewed so far.
| type | name | label | calculation |
| text | hh_id | Household ID | |
| text | hh_address | Address | |
| begin repeat | hh_members | Household Members: ${interviews} | |
| text | mbr_name | Name and last name | |
| integer | mbr_age | Age | |
| end repeat | |||
| hidden | interviews | Every person interviewed | join(",",${mbr_name}) |
Note that the hidden question at the end uses the join function in the calculation column. Then the label in the begin repeat takes that value and displays it dynamically. You can see the effect in the next animation:
We can take join a bit further. Let's pretend we need to design a manhole inspection form. We want all six parts of the manhole to be inspected: the cover, chimney, cone, wall, bench and channel. We will use a repeat to document the inspection results of every component, and the join function to help us make sure all components have been inspected. Let's first have a look at what the form's behavior looks like:

Note that a checklist at the bottom of the form keeps track of the components inspected so far. When a new component is selected for inspection within the repeat, the value of the checklist is recalculated accordingly. This checklist at the bottom is set as read-only, so the user cannot manipulate it. A constraint in the checklist is also in place to avoid users from submitting the form unless all components are checked.
A simplified version of the XLSForm, highlighting the use of the join function is shown below:
| type | name | label | calculation |
| text | manhole_id | Manhole ID | |
| begin repeat | components_group | Components | |
| select_one components | component | Component | |
| select_one conditions | condition | Condition | |
| end repeat | |||
| select_multiple components | comps_inspected | Components Inspected | join(",",${component}) |
To complete the XLSForm to mimic the behavior shown in the animation, you would also need to:
- Set the comps_inspected question as read-only, to avoid users from manipulating the checklist manually.
- Set the constraint of the comps_inspected question to count-selected(${components_tested})=6.
Repeat Count
If you want to control how many records must exist within a repeat, use the repeat_count XLSForm column. If you set the value to 2, then your repeat will be initialized with 2 empty records. If you set it to 5, it will contain 5, etc. You can also set the repeat_count dynamically as shown in the example below.
| type | name | label | required | repeat_count |
| text | hh_id | Household ID | ||
| text | hh_address | Address | ||
| integer | hh_total | How many people live in this house? | ||
| begin repeat | hh_members | Household Members | ${hh_total} | |
| text | mbr_name | Name and last name | yes | |
| integer | mbr_age | Age | yes | |
| end repeat |
The repeat_count column simply defines how many records are shown in the repeat. All records will be empty until the end user goes through every record to add data. Unless you have required questions within the repeat, Survey123 will allow you to submit records from the repeat with no data, and they will show as what they are: empty records. Generally speaking, you do not want to use repeat_count, unless you want to force people to submit a specific number of records in the repeat. If that is the case, you will want to add required fields within the repeat group. In the household example above, we first ask, "How many people live in this house?" We use that number to define the exact number of records in the household roster that must be completed. By making the questions within the repeat required, we guarantee that data is entered for every person in the house.
In cases where you want users to submit a number of records within a range, you will not want to use repeat_count. Instead, you will want to use constraints and the count function. For example, in an electric panel survey, you include a repeat to document all circuit breakers. Say that the number of circuit breakers is always between 5 and 20. This is what you would want to do:
type name label constraint calculation
| type | name | label | constraint | calculation |
| text | cc_id | Circuit Panel ID | ||
| begin repeat | breakers | Circuit Breakers | ||
| select_one type | breaker_type | Type | ||
| select_one status | breaker_status | Status | ||
| end repeat | ||||
| integer | total | Total Breakers | ${total}> 4 and ${total}<21 | count(${breaker_type}) |
As described above, for the count function to work effectively, you will want to make the breaker_type question required.
Nested repeats
A nested repeat is a repeat within a repeat. For example, say you are doing a survey of a campground in a National Park. You want a survey for the campground itself (the name, the location of the entrance, etc). Within each campground you have campsites, so that gives you one repeat (location of the campsite, photo, size, etc). Then for each campsite you have equipment, which gives the second repeat (equipment type, condition, etc).
You can nest as many repeats as you want. That is, you can nest 3, 4 even 5 repeats if you like. Technically you could nest even more but for the sanity of your users avoid it whenever possible.
Note: Nested repeats are not supported in the Survey123 web app when you update a record. You can use nested repeats to collect new records, but not to update them. The Survey123 field app supports nested repeats for new and updating records.
Repeats in the Inbox
The Inbox is a powerful feature in the Survey123 field app, allowing you to edit existing GIS records in a feature layer. If you are not familiar with the Inbox, I strongly suggest you watch this short video tutorial.
By default, when GIS features are loaded into the Inbox, the repeat records will be empty. That is, the Survey123 field app does not fetch data from related records unless told otherwise. When updating an existing record from the Inbox in this way, you will be able to add new repeat records, but not view or update existing ones from the feature layer.
If you want to look at or update existing related records, you need to specify in your XLSForm what you want to download into the app, and for what purpose. This is all done through the bind::esri:parameters XLSForm column.
For example, let's pretend you are creating an asset inspection form and you want the complete history of inspections to be available in read-only mode. Then you would go with something like this:
| type | name | label | bind::esri:parameters | calculation |
| text | panel_id | Electric Panel ID | ||
| geopoint | location | Location | ||
| begin repeat | circuits | Circuit Breakers | query | |
| datetime | insp_date | Inspection date | ||
| select_one status | status | Status | ||
| end repeat | ||||
| integer | total | Total Breakers | count(${breaker_type} |
The query value in bind::esri:parameters will force the Survey123 app to download every related record, so all your inspections will show in the repeat of the asset form. The values supported in this column include:
- query: Used to fetch related records and populate repeats. If query is not used, surveys from the Inbox will not display any repeat information from the existing feature. You can also control which records should be fetched, by defining a where statement for your query. For example: query="status='needs_repair'" will populate the repeat with all related records where the status is set to needs_repair. If no where statement is passed, the query parameter will fetch all related records.
- allowUpdates: This parameter controls if the existing data in the repeat can be updated by the end user of the Survey123 field app or not. This is extremely useful because often you want end users to have read-only access to historical data (for example previous inspections of an asset) in the repeat, while allowing entering a new inspection to the repeat. allowUpdates by default is always false, but you can turn it on: allowUpdates=true.
- allowAdds: By default this parameter is always true, allowing the end user to enter new records in the repeat. You can turn it off by passing allowAdds=false.
In the example below, our electric panel survey will display all existing circuit breakers ever recorded for that asset. It will also allow the end user to modify information from those previously recorded breakers because allowUpdates is set to true. The only exception will be the installation_date, which will be shown in the repeat as read-only.
type name label bind::esri:parameters calculation readonly
| type | name | label | bind::esri:parameters | readonly | |
| text | panel_id | Electric Panel ID | |||
| geopoint | location | Location | |||
| begin repeat | breakers | Breakers | query allowUpdates=true | ||
| datetime | ins_date | Installation date | yes | ||
| datetime | insp_date | Inspection date | |||
| select_one status | status | Status | |||
| end repeat |
You must be a registered user to add a comment. If you've already registered, sign in. Otherwise, register and sign in.