- Home
- :
- All Communities
- :
- Products
- :
- ArcGIS Spatial Analyst
- :
- ArcGIS Spatial Analyst Questions
- :
- Re: Sink results in very different demarkations?
- Subscribe to RSS Feed
- Mark Topic as New
- Mark Topic as Read
- Float this Topic for Current User
- Bookmark
- Subscribe
- Mute
- Printer Friendly Page
- Mark as New
- Bookmark
- Subscribe
- Mute
- Subscribe to RSS Feed
- Permalink
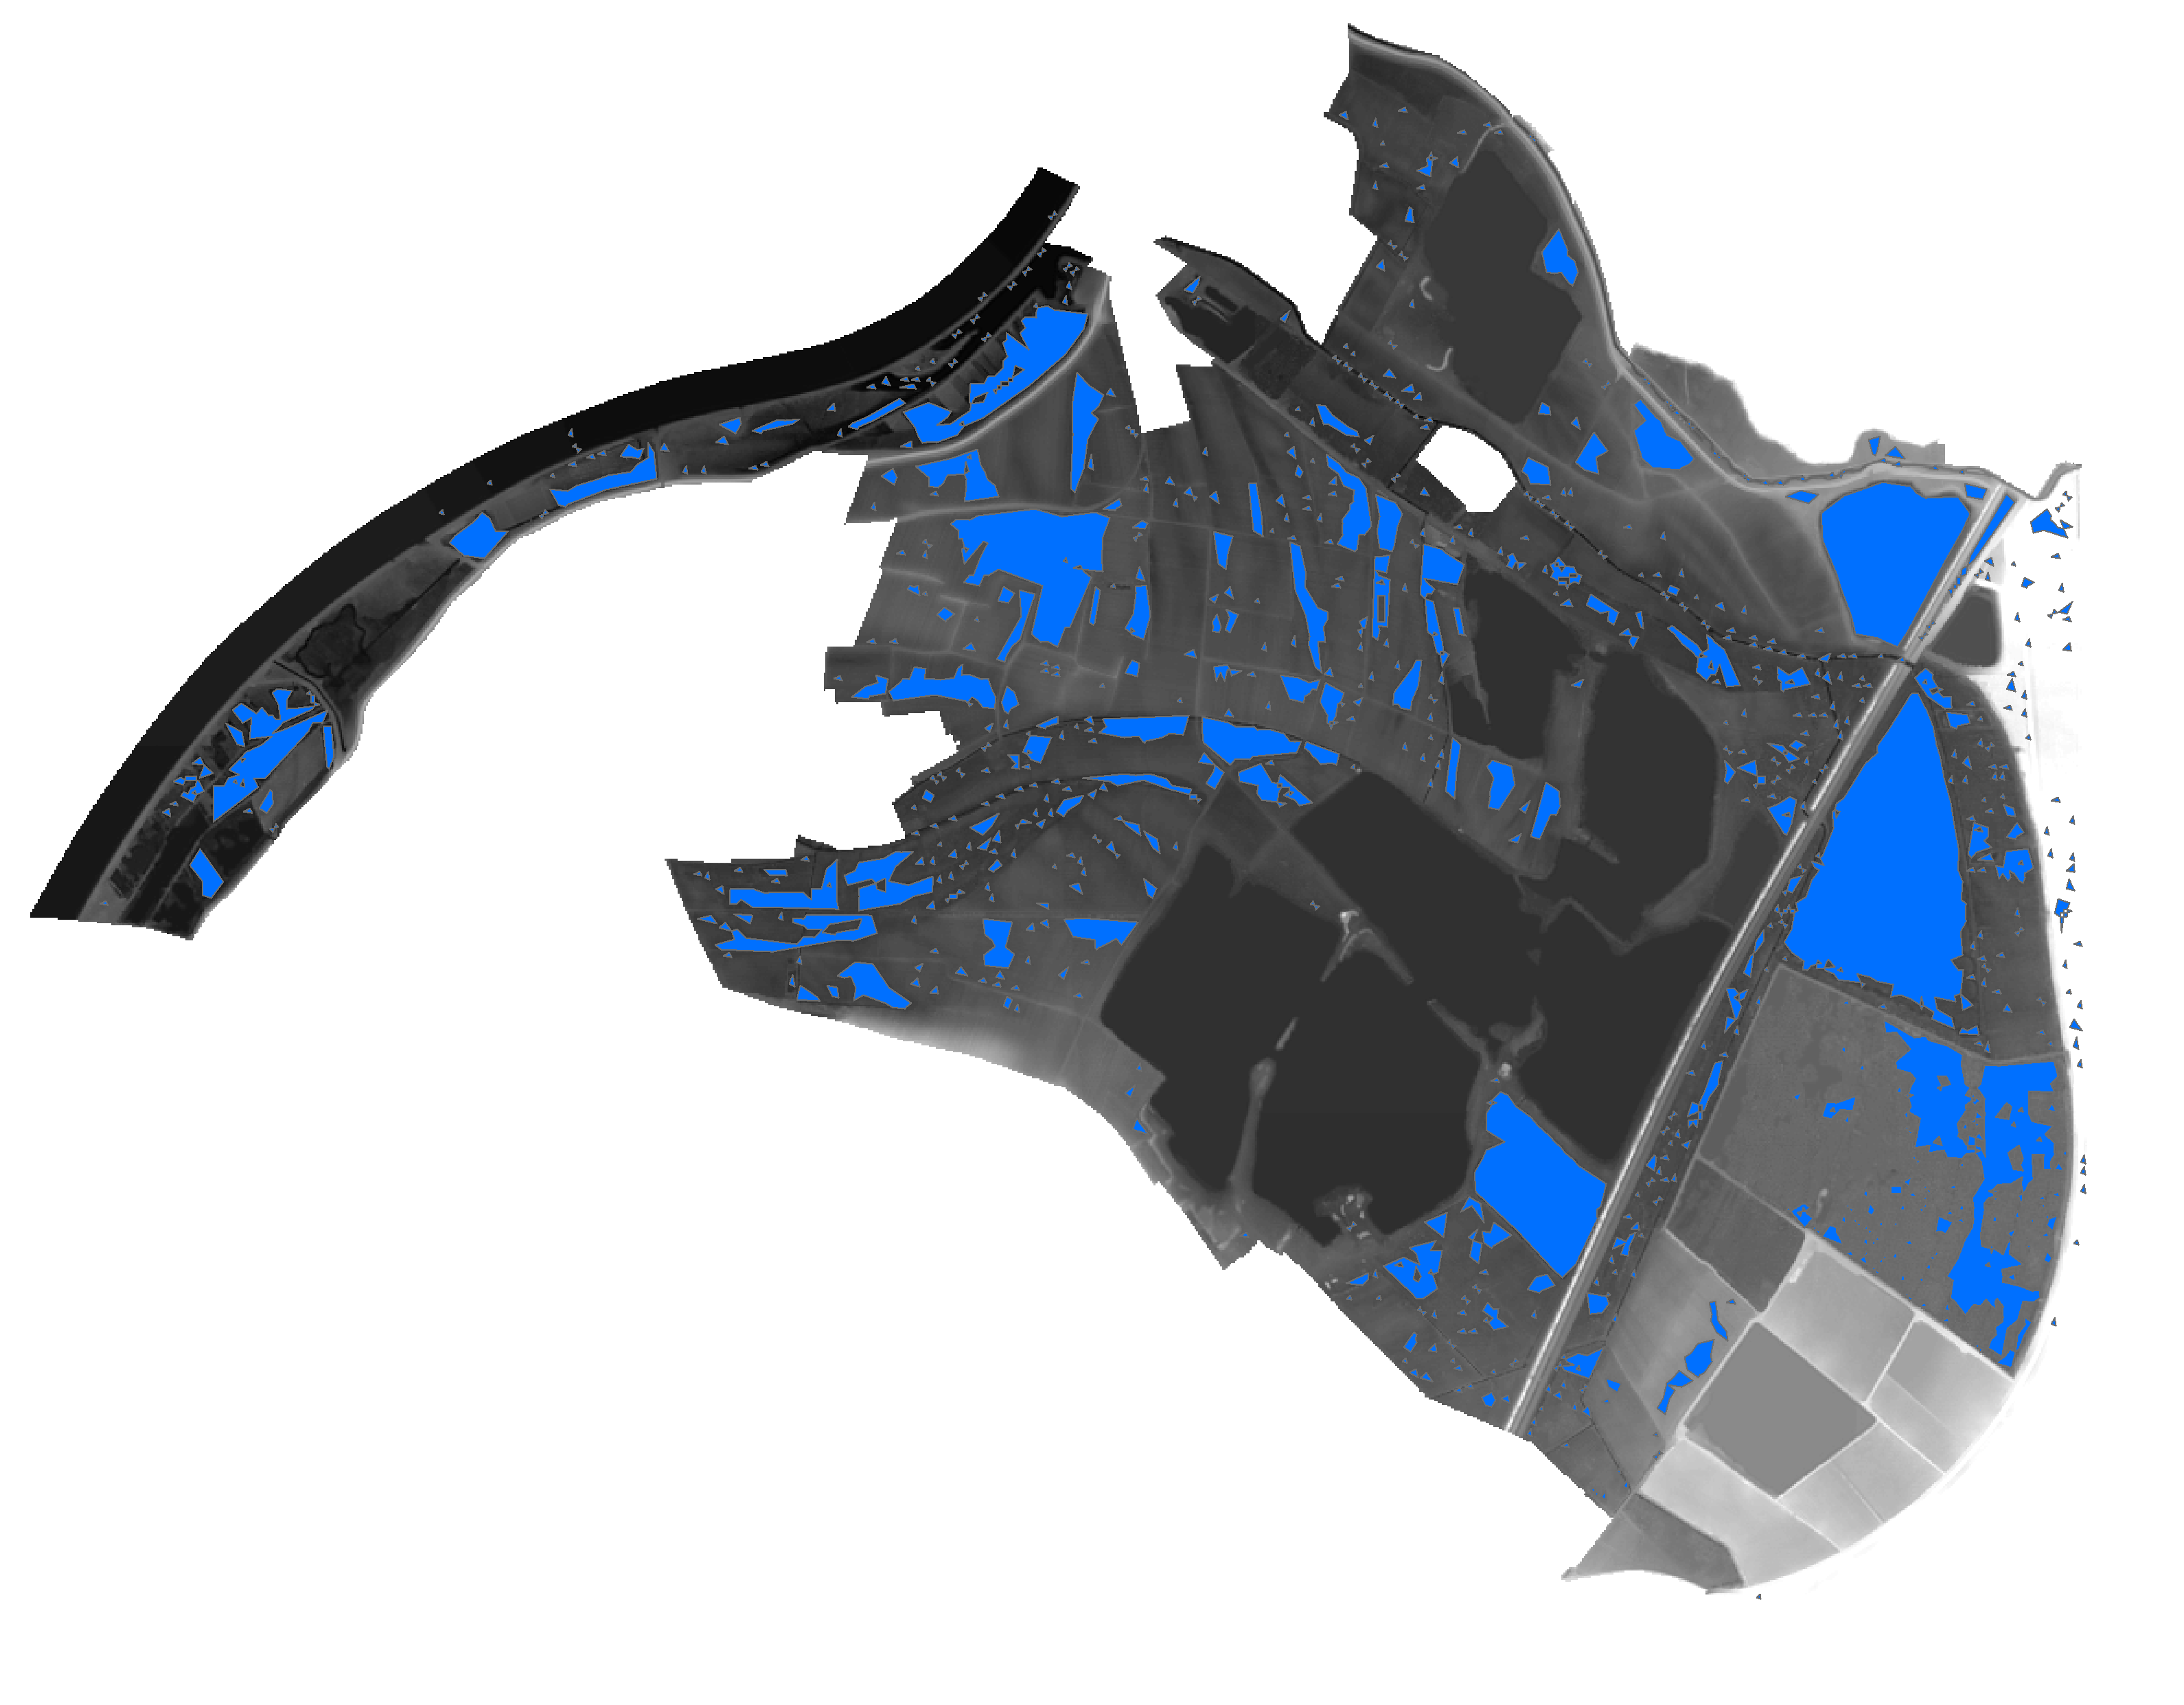
Sink results in very different demarkations depending on the resampling of the raster data. Could someone explain why? I don't understand this?
In the attached images you could see the differences. I use elevation data with a resolution of 5 meters. Sink06m ... is in my opinion better because nearly all lakes are demarked as sinks. Sink06m is resampled to a cellsize of 6m biliniear. Sink10m is resampled to a cellsize 10 meters, but the results are totally different?
Am I doing something wrong?
This is how I calculated the areas:
import arcpy, os
from arcpy.sa import *
arcpy.env.overwriteOutput = True
arcpy.env.workspace = r"MyPath\DGM.gdb"
# Local variables:
DGM005_tif = r"MyPath\DGM005_3.tif"
Fill_tif1 = "Fill_1"
resample = "resample"
FlowDir_Fill2 = "FlowDir_1"
Sink_FlowDir1 = "Sink_FlowDir1"
absenkung = "Absenkung"
arcpy.CheckOutExtension("Spatial")
outCon2 = Con(Raster(DGM005_tif) > 0, DGM005_tif)
# Process: Füllung
arcpy.gp.Fill_sa(outCon2, Fill_tif1, "")
print("fill")
arcpy.Resample_management(Fill_tif1, resample, "8", "BILINEAR")
print("resample")
# Process: Fließrichtung
arcpy.gp.FlowDirection_sa(resample, FlowDir_Fill2, "NORMAL", absenkung)
print("flowdir")
# Process: Senke
arcpy.gp.Sink_sa(FlowDir_Fill2, Sink_FlowDir1)
print("sink")
arcpy.RasterToPolygon_conversion(Sink_FlowDir1, "{}{}".format("Senke08mfill", os.path.basename(os.path.splitext(DGM005_tif)[0])), "SIMPLIFY",
"VALUE")
print("Done")
arcpy.CheckInExtension("Spatial")Solved! Go to Solution.
Accepted Solutions
- Mark as New
- Bookmark
- Subscribe
- Mute
- Subscribe to RSS Feed
- Permalink
Hi Johannes,
Thanks for clarifying your analysis objectives. I will try to outline a few steps, where some are required and some other might be optional. Since there are many different ways to approach each step, I will just pick one, however, you can decide to do run some other tool to find the same final answer.
I am still not clear why you want to change the resolution of your DEM, so for the moment I will put it aside and approach this analysis with the original data. And then we will come back to changing the resolution if needed.
1. Smoothing out the DEM to remove small errors
If you are worried about the accuracy of the data and want to smooth it out, you can use the Filter tool with the 'Low pass' option. If you want more control over the neighborhood, you can use the Focal Statistics too.
2. Removing small sinks
Since you are interested in larger sinks, surface area more that 5000 sq.m, you may decide to remove some sinks at this early stage of analysis. You can do this by running the Fill tool with a z-limit.
The z-limit specifies the maximum difference allowed between the depth of a sink and the pour point and determines which sinks will be filled and which will remain untouched. The z-limit is not the maximum depth to which a sink will be filled.
Choosing an appropriate z-limit could be tricky when your criteria is the surface area of a sink. However, since you are looking at rewetting and dam, I am sure you have a depth of the sink in consideration below which the sink is not worth considering. So, you can easily use that depth to weed out some sinks.
Let's call this filled (with z-limit) DEM as FilledDEMwithZLimit. We will use this DEM for further analysis.
3. Identify remaining sinks
Now it's time to identify the remaining sinks in FilledDEMwithZLimit.
Run the Fill tool using the D8 option and then run the Sink tool.
The output from the Sink tool will contain all remaining sinks. Let's call this output AllSinks.
Please make sure the output AllSinks has the raster attribute table. If not, please use the Build Raster Attribute Table tool to create the attribute table.
4. Identify sinks larger than 5000 sq.m.
There are many ways to approach this step. I will start with a very simple approach. We will just look at the COUNT field in the raster attribute table of AllSinks to look for sinks that meets your criteria.
You said your DEM cell size is 30cm. So, any sink with a cell count of (5000 / (0.3 * 0.3)) = 55,556 will meet your criteria.
You can look at the raster attribute table of AllSinks, select rows where COUNT is equal to or greater than 55,556. These are the sinks meet your criteria.
An alternative approach is to run Zonal Geometry As Table to find out which sinks meet your criteria. The good part is, from the output of Zonal Geometry As Table you will not only get the area, you will have some additional information about the shape and location of the sinks that meet your criteria.
5. Finding the total sink area for the sinks meet your criteria
You can use the Summary Statistics tool to do this task.
You can use the AllSinks, select the rows that meet the criteria, run the Summary Statistics tool and find Sum on the COUNT field. You can multiply the sum of COUNT by (cellsize * cellsize) to find the total area.
Alternatively you can use the output from Zonal Geometry As Table , select the rows that meet the criteria, run the Summary Statistics tool and find Sum on the AREA field.
An alternate approach
Please note, there are many ways we can come to the same result. One of the interesting approach could be to to run Fill without the z-limit using FilledDEMwithZLimit as input. Let's call this output as FilledDEM. Then use the Cut Fill tool to find the area and volume of each sink. You can then select your sinks by applying the criteria of the Cut Fill output. And then of course run the Summary Statistics tool to find the total area.
Changing the resolution of the DEM
Now that we have discussed the steps for fining your sinks and calculating the total area, let's go back to the DEM resolution question. I am still not sure why you need to lower the resolution of the DEM if your computer can process all the steps with the original high resolution DEM within reasonable time. If you still think it is necessary to lower the resolution of your DEM, you can run the Resample tool.
In my opinion, you can do it either before step 1 or after. But before you run any fill operation in step 2.
Hope this help!
Please let me know if you have any additional questions.
Thanks!
Noman
Esri, Redlands, CA
- Mark as New
- Bookmark
- Subscribe
- Mute
- Subscribe to RSS Feed
- Permalink
the statement that "new sinks can be created" during the process
How Sink works—Help | Documentation
And I am not sure why you would resample the Fill rather than the dem if you want the sinks at a coarser resolution
- Mark as New
- Bookmark
- Subscribe
- Mute
- Subscribe to RSS Feed
- Permalink
Thank you for the link.
I thought if I fill the dem first it would sum the sinks better up. Would you remove the fill calculation?
I don't really understand why the small lakes in the area are not all thrown out as sinks? Even in the best result I could reach so far.
- Mark as New
- Bookmark
- Subscribe
- Mute
- Subscribe to RSS Feed
- Permalink
How Fill works—Help | Documentation
Since I am not sure what your intent is in your workflow, then the comment from the above link may be pertinent to it.
The Fill tool uses the equivalents of several tools, such as Focal Flow, Flow Direction, Sink, Watershed, and Zonal Fill, to locate and fill sinks. The tool iterates until all sinks within the specified z limit are filled. As sinks are filled, others can be created at the boundaries of the filled areas, which are removed in the next iteration.
- Mark as New
- Bookmark
- Subscribe
- Mute
- Subscribe to RSS Feed
- Permalink
I'm searching for areas for rewetting, so my intentions is to get some aggregated areas where it's worth to try build barriers to dam the water.
- Mark as New
- Bookmark
- Subscribe
- Mute
- Subscribe to RSS Feed
- Permalink
I suspect it is the aggregation step
what affect do you think that has on the output given your parameters
How Aggregate works—Help | Documentation
The change in cell size seems to be the issue
- Mark as New
- Bookmark
- Subscribe
- Mute
- Subscribe to RSS Feed
- Permalink
You are right, if I resample to strong I get totally different areas (which didn't existed before) after a unknown threshold. The fill tool does a good job to smooth the elevation data.
Didn't know the Aggregate Tool, will try it.
Thank you for your thoughts.
- Mark as New
- Bookmark
- Subscribe
- Mute
- Subscribe to RSS Feed
- Permalink
Hi Johannes,
I am trying to understand your analysis requirements from you statement, "I'm searching for areas for rewetting, so my intentions is to get some aggregated areas where it's worth to try build barriers to dam the water."
- Are you trying to identify all sinks or sinks larger than a certain depth or area or volume?
- What do you mean by, "to get some aggregated areas"? Do you want the total areas of all available sinks that meet certain criteria?
- What is the purpose of changing the resolution of your DEM by resampling?
Just as a side note,
- Once you run Fill on a DEM without a Z-Limit all sinks get filled.
- Once you resample (using bilinear), it is possible a new sink could get created because of how the elevation is recalculated for each cell.
If you want to change the resolution of your DEM, You probably want to resample before you run any hydrology tool such as Fill, FlowDirection etc. Also chose the resampling technique (nearest neighbor or bilinear) based on your application. Bilinear will smooth out your DEM, which may change the flow direction.
Aggregate tool generates a reduced-resolution version of a raster. Each output cell contains the Sum, Minimum, Maximum, Mean, or Median of the input cells that are encompassed by the extent of that cell.
If you are just looking for the total area of all sinks/depressions, you can just look at the count field in the Raster Attribute Table and multiply with cellsize*cellsize to get the area in map units. You can also use tool like Zonal Geometry, Zonal Geometry As Table, Zonal Statistics, Zonal Statistics As Table depending on your application.
One last thing, you may consider running Spatial Analyst tools using the ArcPy sa module. Your output will be on the left hand side and all intermediate data will be temporary and will be deleted by the system. You can just save the final output. If you write a complex map algebra expression, it will be optimized and efficient as well.
Thanks,
Noman
Esri, Redlans, CA
- Mark as New
- Bookmark
- Subscribe
- Mute
- Subscribe to RSS Feed
- Permalink
Hi Norman,
Thank you for your answer and the hints concerning the arcpy sa module.
Yesterday I used a dem with 5m resolution. Now I get some kind of relatively hight resolution laserdata with 8 points/m². I calculated a dem raster with a resolution of 0.3 m out of this data. The only reason I use fill infront of the resampling is to smoothe the dem slightly in an appropriate manner without changing the data too much. Especially the local hights I don't want to change. With this resolution I get a very rough surface so the fill tool is in my opinion the better solution to smooth the dem than resampling the data at this step?
After the fill step I resampled the data to a cellsize of 3m bilinear. Would you use nearest neighbor in this step? After that I go on with flow direction ... sink ...
To your questions:
1. I'm not interested in all (small) sinks, I need sinks larger than an area (let's say about 5000m²) which are worth to be considered as rewetting area.
2. Yes I would like to get the total areas of all available sinks that meet the certain > 5000m².
3. The only purpose of changing the resolution is that I get otherwise only millions of very small sinks because of the "hight" resolution of my data.
How would you arrange the steps of the calculation? Would you put in a fill step after the resampling to a cellsize of 3m?
- Mark as New
- Bookmark
- Subscribe
- Mute
- Subscribe to RSS Feed
- Permalink
Hi Johannes,
Thanks for clarifying your analysis objectives. I will try to outline a few steps, where some are required and some other might be optional. Since there are many different ways to approach each step, I will just pick one, however, you can decide to do run some other tool to find the same final answer.
I am still not clear why you want to change the resolution of your DEM, so for the moment I will put it aside and approach this analysis with the original data. And then we will come back to changing the resolution if needed.
1. Smoothing out the DEM to remove small errors
If you are worried about the accuracy of the data and want to smooth it out, you can use the Filter tool with the 'Low pass' option. If you want more control over the neighborhood, you can use the Focal Statistics too.
2. Removing small sinks
Since you are interested in larger sinks, surface area more that 5000 sq.m, you may decide to remove some sinks at this early stage of analysis. You can do this by running the Fill tool with a z-limit.
The z-limit specifies the maximum difference allowed between the depth of a sink and the pour point and determines which sinks will be filled and which will remain untouched. The z-limit is not the maximum depth to which a sink will be filled.
Choosing an appropriate z-limit could be tricky when your criteria is the surface area of a sink. However, since you are looking at rewetting and dam, I am sure you have a depth of the sink in consideration below which the sink is not worth considering. So, you can easily use that depth to weed out some sinks.
Let's call this filled (with z-limit) DEM as FilledDEMwithZLimit. We will use this DEM for further analysis.
3. Identify remaining sinks
Now it's time to identify the remaining sinks in FilledDEMwithZLimit.
Run the Fill tool using the D8 option and then run the Sink tool.
The output from the Sink tool will contain all remaining sinks. Let's call this output AllSinks.
Please make sure the output AllSinks has the raster attribute table. If not, please use the Build Raster Attribute Table tool to create the attribute table.
4. Identify sinks larger than 5000 sq.m.
There are many ways to approach this step. I will start with a very simple approach. We will just look at the COUNT field in the raster attribute table of AllSinks to look for sinks that meets your criteria.
You said your DEM cell size is 30cm. So, any sink with a cell count of (5000 / (0.3 * 0.3)) = 55,556 will meet your criteria.
You can look at the raster attribute table of AllSinks, select rows where COUNT is equal to or greater than 55,556. These are the sinks meet your criteria.
An alternative approach is to run Zonal Geometry As Table to find out which sinks meet your criteria. The good part is, from the output of Zonal Geometry As Table you will not only get the area, you will have some additional information about the shape and location of the sinks that meet your criteria.
5. Finding the total sink area for the sinks meet your criteria
You can use the Summary Statistics tool to do this task.
You can use the AllSinks, select the rows that meet the criteria, run the Summary Statistics tool and find Sum on the COUNT field. You can multiply the sum of COUNT by (cellsize * cellsize) to find the total area.
Alternatively you can use the output from Zonal Geometry As Table , select the rows that meet the criteria, run the Summary Statistics tool and find Sum on the AREA field.
An alternate approach
Please note, there are many ways we can come to the same result. One of the interesting approach could be to to run Fill without the z-limit using FilledDEMwithZLimit as input. Let's call this output as FilledDEM. Then use the Cut Fill tool to find the area and volume of each sink. You can then select your sinks by applying the criteria of the Cut Fill output. And then of course run the Summary Statistics tool to find the total area.
Changing the resolution of the DEM
Now that we have discussed the steps for fining your sinks and calculating the total area, let's go back to the DEM resolution question. I am still not sure why you need to lower the resolution of the DEM if your computer can process all the steps with the original high resolution DEM within reasonable time. If you still think it is necessary to lower the resolution of your DEM, you can run the Resample tool.
In my opinion, you can do it either before step 1 or after. But before you run any fill operation in step 2.
Hope this help!
Please let me know if you have any additional questions.
Thanks!
Noman
Esri, Redlands, CA