- Home
- :
- All Communities
- :
- Products
- :
- ArcGIS Pro
- :
- ArcGIS Pro Documents
- :
- Using Disperse Markers in ArcGIS Pro
- Subscribe to RSS Feed
- Mark as New
- Mark as Read
- Bookmark
- Subscribe
- Printer Friendly Page
Using Disperse Markers in ArcGIS Pro
Using Disperse Markers in ArcGIS Pro
Do you have point data that you want to map, but multiple features exist at the same location? As a former crime mapper, I ran into this problem a lot - one address might have multiple crime incidents, which was challenging for a number of reasons:
- The map shows just one feature at a location, potentially masking the actual data;
- If you want to style the data by an attribute (e.g. crime type), the stacked symbols will still display just one feature, obscuring the others;
- If the data is to be used for editing, it can be difficult to select just the feature you'd like to edit from the stacked features.
There are a variety of techniques that can address this - aggregating the data to a geography and mapping it thematically, using a density or heat map or using tools to count coincident features and then symbolize by the count of features at a location. However, these techniques don't display the individual features that you'd need to address the second and third bullet points, above.
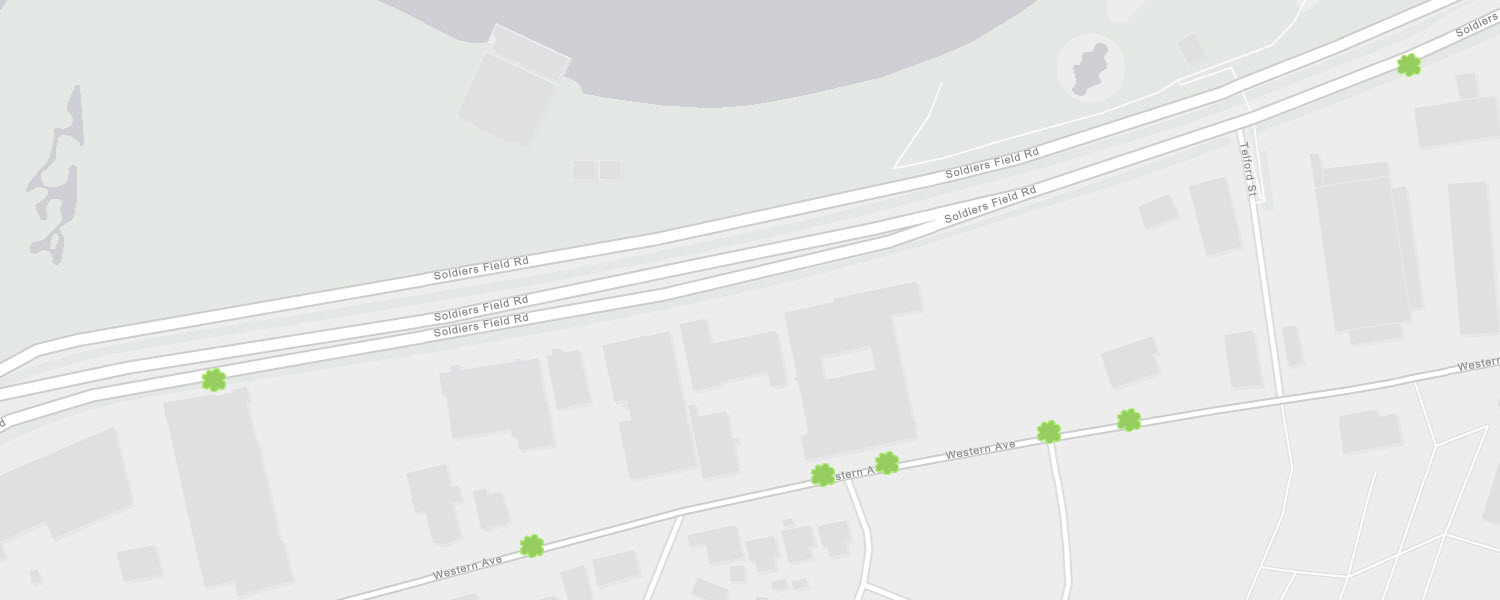
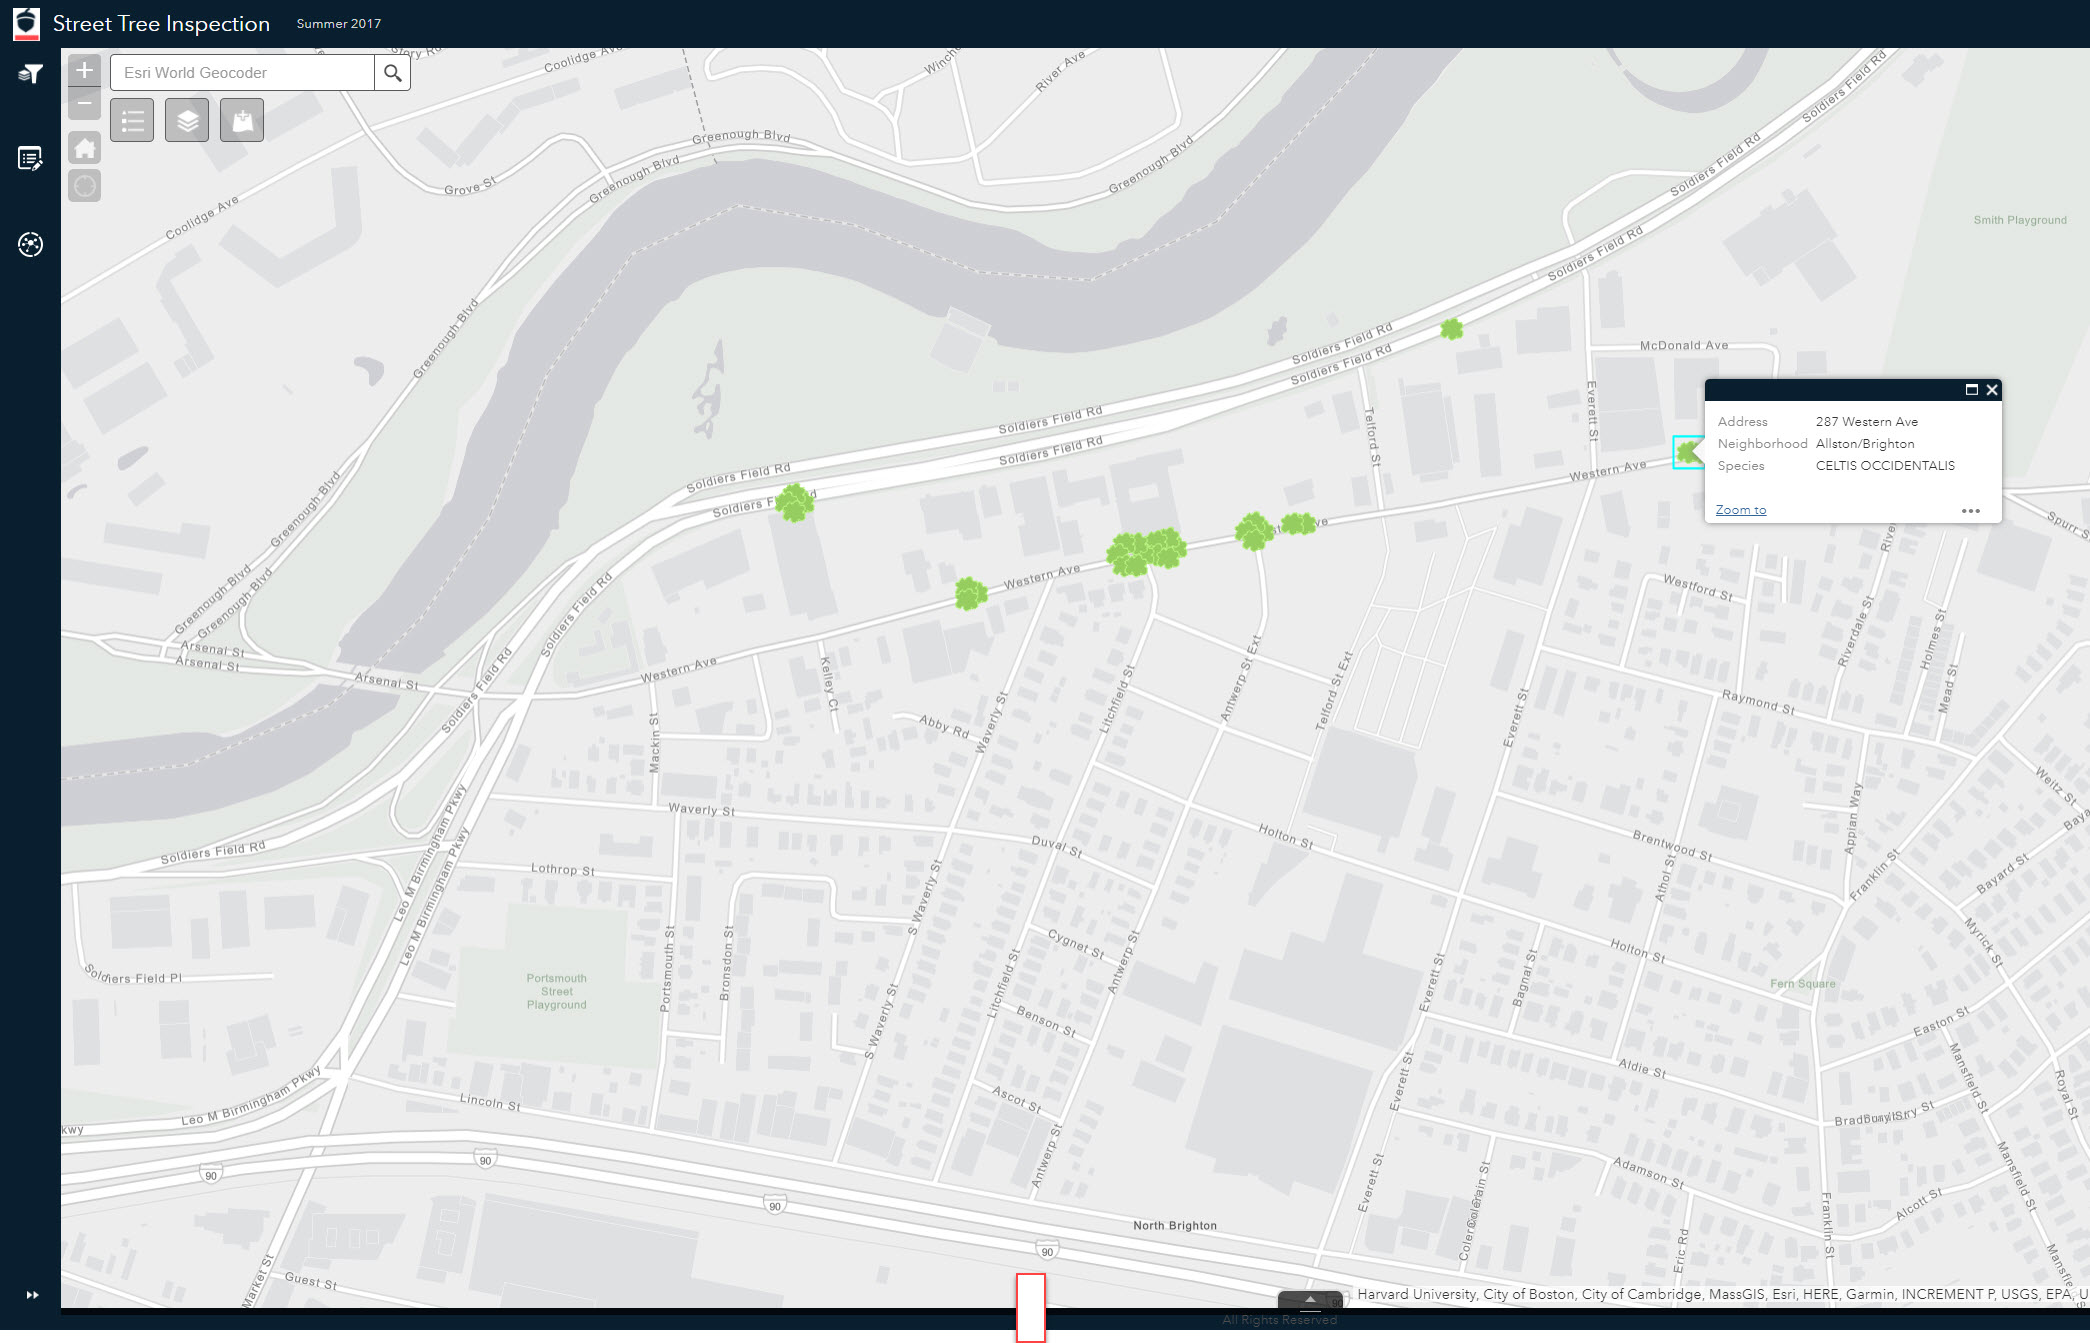
Using ArcGIS Pro, there is another method - the Disperse Markers tool. This tool finds overlapping points and spreads them apart based on a pattern and distance of your choosing. Note - this technique has been available in ArcMap for some time as a part of Cartographic Representations, which allowed you to customize the symbology of data and store these properties as a part of the feature class. Using Disperse Markers has since been simplified within ArcGIS Pro. Let me show you how I used the tool to transform a dataset for Boston street trees from this:
To this: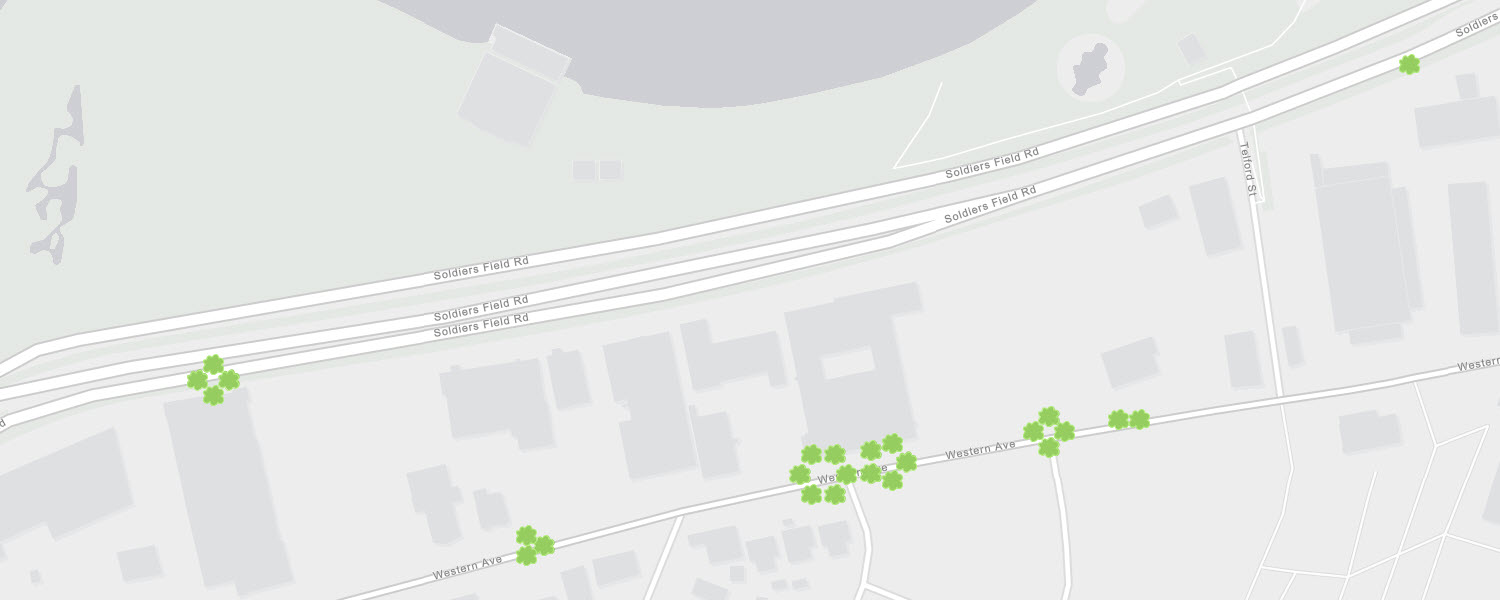
Since the Disperse Markers tool will actually edit the geometry of your features (meaning, they will not retain their original location) it's important to work from a copy of your data.
This tree data was geocoded to addresses - this resulted in multiple features at one location. The tool will help ensure I can see not just one, but all the features as individual points on the map.
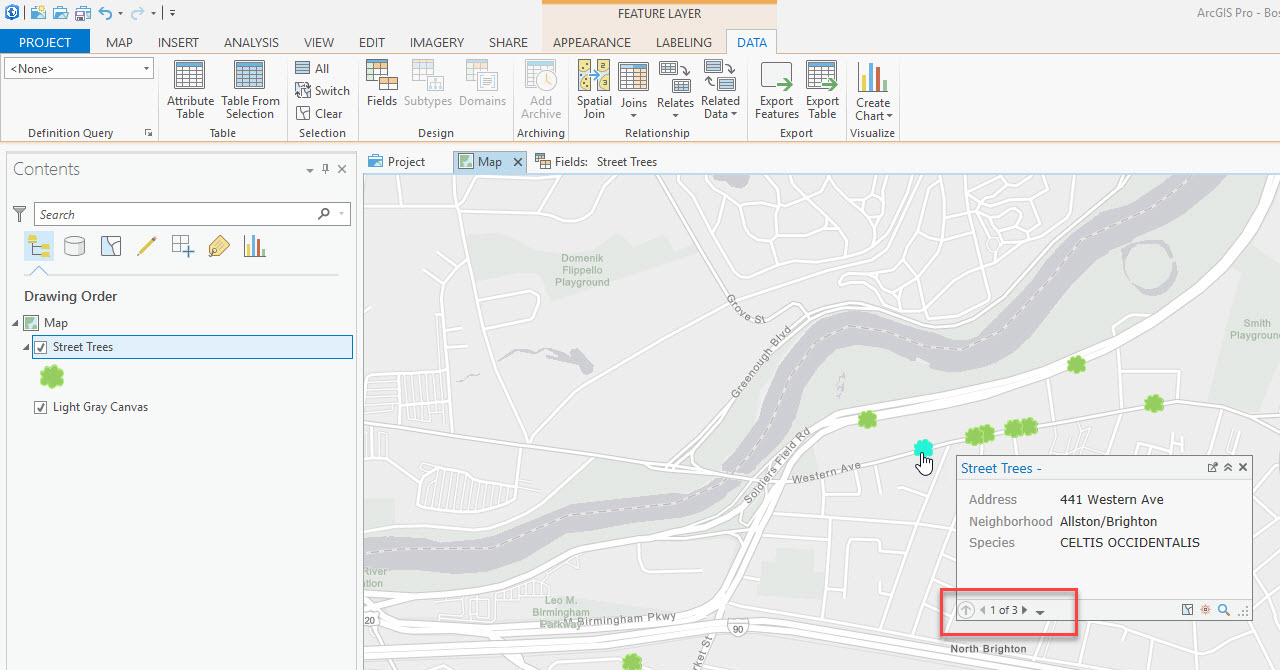
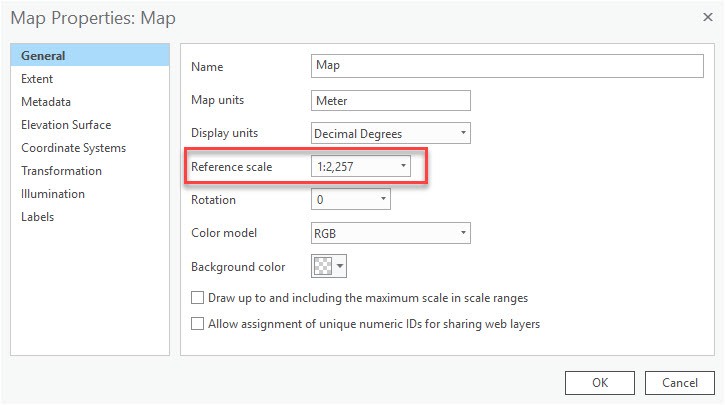
Before running the tool, you'll need to set a reference scale for your map. This means that as you zoom in and out on your map, the size of the symbols will be fixed. Since the Disperse Markers tool will use the reference scale you set to help determine the spacing, it's important to think about your desired end result. For example, in the map above, I was working on a project for an arborist who would be performing tree inspections, so I set the reference scale to be useful for his work (1:2,257, or Level 18 using the ArcGIS Online scales). To set the reference scale, right click on your map in the Contents pane and click Set Reference Scale - it will be set to your current map scale. You can view this in the Map Properties as well:
Note: after you change the reference scale, you may need to alter the symbol size. Remember - you are selecting a symbol style and size that looks appropriate at this zoom level.
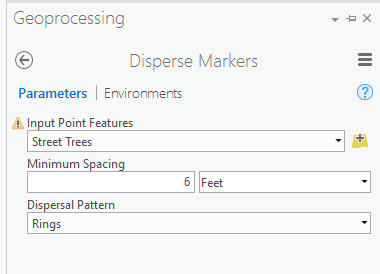
Next, browse for the Disperse Markers tool in the Geoprocessing pane. The parameters are pretty straightforward - you will select a dispersal pattern (described more in the tool help) and a spacing. Remember the minimum spacing takes into account your reference scale - so running the tool with the same parameters but different reference scales will yield different results. The parameters shown here are what I used on the Boston street trees:
There will likely be some trial and error in running this tool - maybe the spacing was too far apart, or you didn't like the pattern you selected. Remember how you made a copy of your data, before getting started? You'll need to re-run the tool off of the non-dispersed data each time - which means, make another copy before running the tool! This will ensure you have your unaltered original data, and can try different scenarios.
Next, I published the result to ArcGIS Online - doing this preserved the new dispersed point locations, making my data useful across the entire ArcGIS platform. From ArcGIS Online, I build a Web AppBuilder for ArcGIS application that was used to demonstrate filtering, web editing and routing capabilities that could help the arborist be more efficient in his work. The dispersed points make it much easier for him to select the appropriate trees for viewing, editing and routing.
I work primarily with local governments, and there are so many datasets that could be candidates for this tool; think of any observation data that you have, that is geocoded to an address - crimes, calls for service, inspections, etc. This is a simple technique to improve the utility of your data.
Thanks for writing this guide! I kept trying the tool over and over again and nothing would happen. After setting the reference scale, it works!!
I thought that if the representations were stored as geometry overrides in the geodatabase, the disperse markers tool would alter those overrides, not the original feature geometry. Is this incorrect?
Hi Dake,
This is true if you run the tool in ArcMap. ArcGIS Pro does not process representations in the same way. In ArcGIS Pro, the geometry overrides are not considered and this tool runs on the feature geometry only.
I'm trying to map code violations throughout the city. So if a property/parcel has multiple violations, I want to be able to show each separate violation by its color (example: high grass is green, trash is purple). However, the point feature classes overlap on the map. I tried the disperse markers tool, but I'm not doing it right. I need to know where to start. I've been using a polygon feature class and copying from that data into point feature classes then using the disperse markers tool.
Thanks!
Hi Rachel,
How would you suggest that I separate features that overlap but are in different feature classes? In the past I used representation, but it looks like I'll need to do this through through Attribute-driven symbology. I'm just getting started on this challenge, but it looks like I'll need to use an expression and consider the map frame scale. The main challenge might be to somehow recognize the locations of features in other feature classes.
Thanks for any suggestions