- Home
- :
- All Communities
- :
- Products
- :
- ArcGIS Online
- :
- ArcGIS Online Questions
- :
- Re: TIF raster to Map Image Layer
- Subscribe to RSS Feed
- Mark Topic as New
- Mark Topic as Read
- Float this Topic for Current User
- Bookmark
- Subscribe
- Mute
- Printer Friendly Page
TIF raster to Map Image Layer
- Mark as New
- Bookmark
- Subscribe
- Mute
- Subscribe to RSS Feed
- Permalink
Hi community!
I'm quite new to dealing with rasters (always used shapefiles etc) and struggling a little dealing with some data. Any help would be greatly appreciated!
I was given a project by another colleague who has taken off, and what I need is to add a new layer that is currently a TIF to a Web Mapping Application. Already the application has TIF files to represent different data as Map Image Layers.
I have a TIF file that looks like this in ArcPRO - Lighter colour representing light forest, and darker representing heavier areas. There is a value chart in the layers that shows the values 1-9 (light to dark).


So, I made the layer as a package to share to ArcGIS online so I could have the raster visible in the application. This brought it in as a Tile Layer (Hosted) (see below), and when I add this layer to the application, I only get the RGB information for the layer, whereas I need the colour band/value as I had in ArcPRO so users can see a better legend representing the lows to highs.

This is the details of a different TIF layer in the application that shows the values represented by the different colours. This layer is also a Map Image Layer in my content. This is what I need for the maturity forest layer.

So, does anyone know what steps I need to undertake (whether it starts in Pro through to Arc Online) to have my new TIF raster made into a Map Image Layer in Arc Online that shows the values in the application?
Thanks in advance to anyone who can help 🙂
Matt
- Mark as New
- Bookmark
- Subscribe
- Mute
- Subscribe to RSS Feed
- Permalink
Your raster looks to be classified in ArcPro into 10 classes. In ArcGIS Online (AGOL), see if you can classify it in the Map Viewer from one of the tools on the right hand side of the web map. It's like under Style or something similar.
My guess is the raster uploaded to AGOL okay, but just needs to be classified based off it's pixel's values like you have it displayed in Pro.
Hopefully this helps!
Jon
Jon
If this response helps or is the solution to your post, please consider marking it as a solution
- Mark as New
- Bookmark
- Subscribe
- Mute
- Subscribe to RSS Feed
- Permalink
Hi Jon,
Thanks for getting back to my original post. I had a look at this option and I was unable to access the style section in the Map Viewer 😕

I did notice that the layer that does show the levels is listed as a Map Image Layer, whereas my new Forest Maturity layer is a Tile Layer (hosted). Could this be what creates the difference between the two do you think?
This is all a first for me, bringing in rasters, so I have no ideas whats going on haha
Thanks again for your help,
Matt.
- Mark as New
- Bookmark
- Subscribe
- Mute
- Subscribe to RSS Feed
- Permalink
Could you do screenshots for the map image layer that works? I'm curious what the same screenshot view would look like for the one that does work. Also, what the symbology screen panel looks like for the layer.
Jon
If this response helps or is the solution to your post, please consider marking it as a solution
- Mark as New
- Bookmark
- Subscribe
- Mute
- Subscribe to RSS Feed
- Permalink
Hi Jon,
Thanks for sticking with me through this, but yes I can share some screenshots with you which will hopefully help! There doesn't seem to be too much difference between the two (not that I can see) so hence it's confusing me. I assume I just rendered or shared the file incorrectly maybe.
This first screenshot is the layer that works or projects the information as I need with a value symbology.

And this is the layer I created myself that doesnt seem to allow the value symbology, just the RGB.

As mentioned in the earlier post, the layer that works is in my AGOL as a Map Image Layer, whereas the raster I brought in is a Tile Layer. Would this have anything to with the differences maybe?
Thanks again for any assistance you could provide, but no pressure as it seems a little tricky to figure out.
Matt.
- Mark as New
- Bookmark
- Subscribe
- Mute
- Subscribe to RSS Feed
- Permalink
No problem! I'm not sure about the map image layer. But the tile layer type seems correct to me since it's raster data and everything I have on my account raster wise is that type. Usually map image layers are just static snap shots of vector data shared as services in AGOL.
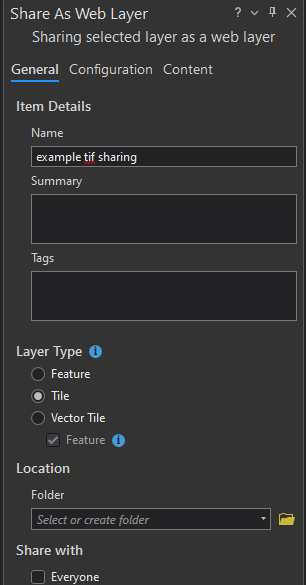
My last idea to try is to go back to Pro where it's displaying correctly, and do the sharing process again. I would put the raster it's it own map, where it displays right, and share it like my screenshot. I would try the "tile" option under the Layer Type section in the sharing dialog pop up on the right.
There are some settings in the Configuration section of the sharing pop up - but the defaults should be okay to see if this works.
Hope this works!
Jon
If this response helps or is the solution to your post, please consider marking it as a solution
- Mark as New
- Bookmark
- Subscribe
- Mute
- Subscribe to RSS Feed
- Permalink
Hi Jon,
Thanks again for your continual help, I really appreciate it 🙂
So, it seems like it kind of worked, but still there's something off and I think it may have something to do with the coordinate system.
I completed the steps you recommended by selecting Sharing>Share as Web layer and changed the Layer Type to Tile. This has brought the raster file into AGOL map but as a Basemap. But if I add the raster as a new layer it appears to be correct, showing the density legend as required (see below).

This is fantastic, however if I turn off the original inputted layer that came in as a Basemap, and change to any other Basemap, the Layer I added does not show. I get the error below. I read online that this might be due to a different coordinate system used. So I'll have to have a play and see if I can convert the layer to the correct/corresponding coordinates before bringing into AGOL and see if that fixes the new issue.

Getting so close haha but didn't think it'd be this difficult! But thanks for your continual help Jon!
Matt
- Mark as New
- Bookmark
- Subscribe
- Mute
- Subscribe to RSS Feed
- Permalink
@mtuffy I'm glad you're getting closer! The default coordinate system AGOL uses is the Web Mercator (WGS84). For the imagery/raster layers I've published, I've published other coordinate systems then WGS, but AGOL normally reprojects it to WGS to display correctly in any web map. Normally though, I just use WGS unless there is a reason to do otherwise.
You may be able to move the published layer you have from basemap to a layer. Normally, there's a setting option when you look at the layer in the web map contents panel that will say something like "move from basemap". This may be worth trying? Once you move it, you should be able to select a new basemap.
Otherwise, goodluck with your map! Hope it get's fully fixed this week.
Jon
Jon
If this response helps or is the solution to your post, please consider marking it as a solution
- Mark as New
- Bookmark
- Subscribe
- Mute
- Subscribe to RSS Feed
- Permalink
Hi Jon,
I apologise for my late reply but I just wanted to let you know that I sorted this issue out! It was due to another issue that only clicked yesterday. We have two accounts for AGOL - our local portal and our AGOL portal. Originally I thought we didnt have access to our local portal through ArcPro (which is where the layer needed to go), but i thought that didnt make too much sense, so I thought I'd try connecting that portal in ArcPro and it worked! I was able to then send the layer as a tile image layer like you suggested to my account, and the layer displayed as a layer with the chart values as needed 😄
So thanks again for sticking with me and helping me with that work! Just so happy it worked now 😄
- Mark as New
- Bookmark
- Subscribe
- Mute
- Subscribe to RSS Feed
- Permalink
Glad it worked out and was an easy fix!
Thanks for the update.
Jon
If this response helps or is the solution to your post, please consider marking it as a solution