ArcGIS GeoEvent Server Blog - Page 6

cancel
Showing results for 
Show  only  | Search instead for 
Did you mean: 

Latest Activity

(108 Posts)
EricIronside
Esri Regular Contributor

At 10.7, the GeoEvent Manager user interface has an issue uploading .jar files greater than 100KB. We are aware of the problem and actively working on fixing the issue.  This workaround applies to any custom component you would deploy to GeoEvent using a .jar file.


In the meantime, if you experience issues uploading .jar files via the GeoEvent Manager interface, you can deploy them directly by placing them into the GeoEvent's Deploy directory (see below). You should do this while the GeoEvent service is running (do NOT stop the service).


<GeoEvent Install Location>\GeoEvent\deploy\

On a windows machine, the default location would be the following:


C:\Program Files\ArcGIS\Server\GeoEvent\deploy\

Once you copy the .jar file into this directory, you can check GeoEvent Manager to verify that the component was imported correctly (go to Site > Components > Transports | Adapters | Processors).  

more
0 0 479
EricIronside
Esri Regular Contributor

Sometimes a log message appears at the ERROR level that you temporarily/permanently need to turn off.  However, the GeoEvent User Interface doesn’t allow you to turn logs off. To get around this, you can do it using the GeoEvent Configuration Files.


1. In GeoEvent Manager, set the log level on the logger you want to eliminate to ERROR. Repeat for each logger. Some examples of loggers that you may decide to turn off.


                    Logger: com.esri.ges.httpclient.Http

                    Logger: com.esri.ges.fabric.internal.ZKPersistenceUtility


2. On the GeoEvent machine, edit the following logging configuration file (NOTE: On Windows you will need to run the editor as Administrator)


                    <GeoEvent Install>\etc\org.ops4j.pax.logging.cfg


3. For each of the logger names above (from Step 1):

         a. Search for the logger name string from above, you should find a .name record like the following:


                    log4j2.logger.com_esri_ges_httpclient_http.name = com.esri.ges.httpclient.Http


         b. Change the .level record for that logger .name record to be OFF


                    log4j2.logger.com_esri_ges_httpclient_http.name = com.esri.ges.httpclient.Http

                    log4j2.logger.com_esri_ges_httpclient_http.level = OFF


4. Save your changes and close the .cfg file.

5. Restart GeoEvent to be sure it picks up the new logger settings.

more
1 3 662
GregoryChristakos
Esri Contributor

For the 10.7.1 release of ArcGIS GeoEvent Server, we are excited to announce new documentation for the existing out-of-the-box input and output connectors. A separate documentation page has been provided for each connector that includes a summary, unique usage notes, list of properties help, and known limitations.

To access this content, you are welcome to visit the existing Available input connectors and Available output connector landing pages where you'll notice that the 10.7 version of the documentation includes links for each of the existing connectors in place of the original text-based list. Clicking on any of these links will bring you to the new documentation for the specified connector. Additionally, you can view the new material as a list by accessing the Input connectors and Output connector topics under Connect to Data and Send Updates and Alerts

Example of new input connector documentation landing page.

As mentioned before, the new documentation for each input and output connector includes unique usage notes. These usage notes are intended to help provide additional information about each connector. You'll find information regarding best practices, tips-and-tricks, expected behavior, references to additional documentation, and configuration considerations.

Example of the usage notes for the new connector documentation.

Below the usage notes for each input and output connector are a complete list of available parameters. It is worth noting that the parameters in the list include all of those which are shown by default as well as those which are hidden since they are "conditional" (or dependent) on other parameters being configured a certain way to then first appear. You'll find that each parameter is paired with a unique description that explains what the parameter is for, what configurable options are available, what the expected input value(s) may be, and in some cases what the default value is.

Example of parameters and descriptions in the new connector documentation.

As always, step-by-step documentation on how to configure various input and output connectors can be found in our existing tutorial-based documentation here: ArcGIS GeoEvent Server Gallery.

more
1 1 1,499
EricIronside
Esri Regular Contributor

One of the most common requests for the HTTP Transport is to implement some custom authentication steps that are required by an external API.  Unfortunately, it is impossible to implement the HTTP Transport in a way that can accommodate all of the possible permutations.  So it becomes necessary to write your own HTTP Transport to include the desired authentication functionality. But how can you do this while still incorporating the default Proxy capabilities provided by the GeoEvent Server?  This blog will show you how to access the underlying proxy properties and implement your HTTP Transport so that you don't have to re-invent the proxy capability from scratch.

NOTE: This blog post assumes you are already familiar with developing custom transports for GeoEvent. If not, please take a look at the GeoEvent SDK documentation provided with your GeoEvent Server installation at:

<GeoEventServerInstallLocation>\ArcGIS\Server\GeoEvent\sdk\GeoEvent Developer Guide.pdf

System Proxy Settings  

GeoEvent Server provides global settings for the proxy on both HTTP and HTTPS schemes.  To access these settings, open GeoEvent Manager, navigate to Site > Settings and scroll down to the Http Proxy Settings and/or Https Proxy Settings sections.  Here you can set the name of the proxy host, the port it is listening on, and the credentials to use. Not all proxy configurations will utilize all of these settings. If you set a host name without specifying a port the system will utilize the default port number for the schema requested (80 for HTTP and 443 for HTTPS).  If you don't specify a username/password, then the proxy request won't include those credentials in the request (the proxy is open from the inside).

One typical implementation includes a forward proxy listening on a single port (default to port 80) that will forward both HTTP and HTTPS schemes. In this case, the settings for HTTP and HTTPS would be the same:

  • Http Proxy Host: myhost.company.com
  • Https Proxy Host: myhost.company.com
  • Https Proxy Port: 80

Once you've set up your proxy settings, you should be able to test them using a standard input that utilizes the HTTP transport (like the Poll and ArcGIS Server for Features that is requesting data from ArcGIS Online).  

Configure A Custom Transport Service

The first thing you need to do to create a custom transport service that will be able to take advantage of the underlying system's proxy support is to get access to the GeoEvent HTTP Client Service.  The blueprint config.xml file should look something like the following.  The important parts are 1) adding the reference to the blueprint to the GeoEventHttpClientService and then 2) add that reference to the service bean as a property (OSGI will inject the GeoEventHttpClientService into the service bean once it is created).

<?xml

            version="1.0"

            encoding="UTF-8"?>
<blueprint

            xmlns="http ://www.osgi.org/xmlns/blueprint /v1.0.0"

            xmlns:ext="http ://aries.apache.org/blueprint/xmlns/blueprint-ext/v1.0.0">
            <reference

                        id="geoEventHttpClientService"

                        interface="com.esri.ges.core.http.GeoEventHttpClientService" />
            <bean

                        id="myTransportServiceBean"

                        class="com.esri.geoevent.transport.custom.MyTransportService"

                        activation="eager">
                        <property

                                    name="bundleContext"

                                    ref="blueprintBundleContext" />
                        <property

                                    name="geoEventHttpClientService"

                                    ref="geoEventHttpClientService" />
            </bean>
            <service

                        id="geotabTransportService"

                        ref="geotabTransportServiceBean"

                        interface="com.esri.ges.transport.TransportService" />
</blueprint>

In the service java code, add a setGeoEventHttpClientService method to allow the injection of the GeoEvent Http Client Service. Then pass that GeoEvent Http Client Service to your transport when it is created.

private GeoEventHttpClientService httpClientService;

public void setGeoEventHttpClientService(GeoEventHttpClientService httpClientService) {
    this.httpClientService = httpClientService;
}

@Override
public Transport createTransport() throws ComponentException {
    return new MyTransport(definition, httpClientService);
}

This GeoEvent Http Client Service will be able to create Http Clients that implement the underlying proxy capabilities of GeoEvent. If you use the Http Clients the service creates, you can rest assured that the Global GeoEvent Settings for proxy values will be honored.


Create the GeoEvent Http Client

In your transport implementation there are a few things to note:

  1. Every time your transport starts, you should create a new HttpClient.
  2. Every time your transport stops, you should close your current HttpClient.

Whenever the properties of your connection are changed, the transport is stopped then started again, so if you follow these rules, you will be guaranteed to use a HttpClient with the correct settings.

In the start() method of your transport, you should create a new HttpClient using the GeoEventHttpClientService. This will create a GeoEventHttpClient that is able to properly proxy your requests.In the stop() method, you will want to close the the HttpClient to free up the resources. Please note that I've left out some try/catch/finally calls here for clarity.  

import com.esri.ges.core.http.GeoEventHttpClient;

...

public class MyTransport extends InboundTransportBase {

private GeoEventHttpClient httpclient;

...

@Override

public synchronized void start() {

    ...

    this.httpclient = httpClientService.createNewClient();

    ...

}

...

@Override
public synchronized void stop() {

    ...

    this.httpclient.close();  // try/catch around this!

    this.httpclient = null;

    ...

}

Creating Requests Using the HttpClient

There are a number of methods on the GeoEvent Http Client that will allow you to create proxy requests. Please note that you must use one of these methods to create your request in order for it to properly utilize the proxy.  

createGetRequest(URL url, Collection<KeyValue> parameters)

This method creates a GET request with the provided list of parameters appended to the request as URL Parameters. The KeyValue Collection parameters can be null, this results in no URL Parameters at the end of the request URL.

Example

URL:             https ://my.org.com/APICall 

Parameters: ({key1,value1},{key2,value2})

Result:          GET https ://my.org.com/APICall?key1=value1&key2=value2

createGetRequest(URL url, String acceptableTypes)

This method creates a GET request with the provided acceptable types set in the header properties. The String acceptableTypes can be null, in that case the header values will not be set.

Example

URL:             https ://my.org.com/APICall 

acceptableTypes: application/json

Result:          GET https ://my.org.com/APICall [content-type=application/json, accept=application/json]

createPostRequest(URL url, String postBody, String contentType)

This method creates a POST request with the provided string body of content type. 

Example

URL:             https ://my.org.com/APICall 

postBody: postBody

acceptableTypes: application/json

Result:          POST https ://my.org.com/APICall BODY=StringEntity(content-type=application/json, entity="postBody")

createPostRequest(URL url, Collection<KeyValue> parameters)

This method creates a POST request with the provided list of parameters embedded in the post body as a URL Encoded Form. The KeyValue Collection parameters can be null, this will result in an empty URL Encoded From Entity.

Example

URL:             https ://my.org.com/APICall 

Parameters: ({key1,value1},{key2,value2})

Result:          POST https ://my.org.com/APICall  [content-type=application/x-www-form-urlencoded,

                     charset=utf-8BODY=UrlEncodedFormEntity(parameters, "UTF-8")

Using the Proxy Http Request

Once the Http Request object is created, you can modify the properties or the entity as needed. For example, if you need a JSON entity inside of a URL Encoded Form request:

    // default content type is "application/x-www-form-urlencoded"
    HttpPost httpPost = httpclient.createPostRequest(url, null);

    // If your request entity is "application/json"
    String requestData = "JSON-RPC=" + URLEncoder.encode(requestString, "utf-8");
    StringEntity entity = new StringEntity(requestData, jsonContentType);
    httpPost.setEntity(entity);

To execute the request via the proxy, use the GeoEventHttpClient from above. 

    try (CloseableHttpResponse response = httpclient.execute(httpPost))
    {

        ...  // Do stuff with the response

    } catch (Exception e) {

        ...

    }

more
2 0 4,488
RJSunderman
Esri Regular Contributor

This blog is one in a series of blogs discussing debugging techniques you can use when working to identify the root cause of an issue with a GeoEvent Server deployment or configuration. Click any link in the quick list below to jump to another blog in the series.

In this blog I will discuss GeoEvent Manager's user interface for viewing logged messages, the location of the actual log file on disk, and how logging can be configured -- specifically how to control the size of the log file and its rollover properties.

The GeoEvent Manager Logging Interface

ArcGIS GeoEvent Server uses Apache Karaf, a lightweight flexible container to support its Java runtime environment. A powerful logging system, based on OPS4j Pax Logging, is included with Apache Karaf.

The GeoEvent Manager web application includes a simple user-interface for the ops4j logging system. You can use this interface to see the most recent messages logged by different components of ArcGIS GeoEvent Server. The UI illustrated below caches up to 500 logged messages and allows you to scroll through logged messages specifying how many messages should be listed on a page, select a specific type of logged message (e.g. DEBUG, INFO, WARN, or ERROR) as well as perform keyword searches.

GeoEvent Manager Logging User Interface

A significant limitation of this logging interface is that only the most recent 500 logged messages are maintained in its cache, so review and keyword searches you perform are limited to recently logged messages. This means that the velocity and volume of event records being processed as well as the number of GeoEvent Services, inputs, and outputs you have configured can affect (and limit) your ability to isolate logged messages of interest. A valuable debugging technique is to locate the actual log file on disk and open it in a text editor.

Location of the log file on disk

On a Windows platform, assuming your ArcGIS GeoEvent Server has been installed in the default folder beneath C:\Program Files, you should be able to locate the following system folder which contains the actual system log files.

C:\Program Files\ArcGIS\Server\GeoEvent\data\log

In this folder you will find one or more files with a base name karaf.log – these files can be opened in a text editor of your choice for content review and search. You can also use command-line utilities like tail, string processing utilities like sed, grep, and awk, as well as regular expressions to help isolate logged messages. Examples using these are included in other blogs in this series.

Only one log file, the file named karaf.log, is actively being written at any one time. When this file's size has grown as large as the system configuration allows, the file will automatically rollover and a new karaf.log file will be created. Log files which have rolled over will have a numeric suffix (e.g. karaf.log.1) and the file's last updated date/time will be older than the karaf.log currently being written.

If you open the karaf.log in a text editor you should treat the file as read-only as the logging system is actively writing to this file. Be sure to periodically reload the file's content in your text editor to make sure you are reviewing the latest file.

How to specify an allowed log file size and rollover properties

Locate the org.ops4j.pax.logging.cfg configuration file in the ArcGIS GeoEvent Server's \etc folder:

C:\Program Files\ArcGIS\Server\GeoEvent\etc

Using a text editor run as an administrator, because the file is located beneath C:\Program Files, you can edit properties of the system log such the default logging level for all loggers (a "logger" in this context is any of several components that are actively logging messages, such as the outbound feature adapter or the inbound TCP transport).

For example, at the 10.7 release a change was made to quiet the system logs by reducing the ROOT logging level from INFO to WARN so that only warnings are logged by default. You can see this specified in the following line in the org.ops4j.pax.logging.cfg configuration file:

# Root logger

log4j2.rootLogger.level = WARN

Searching the configuration file for the keyword "rolling" you will find lines which specify the karaf.log file's allowed size and rollover policy. Be careful -- not all of the lines specifying the rollover policy are necessarily in the same section of the log file; some may be located deeper in the file:

# Rolling file appender

log4j2.appender.rolling.type = RollingRandomAccessFile

log4j2.appender.rolling.name = RollingFile

log4j2.appender.rolling.fileName = ${karaf.data}/log/karaf.log

log4j2.appender.rolling.filePattern = ${karaf.data}/log/karaf.log.%i

log4j2.appender.rolling.append = true

log4j2.appender.rolling.layout.type = PatternLayout

log4j2.appender.rolling.layout.pattern = ${log4j2.pattern}

log4j2.appender.rolling.policies.type = Policies

log4j2.appender.rolling.policies.size.type = SizeBasedTriggeringPolicy

log4j2.appender.rolling.policies.size.size = 16MB

log4j2.appender.rolling.strategy.type = DefaultRolloverStrategy

log4j2.appender.rolling.strategy.max = 10

The settings above reflect defaults for the 10.7 release which specify that the karaf.log should rollover when it reaches 16MB and up to 10 indexed files will be used to archive older logged messages.

The anatomy of a logged message

Before we conclude our discussion on configuring the application logger I would like to briefly discuss the format of logged messages. The logged message format is configurable and logged messages by default have six parts. Each part is separated by a pipe ( | ) character.

Logged messages have six parts

The thread identifier default specification (see illustration below) has a minimum of 16 characters but no maximum length; some thread identifiers can be quite long. The class identifier spec includes a precision which limits the identifier to the most significant part of the class name. In the illustration above the fully-qualified class identifier com.esri.ges.fabric.core.ZKSerializer has been shortened to simply ZKSerializer. We will discuss the impact of this more in a later blog.

You can edit the org.ops4j.pax.logging.cfg configuration file to specify different patterns for the appender. You should refer to https://logging.apache.org/log4j/2.x/manual/layouts.html#PatternLayout in the Apache logging services on-line help before modifying the default appender pattern layout illustrated below.

# Common pattern layout for appenders

log4j2.pattern = %d{ISO8601} | %-5p | %-16t | %-32c{1} | %geoeventBundleID - %geoeventBundleName - %geoeventBundleVersion | %m%n

log4j2.out.pattern = \u001b[90m%d{HH:mm:ss\.SSS}\u001b[0m %highlight{%-5level}{FATAL=${color.fatal}, ERROR=${color.error}, WARN=${color.warn}, INFO=${color.info}, DEBUG=${color.debug}, TRACE=${color.trace}} \u001b[90m[%t]\u001b[0m %msg%n%throwable

Conclusion

Using the logging interface provided by GeoEvent Manger is a quick, simple way of reviewing logged messages recently produced by system components as they ingest, process, and disseminate event data. Event record velocity and volume can of course increase the number of messages being logged. Increasing the logging level from ERROR or WARN to INFO or DEBUG can drastically increase the volume of logged messages. If running components are frequently logging messages in the system's log file only the most recent the messages will be displayed in the GeoEvent Manager user-interface. Messages which have been pushed out of the cache can be reviewed by editing the karaf.log in a text editor. This is a key debugging technique, but you must be aware that the karaf.log is actively being written and will rollover as it grows beyond a specified size.

As you make and save changes to the system logging, for example, to request DEBUG logging on a specific logger, the changes will immediately be reflected in the org.ops4j.pax.logging.cfg configuration file. You can edit this file as an administrator and any changes you save will be picked up immediately; you do not have to stop and restart the ArcGIS GeoEvent Server service.

more
4 0 6,682
RJSunderman
Esri Regular Contributor

This blog is one in a series of blogs discussing debugging techniques you can use when working to identify the root cause of an issue with a GeoEvent Server deployment or configuration. Click any link in the quick list below to jump to another blog in the series.

In a client / server context ArcGIS GeoEvent Server sometimes acts as a client and at other times acts as a server. When an Add a Feature or an Update a Feature output is configured to add / update feature records in a geodatabase feature class through a feature service, ArcGIS GeoEvent Server is a client making requests on an ArcGIS Server feature service. In this blog I will show how you can isolate requests GeoEvent Server sends to an ArcGIS Server service and how to use the JSON from the request to debug issues you are potentially encountering.

Scenario

A customer reports that an input connector they have configured appears to be successfully receiving and adapting data from a provider and event records appear to be processed as expected through a GeoEvent Service. The event record count on their output increments, but they are not seeing some – or any – features displayed by a feature layer they have added to a web map.

Request DEBUG logs for the outbound feature service transport

Components in the ArcGIS GeoEvent Server runtime log messages to provide information as well as note warnings and/or errors. Each component uses a logger, an object responsible for logging messages in the system's log file, which can be configured to generate different levels of messages (e.g. DEBUG, INFO, WARN, or ERROR).

In this case we want to request the com.esri.ges.transport.featureService.FeatureServiceOutboundTransport component log DEBUG messages to help us identify the problem. To enable DEBUG logging for a single component's logger:

  • In GeoEvent Manager, navigate to the Logs page and click Settings
  • Enter the name of the logging component in the text field Logger and select the DEBUG log level
  • Click Save

As you type the name of a logger, if the GeoEvent Manager's cache of logged messages contains a message from a particular component's logger, IntelliSense will help you identify the logger's name.

IntelliSense

Querying for additional information

When a processed event record is routed to an Update a Feature output the data is first reformatted as Esri Feature JSON so that it can be incorporated into a map/feature service request. A request is then made using the ArcGIS REST API to either Add Features or Update Features.

An Add a Feature output connector has the easier job – it doesn't care whether a feature record already exists since it is not going to request an update. An Update a Feature output connector on the other hand needs to know the objectid or row identifier of the feature record it should update.

If the output has previously received an event record with this event record's TRACK_ID then it has likely already sent a request to the targeted map/feature service to query for feature records whose Unique Feature Identifier Field was specified as the field to use to identify feature records to update. The output maintains a cache mapping every event record's TRACK_ID to a corresponding object or row identifier of a feature record.

Here is what the logged DEBUG messages look like when an Update a Feature output queries to discover an object or row identifier associated with a feature record:

1

2019-06-05T15:12:34,324 | DEBUG | FeatureJsonOutboundAdapter-FlushingThread-com.esri.ges.adapter.outbound/JSON/10.7.0 | FeatureServiceOutboundTransport | 91 - com.esri.ges.framework.transport.featureservice-transport - 10.7.0 | Querying for missing track id '8SKS617'

2

2019-06-05T15:12:34,489 | DEBUG | FeatureJsonOutboundAdapter-FlushingThread-com.esri.ges.adapter.outbound/JSON/10.7.0 | FeatureServiceOutboundTransport | 91 - com.esri.ges.framework.transport.featureservice-transport - 10.7.0 | Posting to URL: https : //localhost.esri.com/server/rest/services/SampleRecord/FeatureServer/0/query with parameters: f=json&token=QNv27Ov9...&where=track_id IN ('8SKS617')

&outFields=track_id,objectid.

3

2019-06-05T15:12:34,674 | DEBUG | FeatureJsonOutboundAdapter-FlushingThread-com.esri.ges.adapter.outbound/JSON/10.7.0 | FeatureServiceOutboundTransport | 91 - com.esri.ges.framework.transport.featureservice-transport - 10.7.0 | Response was {"exceededTransferLimit":false,"features":[ ],"fields"...

Notice a few key values highlighted in the logged message's text above:

  • Line 1:  The output has recognized that it has not previously seen an event record with the TRACK_ID 8SKS617 (so it must query the map/feature service to see if it can find a matching feature record).
  • Line 2:  This is the actual query sent to the SampleRecord feature service's query endpoint requesting a feature record whose track_id attribute is one of several in a specified list (8SKS617 is actually the only value in the list). The query requests that the response include only the track_id attribute and an object identifier value.
  • Line 3:  The ArcGIS Server service responds with an empty array features[ ]. This indicates that there are no features whose track_id attribute matches any of the values in the query's list.

The output was configured with its Update Only parameter set to 'No' (the default). So, given that there is no existing record whose track_id attribute matches the event record's tagged TRACK_ID field, the output connector fails over to add a new feature record instead:

4

2019-06-05T15:12:34,769 | DEBUG | FeatureJsonOutboundAdapter-FlushingThread-com.esri.ges.adapter.outbound/JSON/10.7.0 | FeatureServiceOutboundTransport | 91 - com.esri.ges.framework.transport.featureservice-transport - 10.7.0 | Posting to URL: https : //localhost.esri.com/server/rest/services/SampleRecord/FeatureServer/0/addFeatures with parameters: f=json&token=QNv27Ov9...&rollbackOnFailure=true features=[{"geometry":{"x":-115.625,"y":32.125, "spatialReference":{"wkid":4326}},"attributes":{"track_id":"8SKS617","reported_dt":1559772754211}}].

5

2019-06-05T15:12:34,935 | DEBUG | FeatureJsonOutboundAdapter-FlushingThread-com.esri.ges.adapter.outbound/JSON/10.7.0 | FeatureServiceOutboundTransport | 91 - com.esri.ges.framework.transport.featureservice-transport - 10.7.0 | Response was {"addResults":[{"objectId":1,"globalId":"{B1384CE2-7501-4753-983B-F6640AB63816}", "success":true}]}.

Again, take a moment to examine the highlighted text:

  • Line 4:  The ArcGIS REST API endpoint to which the request is sent is the Add Features endpoint. An Esri Feature JSON representation of the event data is highlighted in green.
  • Line 5:  The ArcGIS Server service responds with a block of JSON indicating that it successfully updated a feature record, assigning the new record the object identifier '1' and a globally unique identifier (the feature service I'm using in this example is actually one hosted by my ArcGIS Enterprise portal).

The debug logs include the Esri Feature JSON constructed by the output connector. You can actually copy and paste this JSON into the feature service's web page in the ArcGIS REST Services Directory. This is an excellent way to abstract ArcGIS GeoEvent Server from your debugging workflow and determine if there are problems with how the JSON is formatted or reasons why a feature service might reject a client's request.

Add Features using ArcGIS REST Services web form

I used this technique once to demonstrate that a polygon geometry created by a Create Buffer processor in a GeoEvent Service had several dozen vertices, allowing the geometry to approximate a circular area. When the polygon was committed to the geodatabase as a feature record, however, its geometry had been generalized such that it only had a few vertices. Web maps were displaying very rough approximations of the area of interest, not circular buffers. But it wasn't ArcGIS GeoEvent Server that had failed to produce a geometry representing a circular area. The problem was somewhere in the back-end relational database configuration.

Rollback on Failure?

There is a query parameter on Line 4 in the illustration above which is easily overlooked: rollbackOnFailure=true

The default action for both the Add a Feature and Update a Feature outputs is to request that the geodatabase rollback the feature record transaction request if a problem is encountered. In many cases this is why customers are not seeing all of the feature records they expect updated in a feature layer they have added to a web map. Consider the following fields specification for the targeted feature service's feature layer:

Fields:
    track_id ( alias: track_id, type: esriFieldTypeString, length: 512, editable: true, nullable: true )
    reported_dt ( alias: reported_dt, type: esriFieldTypeDate, length: 29, editable: true, nullable: true )
    objectid ( alias: objectid, type: esriFieldTypeOID, length: 8, editable: false, nullable: false )
    globalid ( alias: globalid, type: esriFieldTypeGlobalID, length: 38, editable: false, nullable: false )

Suppose for a moment that the esriFieldTypeString specification for the track_id attribute specified that the string should not exceed seven characters. If a web application (client) were to send the feature service a request with a value for the track_id which was longer than seven characters, the data would not comply with the feature layer's specification and the feature service would be expected to reject the request.

Likewise, if attribute fields other than esriFieldTypeOID or esriFieldTypeGlobalID were specified as not allowing null values, and a client request was made whose attribute values were null, the data would not be compliant with the feature layer's specification; the feature service should reject the request.

By default both the Add a Feature and Update a Feature output connectors begin working through a cache of event records they have formatted as Esri Feature JSON placing the formatted data in one or more requests that are sent to the targeted feature service's feature layer. Each request, again by default, is allowed to contain up to 500 event / feature records.

Update a Feature default properties

It only takes one bad apple to spoil a batch. If even one processed event record's data in a transaction containing ten, fifty, or a hundred feature records in a single transaction request is not compliant with string length restrictions, value nullability restrictions – or any other restriction enforced by an ArcGIS Server feature service – the entire transaction will rollback and none of the feature records associated with that batch of processed event records will be updated.

Reduce the Maximum Features Per Transaction

You cannot change the rollback on failure behavior. The outbound connectors interfacing with ArcGIS Server feature services do not implement a mechanism to retry an add/update feature record operation because one or more feature records in a batch do not comply with a feature layer's specification.

You can change the number of processed event records an Add a Feature or Update a Feature output connector will include in each transaction. If you configure your output to specify a maximum number of one feature record per transaction you can begin to work around the issue of one bad record spoiling an entire transaction. If bad data or null values were to occasionally creep into processed event records then only the bad records will fail to update a corresponding feature record and the rollback on failure won't suppress any valid feature record updates.

The downside to this is that REST requests are inherently expensive. If it were to take as little as 20 milliseconds to make a round-trip to the database and receive a response to a transaction request you could effectively cut your event throughput to less than 50 event records per second if you throttle feature record updating by allowing only one processed event record per transaction. The upside to reducing, at least temporarily, the number of records allowed in a transaction is that it makes the messages being logged much, much easier to read. It also guarantees that each success / fail response from the ArcGIS Server feature service can be traced back to a single add / update feature request.

Timestamps – another benefit to logging DEBUG messages for the outbound transport

Every logged message includes a timestamp with millisecond precision. This can be very useful when debugging unexpected latency when interacting with a geodatabase's feature class through an ArcGIS Server's REST interface.

Looking back at the two tables above with the logged DEBUG messages, the time difference between the messages on Line 1 and Line 2 is 165 milliseconds (489 - 324 = 165). That tells us it took over a tenth of a second for the output to formulate its query for "missing" object identifiers needed to request updates for specific feature records. It takes another 185 milliseconds (674 - 489 = 185) to actually query for the needed identifiers and discover that there are no feature records with those track_id values.

To be fair, you should expect this latency to drop as ArcGIS Server and/or your RDBMS begin caching information about the requests being made by clients. But it is important to be able to measure the latency ArcGIS GeoEvent Server is experiencing. If every time an Add a Feature output connector's timer expires (which is once every second by default) it takes a couple hundred milliseconds to complete a transaction, you should have a pretty good idea how many transactions you can make in one second. You might need to increase your output's Update Interval so that it holds only its cache of processed event records longer before starting a series of transactions. If you do this, know that as updates arrive for a given tracked asset older records will be purged from the cache. When updating feature records the cache will be managed to contain only one processed event record for each unique TRACK_ID.

Conclusion

Taking the time to analyze the DEBUG messages logged by the outbound feature service transport can provide you a wealth of information. You can immediately see if values obtained from an event record's tagged TRACK_ID field are reasonably expected to be found in whatever feature layer's attribute field is being used to query for feature records that correlate to processed event records. You can check to see if any values in a processed event record are unexpectedly null, have strings which are longer than the feature layer will accept, or – my favorite – contain what ArcGIS Server suspects is HTML or SQL code resulting in a service rejecting the transaction to prevent a suspected injection attack.

ArcGIS GeoEvent Server, when interfacing with an RDBMS through a map / feature service's REST interface, is acting as any other web mapping application client would act in making requests on a service it assumes is available. You can eliminate GeoEvent Server entirely from your debugging workflow if you copy / paste information like the ESRI Feature JSON from a DEBUG message logged by the outbound transport into an HTML page in the ArcGIS REST Services Directory. I did exactly this to prove, once, that polygon geometries with hundreds of vertices modeling a circular area were somehow being generalized as they were committed into a SQL Server back-end geodatabase.

If a customer reports that some – or all – of the features they expect should be getting added or updated in a feature layer are not displayed by a web map's feature layer, take a close look at the requests the configured output is sending to the feature service.

more
5 0 5,995
RJSunderman
Esri Regular Contributor

This blog is one in a series of blogs discussing debugging techniques you can use when working to identify the root cause of an issue with a GeoEvent Server deployment or configuration. Click any link in the quick list below to jump to another blog in the series.

In this blog I will illustrate a couple of techniques I use to identify more granular component logging than requesting the ROOT component produce DEBUG messages for all component loggers. I will also introduce a couple command-line utilities I frequently use to interrogate the ArcGIS GeoEvent Server's system log file. I'll consider a specific scenario and show how to isolate logged messages that provide information about an output's requests to a feature service which identify the criteria used to discover and delete feature records.

Scenario

A customer has configured the Delete Old Features capability on an Add a Feature output connector and reports feature records are being deleted from the geodatabase earlier than expected. Following advice from the blog Add/Update Feature Output Connectors they have captured a few logged messages from the outbound feature transport but are not seeing any information about criteria the connector is using to determine which feature records should be deleted or when the records should be deleted.

Feature Transport - Delete Features

What is the outbound feature transport telling us?

The illustration above does not give us much information. It confirms that an Add a Feature output is periodically, once a minute, making requests on a feature service to delete old feature records and that, for the three intervals shown, no feature records were deleted (the JSON array in the response from the feature service is empty).

If one or more existing feature records had satisfied criteria included in the delete features request, then the logged messages would contain feature record identifiers to confirm which feature records had been deleted. Hypothetically, looking at the raw logged messages in the karaf.log file, we would expect to see a message similar to the following:

2019-06-03T16:42:41,474 | DEBUG | OutboundFeatureServiceCleanerThread-[Default][/][SampleRecord][0][FeatureServer] | FeatureServiceOutboundTransport | 91 - com.esri. ges.framework.transport.featureservice-transport - 10.7.0 | Response was {"deleteResults":[{"objectid":3, ... "success":true},{ "objectid":4, ... "success": true}]}.

The outbound feature transport is only confirming what has been deleted, not criteria used to determine what should be deleted. The information we need, hopefully, is being logged by a different component logger.

How to determine which component logger to watch

As I mentioned in the blog Configuring the application logger, the logging system implemented by ArcGIS GeoEvent Server logs messages from the Java runtime. The messages being logged generally contain good information for software developers, but are rather hard for a GIS analyst to review and interpret. If someone from the product team has not identified a component logger from which you should request more detailed log messages, your only option is to request DEBUG logging on the ROOT component.

If you elect to do this you must know that the karaf.log will quickly grow very large and will roll over as described in the aforementioned blog.

All hope is not lost lost however. One technique I have found helpful is turn off as many of my running inputs and outputs as I can to quiet ArcGIS GeoEvent Server's activity and then briefly, for perhaps a minute or two, request DEBUG level messages be produced by setting the debugging level on the ROOT component. GeoEvent Manager's logging user interface will quickly cache up to 500 messages and you can use built-in IntelliSense to at least get an idea of which components are actively running and producing log messages.

IntelliSense illustration

Once you understand that both the Add a Feature and Update a Feature output connectors use endpoints exposed through the ArcGIS REST Services Directory to interface with their targeted feature services, one component logger should stand out – the HTTP Client component logger highlighted in the illustration above. The information we need on the criteria used to identify feature records to delete is probably being logged as part of an HTTP REST request.

Request DEBUG logs for the HTTP Client

In this case we want to request the com.esri.ges.httpclient.Http component log DEBUG messages to help us identify the problem. To enable DEBUG logging for a the identified component's logger:

  • Navigate to the Logs page in GeoEvent Manger and click the Settings button.
  • Restore the ROOT component logger to its default level WARN and click Save.
  • Specify the name of the HTTP Client component logger, select the DEBUG log level, and Save again.

ArcGIS GeoEvent Server is fundamentally RESTful, which means you will still have a high volume of messages being logged to the karaf.log – but not as many as if you had left DEBUG logging set on the ROOT component logger.

Useful command-line utilities for interrogating karaf.log

I operate almost exclusively on a Windows platform, but Cygwin is one of the first things I install whenever I get a new machine. Cygwin is a free, open source, environment which provides a native Windows integrated command-line shell from which I can execute some of my favorite Unix utilities like sed, grep, awk, and tail. There are probably other packages available which provide similar utilities and tools, but I like Cygwin.

If I open a Cygwin command-line shell I can change directory to where the karaf.log file is being written and generate an active tail of the log so that I don't have to open the log file in a text editor and frequently re-load the file as its content is updated. I am also able to pipe the streaming content from tail through grep to limit the logged messages displayed to those which contain specific keywords or phrases. For example:

1

rsunderman@localhost //localhost/C$/Program Files/ArcGIS/Server/GeoEvent/data/log

2

$ tail -0f karaf.log |grep --line-buffered 'where.*reported_dt'

3

2019-06-07T16:33:19,545 | DEBUG | OutboundFeatureServiceCleanerThread-[Default][/][New_SampleRecord][0][FeatureServer] | Http | 60 - com.esri.ges.framework. httpclient - 10.7.0 | Adding parameter (where/reported_dt < timestamp '2019-06-07 17:33:19').

4

2019-06-07T16:34:20,269 | DEBUG | OutboundFeatureServiceCleanerThread-[Default][/][New_SampleRecord][0][FeatureServer] | Http | 60 - com.esri.ges.framework. httpclient - 10.7.0 | Adding parameter (where/reported_dt < timestamp '2019-06-07 17:34:20').

5

2019-06-07T16:35:20,433 | DEBUG | OutboundFeatureServiceCleanerThread-[Default][/][New_SampleRecord][0][FeatureServer] | Http | 60 - com.esri.ges.framework. httpclient - 10.7.0 | Adding parameter (where/reported_dt < timestamp '2019-06-07 17:35:20').

The above quickly reduces all the noise logged by the HTTP Client component logger to only those messages which include the name of the attribute field reported_dt which the Add a Feature output was configured to use when identifying feature records older than a specified number of minutes. The criteria we are looking for is clearly identified as a parameter the HTTP Client is adding to the request it is constructing to send to the feature service to identify and delete old feature records.

The system I am running is in California, which is -07:00 hours behind GMT. The date/time values in the reported_dt attribute of each feature record in my feature are expressed as epoch long integers and represent GMT values. My output is configured to query every 60 seconds and delete feature records which are more than six hours old. The logged messages above bear timestamps which are roughly 60 seconds apart and the where clause identifies any feature record whose date/time is "now" + 07:00 hours (UTC offset) - 06:00 hours (the number of hours at which a feature record is considered "old").

Using the ArcGIS REST Services Directory to query feature records from the feature service, I can quickly see that feature records which are not yet six hours old (relative to GMT) remain but those I add or update with a reported_dt value which is at least six hours old get deleted every 60 seconds.

What if the above had not yielded the information we needed?

We could always fall back to set the ROOT logger to DEBUG so that all component loggers produced debug messages. While this is extremely verbose the technique which uses the tail and grep command-line utilities can still be used to try and find anything which mentions our particular feature service's REST endpoint.

In this case my feature service's name was New_SampleRecord, so I can reasonably expect to find logged messages which include references to:  New_SampleRecord/FeatureServer/0/deleteFeatures

A grep command, using a regular expression pattern match like the following should find only those logged messages which appear to be attempting to delete features from the feature layer in question:
tail -0f karaf.log |grep --line-buffered 'SampleRecord.*FeatureServer.*deleteFeatures'

Tests using the above grep log message filter reveal about 75 messages logged every 60 seconds which include a reference to the deleteFeatures endpoint for the feature layer my output is targeting. Copying and pasting these lines into a text editor I can review them to discover that only one message contains a SQL WHERE clause. Such a clause would be required to identify records with a date/time value which should be considered "old".

While the date/time value in this logged message is HTTP encoded, because this particular message depicts text ready to be sent out over the HTTP wire, we can still use the logged message to understand the criteria being applied by the ArcGIS GeoEvent Server's output.

2019-06-07T18:10:06,956 | DEBUG | HttpRequest Worker Thread: https://localhost.esri.com /server/rest/services/New_SampleRecord/FeatureServer/0/deleteFeatures | wire | 60 - com.esri.ges.framework.httpclient - 10.7.0 | http-outgoing-27360 >> "f=json&token=HM85k4E...&rollbackOnFailure=true&where=reported_dt+%3C+timestamp+%272019-06-07+19%3A10%3A06%27"

more
2 0 3,098
DanWade
Esri Contributor

Introduction

Often computers think they are smarter than humans, but since it is the human whom programs the computer code to perform a repetitive task, we know there are times additional tweaking can be beneficial for a successful outcome of a given workflow. XML data structures with namespaces is no exception.

If you have not started your XML quest off by reading the blog, XML Data Structures - Characteristics and Limitations, written by RJ Sunderman, I highly recommend starting there. It provides a solid foundation for working with XML data structures. What we will explore in this blog is XML data structures that include the use of namespaces, in particular, that of a Web Feature Server (WFS) service. The first question here might be,what exactly is a "namespace?" The namespace refers to the pre-fix of the XML element, for example, <wfs:WFS_Capabilities>. When working with XML data that includes namespaces there will be an XML <schema> element with one or more attributes containing URLs describing the XML structure and all namespaces used in the document. This schema declaration often looks something like:

The XML Schema Declaration results from WFS getCapabilities request.

The xmlns:wfs="http ://www.opengis.net/wfs/2.0" attribute in the illustration above indicates the elements and data types used in the schema come from the "http://www.w3.org/2001/XMLSchema" namespace. The same attribute also specifies the elements and data types that come from the "http://www.w3.org/2001/XMLSchema" namespace should be prefixed with wfs. For more information, see XSD - The <schema> Element.

At this point, it should be noted that WFS services in ArcGIS Server use Geography Markup Language (GML) to encode the feature data. In order to represent geographic information, GML is the means used for XML. The GML used in ArcGIS Server WFS services is the Simple Features profile. For more information, see the technical notes in Why use a WFS service?.

Explore a WFS service

To begin our adventure, you will need an existing WFS service published that ArcGIS GeoEvent Server can ingest. You might not be aware, but ArcMap provides sample data that can be accessed, by default, in the following location: C:\Program Files (x86)\ArcGIS\Desktop<version>\TemplateData\TemplateData.gdb. Keep in mind, you are working with the actual features, therefore, the feature class must reside in a registered enterprise geodatabase before proceeding, see Data sources for ArcGIS Server for more information. For this blog, I have added the USA Cities feature class to ArcMap (ArcGIS Pro works too!) and published it as a service to ArcGIS Server. 

NOTEAvoid using special characters in the layer name represented in the Table of Contents in ArcMap or ArcGIS Pro.

During the publishing process the following capabilities were enabled in ArcMap.

ArcMap Service Editor dialog box during publishing process.

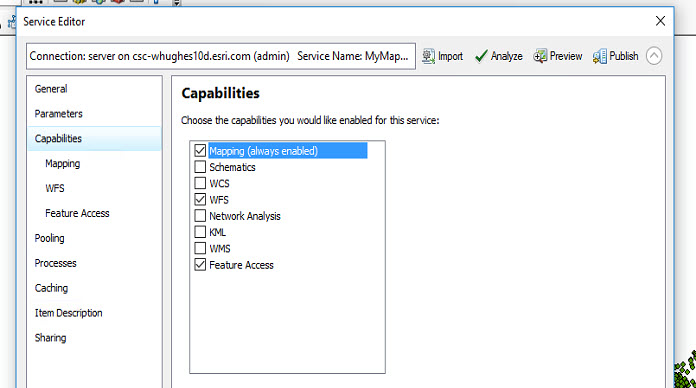
If you are working with an existing service, you can use ArcGIS Server Manager to ensure you have the appropriate capabilities enabled on the service.

Select and configure capabilities page of published service from within ArcGIS ServerSelect and configure capabilities page of published service from within ArcGIS Server

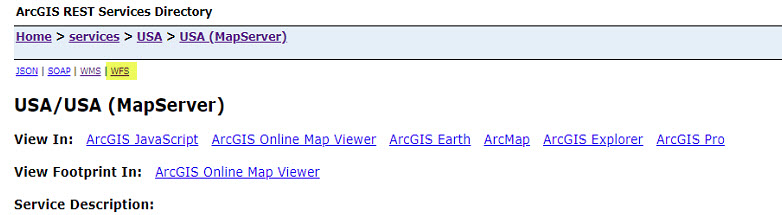
Once the service is finished publishing the service should be shared with Everyone if your ArcGIS environment is a federated ArcGIS Enterprise deployment. Otherwise, continuing with the workflow below might not work as expected. In the ArcGIS REST Services Directory, browse to the endpoint for the published service and click the WFS link, which then performs a GetCapabilities of the WFS service:


Results from WFS getCapabilities request.

Okay, so far so good, but you will need to work with the features of the WFS service which requires sending the GetFeature request query parameter. To accomplish this, you need to know the name of the feature element. You can use the DescribeFeatureType parameter that describes the field information about one or more features from the WFS service. In this case, you are working with Cities which is returned from this request.


The request resembles:


URL example for DescribeFeatureType

And returns the following XML information:

Results from WFS Describe Feature Type request.

For additional assistance on this and other parameters, see Communicating with a WFS service in a web browser. Now that you have all of the parameters for the WFS services, you can go ahead and request those features.

Your request will look something like:

URL example for getFeature

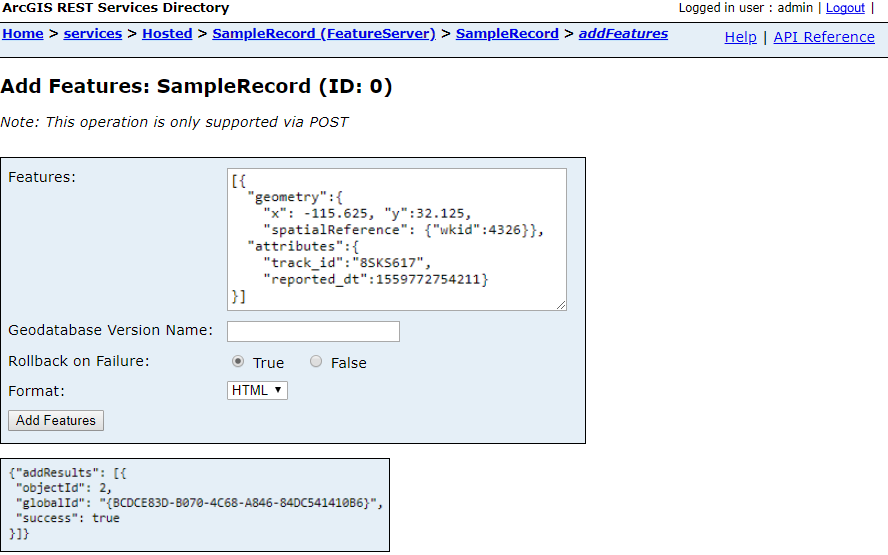
And the features returned will look like the following:

One entire feature returned from the WFS getFeatures request for Cities.

The above illustration shows one feature from the GetFeature request. Depending on how many features your service contains, the request might take anywhere from a few seconds to several minutes, the request may also flash a blob of unformatted text in the browser. Be patient and wait for the GetFeature request to perform its magic, all features will be returned as formatted XML. The sample data used here contains 3,159 cities within the USA dataset, this information is returned as part of the GetFeature request within the first XML element. Although it is not displayed here, just look for the XML attribute numberReturned="3159". Note that, since the XML data structure for the WFS service also contains GML data, there is the ever important X and Y location information listed under the <gml:pos> attribute, So, enough about WFS services, let’s get to the fun that is GeoEvent Server...

Working with XML namespaces in GeoEvent Server

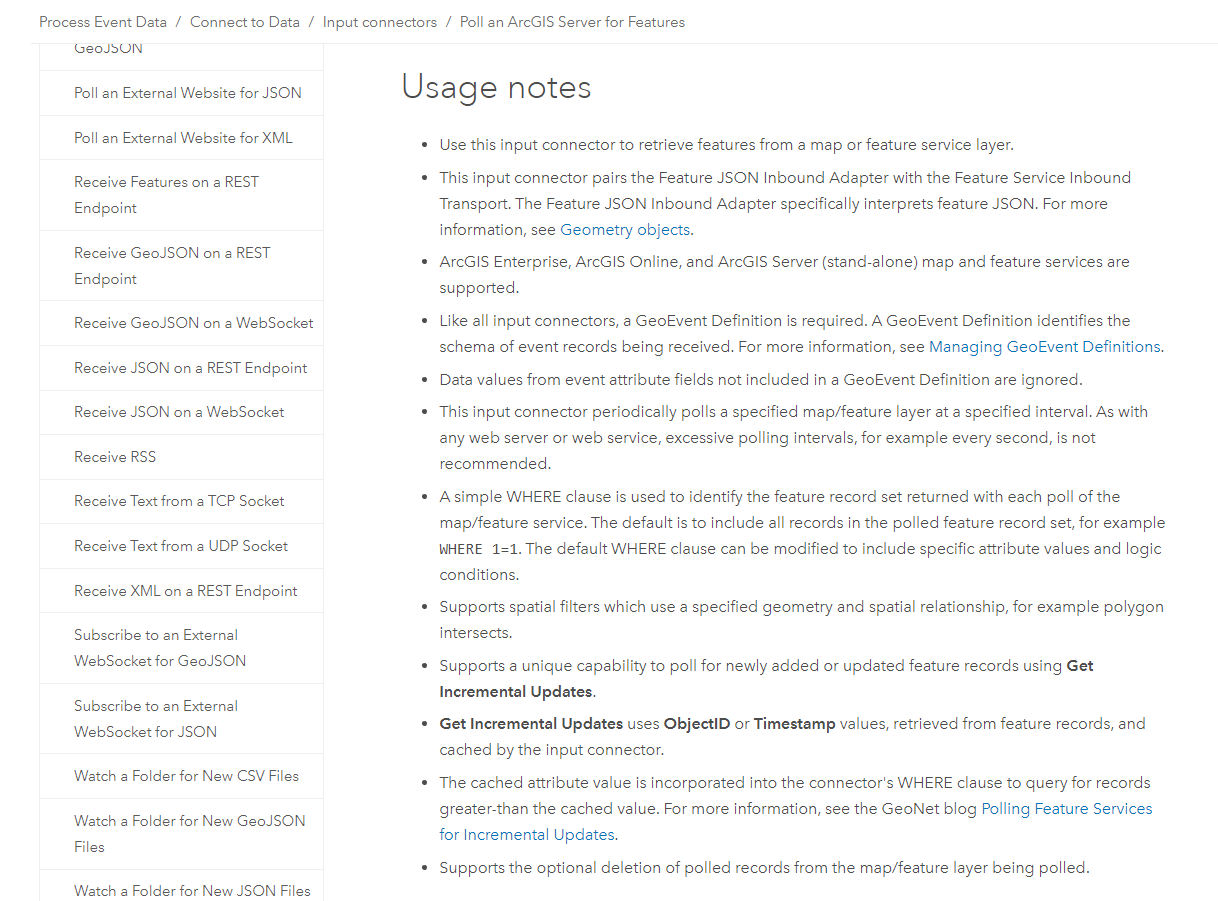
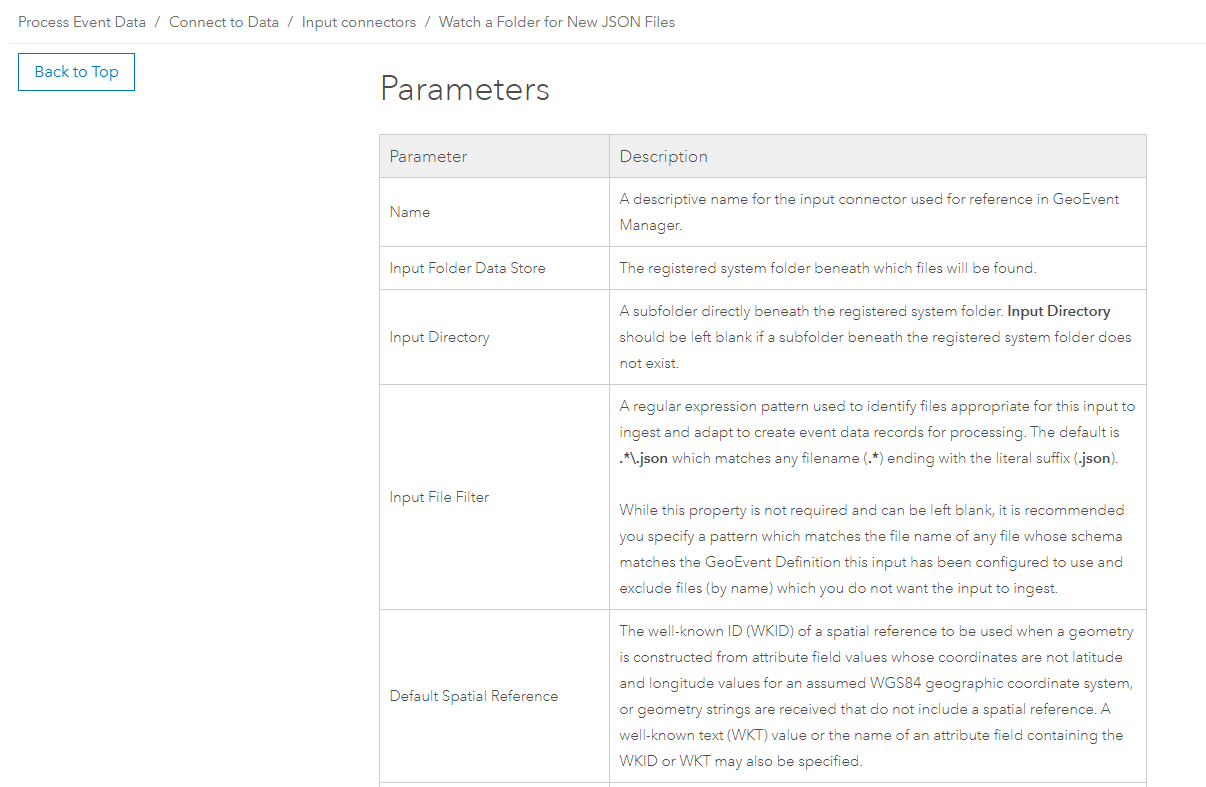
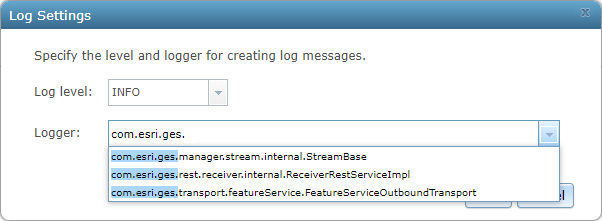
The XML/GML namespace and hierarchy found in a WFS service can get in the way when using default values to configure a new “Poll an External Website for XML” Input Connector in GeoEvent server. For example, if the above GetFeatures URL for the WFS service query parameter is specified, leave the XML Object Name unspecified, and allow GeoEvent Server to auto-generate a GeoEvent Definition for us, below is the resulting GeoEvent Definition that is created:

Auto-generated GeoEvent Definition from the WFS service getFeatures request.

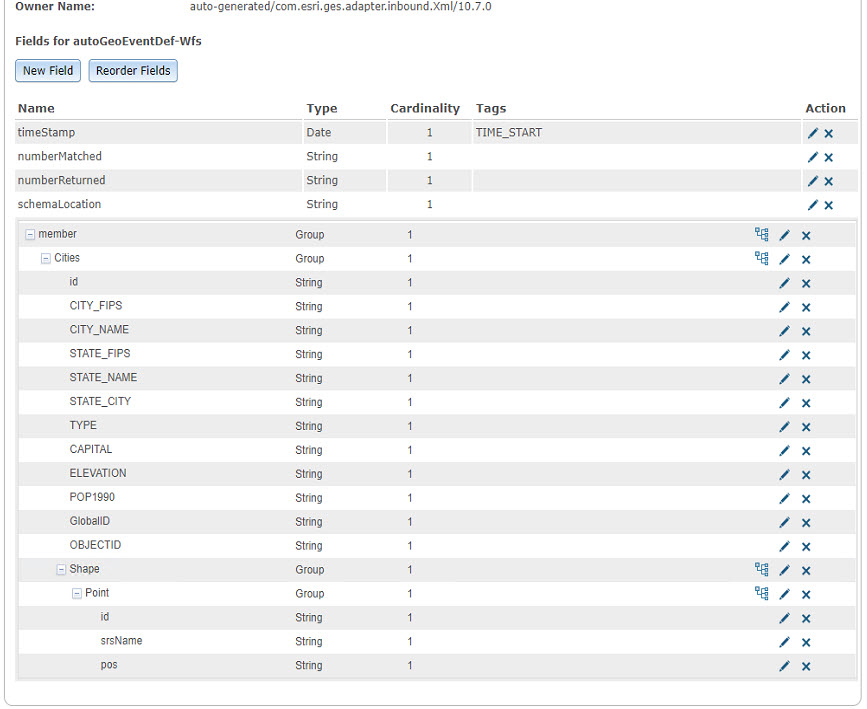
If we compare the GetFeatures request to the GeoEvent Definition they match up perfectly at first glance. However, notice that all the namespaces have been stripped of the attribute names. Upon further observation there is no need for the “metadata” above each “member” attribute (e.g. numberMatchednumberReturned, etc.) Also, we know that each “member” should be processed as a separate event record and therefore, a value for the input connector’s XML Object Name needs to be specified somehow. Looking back at the screenshot above of the GetFeatures request and the GeoEvent Definition, the logical choice in this workflow would be to use the wfs:member to tell the input connector to look in that list for individual event records.

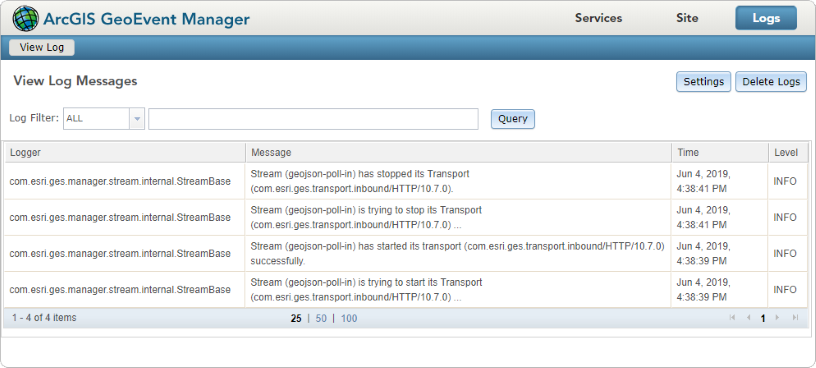
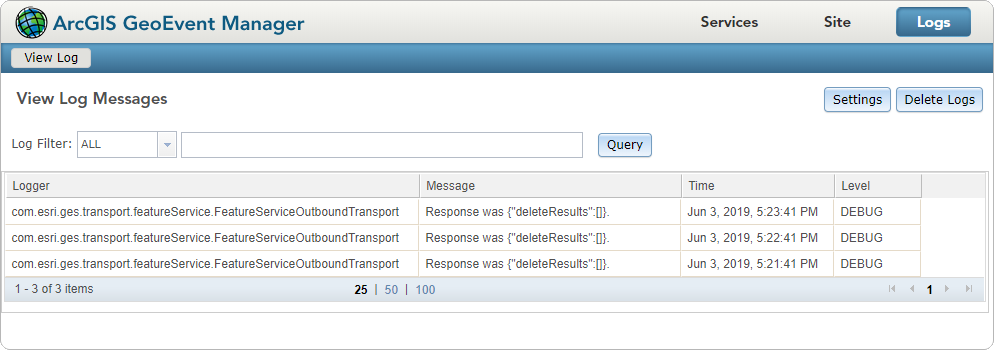
By doing so, whereby the wfs:member is entered as the input connector’s XML Object Name, the event count for the input connector does not increment. Even if the modified input connector attempts to create a new auto-generated GeoEvent Definition with XML Object name specified the count does not increment. Further, if you stop the input, update the properties again, save the input and then restart the input, an ERROR is logged from the com.esri.ges.adapter.xml.XmlInboundAdapter indicating us that it is Unable to parse input '' into spatial reference. This, is, more than likely, where the GML/XML namespaces are getting in the way.

There are two paths the GeoEvent Definition can take from here. If you are lucky, you might find your XML data structure is such that it does not contain a double nested hierarchy like the one above. In this instance the existing GeoEvent Definition can be modified to include the XML namespaces and then you can carry on. However, with a WFS service, manually creating the GeoEvent Definition is necessary. To do so, you will need to specify USA_USA:Cities as a "Group" element, specifically calling out each attribute and element beneath that group (pre-fixing the namespace designation) while taking care to also map the nested hierarchy for the shape element too, Once you create a GeoEvent Definition with these changes applied, you should be able to successfully ingest event data into GeoEvent Server.

Below is the GeoEvent Definition created to include attributes and the corresponding XML namespace. Take note of the USA_USA:Shape group, with its nested element gml:Point, which is also a group and contains an element gml:pos. Also notice that the feature dataTypes can be specified in the GeoEvent Definition, which can be obtained from the WFS Describe Feature Type results.

GeoEvent Definition with namespace on left side and Wfs GetFeatures

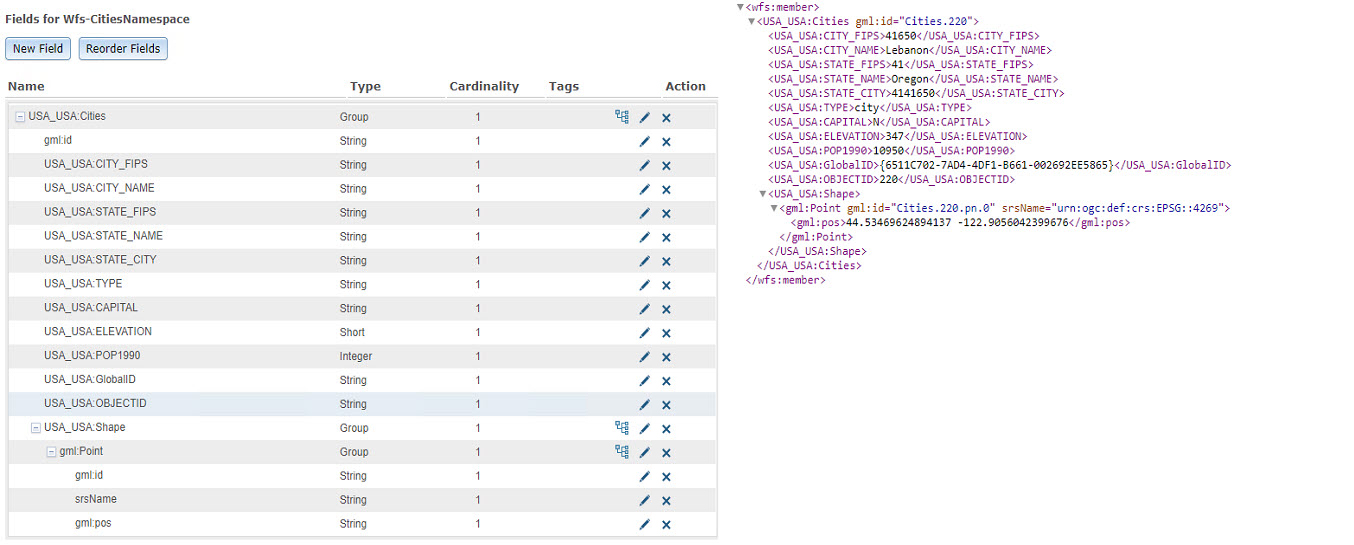
You may be thinking the namespace for this cities feature looks a little strange, let me explain. When this data was published to ArcGIS Server it was placed in a folder named "USA". So, just like the folder name is reflected in the REST URL it is also added to the XML namespace as USA_USA.

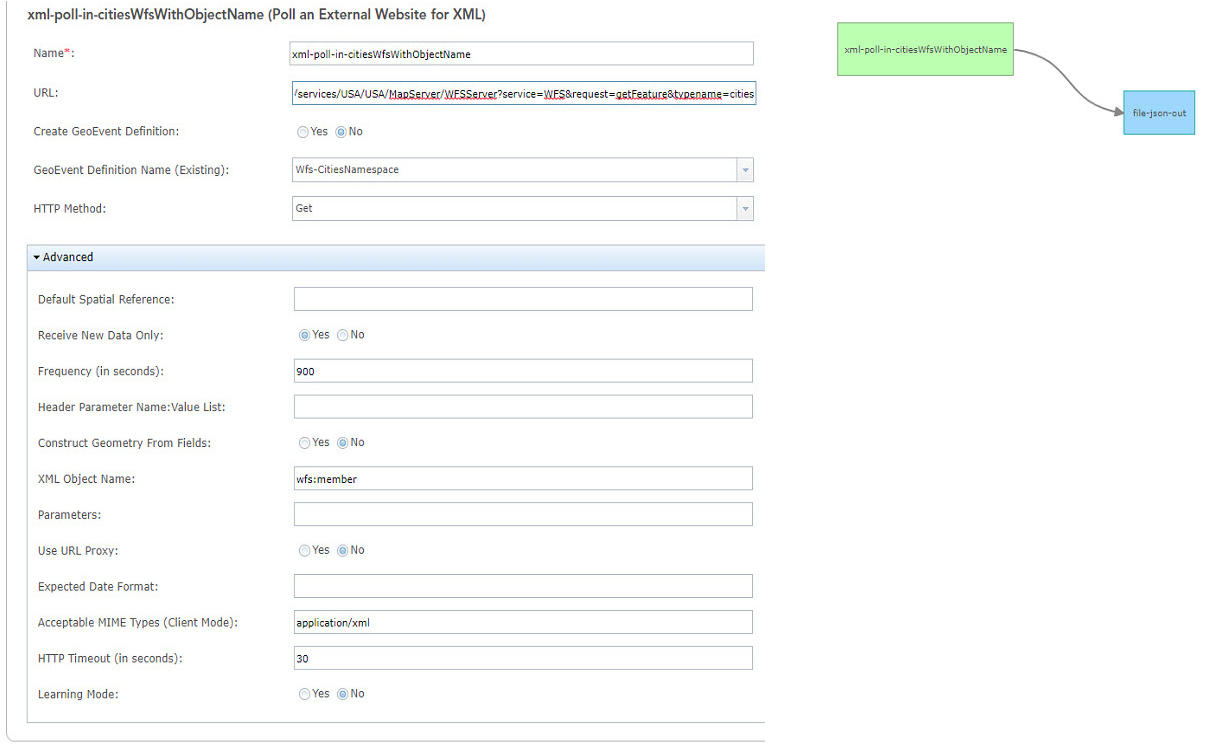
Below is the configured “Poll an External Website for XML” Input connector along with an initial GeoEvent Service.

On the left is The configured “Poll an External Website for XML” inbound connector and on the right is The start of the GeoEvent Service.

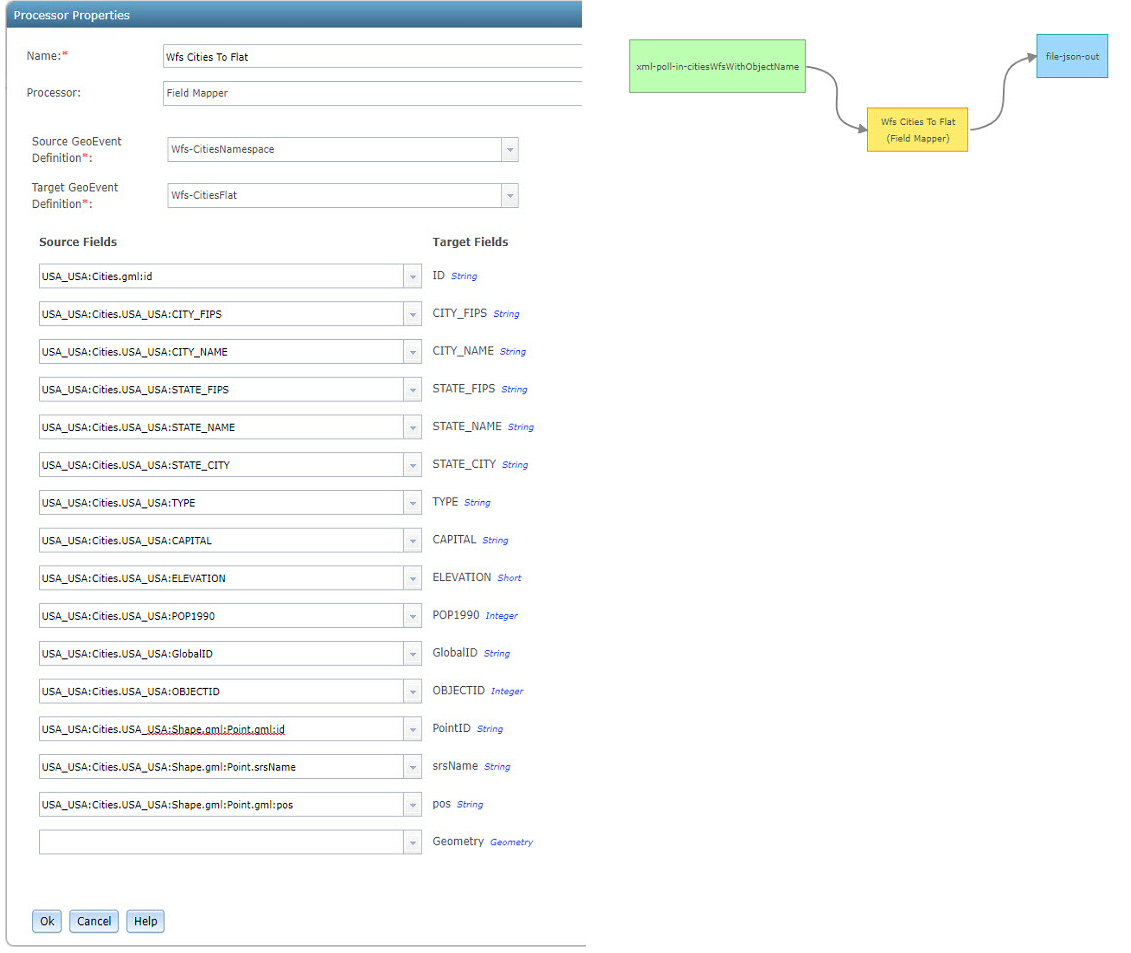
As a best practice, GeoEvent Definitions should be a flat representation of the data being ingested. Therefore, it is recommended you re-map those ingested event records. This magic is possible by using the Field Mapper Processor. To start, you will need to create an additional GeoEvent Definition without any of the group elements or namespaces as the new schema to which you want to map the received data. In addition to flattening the structure, this provides you an opportunity to rename all the attribute fields if you choose, I did not in this case. You will, however, want to remove the ":" and the unnecessary XML namespace pre-fixes, which in the example above is USA_USA and gml. The ":" will cause problems later in your GeoEvent Service if you do not remove them. Go ahead and create the flat definition at this point.

With the flat GeoEvent Definition created, you should now have the auto-generated GeoEvent Definition from the XML data structure of the WFS service, which was modified to include the attributes and XML namespaces. In addition, you should also have a second GeoEvent Definition that is flat and includes a Geometry field and structure illustrated below.

On the left is The Field Mapper processor and on the right is The GeoEvent Service that includes the Field Mapper processor.

If you are wondering how we are going to get the Latitude and Longitude from that pos string field, read on.

Working with Geometry

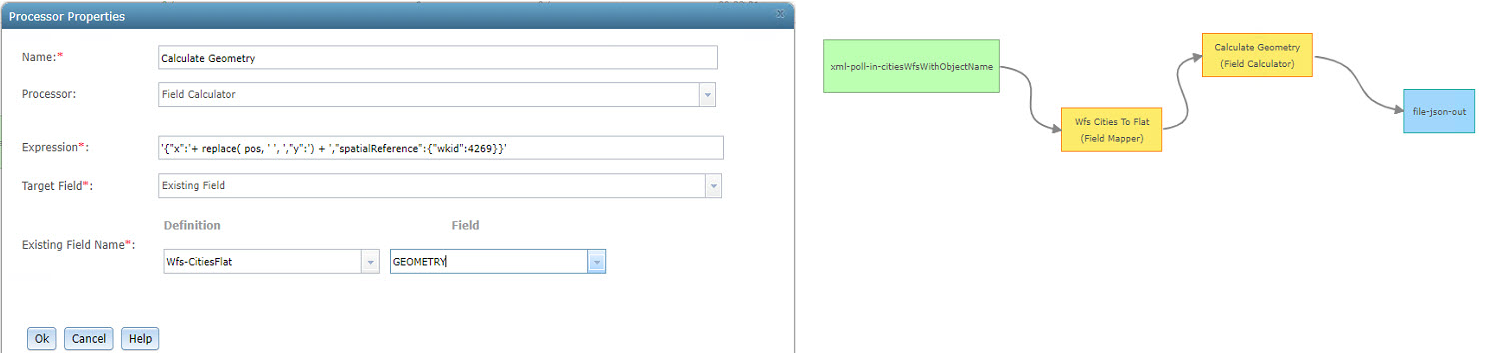
The finish line is close, we just have one more thing to address, but the coordinates in the pos attribute string field need to be converted into a point geometry. The key to this conversion is to recognize that pos is actually a single string containing two coordinate values separated by a space. In this case, the Field Calculator Processor can be used with the expression '{"x":'+ replace( pos, ' ', ',"y":') + ',"spatialReference":{"wkid":4269}}' to convert this string into a JSON string representation of an Esri point feature.

The above expression targets the literal space between the first coordinate and the second coordinate and replaces it with the literal string:, "y":. The expression also prepends the literal string {"x": and appends the literal string, "spatialReference":{"wkid":4269}} which completes the geometry string with a spatial reference. Remember, the spatialReference can be found in the srsName attribute field.

Now, let’s explore how this would look in a configured Field Calculator Processor along with the completed GeoEvent Service.

On the left is the The Field Calculator processor and on the right The final GeoEvent Service showing the Field Mapper and Field Calculator processors.

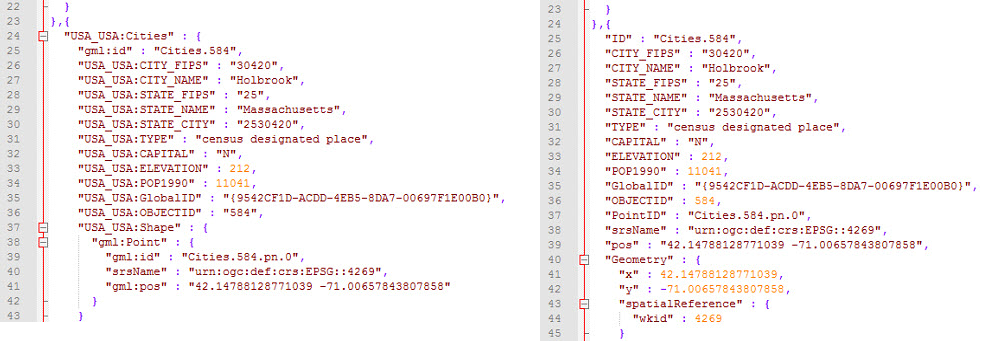
So far, the GeoEvent Service has been writing out to JSON files, to bring this full circle let’s compare the JSON output from the auto-generated GeoEvent Definition to the JSON file after the Field Mapper and Field Calculator Processors have processed the manually created GeoEvent Definition.

On the left is The JSON output from the auto-generated GeoEvent Definition and on the right is The JSON output from the manually created GeoEvent Definition and both processors.

Conclusion and References

I hope the information presented above is useful and provides insight into working with WFS services in GeoEvent Server.

As you may have noticed, a lot of the work was related to XML data structures. An additional resource I find useful when working with XML data is the free program, Microsoft - XML Notepad 2007. For help with regular expressions try regex101.

You can read more about creating JSON string representations for Esri feature geometry in the How to switch positions on coordinates GeoNet post. There’s also a slightly different approach discussed in the Appendix of the Introduction to GeoEvent Server however you would have to slice the two coordinate values out of the string and save them as separate attribute values to use that approach.

I cannot finish this Blog without also mentioning another great Blog written by RJ, JSON Data Structures - Working with Hierarchy and Multicardinality. His discussion on hierarchy ties in nicely with the XML Data Structure.

more
4 6 3,512
EricIronside
Esri Regular Contributor

CAUTION: Not compatible with ArcGIS GeoEvent Server 10.8.1 (an update is pending)

Cartegraph provides an operations management system that allows governments to manage assets, maintain infrastructure, and track resources.  It is common to integrate Cartegraph with GIS to provide a spatial aspect to all those capabilities.  Recently, I developed a Cartegraph Connector for GeoEvent Server that would allow GeoEvent to write events out to the Cartegraph OMS to track labor and equipment resources against specific tasks. This post provides the components and instructions for deploying this Connector.

This connector was designed to allow GeoEvent to provide updates for both labor and equipment that are operating on specific tasks within the Cartegraph system.  The underlying assumptions for this connector are as follows:

  1. AVL Data Feed - Labor and/or equipment identification is provided in the incoming data feed. This may be a Vehicle Tracking feed that contains an equipment’s
    • GPS Location
    • The ID of the equipment (such as a VIN)
    • And/or the ID of the equipment operator (labor)
  2. Shared IDs - The IDs provided by the AVL Data feed are shared by the Cartegraph system. If they are not shared, the IDs can be translated or looked up in GeoEvent using a Field Enricher.
  3. Spatially Defined Cartegraph Assets – The GEoEvent Server will have access to an Esri Feature Service that provides the location and details for the Cartegraph Assets that need to be cross-referenced with the equipment and labor above.
    • Each Task feature will contain an AssetID that identifies the Cartegraph asset (such as a roadway).
    • GeoEvent will use this AssetID to create a Task in the Cartegraph system and assign the equipment and/or the labor to that task.

When an equipment and/or labor location event is sent to GeoEvent, it will GeoTag that event with an AssetID by intersecting the GPS location with the Cartegraph Asset Features. The resulting GeoTag will indicate which Asset(s) the equipment/labor is currently active in. The resulting event containing equipment, labor, and asset information is sent to the Cartegraph system as a Task.  The name of the task is defined in the GeoEvent Output and can represent any sort of operation that currently exists in the Cartegraph system, such as “Snow Plowing” or “Mowing”.

Finally, the output will maintain a state of the task and will update the information for that task according to the lifetime of the task. At the completion of a task, a Cartegraph log will be created to track the equipment and labor work done on the asset for that task.

  • If the equipment location is entering the asset’s area for the first time, a new task will be created.
  • If the equipment location was previously in the asset’s area, an existing task will be updated.
  • If the equipment location leaves an asset’s area, the existing task will be closed and a log item will be created for the equipment and/or labor.

Detailed Instructions for installing this connector can be found in the zip file attached to this post.

more
0 0 732
EricIronside
Esri Regular Contributor

I often get questions about the settings for the Feature Service Field Enricher. Specifically the cache options availble with that processor. Below is a discussion of the properties and how various settings may affect your processor.

Cache Operation

When an event record is received by the processor, the processor checks its cache to see if it has a feature record matching the event record’s TRACK_ID (or primary key). If so, and if that feature record is not old/expired, then the enrichment is performed using the cached value.

If no such feature record exists in the cache, or the existing cache item is old/expired, then the processor makes a focused query to obtain just that one feature record from the feature service. Each cached item maintains its own expiration time. An item in the cache is either:

  1. Retrieved as is  because an event needs the data and the cached item has not expired.
  2. Refreshed via the feature service because an event needs the data but the cached item has expired.
  3. Removed from the cache because the cache size has exceeded its limit and the cached item is expired.

In cases #1 & #2, the cached item is promoted to the top of the cache queue (regardless of expiration time or whether the item was fetched from the feature service or not).  In case #3 above, the cache queue is pruned from the bottom (so records that haven't been used to enrich an event recently are removed first).

Cache Memory Management

From a memory management perspective the processor is loading feature records on-demand rather than batch-loading a bunch of records into memory “just in case they are needed”. It also avoids a nasty problem of trying to decide which records to load when a cache size is smaller than the total number of records in the feature service (for example, when the default cache size of 1,000 is used, but there are tens of thousands of feature records in the feature service).  There are three downsides to this approach: initialization, short cache expiration times, and large enrichment pools. Initializing the cache can be expensive because, on startup, each event causes a call to the feature service. But once the cache is loaded, the processor will operate very quickly.  Situations where the cache item expiration time is small/short (when the data being enriched changes often/quickly) the cache must reach out to the feature service as each item expires.  If you find you are in this situation, you should factor this knowledge into your performance expectations (for example: on my test machine, a request to a feature service took on average around 100 ms). The final situation will occur when the cache size is too small. If you have a large set of data from which to enrich from, you should increase your cache size while monitoring your memory usage.

Disabling the Cache?

As mentioned above, I've seen situations where the enriched data needs to be read in from the feature service every time (regardless of the performance penalty).  The underlying enriched data is changing just as frequently as the event data running through the GeoEvent Service.  In this case, you cannot set the cache expiration to anything less than 1 minute (0.5 wont work, and 0 causes the cache to never expire). But you can set the cache size to 1. Assuming your events are all mixed up (e.g. the TRACK_ID is not the same for two successive events) then the cache will never hold the right value and the processor will have to fetch from the feature service every time.

Field Enricher Cache Notes:

  • Cache expiration time (in minutes) is:
    • Stored and consumed as an Integer value.
      • So 0.5  (30 seconds) is not a valid value.
    • It can be set to 0:
      • data never expires.
      • Once an item is read in, it will not be refreshed
      • To reset the cache, you can restart or re-publish your GeoEvent Service.
  • Each cache item (values, expire time) is maintained separately
    • If a value is not found or found to have expired, it is queried for directly from the feature service ("where <uniqueID>=<value>")
    • When a new value is retrieved it is assigned its own expire time (now()+x minutes)
  • The cache size can be any integer value > 0
    • Setting the value to 0 will result in a default value of 1.
    • Setting the cache size to something small (like 1) would force cache updates potentially faster than 1 minute
      • Assuming your stream of events don't have the same TRACK_ID, then each new event will have to be fetched from the feature service.
      • If your enrichment data changes very often, then this can be a valid strategy to use to force the enricher to get new data every time.
      • This will impact performance so you should test to be sure how much of an impact it will be in your case.
    • When the cache size exceeds the max cache size, the least used records are pruned from the list.
      • The expiration time of a record has nothing to do with cache pruning.
      • Each time a record is used to enrich an event, it is promoted to the top of the queue.
      • Records that are not used to enrich an event fall to the bottom of the list.
      • The records at the bottom of the list are pruned first.

more
2 1 1,260
128 Subscribers