Turn on suggestions
Auto-suggest helps you quickly narrow down your search results by suggesting possible matches as you type.
Cancel
- Home
- :
- All Communities
- :
- Products
- :
- ArcGIS Enterprise
- :
- ArcGIS Enterprise Portal Questions
- :
- Re: Map book, data driven pages for a polyline: Gr...
Options
- Subscribe to RSS Feed
- Mark Topic as New
- Mark Topic as Read
- Float this Topic for Current User
- Bookmark
- Subscribe
- Mute
- Printer Friendly Page
Map book, data driven pages for a polyline: Grid Index vs Strip Map??
Subscribe
19523
12
04-26-2011 10:41 AM
04-26-2011
10:41 AM
- Mark as New
- Bookmark
- Subscribe
- Mute
- Subscribe to RSS Feed
- Permalink
I need some help in creating a map book. My project area is a pipeline that curves, turns, and has extensions coming off it, sometimes relatively parallel to major line. I've tried using the grid index and the strip map index tools to designate/reference my pipeline and have found pros and cons to both, but neither tool functions the way I need it to.
The strip map index follows the pipeline, but the polygons created are angled. If I were to put this together as a map book, I'd have a lot of overlapping that is not desired. The grid index doesn't provide a "best fit" to my line and yields extra polygons. I know I can move and delete the polygons for a better fit to my line, but then I can't Calculate Adjacent Fields, etc. because now that I have moved the polygons, they don't neatly line up (plus the page name/number no longer follows any logical manner).
I've been trying to learn this process from the example in the Help menu, but my project area is so much different, it's been frustrating trying to adapt it to my needs. Another issue is that I'm working in a State Plane coordinate system and the Help example uses UTM. It also requires a "Calculate UTM Zone" tool which is used in the Data Driven Pages as a Spatial Reference.
Basically, I need to create a map book with an index layer that follows along the pipeline, much like the grid index, but with a "best fit" to my line. And it needs a spatial reference.
Up until now, I've been setting up bookmarks and manually adding match lines. I'd pdf each bookmark separately (sometimes 80+ bookmarks/pdf'd maps) and change the map number as needed. I would really like to be able to use this new functionality in ArcMap 10 (dynamic text included).
It doesn't seem that it should be as complicated as I'm finding it to be. Any help would be greatly appreciated.
12 Replies
by
Anonymous User
Not applicable
05-12-2011
08:24 AM
- Mark as New
- Bookmark
- Subscribe
- Mute
- Subscribe to RSS Feed
- Permalink
Would it be feasible for you to create a new polygon feature class, draw polygons around each portion of pipe, and use that new feature class as your DDP index layer?
If not, would you please include some screen shots to illustrate the problem?
If not, would you please include some screen shots to illustrate the problem?
10-17-2012
09:31 AM
- Mark as New
- Bookmark
- Subscribe
- Mute
- Subscribe to RSS Feed
- Permalink
So I thought that I would reply to my own post after seeing so many people have checked it out.
I use Grid Index Features/Data Driven Pages all the time now and choose the desired shapefile for it to be drawn around (line or polygon). I do have to move the grid around to get a "best fit" to my pipeline, but the process isn't very painful (just double click box to bring up vertices/select all vertices/snap to adjacent grid box). I never use "Calculate adjacent field" and never really looked into it. I have gotten Data Driven Pages to do what I need it too and also love dynamic text! So much easier!!
I'll try to answer any questions on the subject. Ask away.
05-15-2013
08:25 AM
- Mark as New
- Bookmark
- Subscribe
- Mute
- Subscribe to RSS Feed
- Permalink
How have you implemented match lines? Do they appear at the same location on each page?
05-15-2013
09:55 AM
- Mark as New
- Bookmark
- Subscribe
- Mute
- Subscribe to RSS Feed
- Permalink
Do you want all your map pages to be at the same scale?
You can create your base polygon to be used in the correct size.
Draw it around the beginning of your map book. Then simply copy and paste the polygon going down the pipeline and snap it to the previous polygon.
If you know the schema in which you wish to name the map pages and it follows a logical sequential order then it is somewhat important to follow the pipeline from begging of the book to the end.
It will give the polygons sequential objectid's which could potentially be used for a variety of field calculations.
Say for your first page is 001 and your second is 002. You could use object id to populate the map page field.
Then if they are sequential you can populate an attribute with the page before and the page after. Or page to the east, west, north or south.
You only have 80 pages so even if you had to manually put in the page in a given direction it won't take that long.
Then instead of relying on the function to tell you which page is in a given direction you can use a data driven label to read from a a given attribute that designates as such.
We did this for transmission lines that span 400 miles. It was more important for us to have the map pages represent the same scale and then travel the entire length of the line and always keep north to the north. Sometimes the line would enter the page in the NW corner, sometime the middle of the west etc...it never seems to go straight for terribly long.
05-15-2013
10:04 AM
- Mark as New
- Bookmark
- Subscribe
- Mute
- Subscribe to RSS Feed
- Permalink
Jim,
I haven't used match lines since I started using data driven pages and the grid index tool. It really isn't necessary to and was very time consuming with the way I was doing it. With the grind index tool (toolbox > cartography > data driven pages > grid index features), polygons are made based on size inputs that you specify within the tool. For me, I set the size based on extent of the map and data frame size when in layout view. To figure this out, bring up the data frame properties dialog box, go to the size and position tab, and under "size" you will see the width and height of your data frame that exists on a page. If you have an 8.5 x 11 layout, the size of your data frame will be different than if you are working in an 11 x 17 layout. Basically, it's the size of your data frame in page units (inches).
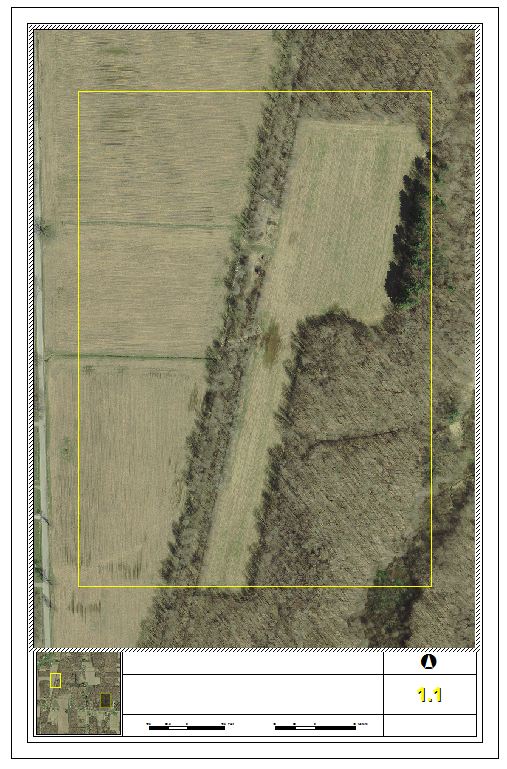
So once your grid is made, you have several choices of how to display it. I put an inset into the corner of my map, zoom to the extent of the grid index, and with the help of "Definition query" I highlight (for lack of a better word) the page that the person is looking at while the other pages are grayed out (still seen, but, in a sense, transparent). I've included an attachment so you can see what I mean.
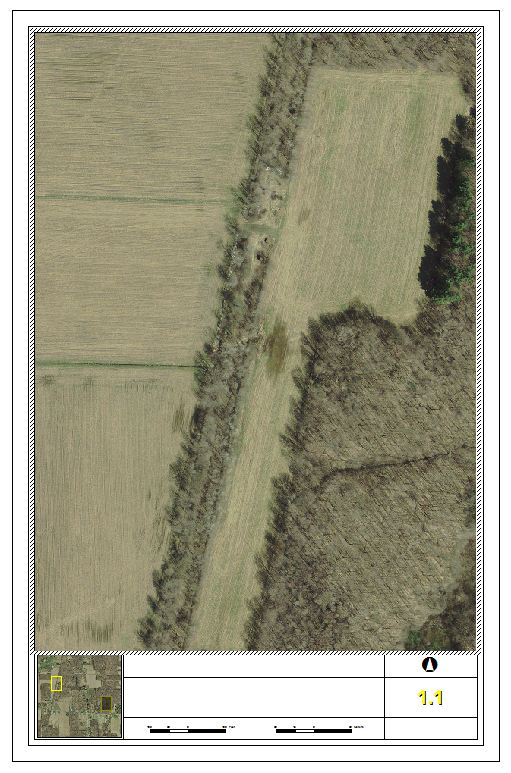
Alternatively, you could display the grid index on your map so you can see the bounding lines of the grid (example 2 attached). This one is zoomed out a bit more than the first one, but that's a function that you can set within the "map extent/best fit" within the "setup data driven pages" dialog box.
This may seem like a lot of work to do each time you want to make a map book, but I have templates saved so my width/height is always the same (exceptions between 8.5 x 11 and 11 x 17 layouts). Also, I've used model builder to make a few models that create the grid, assign the size and extent, and even symbolize it for me. I only have 2 inputs, click ok, and my grid is done in seconds.
Let me know if you have any other questions.
Danielle
I haven't used match lines since I started using data driven pages and the grid index tool. It really isn't necessary to and was very time consuming with the way I was doing it. With the grind index tool (toolbox > cartography > data driven pages > grid index features), polygons are made based on size inputs that you specify within the tool. For me, I set the size based on extent of the map and data frame size when in layout view. To figure this out, bring up the data frame properties dialog box, go to the size and position tab, and under "size" you will see the width and height of your data frame that exists on a page. If you have an 8.5 x 11 layout, the size of your data frame will be different than if you are working in an 11 x 17 layout. Basically, it's the size of your data frame in page units (inches).
So once your grid is made, you have several choices of how to display it. I put an inset into the corner of my map, zoom to the extent of the grid index, and with the help of "Definition query" I highlight (for lack of a better word) the page that the person is looking at while the other pages are grayed out (still seen, but, in a sense, transparent). I've included an attachment so you can see what I mean.
Alternatively, you could display the grid index on your map so you can see the bounding lines of the grid (example 2 attached). This one is zoomed out a bit more than the first one, but that's a function that you can set within the "map extent/best fit" within the "setup data driven pages" dialog box.
This may seem like a lot of work to do each time you want to make a map book, but I have templates saved so my width/height is always the same (exceptions between 8.5 x 11 and 11 x 17 layouts). Also, I've used model builder to make a few models that create the grid, assign the size and extent, and even symbolize it for me. I only have 2 inputs, click ok, and my grid is done in seconds.
Let me know if you have any other questions.
Danielle
05-15-2013
10:54 AM
- Mark as New
- Bookmark
- Subscribe
- Mute
- Subscribe to RSS Feed
- Permalink
Robert and Danielle,
I follow what you're saying, Danielle, but I am mapping a very linear route (pipelines). And the end-user will be using the maps in the field, and he finds the match lines particularly helpful.
And Robert, this is what I have done for other projects. That is, I inserted the index rectangles manually and copy-and-pasted them down the line. I never really had cause to use match lines, however, and so it didn't matter how the alignment came into each page from the north, east, west, etc.
However, I need to re-orient the alignment in a (generally) west-to-east direction for each page, using a north arrow which rotates dynamically with each page. That said, I still need the match lines to appear on each page and at the same distance from the edge of the data frame border each time - and still be serving as true match lines, crossing the alignment in the same location.
I have a PDF sample that shows this being done (over 32 pages), but I have not yet been able to figure out how to implement the match line portion. From the sample, it is evident that the author created the lines in layout view - but somehow, the lines work for every page.
Jim
05-15-2013
11:52 AM
- Mark as New
- Bookmark
- Subscribe
- Mute
- Subscribe to RSS Feed
- Permalink
I have not used matchlines as they are considered in cartography.
What we simply have done is to make the map sheets visible from adjoining and adjacent map sheets and just had them as hollow with a border.
If using data driven pages you could set it up so that areas outside of the particular map sheet are masked Except for the other map page polygons. Or you could convert your map polygons to polylines and do the same.
But you set up your data driven pages to have say 105% extra.
The first attachment is a sample of what it looks like. Now the map pages I used here are all actually townships so there is no rotation.
The following 4 attachments show
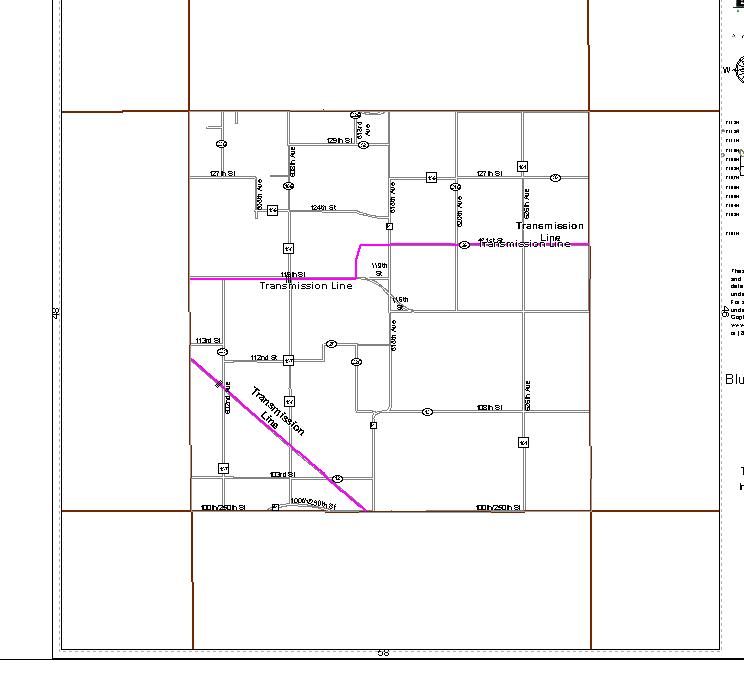
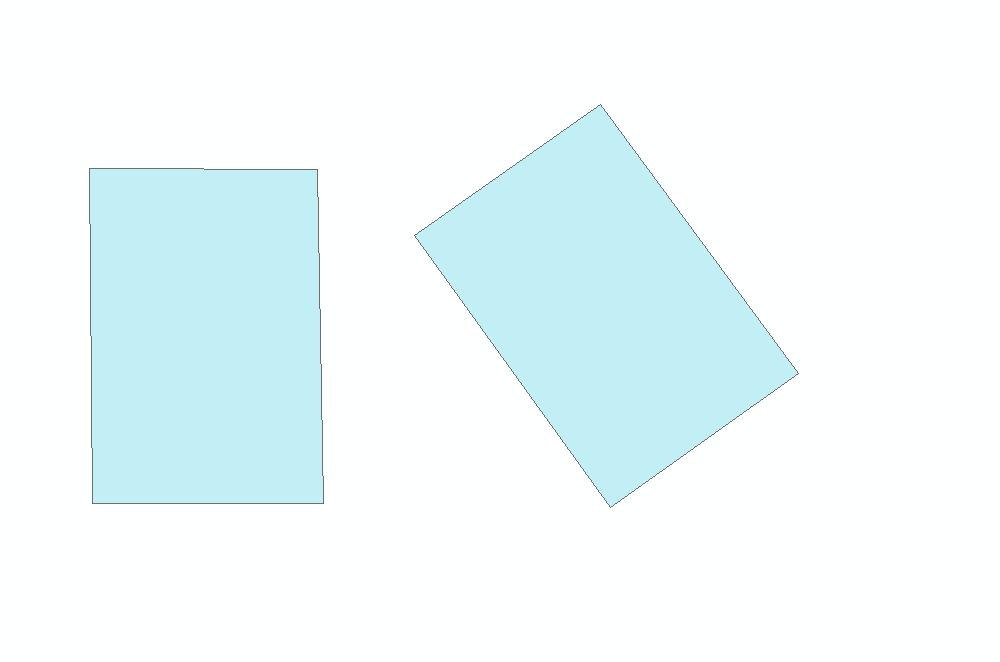
Map1 the two polygons I start with as map pages. Sorry I didn't make them over lap for the matchline purpose.
Observe they are at different angles. The one on the right is page 1
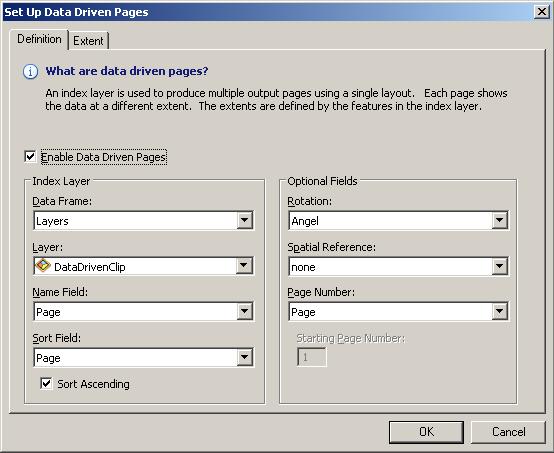
Map 2 Shows setting up the data driven pages to have rotation. Sorry I misspelled Angle
Map 3 shows the Angle I put in to rotate that map. The angle I put in for page one is 234
Map 4 shows what Page 1 looks like in the layout view with it rotated.
Now put in your always facing north, north arrow.
This should help you achieve the desired result.
There is a measurement tool in there that will more precisely tell you the angle so you can have it perfectly rotated so it is at right angles in the layout.
What we simply have done is to make the map sheets visible from adjoining and adjacent map sheets and just had them as hollow with a border.
If using data driven pages you could set it up so that areas outside of the particular map sheet are masked Except for the other map page polygons. Or you could convert your map polygons to polylines and do the same.
But you set up your data driven pages to have say 105% extra.
The first attachment is a sample of what it looks like. Now the map pages I used here are all actually townships so there is no rotation.
The following 4 attachments show
Map1 the two polygons I start with as map pages. Sorry I didn't make them over lap for the matchline purpose.
Observe they are at different angles. The one on the right is page 1
Map 2 Shows setting up the data driven pages to have rotation. Sorry I misspelled Angle
Map 3 shows the Angle I put in to rotate that map. The angle I put in for page one is 234
Map 4 shows what Page 1 looks like in the layout view with it rotated.
Now put in your always facing north, north arrow.
This should help you achieve the desired result.
There is a measurement tool in there that will more precisely tell you the angle so you can have it perfectly rotated so it is at right angles in the layout.
05-16-2013
04:26 AM
- Mark as New
- Bookmark
- Subscribe
- Mute
- Subscribe to RSS Feed
- Permalink
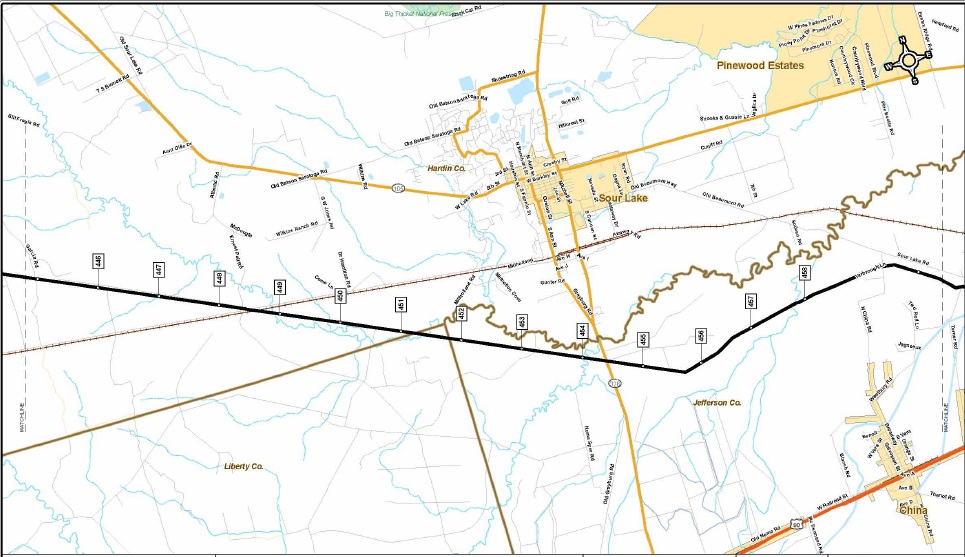
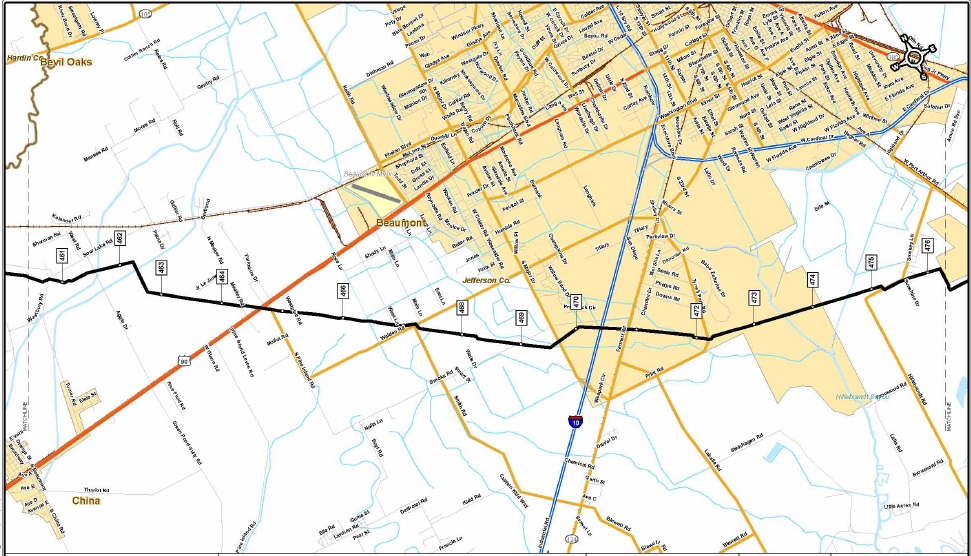
Just for clarity, I have attached three pages from the sample PDF. These images were clipped to the border of the data frame (no need to show the marginalia). They go in order: Page_1, Page_2, Page_3.
Note how the north arrow changes as the page re-orients itself. But the match lines never move, and always remain vertical. And, most importantly, they serve as real match lines, crossing the alignment in the same location on each page.
Note also that Page_3 (which is actually the last page in the entire map series) also has a match line on the eastern edge - even though there is no succeeding page. This makes me believe that these lines were created in layout view and 'faked' in (the author leaving both match lines visible, even though this is the last page).
05-17-2013
09:42 AM
- Mark as New
- Bookmark
- Subscribe
- Mute
- Subscribe to RSS Feed
- Permalink
Jim,
I also map pipelines and that does make up a majority of my work. The attachments that I included previously were not pipelines, but it was just to show you how I display the inset with the current page highlighted.
Our field people use my maps in the field and they find it quite easy to follow along, especially with the inset showing which page they are currently on (and no match lines). I always keep north, well, north and never rotate my data frame. I think it makes it easier on the field crew and others reviewing the maps.
As for your match line problem, I'm guessing that you drew your match line (assuming it is a graphic) "on the page" in layout view, instead of "on the world" (I'm sure there's a better way to say this, but that's how I've always described it). With data driven pages enabled, any text or graphic "on the page" will be seen on all pages. Basically with data driven pages, you have one layout/one page and the only thing that changes is the extent of your data frame, with the exception of dynamic text which has become a favorite of mine.
If you want, I can include some attachments if you want to see my pipeline mapping.