- Home
- :
- All Communities
- :
- Products
- :
- ArcGIS Enterprise
- :
- ArcGIS Enterprise Blog
- :
- Creating your own Vagrant Box for testing environm...
Creating your own Vagrant Box for testing environments via VirtualBox
- Subscribe to RSS Feed
- Mark as New
- Mark as Read
- Bookmark
- Subscribe
- Printer Friendly Page
With a previous article connected to Chef Kitchen: https://community.esri.com/people/TNickolai-esristaff/blog/2019/11/18/chef-test-kitchen-for-arcgis-e... we hit on the utilization of VirtualBox/Vagrant to create virtual machines quicker and test deployments via Chef. The key part of this concept is getting your own Vagrant Box to utilize with these tests. The Vagrant Box can be pre-configured with certain tools or content to allow you to have a ready to go deployment of a Virtual system to then test on with our ArcGIS on-premises software. I wanted to put together this article to give you the ability to create your own Vagrant Box following easy steps.
Download/Install Virtual Box and Vagrant:
Virtual Box: https://www.virtualbox.org/wiki/Downloads
Vagrant: https://www.vagrantup.com/downloads.html
-Follow the defaults for the installation/setup.
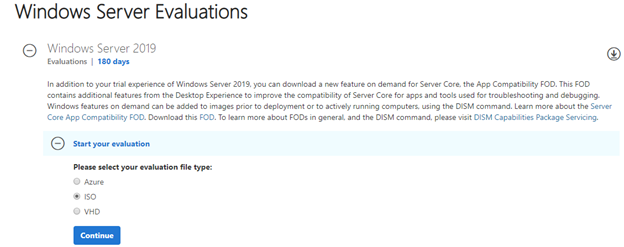
1.) Getting a Windows Microsoft 2019 ISO
- Access https://www.microsoft.com/en-us/evalcenter/evaluate-windows-server-2019
- Windows Server Version you want.
- Select ISO, continue, provide your information, download.
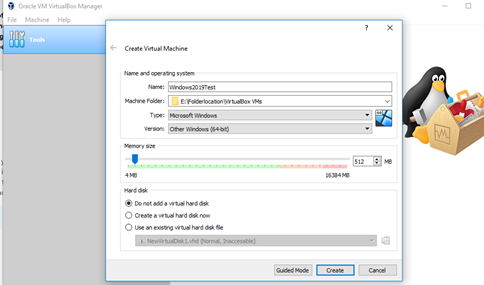
2.) Launch Virtual Box
-Top left of the VirtualBox UI, Machine, New.
- -Provide a Name
- -Provide a Machine Folder (where the machine's VirtualBox configuration will be placed).
- -Version: select Other Windows (64-bit)
- -Memory Size: select a relevant amount (like 5GB). Caution, this RAM is tied to the hosting system. You need to take into account how much RAM your system has before the allocation of RAM to the Virtual Box deployment.
- -Do not add virtual hard disk.
3.) Virtual Box Machine Settings.
-System:
- Make sure the RAM is still set to a proper level
- Click on Processor, update the processor(s) to a proper level (remember we need to be aware of our own systems resources)
-Storage:
- Add Optical Drive (the ISO we downloaded from step 1).
- Add hard disk. Create a Virtual Hard Disk, Select VHD, Fixed Size, provide the location this VHD will be utilizing space from and provide the amount of disk space the VHD will be using.
- We want to make sure this hard disk is large enough to be able to host an Enterprise deployment. 70GB+ should be sufficient. Remember this is a clean deployment without any of the OS installation completed so true space available following our setup with 70GB is going to be about 58GB.

The remaining configurations we can leave as default.
4.) Launch our Virtual Box machine.
- On the home page for VirtualBox, select the machine listed, right-click, Start.
- The Machine will launch and open a new window that will run through the beginning steps of an Operating System install.
- Select the defaults listed. When we hit "Select the operating system you want to install" be sure to select the "Windows Server 2019 Standard Desktop Experience" as this will have the GUI involved.
- Select Custom Install, select your lone drive for the Windows installation, hit next. The system will begin to install the 2019 Windows OS.
- You will need to provide a password to the Administrator username, be sure to make note of this password
5.) Preparing the VB Machine for Vagrant.
- Open Windows Server Manager, Tools, Local Security Policy, Account Policy, disable "Password must meet complexity requirements"
- Add a user called vagrant with the password vagrant. Open Computer Management, Local Users and Groups, Users, right-click and select New User.
- Call the user "vagrant" and password "vagrant".
- Go to Groups, Administrator, add the vagrant user to this group and hit ok.
- At the top of the VirtualBox display, we will see "Devices", click on this and then "Insert Guest Additions CD".
CAUTION: If the version of Guest Additions is 6.0.6, there is a bug that will cause your Virtual System to crash when syncing a folder. Pending on the version of Virtual Box downloaded, you might need to download and "insert" the proper Guest Additions: Index of http://download.virtualbox.org/virtualbox/6.1.6 (Find Guest Additions download).
- Open File Explorer on the Virtual Box system, click on the CD drive, run the "VBoxWindowsAdditions" application, follow the defaults for the install.
- We need to change the security settings for users (we don't want vagrant being prompted when it utilizes winrm to access the system). Control Panel, User Accounts, User Accounts, Change User Account Control Settings, Set the bar to the lowest setting.
- We also can run:
HKEY_LOCAL_MACHINE\Software\Microsoft\Windows\CurrentVersion\Policies\System /v EnableLUA /d 0 /t REG_DWORD /f /reg:64
- Open Command Prompt as Admin. Run the following commands,one at a time, to configure our winrm:
winrm quickconfig -q
winrm set winrm/config/winrs @{MaxMemoryPerShellMB="512"}
winrm set winrm/config @{MaxTimeoutms="1800000"}
winrm set winrm/config/service @{AllowUnencrypted="true"}
winrm set winrm/config/service/auth @{Basic="true"}
sc config WinRM start= auto
- We need to change PowerShell restriction policies so the vagrant commands aren't stopped to accept restrictions. Run the following command in PowerShell:
Set-ExecutionPolicy -ExecutionPolicy Unrestricted
Once prompted, type A and hit enter to accept all changes.
- We need to enable remote access capabilities. Access Control Panel, System and Security, System, Advanced System Settings, Remote, Select the radial for "Allow remote connections to this computer" and disable the checkbox below this radial.
Optional Steps:
Since this will essentially be a server container and remain the same with every deployment, we can take this time to install applications such as Notepad++ or different browsers, change settings, etc.
-You could also upload the installation packages for Esri software and have them ready for use (make sure you do not license the software though as the vagrant packaging process will break the license storage).
6.) Packaging our VirtualBox system for re-use.
- On our local system (desktop/host) we will need to create a Vagrantfile.rb file. Simply open Notepad or Notepad++ and copy/paste the below section:
# -*- mode: ruby -*-
# vi: set ft=ruby :
# All Vagrant configuration is done below. The "2" in Vagrant.configure
# configures the configuration version (we support older styles for
# backwards compatibility). Please don't change it unless you know what
# you're doing.
Vagrant.configure(2) do |config|
config.vm.guest = :windows
config.vm.communicator = "winrm"
config.vm.boot_timeout = 600
config.vm.graceful_halt_timeout = 600
# Create a forwarded port mapping which allows access to a specific port
# within the machine from a port on the host machine. In the example below,
# accessing "localhost:8080" will access port 80 on the guest machine.
#
#config.vm.network "forwarded_port", guest: 80, host: 8080
config.vm.network :forwarded_port, guest: 3389, host: 3389, id: 'rdp', auto_correct: true
#config.vm.network :forwarded_port, guest: 5985, host: 5985, id: "winrm", auto_correct: true
config.vm.provider "virtualbox" do |vb|
#
# Customize the name of VM in VirtualBox manager UI:
vb.name = "Windows2019"
end
end
- This file helps vagrant communicate with the VirtualBox via winrm. Save this file as a .rb.
- We will now package the VirtualBox system into a vagrant box.
- Open PowerShell as admin and run the following command:
vagrant package --base Windows2019 --output E:\boxes\windows2019.box --vagrantfile E:\Vagrantfile.rb
- The PowerShell will begin to package the VirtualBox as a vagrant box. This could take some time, but, once this is completed, we have one final command to run which will box the package:
vagrant box add E:\boxes\windows2019.box --name windows2019
At this point, we have now created a Windows 2019 vagrant box which can now be utilized with Virtual Box via Chef Kitchen and test Enterprise deployments or Desktop deployments: https://community.esri.com/people/TNickolai-esristaff/blog/2019/11/18/chef-test-kitchen-for-arcgis-e...
You must be a registered user to add a comment. If you've already registered, sign in. Otherwise, register and sign in.