Turn on suggestions
Auto-suggest helps you quickly narrow down your search results by suggesting possible matches as you type.
Cancel
- Home
- :
- All Communities
- :
- Products
- :
- ArcGIS CityEngine
- :
- ArcGIS CityEngine Questions
- :
- Creating LOD 2 ~ 2.5 Buildings
Options
- Subscribe to RSS Feed
- Mark Topic as New
- Mark Topic as Read
- Float this Topic for Current User
- Bookmark
- Subscribe
- Mute
- Printer Friendly Page
Creating LOD 2 ~ 2.5 Buildings
Subscribe
6411
5
12-16-2012 02:37 PM
12-16-2012
02:37 PM
- Mark as New
- Bookmark
- Subscribe
- Mute
- Subscribe to RSS Feed
- Permalink
Hi,
I'm trying to create a bunch of somewhat detailed buildings from footprints containing some GIS data (building height, roof height, basic roof shape, floors, etc), with as much CGA-scripting as possible.
I'm not looking for a complete solution but any hints or tips would be very helpful 🙂
The modelling includes:
* Extruding the buildings
* Texturing each facade with a seperate texture
* Extruding significant attributes (like a balcony) and texturing them
* Roof modelling, again with attributes extruded and textured
* (The objects should obviously retain the GIS data)
I've experimented a bit and can create the basic building shapes and texture them if they're simple blocks (comp front, back, sides). However, I can't really figure out a good way how to continue. There's always the option to do a shape conversion and extrude/texture manually, but I'm rather hesitant to use it because it feels too stiff and "final".
My main problems are:
* Texturing buildings with an arbitrary number of sides. I tried comp(f){all:SubShapes} but after that I'm kinda stuck. I'd like to do a loop like "for i = 1 to <number of facades> apply texture from <folderpath/buildingid/i.jpg>". Is that possible?
* Accessing the generated sides for attribute extrusion & texturing without converting them to shapes. I hoped the inspector would give me a some info about the sides but nada. I figured I could import a building-specific script after running the above one, but again I haven't got the slightest clue how I could specify what to extrude at which point (except manually, which I'd like to avoid).
* Creating a more complex shape from a footprint, like placing a smaller roof on a bigger roof, or stairs-like structures (again with textures).
Any ideas where I should start to look?
5 Replies
12-17-2012
12:07 PM
- Mark as New
- Bookmark
- Subscribe
- Mute
- Subscribe to RSS Feed
- Permalink
Hi
If you're looking to use data from your gis attributes you just need to 'call' them in your rule file first eg:
The attribute names should be the same as is displayed in your Object Attribute information so that it uses that data.
If you're looking for information on specific sides of a building use the Model Hierachy (located under 'Windows') and click the 'inspect model' (beside your generate model tool) to see specifics about your building.
I found the easiest way to texture individual sides was to split it up using a conditional rule, eg:
Then you can use each of the Wall's to break down further with splits and comp functions plus your different textures (note you probably want to apply the texture before you start splitting it up if you want the texture to cover the whole side, otherwise it won't match up nicely).
Then when you want to get to more complex stuff such as steps you can use something like this: (just place the steps in the correct split location for where you want them).
hope that gives you some insight to get you started.
If you're looking to use data from your gis attributes you just need to 'call' them in your rule file first eg:
attr Building height = 0
attr roof height = 0
etc...
The attribute names should be the same as is displayed in your Object Attribute information so that it uses that data.
If you're looking for information on specific sides of a building use the Model Hierachy (located under 'Windows') and click the 'inspect model' (beside your generate model tool) to see specifics about your building.
I found the easiest way to texture individual sides was to split it up using a conditional rule, eg:
Lot--> extrude(height) Building

Building--> comp(f){side: facade(comp.index)  | top: Roof}

facade(facadeIndex)--> case facadeIndex == 1: Wall1
case facadeIndex == 2: Wall2
etc...
else: NIL
Then you can use each of the Wall's to break down further with splits and comp functions plus your different textures (note you probably want to apply the texture before you start splitting it up if you want the texture to cover the whole side, otherwise it won't match up nicely).
Then when you want to get to more complex stuff such as steps you can use something like this: (just place the steps in the correct split location for where you want them).
@Group ("Steps")
attr stepHeight = 0.19
@Group ("Steps")
attr stepDepth = 0.27

Step(index) -->
 extrude(stepDepth * index)
 setupProjection(0, scope.xy, 2, 2)
 projectUV(0)
 texture(step_tex)
hope that gives you some insight to get you started.
12-26-2012
02:05 PM
- Mark as New
- Bookmark
- Subscribe
- Mute
- Subscribe to RSS Feed
- Permalink
Thanks.
Well, the manual case method works fine with simple buildings but mine have over 30 sides. Is there really no way to do a loop? Get the index count and then do something? I couldn't find anything yet so I wrote a loop in C# for 50 cases, "unwrapped" it by writing the output to console and copypasted it to a cga file but this doesn't seem very optimal.
Texturing my buildings is also a PITA. My sides look like in the attached image. As you can see, it's split up but I don't need such a level of detail. The texture I have covers the whole wall, so I'd like to start at #4 and plaster it across the side (so it covers #4 - #10). Is that somehow possible? I really don't want to cut the stuff up in Photoshop.
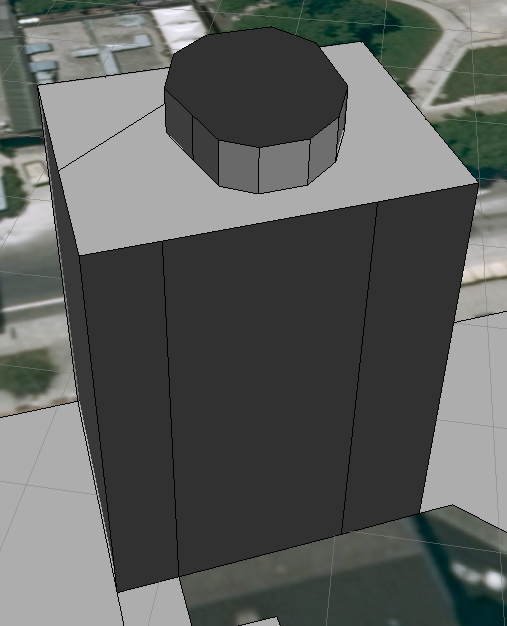
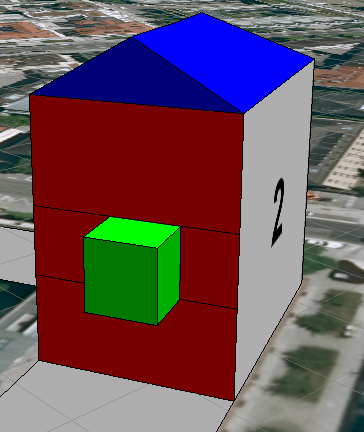
I also still can't figure out how to do something like in the second image attached. Just a simple structure on top of my building. Can I specify a center point/corner points and then say "make a circle/rectangle, extrude it 50cm" or something? Also how do I make dome-shaped roofs?
Also why are all my textures so dark? The numbered textures are supposed to be pure white! I've read the help file up and down but it feels like they filled it with everything except what I want to know.
/edit
Okay I made some progress (image 3), but not much. The roofs are giving me a headache, is it possible to convert JUST the roof to a shape, or create the roofs separately as shape and put them on top? Also the block I extruded, is it possible to extrude into the building (create a hole so to say), and how do I find the exact coordinates for extrusions? For example, I'd like to extrude some stairs in the center bottom, where do I find the coordinates for them?
[ATTACH=CONFIG]20200[/ATTACH]
[ATTACH=CONFIG]20201[/ATTACH]
[ATTACH=CONFIG]20224[/ATTACH]
Well, the manual case method works fine with simple buildings but mine have over 30 sides. Is there really no way to do a loop? Get the index count and then do something? I couldn't find anything yet so I wrote a loop in C# for 50 cases, "unwrapped" it by writing the output to console and copypasted it to a cga file but this doesn't seem very optimal.
Texturing my buildings is also a PITA. My sides look like in the attached image. As you can see, it's split up but I don't need such a level of detail. The texture I have covers the whole wall, so I'd like to start at #4 and plaster it across the side (so it covers #4 - #10). Is that somehow possible? I really don't want to cut the stuff up in Photoshop.
I also still can't figure out how to do something like in the second image attached. Just a simple structure on top of my building. Can I specify a center point/corner points and then say "make a circle/rectangle, extrude it 50cm" or something? Also how do I make dome-shaped roofs?
Also why are all my textures so dark? The numbered textures are supposed to be pure white! I've read the help file up and down but it feels like they filled it with everything except what I want to know.
/edit
Okay I made some progress (image 3), but not much. The roofs are giving me a headache, is it possible to convert JUST the roof to a shape, or create the roofs separately as shape and put them on top? Also the block I extruded, is it possible to extrude into the building (create a hole so to say), and how do I find the exact coordinates for extrusions? For example, I'd like to extrude some stairs in the center bottom, where do I find the coordinates for them?
[ATTACH=CONFIG]20200[/ATTACH]
[ATTACH=CONFIG]20201[/ATTACH]
[ATTACH=CONFIG]20224[/ATTACH]
01-06-2013
05:00 PM
- Mark as New
- Bookmark
- Subscribe
- Mute
- Subscribe to RSS Feed
- Permalink
Hi
I'm not sure about creating a loop, if there is one which has a majority then you could just use that in the else section. Also you can say:
The && function allows you to use more than one indexside.
Alternatively you could try creating your conditional rule within a split prehaps and using the asterix * to denote repeat? Not sure if that'd work though.
In order to get the building texture across the whole building you need to add the texture before you split it up. It's all a matter of where it comes within the rulefile.
I'm not 100% sure about the structure ontop of the building but you insert it as an obj file to appear on the roof ( create it either within sketch and export or create using the polygonal shape tool and export as obj).
Also for extruding stairs, rather than looking for coordinates, you want them attached to a building don't you? so when you create your splits just insert the stairs into one of the groundfloor splits for example this is how I did mine:
that was so that I could have steps under my doors.
hope that's of some help!
regards
Joanne
I'm not sure about creating a loop, if there is one which has a majority then you could just use that in the else section. Also you can say:
case facadeIndex == 1 && facadeIndex == 1 etc : Wall1
else : Wall2
The && function allows you to use more than one indexside.
Alternatively you could try creating your conditional rule within a split prehaps and using the asterix * to denote repeat? Not sure if that'd work though.
In order to get the building texture across the whole building you need to add the texture before you split it up. It's all a matter of where it comes within the rulefile.
I'm not 100% sure about the structure ontop of the building but you insert it as an obj file to appear on the roof ( create it either within sketch and export or create using the polygonal shape tool and export as obj).
Also for extruding stairs, rather than looking for coordinates, you want them attached to a building don't you? so when you create your splits just insert the stairs into one of the groundfloor splits for example this is how I did mine:
@Group ("Steps")
attr stepHeight = 0.19
@Group ("Steps")
attr stepDepth = 0.27

Base--> split(x) { ~1 : BaseSide | doorWidth : split(y) {~stepHeight : Step(split.total - split.index)}*  | minWallWidth  : BaseSide}

Step(index) -->
 extrude(stepDepth * index)
 setupProjection(0, scope.xy, 2, 2)
 projectUV(0)
 texture(step_tex)
that was so that I could have steps under my doors.
hope that's of some help!
regards
Joanne
01-07-2013
04:39 PM
- Mark as New
- Bookmark
- Subscribe
- Mute
- Subscribe to RSS Feed
- Permalink
hi !
you can make a 'loop' by using the 'comp.index'.
so after
just print the component split's index :
use this index for your texturing by catenating strings.
e.g.
Of course, you need to setup the UVs first.
Hope this makes sense.
you can make a 'loop' by using the 'comp.index'.
so after
comp(f) {side: Facade}just print the component split's index :
Facade -->
    print (comp.index)
use this index for your texturing by catenating strings.
e.g.
Facade -->
    print (comp.index)
    texture("assets/myTex_" + str(comp.index) + ".jpg")
Of course, you need to setup the UVs first.
Hope this makes sense.
01-07-2013
04:43 PM
- Mark as New
- Bookmark
- Subscribe
- Mute
- Subscribe to RSS Feed
- Permalink
Hi !
Concerning the brightness :
Could it be the lighting/shading in your scene ?
The light type ? ( toggle it by using the 'L' key.)
Yes, you can place objects on top of your roof. You have to create an 'asset', then insert it on the top shape of your initial geometry.
Did you already see the intro tutorial videos here ? ->
http://forums.arcgis.com/threads/64843-CityEngine-Collection-RESOURCES-FAQ-HELP