- Home
- :
- All Communities
- :
- Products
- :
- ArcGIS CityEngine
- :
- ArcGIS CityEngine Documents
- :
- CityEngine VR Experience Advanced Features
- Subscribe to RSS Feed
- Mark as New
- Mark as Read
- Bookmark
- Subscribe
- Printer Friendly Page
CityEngine VR Experience Advanced Features
CityEngine VR Experience Advanced Features
This document describes some advanced features of the CityEngine VR Experience. The basic information is available here: https://arcg.is/0u0y11. We recommend to read the basic information first before going into the details provided in this document.
Note: This document refers to CityEngine VR Experience 2021.1, CityEngine 2021.1, and Unreal Engine 4.27. The CityEngine VR Experience is available at the Unreal Marketplace, follow this link to get the template project for free.
Materials
Special Considerations for Materials in the VR Experience
The CityEngine VR Experience requires specially modified materials (VR Materials) for the experience to work properly. This VR materials are automatically created when the level is saved, but they can get outdated if the materials used in the scene are changed after the level was saved for the first time. The outdated VR Materials can be updated using the following two steps:
- Click the Create VR Materials button in the CityEngine Toolbox
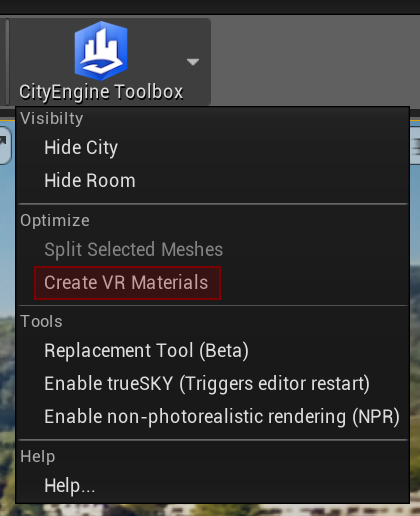
- Click Save All to make the changes persistent.
Using Adobe / Allegorithmic Substance Materials
This section describes how to use Substance materials in combination with CityEngine Datasmith exports. The following steps highlight the general workflow, which can be repeatedly applied as your CityEngine scene evolves:
- In the Epic Games Launcher, download the Substance Plugin from the Marketplace.
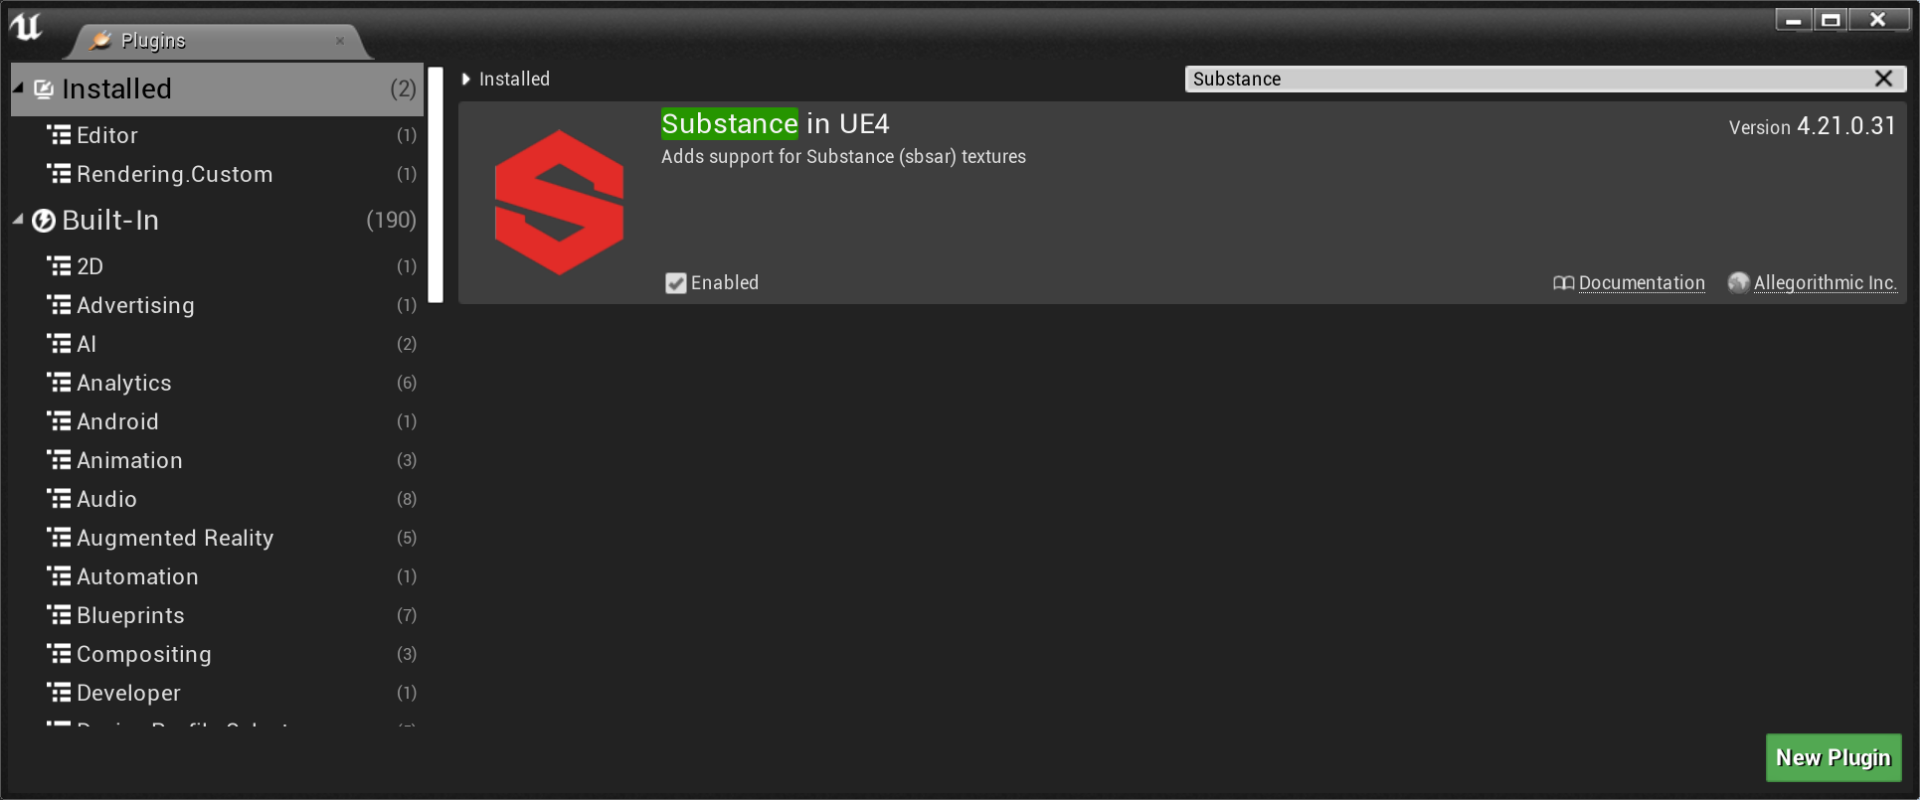
- Create a new CityEngine VR Experience project and enable the plugin.
- In the Material folder of your Unreal project, create a new folder named SubstanceMaterials.
- Open Substance Source and download a material you want to assign from CityEngine.
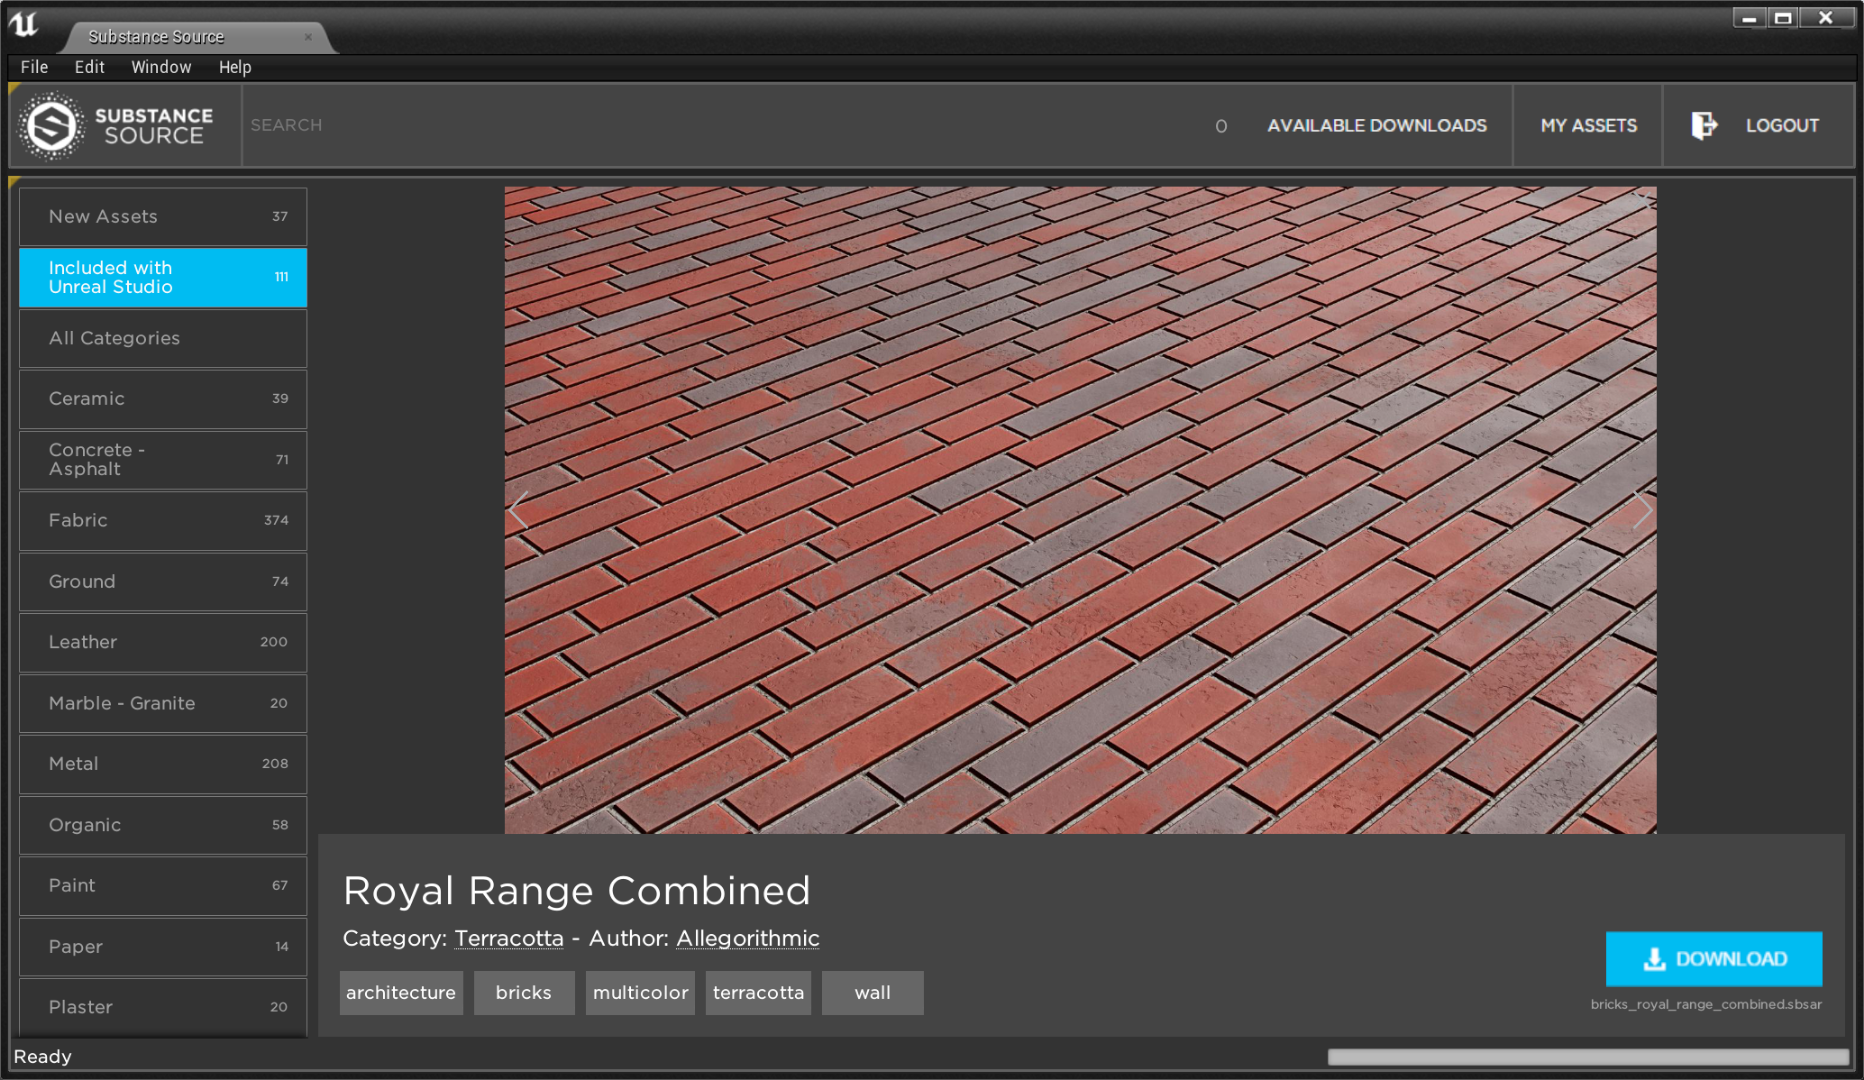
- Right click on the material (filename ending with _MAT. In our example Royal_Range_Combined_MAT) and press Copy Reference. This will copy the file path for later use in CityEngine.
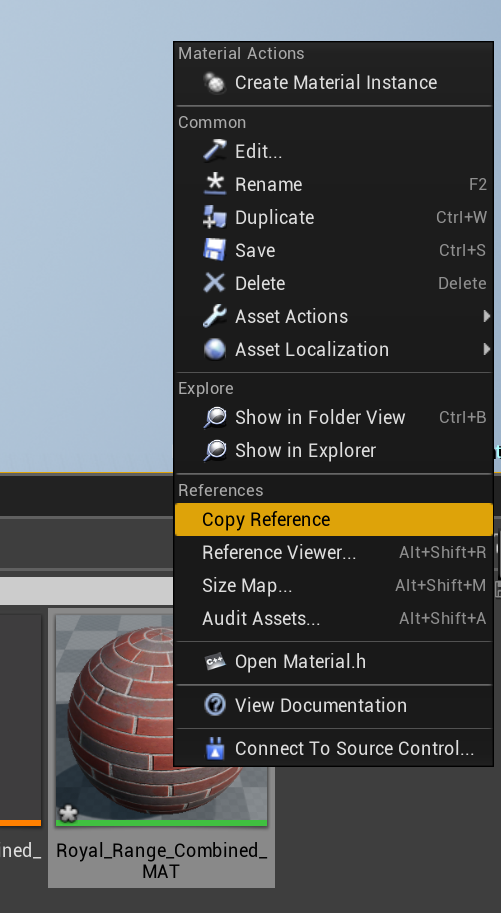
- Go back to CityEngine, open your scene. Using the model hierarchy view, inspect the facade you want to apply your Substance material to. Double-clicking on the node will move you to the corresponding part of CGA code.
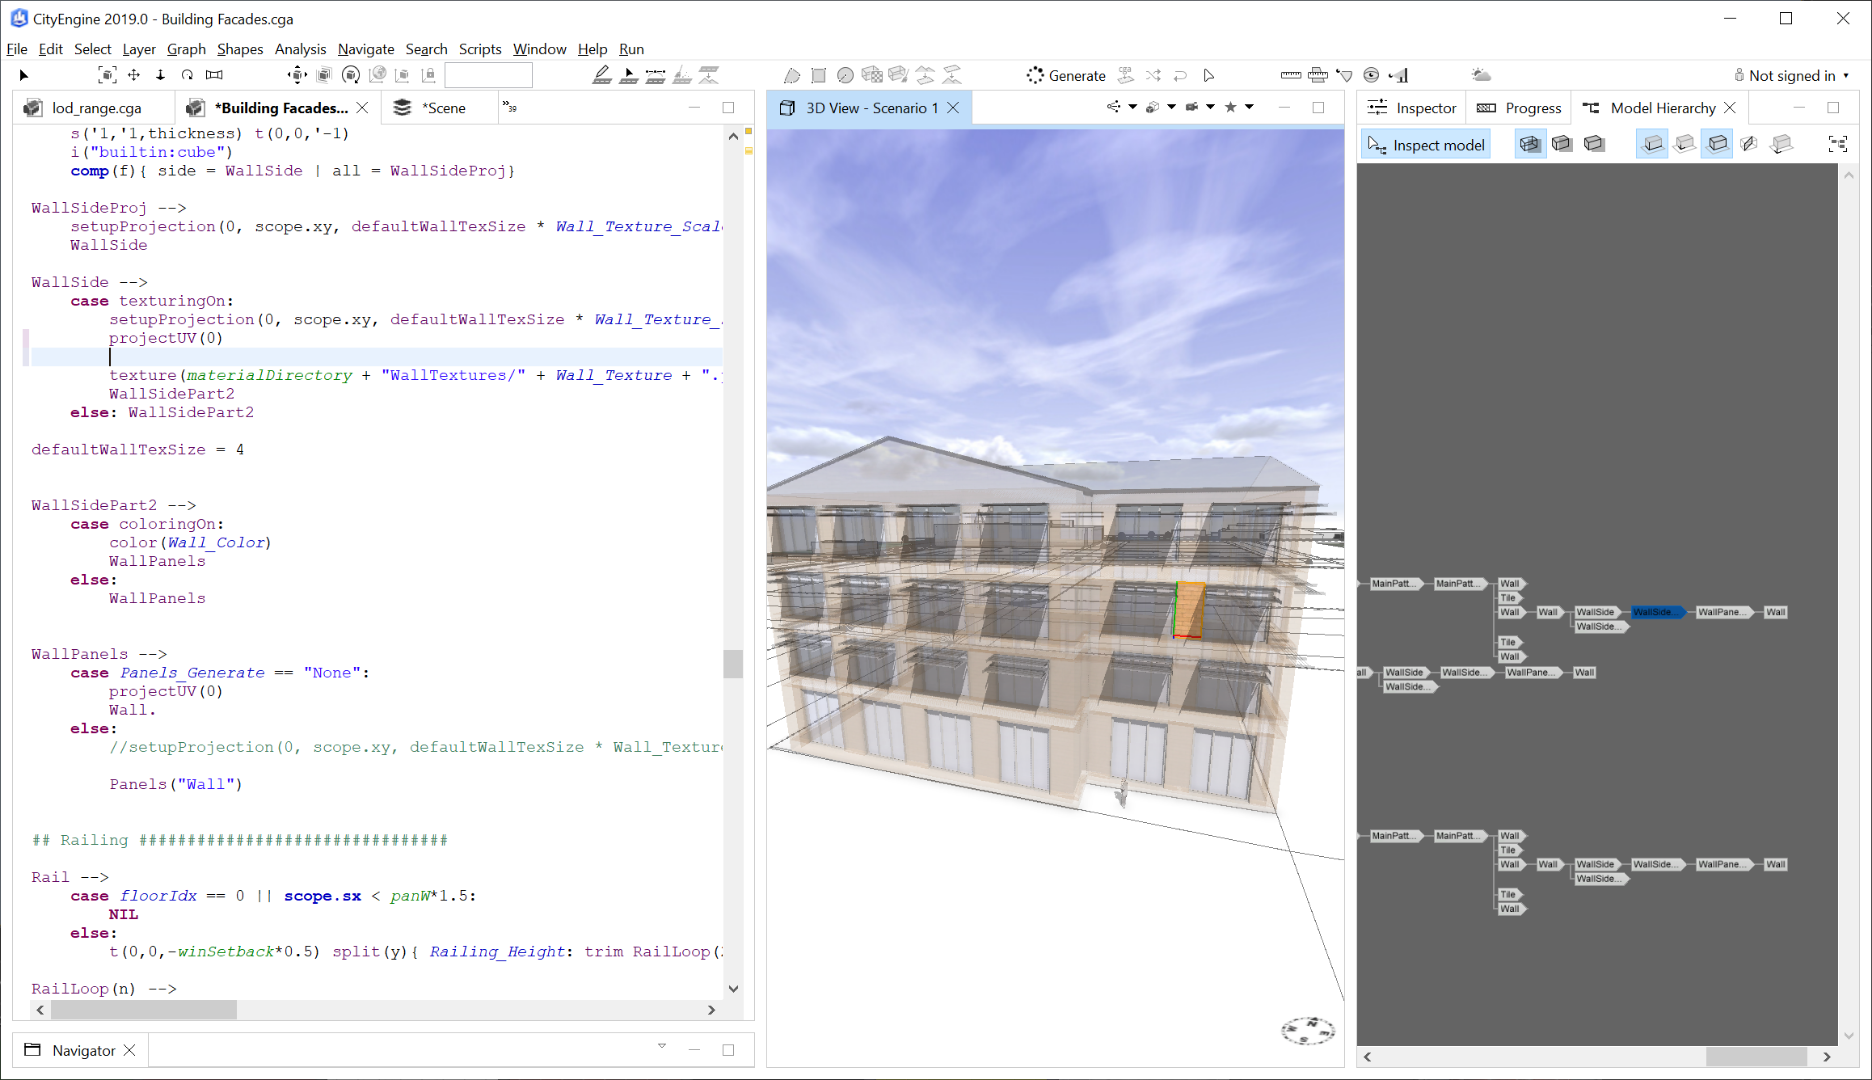
- Insert the command at an appropriate location in your Rule file:
set(material.shader, "<material_path>")
- Replace <material_path> with the path to the material previously copied in Unreal Engine. In our example, the path was "Material'/Game/Materials/SubstanceMaterials.Royal_Range_Combined_MAT.Royal_Range_Combined_MAT".
- Remove the leading Material' and the trailing .Royal_Range_Combined_MAT' and replace <material_path> with this path. The resulting CGA command should look like this:
set(material.shader, "/Game/Materials/SubstanceMaterials/Royal_Range_Combined_MAT")
- Export your scene using the Unreal Engine exporter.
- Go back to Unreal Engine and import the exported datasmith file into the previously created CityEngine VR Experience project with the Substance material.
Terrains / Landscapes
Starting with CityEngine 2019.0, exporting terrains is handled natively by the CityEngine Unreal exporter.
Which terrain layer are exported to Unreal can be set in the export dialog:

The scenario export python script automatically exports all visible terrains.
For each terrain layer a terrain actor is created in Unreal. If it should be possible to grab the terrain in the VR Experience with the controller, the Generate Overlap Events property of the terrain must be set to true as shown in the screenshot below:

Depending on the size of the terrain, this can sometimes lead to performance problems. To increase the performance at runtime, increase the Simple Collision Mip Level at the cost of accuracy. In that case, we recommend using values in the range between one and three.
Multiplayer Support (Experimental)
With the experimental Multiplayer feature, multiple people can join the same VR Experience and interact with each other in a local network. First one user has to host a server and then other users can join this server.
Hosting a Server
Hosting a server: press "H" on the computer keyboard to host a server.
Joining a server: press "J" on the computer keyboard to join an existing server in the local network.
Batch-Replacing Actors and Foliage
The Replacement Tool is used to batch-replace placeholder objects exported from CityEngine with high quality assets in Unreal. The following section describes how objects need to be exported in CityEngine and how the Replacement Tool can be used in Unreal.
CityEngine
First a placeholder object needs to be inserted in CityEngine using the CGA insert command as follows (hint: the Scatter Operation can be used to distribute the objects):
primitiveQuad(0.2,0.2)
i("garden_plant.obj")
The garden_plant.obj can be any object (even a simple cube) as it will be replaced in Unreal. Note that each object you want to replace needs a unique name as the name is used in Unreal to discern between the different Actors. In CityEngine's Unreal Export settings, Instancing needs to be set to Use Instancing so that each placeholder is imported as a separate actor in the scene, named after the asset that created them (in this case the ‘garden_plant.obj’).
Unreal Engine
Import the Datasmith file as usual. Once the import completes, the result should look something like the scene in the image below.
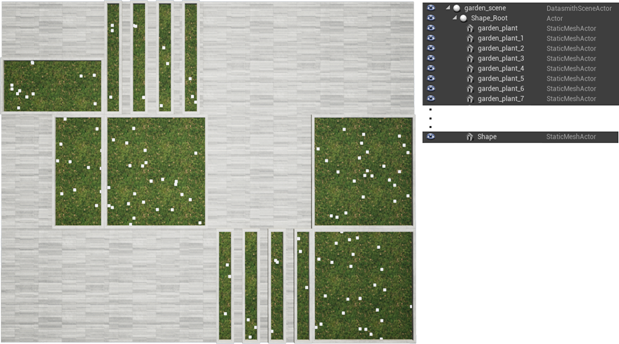
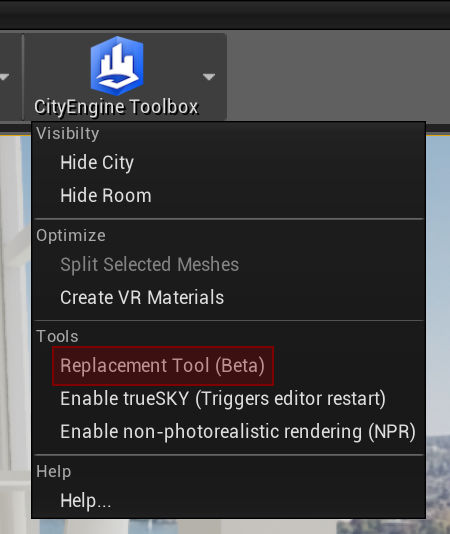
The Replacement Tool helps batch-replacing the white cubes. It can be found in Unreal Engine in the CityEngine Toolbox:
After selecting the menu item, a dialog with a number of options opens. The image below shows a sample dialog to replace our placeholders with the HillTree_02 model (from Epic Games' Open World Demo Collection😞
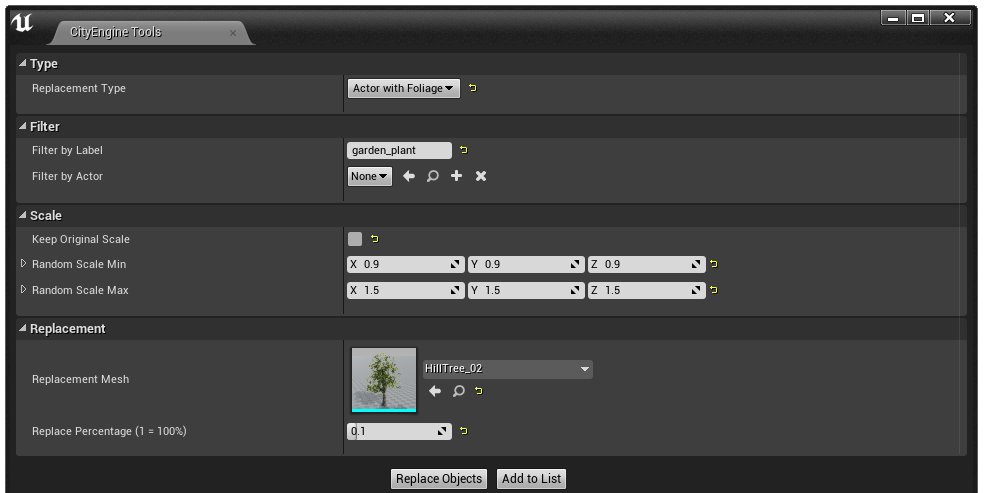
Following a description for all options of the Replacement Tool:
- Type: Select the type of object you want to replace, and the type of object you want it to be replaced with.
- Filter: Select the criterion for finding the objects that will be replaced, usually we use the name of the actor.
- Scale: Select the scale of the new object. You can either chose to keep the original scale of the placeholder, or to scale the new object randomly within the domain that you specify.
- Replacement: The Replacement Mesh selects the path to the new object, i.e. the object to be used instead of the original one. The replacement percentage defines how many of the existing actors that meet the filter criteria will be replaced. You can add as many replacements as you want for the same criteria. This allows you to distribute different plants using a single placeholder by experimenting with different replacement percentages and executing them one after the other until the desired density has been reached.
- Add to List: You can save your previous replacements in the List so that you can easily repeat them by enabling them and clicking on ‘Execute enabled replacements’.
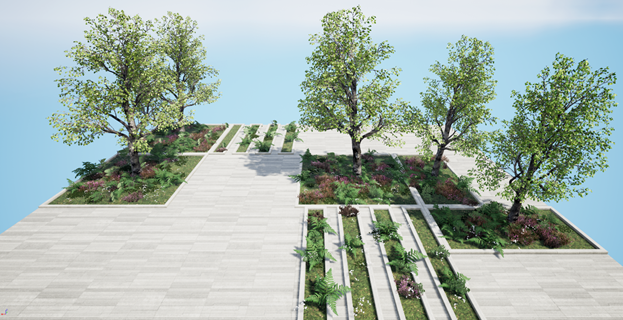
Note that you can undo the replacement in Unreal Engine with a simple Ctrl+Z, so that you can easily adjust your percentages and parameters until you find the right mix of actors. Here’s what our garden looks like after the execution of multiple replacements:
Note: The Replacement Tool is currently in beta.
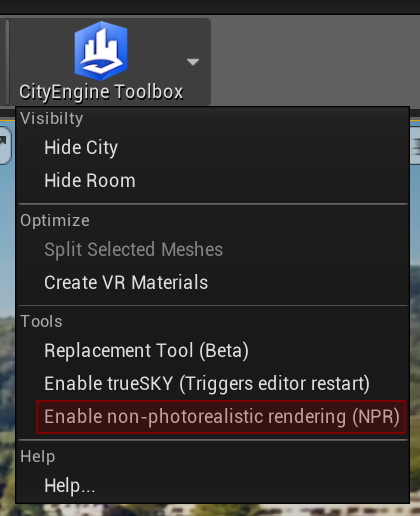
Non-photorealistic Sketch Rendering
An experimental non-photorealistic (NPR) shader can be enabled/disabled to highlight edges as shown in the screenshot below:

The shader can be enabled/disabled from the CityEngine Toolbox:
Level of Detail
Unreal Engine can automatically generate Level of Detail (LoD) for meshes. This section briefly describes how these LoDs can be generated and how the settings can be tweaked to get optimal results. There are two ways to create and edit your LoD settings: LoD for a single mesh and LoD for multiple meshes.
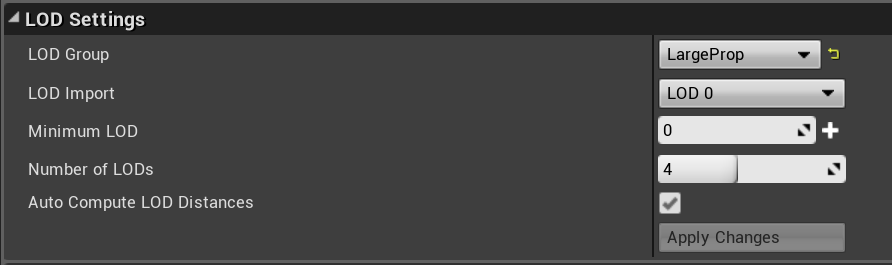
LoD for a Single Mesh
- Open the asset in your content browser and navigate to the details panel.
- Assign a predefined LoD group to the mesh (for buildings, "LargeProb" is a good choice)
- Choose the amount of LoDs you would like to have and save (4 - 6 usually).
LoD for Multiple Meshes
- If you have multiple meshes (buildings) use the Bulk Edit over Property Matrix.
- Experiment with the LoD settings for a single mesh before starting to the edit multiple meshes with the property matrix.
Note: When editing multiple assets over the Property Matrix, Unreal Engine starts to calculate immediately when you hit enter, which potentially leads to very long computation times.
Recommended LoD Settings for VR
In VR the LoD Screen Size needs to be adapted as the resolution is typically higher then no VR. Adjusted Screen Size percentage settings for a VR-Project could look like this:
- LoD Levels: 4
- Switch to Level 1 from 0 at Screen Percentage 60%
- Switch to Level 2 from 1 at Screen Percentage 40%
- Switch to Level 3 from 2 at Screen Percentage 20%
- Switch to Level 4 from 3 at Screen Percentage 10%
For details further details, please refer to Setting Up Automatic LOD Generation documentation.
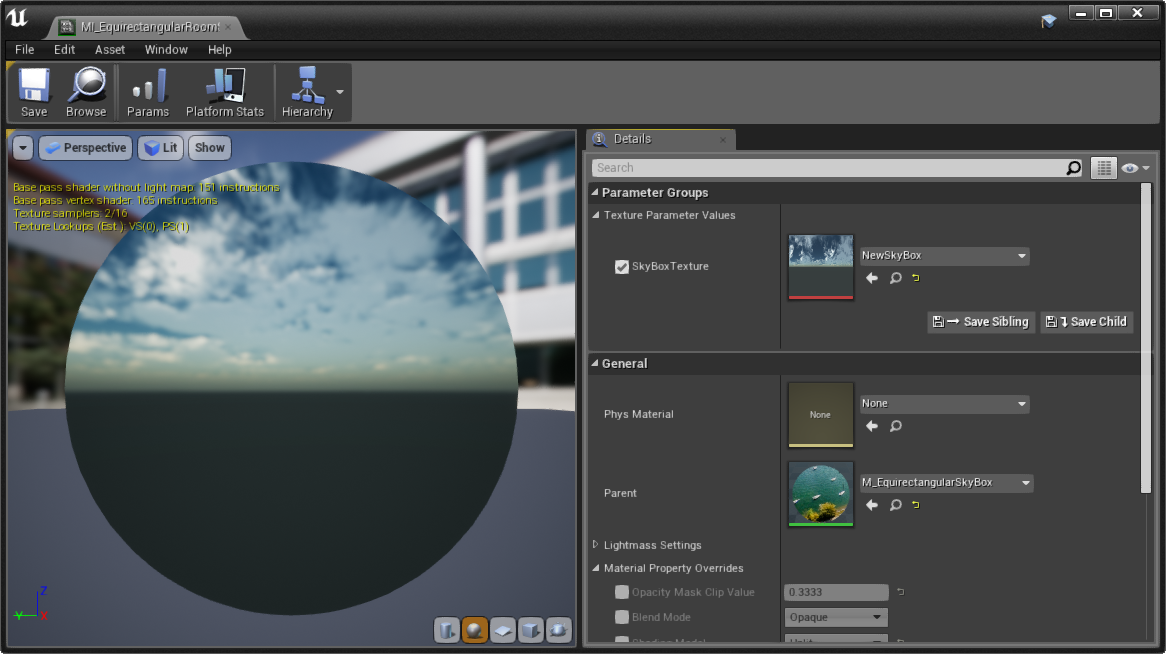
Changing the Office Skybox
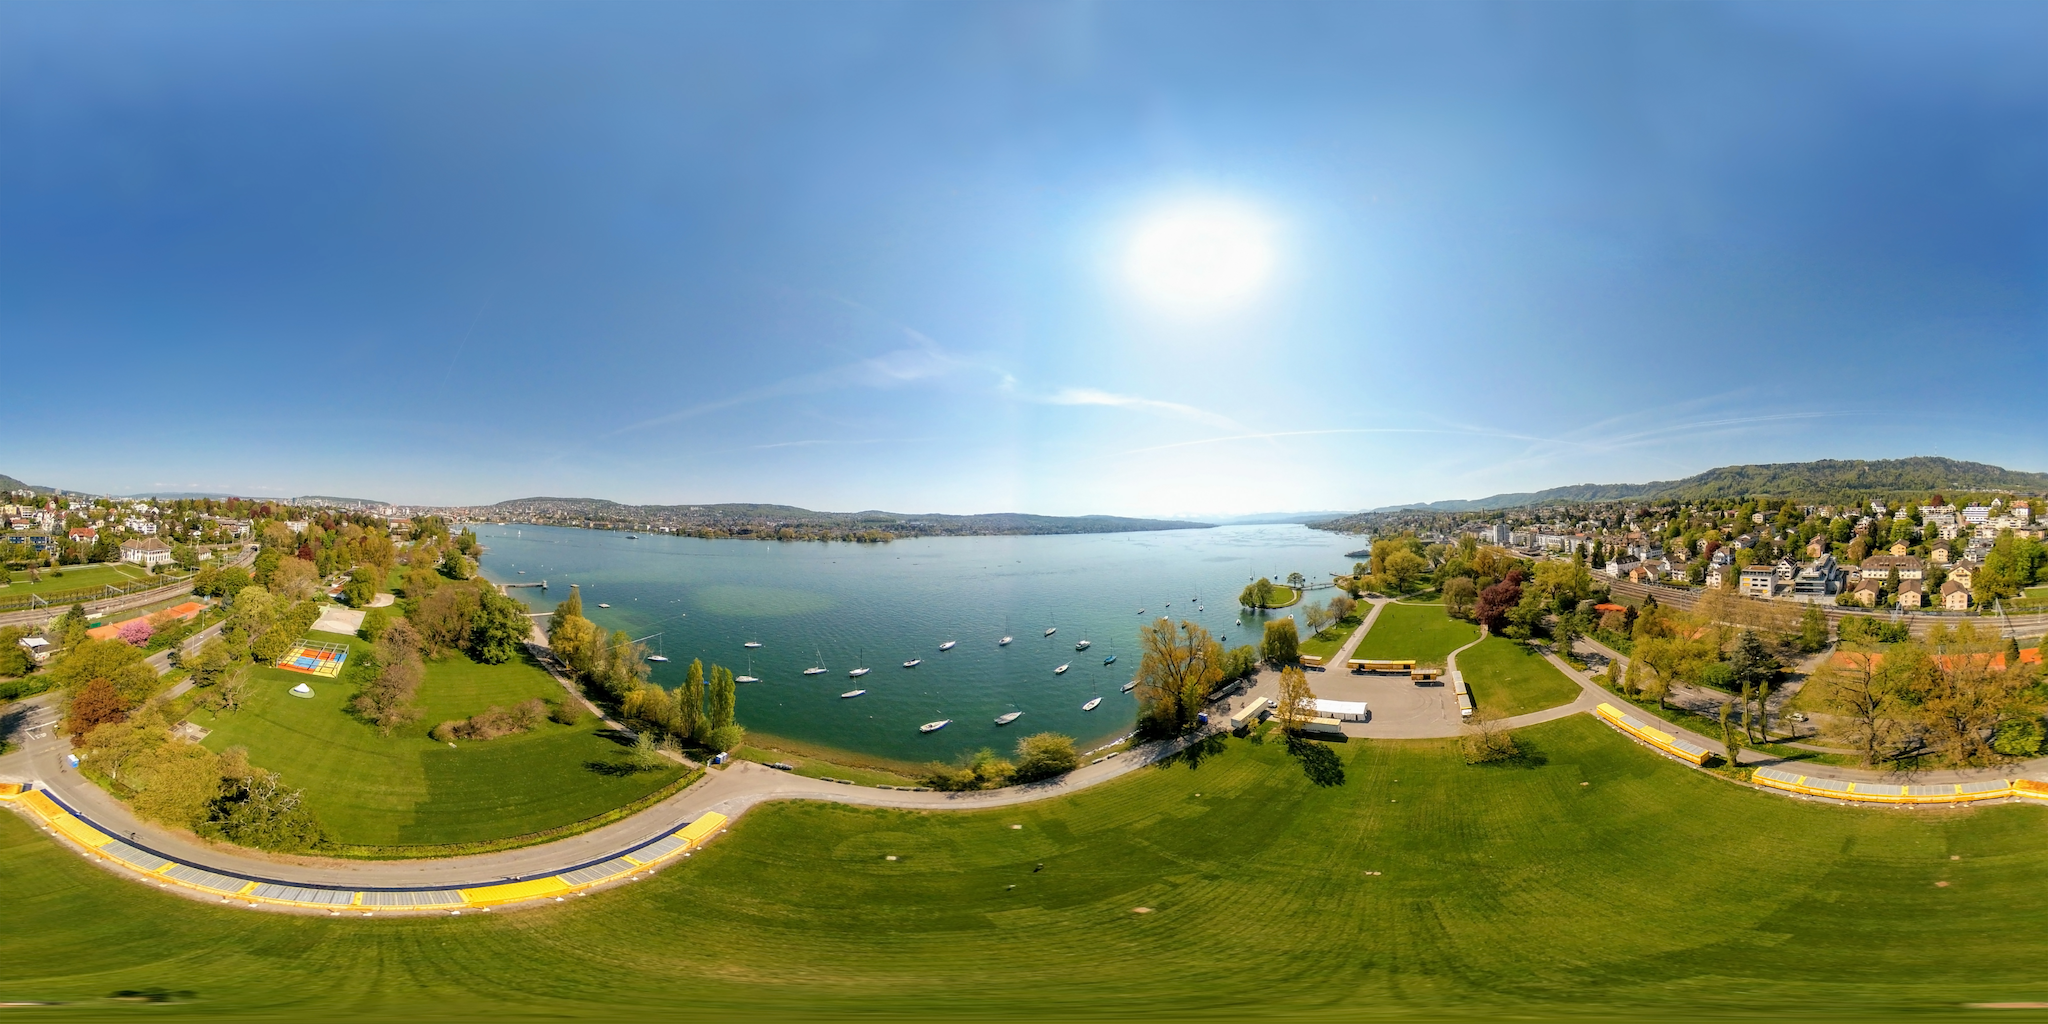
The skybox (i.e. the surroundings outside the office) can be replaced with a different 360° panorama as follows:
- Import the new image containing the 360° panorama for the skybox either by dragging it from the Explorer into the Content Browser or through the Import button in the Content Browser. Note that the image must use equirectangular projection such as the image below.
- Open the imported image and set the value for "Level of Detail -> Mip Gen Settings" to "NoMipmaps".

- Save the changes and close the tab.
- Navigate to "Content -> Maps -> Room -> Skybox" in the Content Browser and open the "MI_EquirectangularRoomSkyBox" material instance.
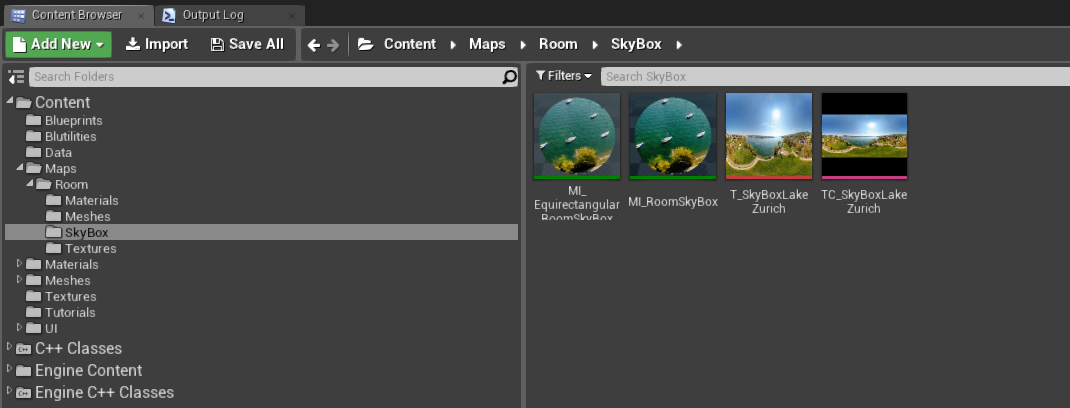
- Change the value for "Parameter Groups -> SkyBoxTexture" to the newly imported image.
- Save the changes and press play to test if the Skybox is displayed correctly.
Non VR
It is possible to visualize the data imported from CityEngine in a desktop application without VR. To create a non VR level either create a new Level or use the NonVRTemplate level at Content/NonVR/Maps. To set this new level as default, go to Edit->Project Settings->Maps & Modes and set the Editor Startup Map & Game Default Map to the new level.
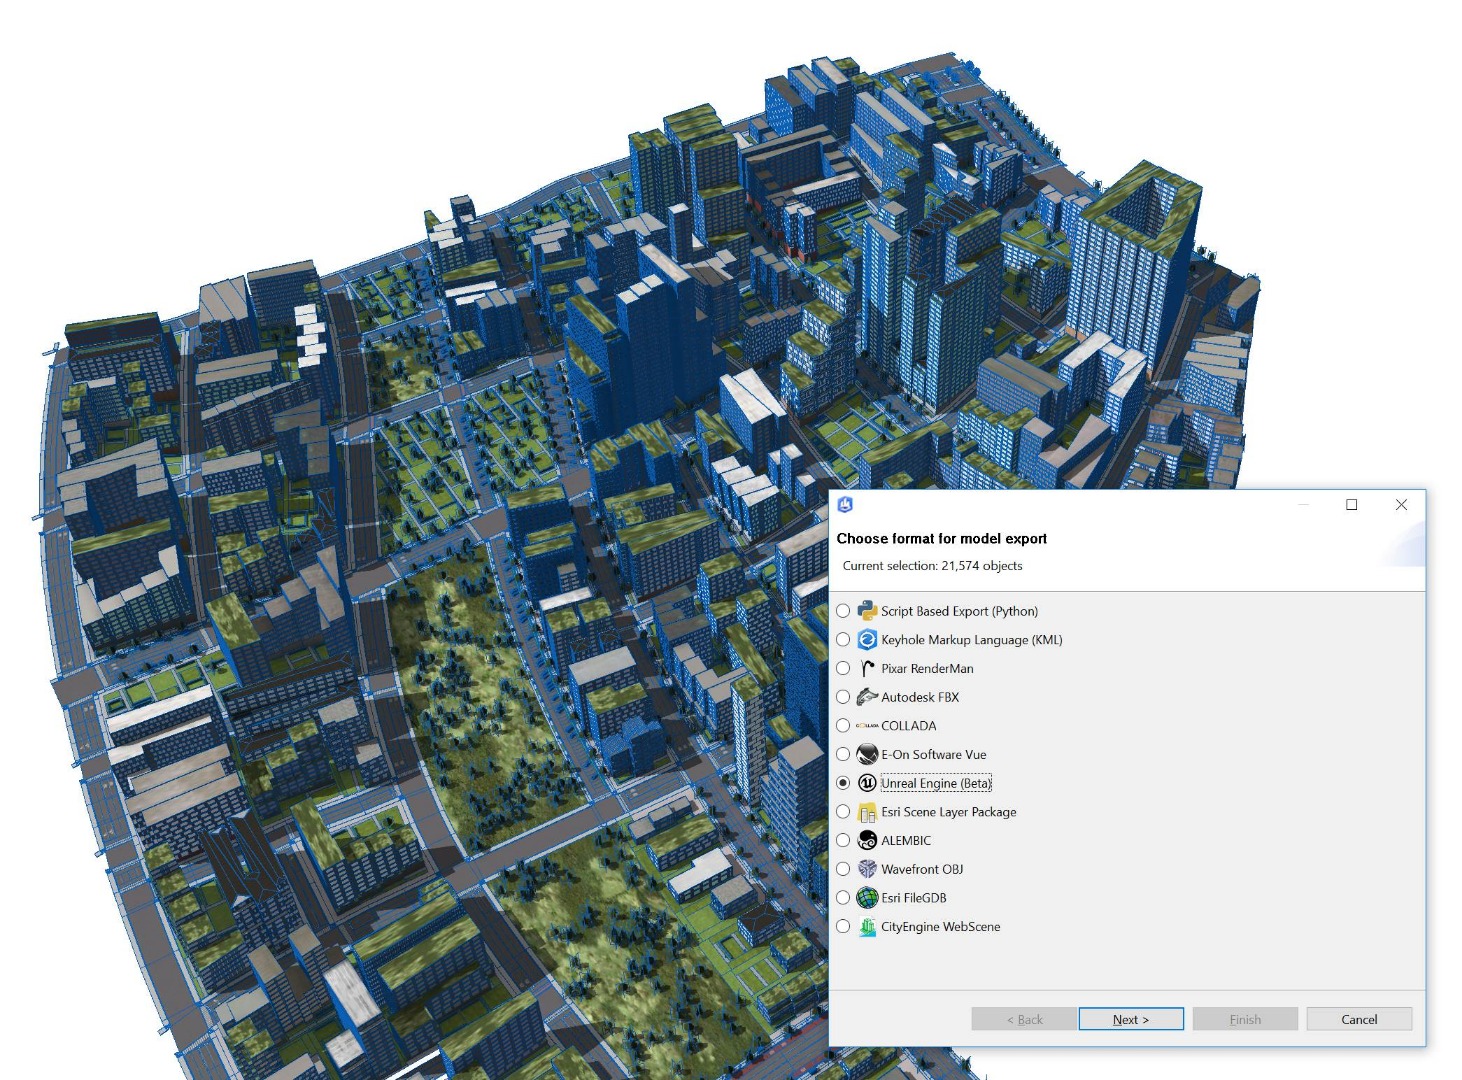
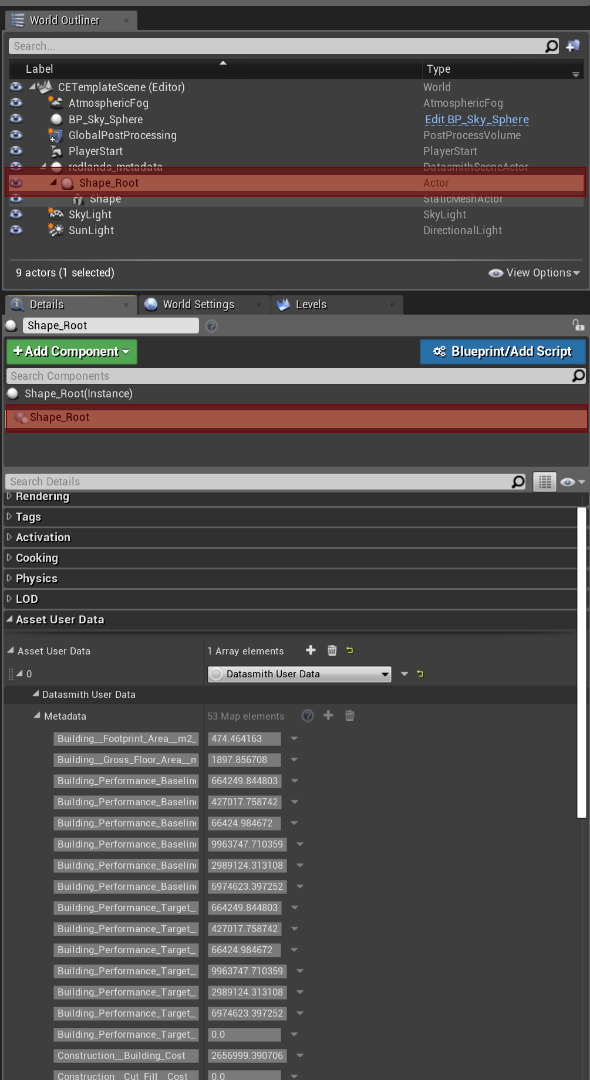
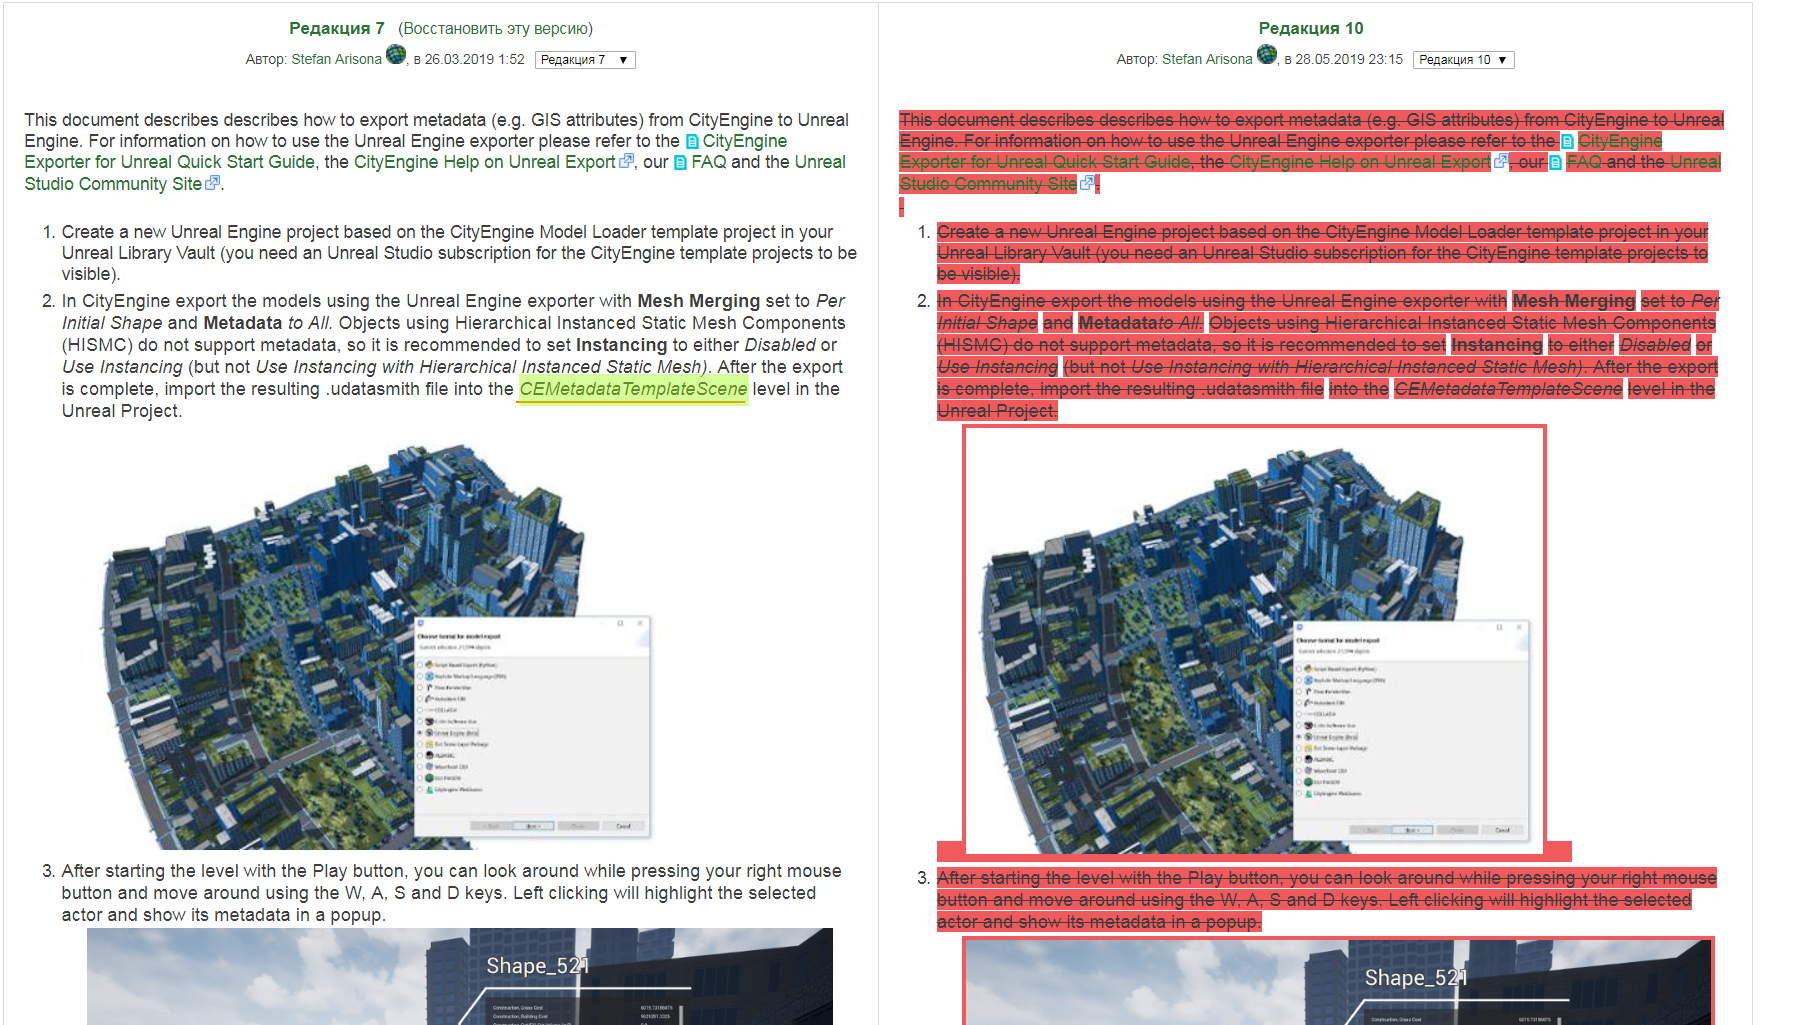
Exporting Metadata from CityEngine to Unreal Engine
Starting with CityEngine 2019.0, it is possible to export metadata (for example GIS attributes) using the Unreal Engine exporter. To do so, export CityEngine models with the following export options:
- Mesh Merging set to "Per Initial Shape"
- Metadata set to "All"
- Instancing either set to "Disabled" or to "Use Instancing", but not to "Use Instancing with Hierarchical Instanced Static Mesh" since the HISMC mesh component type does not support metadata at this point.
If you are using the NonVRTemplate level, you can take advantage of the built-in metadata information display functionality: After starting the level with the Play button, you can look around while pressing your right mouse button and move around using the W, A, S and D keys. Left clicking will highlight the selected actor and show its metadata in a popup.
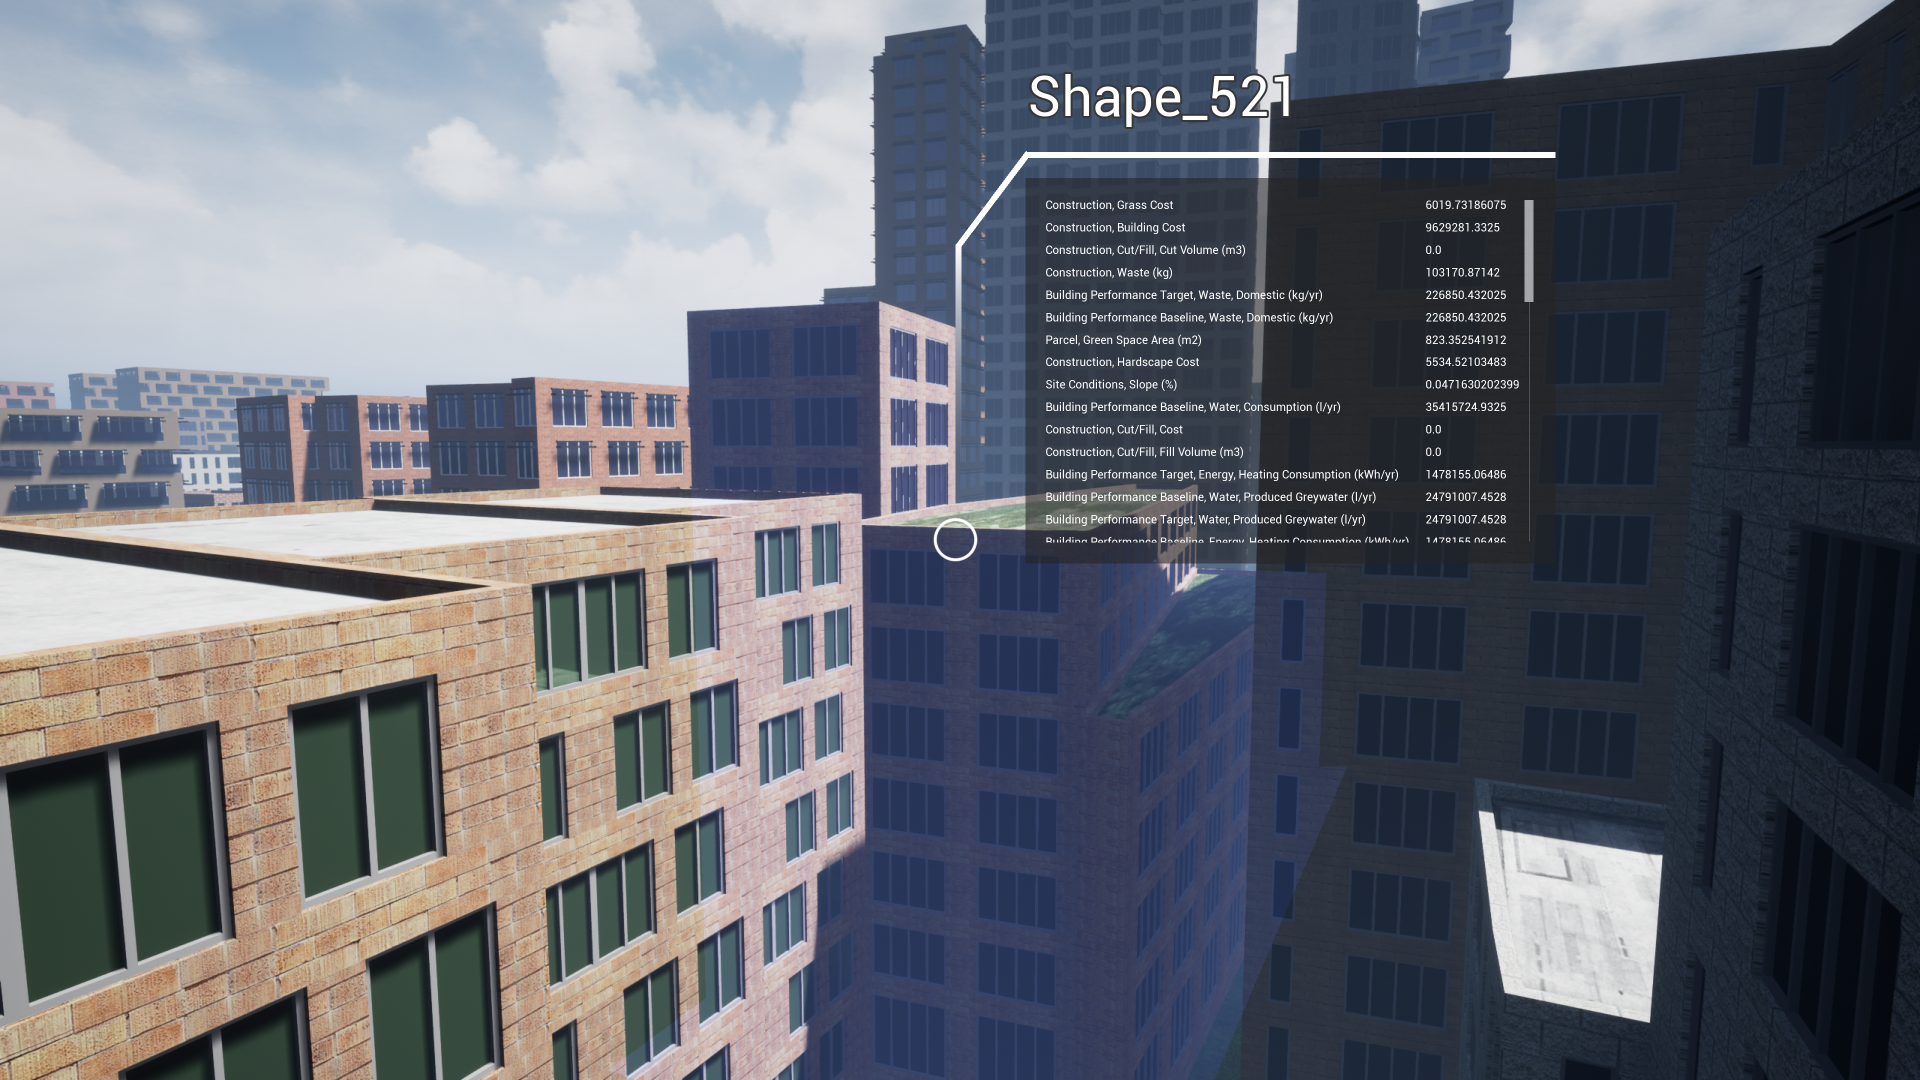
To see the Metadata in the Unreal Engine Editor first select the <ShapeName>_Root Actor (there is one Actor for each exported initial Shape from CityEngine) and then its Root Component. The metadata is visible in the Asset User Data Section in the Details Panel as seen in the screenshot below:
Is there any update on this? Currently the meta data feature is not coming through from CE 2019.0 > UE4.22.3
See my answer here: https://community.esri.com/docs/DOC-11559-exporting-cityengine-metadata-to-unreal-engine-4.
Best,
Benjamin
Are updates due to come soon? Currently trialing CityEngine and I'm having issues with the Datasmith import/export.
Using the template project, materials are generated but not applied. In an up to date UE 4.22 project, no materials are generated at all. Import is also painfully slow even for relatively simple scenes.
I'd also like to know if there are any plans to support world composition so we can have very large geo-accurate landscapes in UE4.
Hi James
Are updates due to come soon? Currently trialing CityEngine and I'm having issues with the Datasmith import/export.
The update is with Epic now. It will take them some time to review it and then it will be released in the marketplace. In the meantime you can try to upgrade the project manually to 4.22 like this:

and set it to 4.22. The materials should work then (the metadata popup on the other hand not).
Import is also painfully slow even for relatively simple scenes.
Let me know if this is still the case with 4.22. It should actually be much faster.
I'd also like to know if there are any plans to support world composition so we can have very large geo-accurate landscapes in UE4.
This is a good idea. How would imagine it working? Large terrains being split up during the export and imported into multiple worlds (using world composition)?
Cheers
Benjamin
Hi, thanks for the quick response!
I'll let you know how I get on with updating, however I am using the latest datasmith importer on blank project with varying degrees of success. I left a datsmith import of Glasgow City running overnight and I think it progress 2% up to 53% by the time I got back to it. I'm only using basic white-box OSM extrusions.
UPDATE: Just tried using the usual FBX workflow instead of datasmith and that worked out fine after about 10-15 minutes.
In terms of using world composition, what you said was mostly how I envisaged it. Getting geo-accurate terrain into UE4 has always been a headache for me and getting very large geo-accurate terrains nigh-impossible. In a previous project where this was a key aspect, Unigine turned out to be a better solution - I'm not sure what its process is under the hood bit it utilises GDAL functions to import both heightmap and shapefile data to generate suitable geo-accurate terrain - earth curvature included as an option! All this without having to pre-tile the heightmap. It also supports 32bit geotiff whereas UE4 maxes out at 16bit.
I've tried using QGIS to break large datasets into smaller chunks but this has always been tedious and difficult due to the finicky landscape system technicalities of UE4 - I notice even cityengine can have weird issues at the boundaries of a landscape tile.
In an ideal scenario, CityEngine upon export would evaluate a heightmaps m/px and break it down into chunks that UE4 can understand (and also split other layers so they too fit inside those chunks) so that on import it can be used with the world composition system rather than being limited to one 4k tile. World Composition would also allow for far larger cities due to then having access to the Level LOD system which can take a whole streaming level and bake it down to one proxy mesh.
Hi,
I'll let you know how I get on with updating, however I am using the latest datasmith importer on blank project with varying degrees of success. I left a datsmith import of Glasgow City running overnight and I think it progress 2% up to 53% by the time I got back to it. I'm only using basic white-box OSM extrusions.
What options did you use for the Datasmith export (merging and instancing)? Typically the "globally" merge strategy is really slow upon import.
Thank you for the input on world composition!
Best regards
Benjamin
Hi,
Datasmith has issues with really large meshes. What probably happens is because you only have white extrudes, all the buildings are merged together (because they all have the same material). Could you try exporting using the per initial shape merge option again and see if the import is still slow?
Let me know how that goes.
Best,
Benjamin
Where I can get button CityEngine Toolbox ?
UE4.22.2 - CityEngine Model Loader Project - Imported Datasmith scene from CityEngine 2019
There is no button or plugin CityEngine Toolbox
Hi
The CityEngine Toolbox is currently only available in the CityEngine VR Experience Project (see https://community.esri.com/docs/DOC-11563-cityengine-vr-experience-for-unreal-studio for a setup guide). If you don't want to use VR you can just create a new empty Level and import your Datasmith file there. Let me know if that works out.
Best,
Benjamin
Hi there,
yes believe me FBX workflow is way to go for concatenating very large dataset chuncks, numerical precision is handled correctly...what I mean is centimeter visual resolution at mega city scale. But one have to think first of what can and must be merged by material (and prebatched) and what could be instanced. So from my experience you can throw millions of very large meshes into dozens of ~100/200 Mo FBXes (containing ~100 of this meshes) for all static scenery building, infrastructures and so on. Use instancing along with datasmith or FBX workflow only for small tiles with max 1000/3000 instances, otherwise you'll be stuck in file byte sized open/read process of the importer forever and eventually UE will crash upon import.
As a Unigine user also, I find simpler to cut my world layers into merged/instanced via cga generation of placeholders, converted to shapes and exported to shapefiles which can be directly used in the editor to sample objects, clutters and so on...And you can work in the same projection. Unfortunately each engine has its own data i/o philosophy that needs to be workaround somehow if one wants to stick with one particular solution, especially if it was designed for games in the first place.
Just thinking out loud here.
Romain
Yes, when I create New Level I can use scene without VR and with CityEngine Toolbox. Thank you. Just need to disable mouse cursor in game, it blocks normal movement of camera when cursor reaches border of window... can't find where to change it
Trying to see metadata in my scene. Exported from CE 2019 as described in your instruction. In CityEngine Model Loader Project we don't have mouse pointer to click on building. In CityEngine VR Experience Project I have mouse pointer after New Level creation, but nothing happens when I click on building.
Something missing here:
"After starting the level with the Play button, you can look around while pressing your right mouse button and move around using the W, A, S and D keys. Left clicking will highlight the selected actor and show its metadata in a popup."
I have attributes in CityEngine 2019: Screenshot1
And I don't have attributes (metadata) in Unreal Engine 4.22.2: Screenshot2
Export options: Screenshot3
Hi,
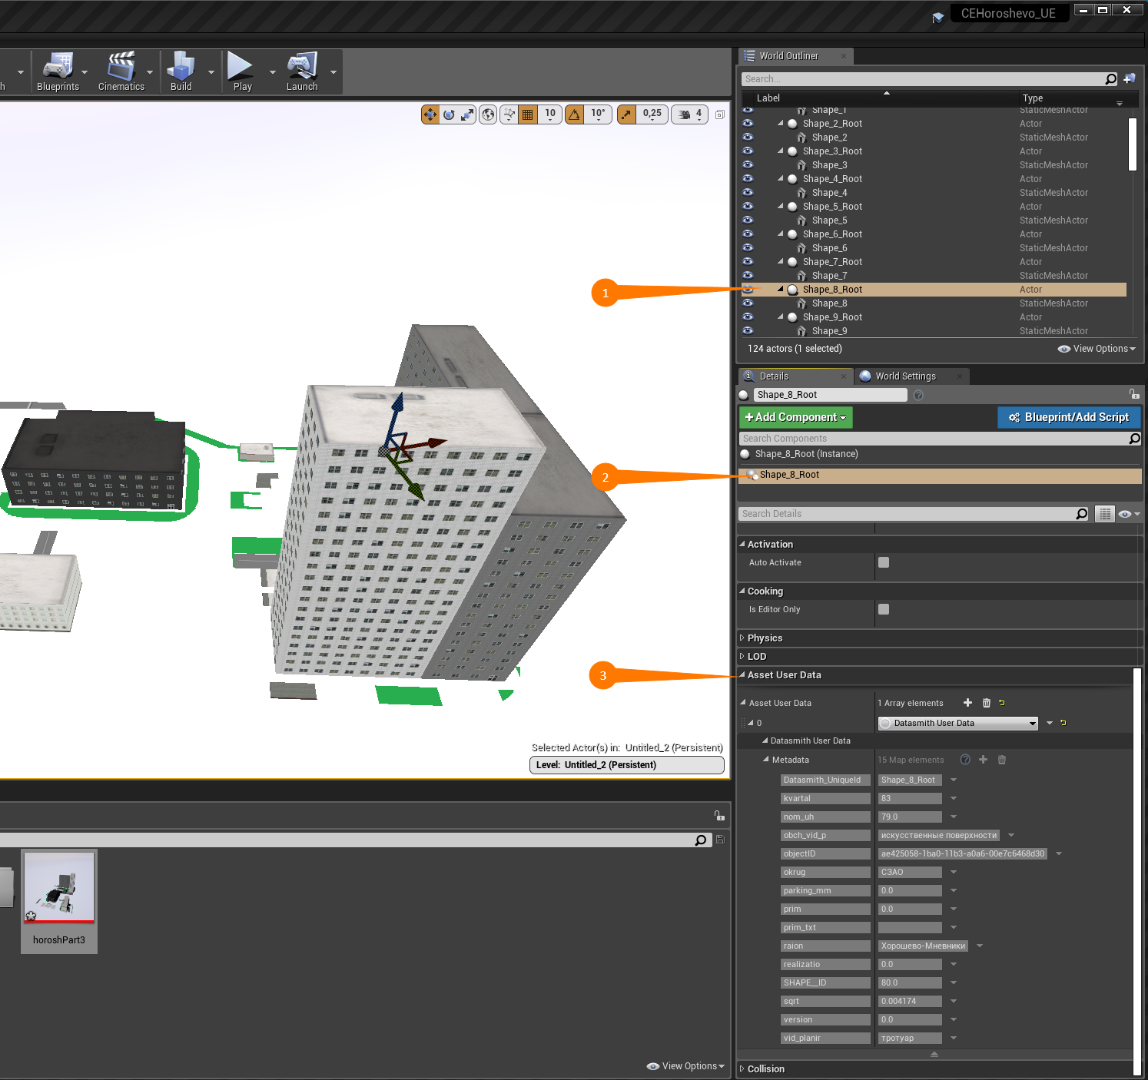
To see the metadata in Unreal Engine you actually have to select the Shape_Root Actor first and then the Shape_Root component as seen in this screenshot:

So in your case that should be here:
I will look into your other issues asap.
Best,
Benjamin
Thank you. I found it deeper )) Only when I changed component in part 2 I can see metadata.
Finally! I found your old document where you point to import in CEMetadataTemplateScene to see metadata. Now its working.
Hi
I'm very sorry for the confusion, as we currently have two template projects and not all features are supported in both of them it can get a bit confusing. I'll update the documentation to make it clearer.
Let me know if you have more questions.
Best,
Benjamin
Do you have functionality in VR mode to show metadata by "pointing" on building?
Hi Aleksandr
We are working on it. It will hopefully make it into the next release.
Best,
Benjamin
CityEngine 2019.1 to UnrealEngine 4.22.3 VR Experience. When I export my CityEngine model to UE4, everything imports well (objects and my landscape layer) except that everything is black/greyscale. This scene includes buildings, complete streets, benches, trees, 3D warehouse objects, etc., but there is no color. The detail of every object is present, but no color.
Any ideas on how to fix this? The VR scene is almost exactly how I want it- just no color! (Thanks for any help).
Hi Gary
Did you see any error while importing the Datasmith file (in the Output Log. You can open it via Window/Developer Tools/Output Log)?
Are you assigning custom materials in CGA using set(material.shader, "custom/unreal/material")?
If not, could you maybe send me (you can send me a private message) the Datasmith scene so we can have a look at it?
Best,
Benjamin
Ben, Thank you for the response. I see many errors on the CE and UE4 logs. We have created a number of different scenes in CE as the model and University projects changed. Maybe I have objects and textures that are too many different folders. I sent you the files at the [email protected] email.
Thanks and regards, Gary
I am using CityEngine 2019.1 and Unreal Engine 4.23.1
The installation steps in CityEngine VR Experience for Unreal Studio is only valid up for Unreal Engine 4.22 and the CityEngine VR Experience Pro 2019.0 (compiled for UE4.22).
How to setup an environment for CityEngine 2019.1 and Unreal Engine 4.23.1 ?
Where to find the CityEngine VR Experience Pro 2019.1 (compiled for UE4.23) and replace the 2019.0 version if it's been installed previously ?
I can't wait to try the VR experience but I am not able to setup the environment correctly.
Thanks for your help, Theo
Hi Theodore
We are sorry for the confusion. The other document is currently being updated as we wait for Epic Games to review and publish the new VRExperience Template. I will let you know once it is released.
Cheers
Benjamin
Thank you for the clarification. I will keep an eye on the other document.
Hello @StefanArisona ,
I wonder if you could guide me in how to implement/use the tutorial/onboarding features. I'm a little lost as to how these get triggered, or what types of events will trigger narration. I want to use all of the sound assets for onboarding that are already in the template. I will really appreciate any kind of guidance. Currently in my Unreal Editor the following message is displayed when I click on the BPOnboarding instance. I want to know what is meant by "must have at least two Branches." Thank you.

Thank you,
Eva
Hi @ETMP!
I want to know what is meant by "must have at least two Branches."
Branches means "scenarios" in this context (we use ArcGIS Urban terminology). If your CityEngine scene contains scenarios you can automatically export them as described here.
Otherwise you can also add them in Unreal Engine by adding a BP_Branch Actor to your scene and attaching it to the "MountainView" BP_UrbanEvent (in your case) as seen here:

All geometry Actors which are attached to these BP_Branch actors will belong to that scenario.
Let me know if that helps.
Best,
Benjamin
Hi @BenjaminNeukom !
Thank you so much! it did work! I added a BP_Branch actor, as at the moment I don't have another scenario. I just encounter another problem. The CityEngine VR Experience tutorial runs smoothly until you have "to teleport to the city select a blue figure with your laser pointer". It just gets stuck there and I can't select the blue figure. I don't know why this is happening. I will really appreciate any kind of guidance.

Thank you!
Hi @ETMP!
No problem! Sometimes it can be a bit tricky to hit these "blue figures" from far away. Can you try walking a bit closer to them and aim the laser directly at the figures (not the blue lines on top) and then pressing the trigger button?
If that does not work would it be possible to send us the whole project (via Dropbox or similar) so we could test it out ourselves?
Best,
Benjamin
Hi @BenjaminNeukom,
It did work. If I get inside the table or move really near to it, I am able to actually hit the markers and teleport. Is there a way to make the "blue figures" scaled up a bit bigger so they are easier to trigger without needing to move from the front of the table?
Hi,
We're trying to show object attributes in the metadata popup, but we're not getting a popup to work.
It's not working in the play/simulate mode, but also not in the play/VR preview mode.
Is this functionality implemented in the VR template? We've tried looking for the other template but it doesn't seem to exist anymore. Getting it to work in VR is our end goal, though :).

I am trying to display attributes but no popup appears when left-clicking an actor in a none-VR map; instead I get the axis gismo. On the Outliner the shape_root only shows a shape id and no other attributes. When the models are procedurally generated it lists many related to the CGA script. In either case I get no popup.
At first I though it was the amount of attributes so I deleted many. Some objects have none. Of course I I click the ones I know have a few. I used simple colors for material, disabled instance at export, and All metadata. I generate no reports. CE 2022.1, UE4.27
I saw older videos with popups on building and even the use of a spreadsheet but I find no instructions. I am willing to try that too. Any advise or have I missed something?
I also would like to display attributes in VR and/or in scenarios. It seems these are not yet supported, correct?