- Home
- :
- All Communities
- :
- Products
- :
- ArcGIS AppStudio
- :
- ArcGIS AppStudio Blog
- :
- How to use Biometric Authentication in the AppStud...
How to use Biometric Authentication in the AppStudio Apps
- Subscribe to RSS Feed
- Mark as New
- Mark as Read
- Bookmark
- Subscribe
- Printer Friendly Page
AppStudio 2.1 release has introduced a new Biometric Authentication plugin that provides a layer of security to authenticate a user in an app via fingerprint scan. This blog post shows how you can enable Biometric Authentication in your apps along with usage.
Please note: This is a BETA feature and is currently available on Windows, iOS, and macOS. Support for Android devices is being worked on and should be available in the next version of AppStudio. We are looking for your feedback while using it in your own AppStudio apps. (You can see that we have added this to the AppStudio player.)
Overview
BiometricAuthenticator singleton is part of Authentication module, it currently supports on devices that have a built-in fingerprint sensor or portable reader. Such as your iPhone or Mac with new touch bar or Windows devices with built-in fingerprint reader or a portable USB one.
BiometricAuthenticator has the following properties:
- supported – Return a boolean value whether your device supports this functionality
- activated – Return a boolean value whether your device is activated to use this functionality
- message – Set a custom message in the authentication dialog.
It has to be set before calling authenticate() method
- errorMessage – It's a read-only property which returns the error message on authentication. By default, it returns “No Error” for unsupported devices.
Make sure that you check for this property only when a device is supported
Methods:
- authenticate() – Invoke the native biometric authentication dialog (also known as touch id for iOS and macOS)
Signals:
- accepted() – This signal is emitted when a user is successfully authenticated
- rejected(Reason reason) – This signal is when emitted when a user fails to authenticate along with the reason for failure
Requirements
- Your device needs to have a built-in fingerprint sensor or portable reader
- Fingerprint must be enrolled in your device
How to implement fingerprint authentication
This step - by - step tutorial will get your familiarized with BiometricAuthenticator and help you get you started with the fingerprint authentication.
Step 1
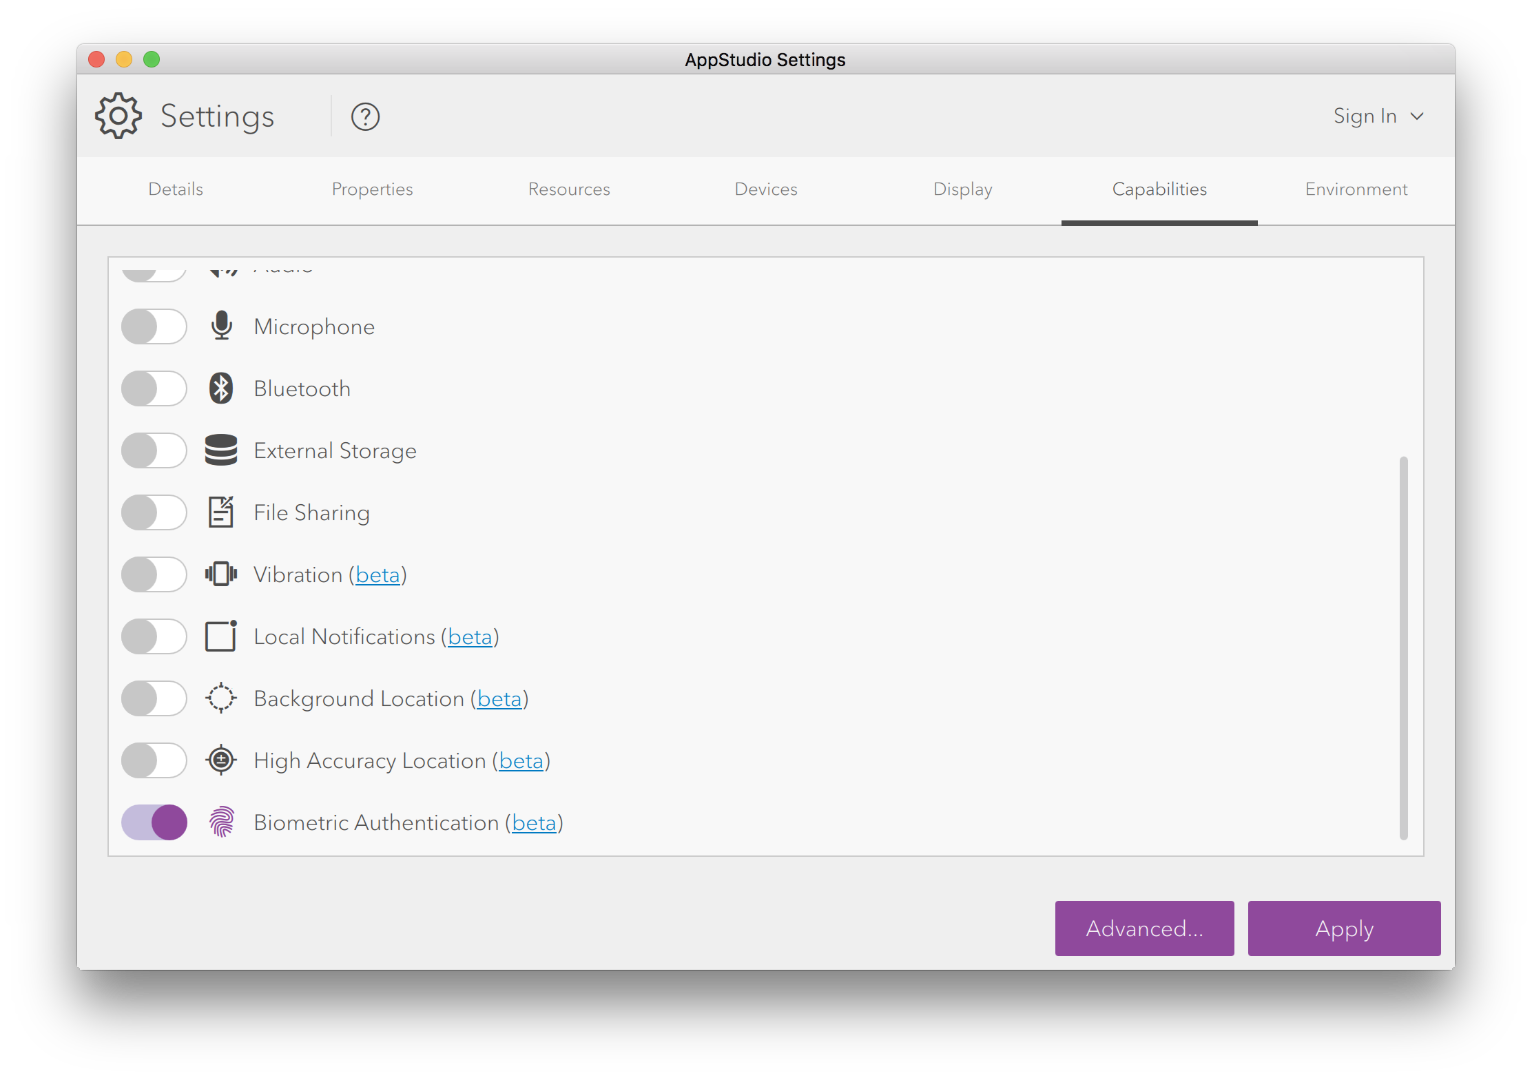
Enable Biometric Authentication capability, to do this:
Open Desktop > Select your app > Click on Settings > Capabilities > Enable Biometric Authentication
Step 2
Import Authentication Module
import ArcGIS.AppFramework.Authentication 1.0Step 3
Check if biometric authentication is activated or not. Rectangle color will turn to green if biometric authentication is activated and it will turn to red if it is not activated
App {
id: app
width: 400
height: 640
property color successColor: "green"
property color errorColor: "red"
Rectangle {
anchors.fill: parent
color: BiometricAuthenticator.activated ? successColor : errorColor
}
}
Step 4
Add a button to call authenticate() method
Button {
id: touchIDButton
anchors.centerIn: parent
text: "Touch ID"
onClicked: {
BiometricAuthenticator.authenticate()
}
}Step 5
Add a custom message on the fingerprint dialog
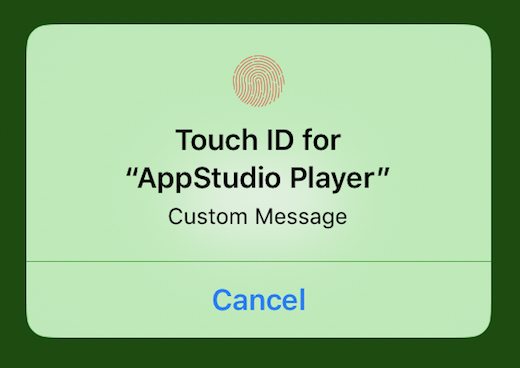
Button {
id: touchIDButton
anchors.centerIn: parent
text: "Touch ID"
onClicked: {
BiometricAuthenticator.message = qsTr("Custom Message")
BiometricAuthenticator.authenticate()
}
}Step 6
Display fingerprint status message with the BiometricAuthenticator signals. When a fingerprint is successfully authenticated, the accept signal will emit and “Success” text will print out. When fingerprint fails to authenticate, the reject signal will emit and print out "Fail"
Text {
id:statusMessage
anchors.top : touchIDButton.bottom
anchors.horizontalCenter: parent.horizontalCenter
Connections {
target:BiometricAuthenticator
onAccepted :{
statusMessage.text = qsTr("Success")
}
onRejected: {
statusMessage.text = qsTr("Fail")
}
}
}Step 7
Upload and test in the AppStudio Player
Biometric Authentication Sample
We have provided a sample app to demonstrate how to use Biometric Authentication plugin for your apps.
- Open AppStudio Desktop
- Click on the New App button
- Search and select Biometric Authentication sample
- Click on the Create Button
This sample is also available in the appstudio-samples GitHub repo

We would greatly appreciate any comments or suggestions on how we can improve Biometric Authentication plugin. Please leave your comments down below or email us your feedback.
To learn more about Biometric Authentication plugin, please check our API guide and API reference.
You must be a registered user to add a comment. If you've already registered, sign in. Otherwise, register and sign in.