Distributive Flow Maps for Pro

22923
28
03-05-2019 09:14 AM
BobGerlt
Esri Contributor
10 28 22.9K

A new version of  the Distributive Flow Lines (DFL) tool is now available. (Dec 15 , 2022)  updating compatibility to ArcGIS Pro 3.0. A couple of enhancements were made and some code cleanup.  The tool now uses the new Distance Accumulation tool.   If you want to use the tool in ArcMap, the previous version of the DFL and the previous blog are still available.  The previous blog also contains a little background on distributive flow maps and some details about the internal workings of the tool.  Here I will focus on how to use the new Pro tool and a couple details about the inputs and flow “direction”.  The example in this blog shows the flow of federal education tax dollars from Washington D.C. to the lower 48 state capitals.  If you would like to follow along, the tool and test data used to produce the maps in this blog are available at the first link above. 

Note: To use the tool you need ArcGIS Pro and the Spatial Analyst extension.  If you do not have access to a Spatial Analyst license, a 30-day no cost trial can be obtained through the Esri Marketplace.  The tool will with a base license level of Basic.  If you want to use the Create smoothed output option available in the tool then a Standard or Advanced base license will be required.

Usually, flow maps depict the flow of something from a single source to many destinations. They can also show stuff flowing from many destinations to a single source.  The DFL tool can be used for both cases.   Within the interface the point of convergence is named Source Feature.   Behind the scenes the “something” always flows from the Destinations to the Source.  This is because the tool uses ArcGIS hydrology GP tools and the flow lines are more akin to a stream network with the mouth of the largest stream terminating at the Source node.  The Source Feature is just the location where the flow lines will terminate and does not need to have any specific fields describing the “something” flowing through the network.
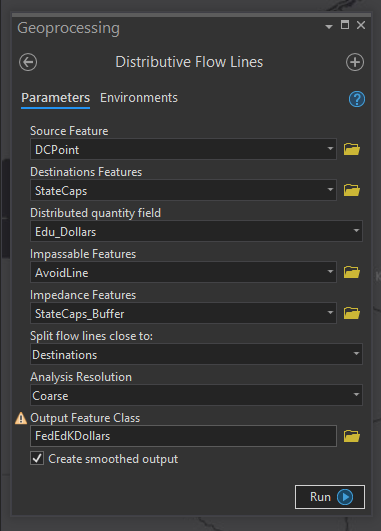
Figure 1: New Distributive Flow Lines Tool

Figure 1: New Distributive Flow Lines Tool


The Destination Features in Figure 1 must have an integer field indicating the amount of “stuff” received from the Source.  In Figure 1, the Source Feature, DC Point, is a point feature over Washington DC.  StateCaps represents the lower 48 state capitals.  Edu_Dollars is a field in the StateCaps feature class representing federal education tax dollars supplied to the states. Figure 2, below, is the output generated based on the inputs in Figure 1.
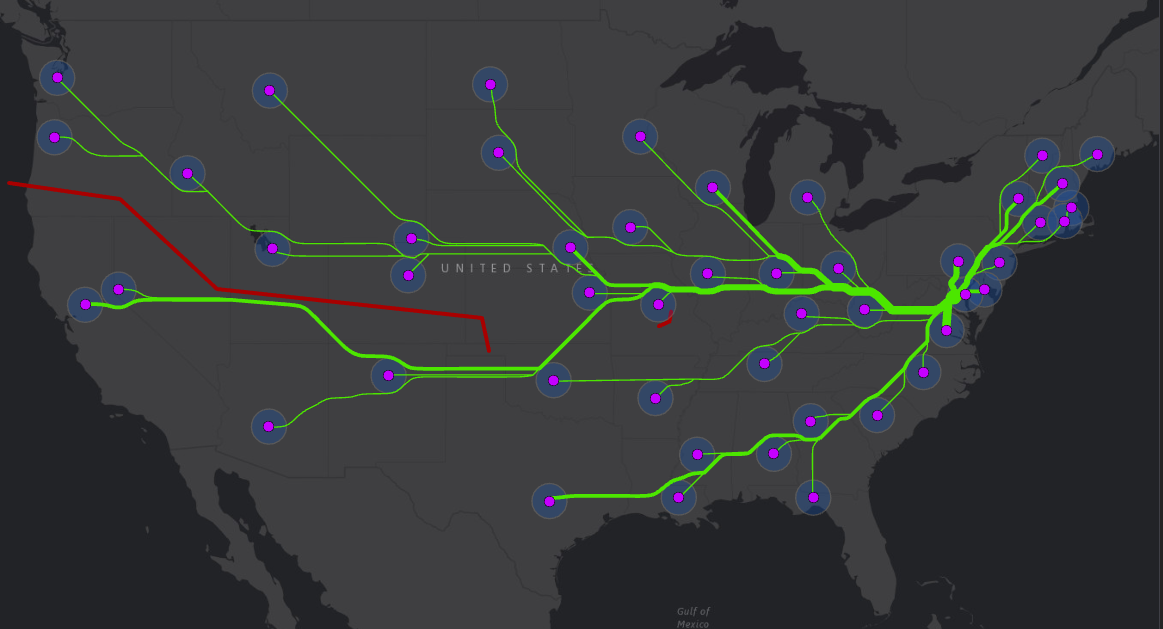
Figure 2: Output based on Figure1 input values. California and Nevada flow southward to avoid the red barrier.

Figure 2: Output based on Figure1 input values. California and Nevada flow southward to avoid the red barrier.

Note: The tool output lines will automatically be added to the map with a Single Symbol style.  To make the output have lines with increasing thickness it is necessary to change the symbology of the features using the Symbology pane.  The output features will contain a field with the same name as the input Distributed quantity field from the Destination features.  Use this field as the symbology Field.  Additionally you will want to experiment with the Method,  Classes, Minimum size, Maximum size and Template input parameters in the Symbology pane to achieve the effect you like.

In previous versions of the DFL, the optional inputs, Impassable Features and Impedance Features, also caused some confusion because they are similar but treated much differently by the tool. Both provide some control over where the flow lines will be placed. In Figure 2, the large red line in the western half of the US is the Impassable Features input.  The blue buffers around the capitals are the Impedance Features input.  Impassable features will not be crossed or touched by flow lines.  They will be slightly buffered and the lines will appear to flow around them.  The Impedance Features may be crossed by flow lines but in most cases the tool will also avoid these features unless there is no other less “expensive” path toward the Source Feature.  Figure 3 represents the output where no Impassable Features are specified. Note the flow lines from California and Nevada change from southward to northward.
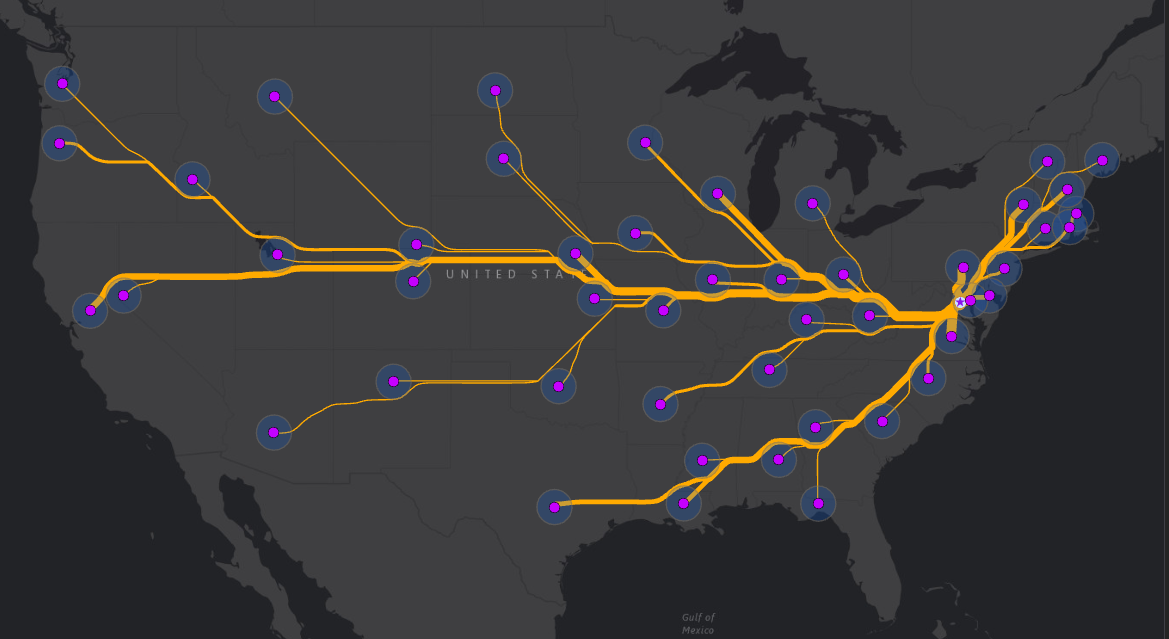
Figure 3:  Impedance Features input specified but no Impassable Feature input. Now flow lines generally go around the intermediate state capitals.

Figure 3:  Impedance Features input specified but no Impassable Feature input. Now flowlines generally go around the intermediate state capitals.

Tip:  It is not necessary to turn on, or even add the Impedance and Impassible features to the map.  They are shown here for clarity.  Depending on the application of the tool you may wish to show them because they are significant to the story you are trying to communicate, but often they are just used for aesthetic purposes to control the shape of the output and have nothing to do with the story being told.

In Figure 4 below, neither Impassable nor Impedance features were specified.  As you can see, flow lines pass through the intermediate state capitals.  This is sometimes desired, but in the case of federal tax dollars, the dollars do not flow through intermediate states, so this might be confusing.  Providing an Impedance feature reduces this confusion.  If the buffers around the state capitals were specified as Impassable Features, the flow lines could not flow away from the states and no solution would be possible. 
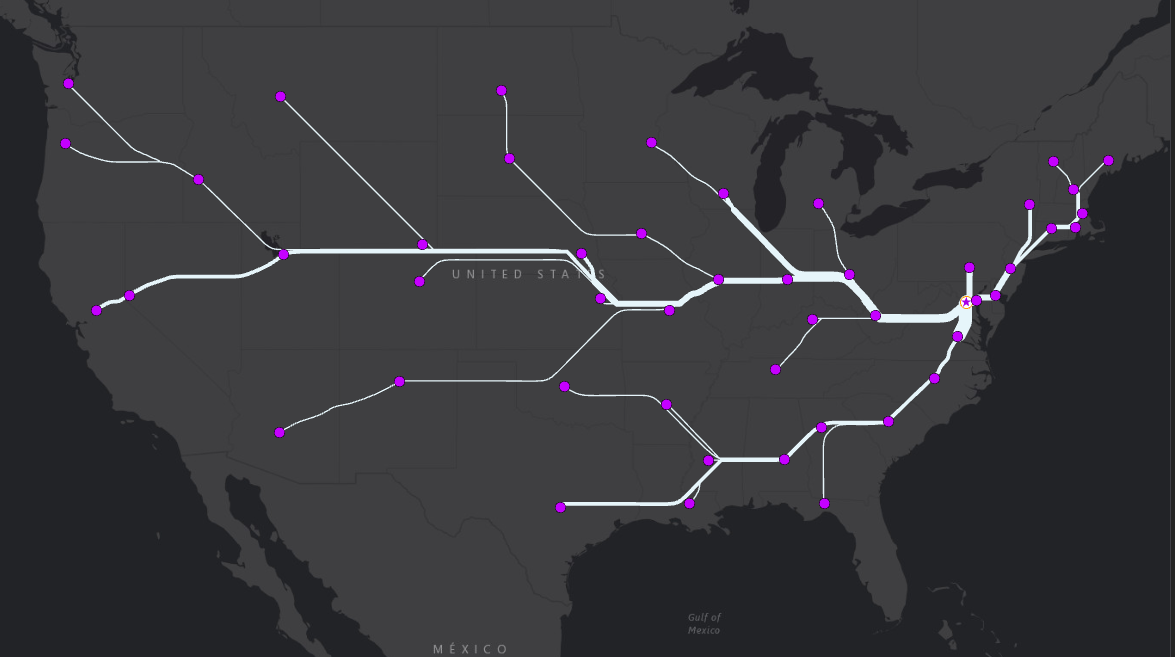
Figure 4: Output generated without specifying Impassable or Impedance Features.  California and Nevada flow northward. Flow lines flow through intermediate state capitals

Figure 4: Output generated without specifying Impassable or Impedance Features.  California and Nevada flow northward. Flow lines flow through intermediate state capitals


The output in Figure 5 below used the same inputs as Figure 4 except the “Split flow lines close to” parameter was changed from Destination to Source. The result is that California has a dedicated line all the way into Missouri, and several things change in the Northeast.  This may be less aesthetically pleasing but does a better job of highlighting which individual states receive more tax dollars.
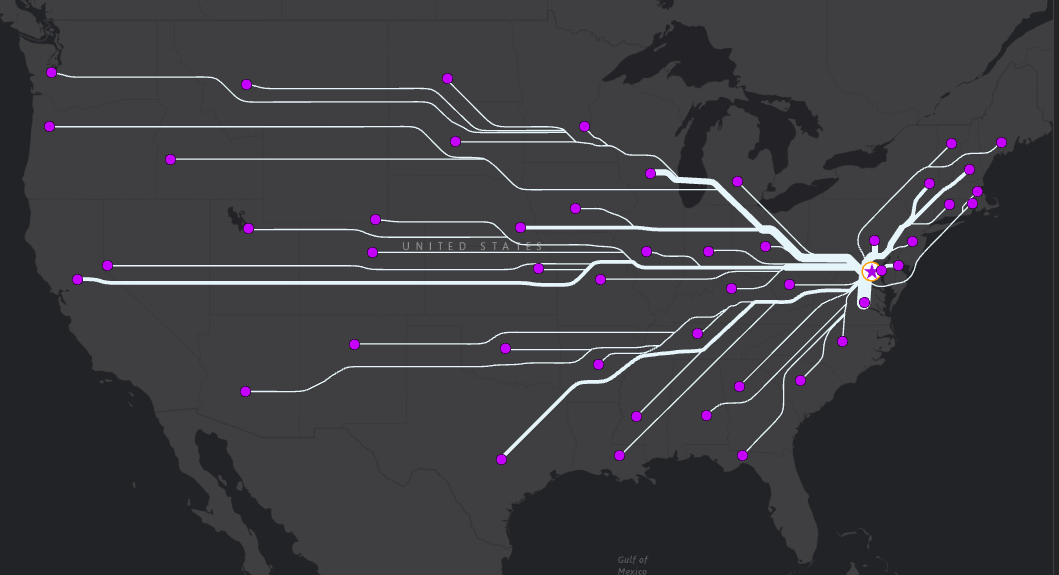
Figure 5: Split flow lines close to Destinations, Neither Impedance nor Impassable features specified.

Figure 5: Split flow lines close to Destinations, Neither Impedance nor Impassable features specified.


Figure 6 is a closeup of what is going on in the Northeast. There are a few things worth pointing out. The first is the treatment of the Impedance Features, StateCaps_Buffer.  Notice how the flow lines pass through the New York and Connecticut buffer features. This is happening because the direct route is less “expensive” than going around those buffers.  Purple labels indicate where the values on the flow lines are coming from. The green flow line labels emphasize the additive nature when individual tributary flow lines converge as they get closer to the Source feature.  Lastly, the Massachusetts flow line goes directly through Rhode Island. This is because it is located within the Rhode Island StateCaps_Buffer. This is a case where some manual editing may be needed to clarify that Massachusetts tax dollars are not flowing through Rhode Island.
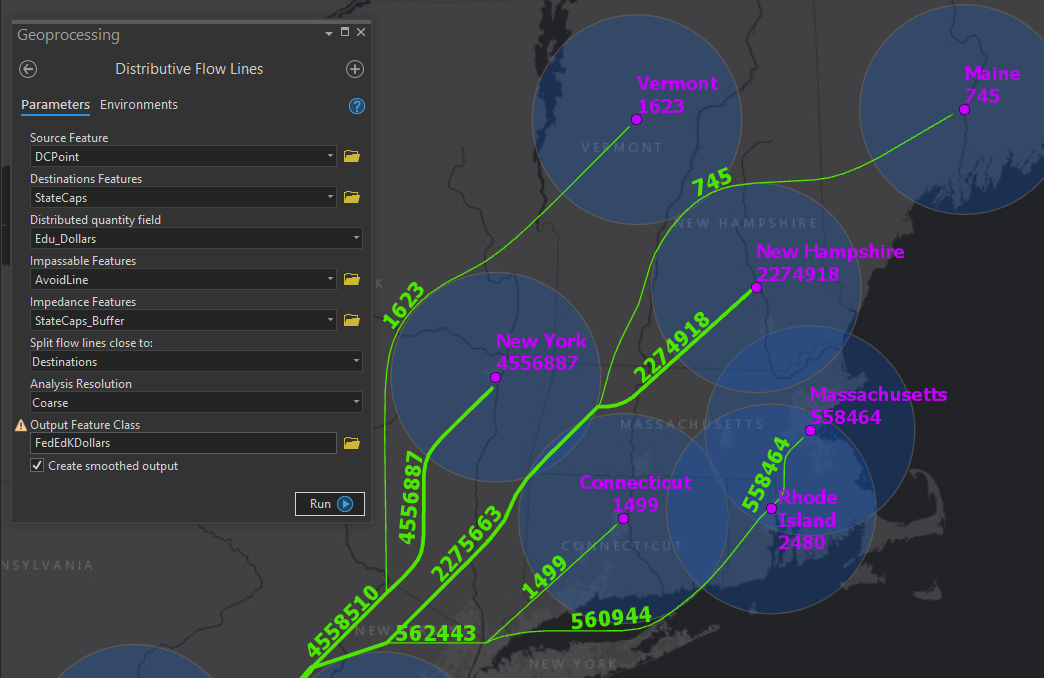
Figure 6: Note the flow line pass through the buffers around New York and Connecticut as well as Rhode Island. Also note the additive nature of the flow lines.

Figure 6: Note the flow line pass through the buffers around New York and Connecticut as well as Rhode Island. Also note the additive nature of the flow lines.


I hope you will find the tool useful in creating flow maps or other creative applications.  I also look forward to reading your comments, suggestions and use cases.  If you missed the link to the tool and sample data, here it is again.  Distributive Flow Lines for Pro.

28 Comments
alex_friant
Frequent Contributor

What a powerful tool for visualizing flow. Thank you for working so hard on this!

BartoszBrzeziński1
Regular Contributor

Well done, amazing work!
I would like to use my tool for a given area, but I am getting no results. I've set everything up as recommended and yet the tool doesn't return any layer.
Area of intereset: Europe,
Projected coordinate system: ESPG 3857

I get the following message: 

LOG:
Foreground cost raster created!
Source Feature processed
Destination features processed
NOTE: "If script completes with no output make sure destination feature is within the processing extent"

I compared this message with the message from your sample and it seems the script didn't take a few steps.

Thanks in advance for help!
Bartosz

BobGerlt
Esri Contributor

Bartosz

The behavior you are seeing is usually due the fact that there are not connections possible between the source and destinations.  This may be caused by use of barrier features that obstruct the path between the source feature and destinations. It may also be caused by projection issues but I believe the code checks for that situation.

Let me know if this suggestion does not help you get things working and we can keep troubleshooting.

Best

Bob


HoqueM
by
New Explorer

Hi Bob, Thanks for allowing to use this excellent tool. Is there any way the tool can be modified to allow the flow to happen along specified lines/paths (and the direction to be controlled by the slope of the lines/paths)? Currently, I guess one can have some control over the lines by putting several lines under Impassable Features. Thanks for your help! Best, Mo

BobGerlt
Esri Contributor

Mo

If I understand your question, you might be able to directly use the Hydrology tools in Spatial Analyst.  Those are the same tools I use in the DFL tool to create flowlines.  There are a number of tools in Pro for creating surfaces which is what you need as input to the Flow Accumulation tool and then eventually the Stream To Feature tool.  Topo to Raster would provide a way to use the existing lines as input to the surface creation process. Create TIN, Edit TIN, and Raster to TIN are tools that may also help.  If your features do not represent a conventional streams but you want things to flow to them you can use Euclidean Distance or Distance Accumulation or Cost Distance to create an "artificial" surface that gains elevation as it moves away from your existing lines. This surface can than be used as input to the Hydrology tools.  The general workflow would be something like 1. Distance Accumulation based on distance from existing lines, 2. Flow Direction, 3. Flow Accumulation using output from Flow direction. 4. Stream to Feature.   Distance Accumulation and Euclidean Distance both provide for an optional Direction output so you could skip the Flow Direction step above.  Here is a much description of the process I outline above.  

Hope this helps,  Bob


MarenLam
New Explorer

Hello! 

I have downloaded this tool and have been tinkering with it and I can't get it to work. I am trying to show the flow of refugees from various countries (source feature class) into the US (destination feature class). Both of these parameters are met with this:

DFL Screenshot .jpg

"ERROR 000001 Traceback (most recent call last):
File "<string>", line 130, in updateParameters
AttributeError: module 'arcpy' has no attribute 'mapping'"

Do you have any tips? My professor has never used this tool.

Thank you


BobGerlt
Esri Contributor

Maren

I believe what might be happening is that you have opened the ArcMap version of the tool but are trying to use the tool in ArcGIS Pro.  This link: https://geoxc.maps.arcgis.com/home/item.html?id=46a5ce17daa146e29aa60bc3535d3833 will get you to the version of the tool that will work with ArcGIS Pro.

Please let me know if this does not resolve your issue. 

Thanks

Bob

MarenLam
New Explorer

You are right! I did download the wrong one. Thank you.

Now I am having issues with the distributed quantity field. I do not have the option to select the refugee totals per country from the drop down. Only the "FID" number. I don't know if it matters, but I keyed in the refugee numbers myself to the attribute table.

BobGerlt
Esri Contributor

The distributed quantity field needs to be an integer field. (Long or Short). This sounds like an interesting project. The refugee field is already an integer field you can reach out directly to me at bgerlt@esri.com.  It has been a while since I published the tool so it may need an update.  

Best,

Bob


JimWooten
Frequent Contributor

Hi Bob;

Thanks for providing the tool but it apparently doesn't work with a Basic license.  Is there a way to change the tool to allow it to work at that license level? Thanks.

Jim

nathandb
New Explorer

Hi Bob, @BobGerlt 

i am running the latest version of arcgis pro (3.03), after running the flow line generator with youre basic settings, the lines are drawn on the map, but the thickness of the lines is the same for every line and no circles are drawn around the cities, any ideas how to fix that? 

nathandb_0-1671029114844.png


Thanks for the tool!

greetings Nate

BobGerlt
Esri Contributor

Nate,  @nathandb 

Thanks for using the tool and for your comments.  In paragraph 5 above, I attempt to explain how to use Impedance features.  If you would like to have the lines "mostly" avoid the cities then you need to create buffers around them and specify those buffers as input "Impedance" features.  As Impedance features the lines will generally avoid the buffers but in some cases, where a less costly path is unavailable, the lines will pass through the buffers as in the Northeast section of the US example.   If you make the buffers "Impassable" then you will make those features unreachable and so a solution will not be possible.  Generally "Impassable" features should not directly correspond to Source or Destinations but might be used to control the location of output lines.  For instance the US boundary LINES between Mexico and  Canada could be used as "Impassable" feature to prevent lines passing through those countries.  This might happen if you included Alaska as part of the input.

Your question about the thickness of the lines caused me to reread the blog and realize I did not explain how to get the thicker lines as the distributive quantity increases.  I think I must have covered it in a previous blog or in the tool comments but not in this version. To make the lines increase in width you must symbolize the lines using the Graduated or Proportional line symbols in the Symbology pane, use the distributed quantity field, e.g. Tax dollars or People, as the  symbolization Field.  Adjust the number of Classes, break Method, Template, Minimum and Maximum to get the line sizes you prefer.  

Watch for some edits to the blog as well as a new version of the tool coming soon.

Thanks

Bob

JimWooten
Frequent Contributor

Hi Bob;

Any news on the availability of the tool at the Basic license level?  Does it require the Spatial Statistics extension?  Thanks.

Jim

BobGerlt
Esri Contributor

Jim, @JimWooten 

I hope to make time to post an update to the tool this week.  At that point I will also check the minimum license level required to verify if it more than Basic with Spatial Analyst extension.

The tool should not require the Spatial Statistics extension but it will require the Spatial Analyst extension.

Bob

JimWooten
Frequent Contributor

Thank you!

BobGerlt
Esri Contributor

@JimWooten 

I have updated the tool to be a bit more compatible with ArcGIS Pro 3.0.  The tool will run with only a Basic ArcGIS Pro base license and a Spatial Analyst extension.  If you choose to use the Create smoothed output option then a Standard or Advanced base license will be required in addition to the Spatial Analyst extension.

I look forward to feedback and comments.  


Thanks

Bob

JimWooten
Frequent Contributor

Great, Bob, thanks.  I'll work with the tool and let you know how it goes.

Dede
by
New Explorer

Hi

i am getting this error when running the tool:

ERROR 001041: At least one densification parameter must be specified.


please help

BobGerlt
Esri Contributor

Dede

I will need a bit more info to help... could you send me a screenshot of the tool with the parameters you used to run it?  You can send it directly to me at bgerlt@esri.com.  If you are using Impassable features it may be that you have created a situation where your Impassable features prevent any valid paths between between the many Destination Features and the single Source Feature.

TCKauhi
Occasional Contributor

@BobGerlt 

Thank you for your work on this, I am using ArcGIS Pro 3.1.  Does it work in 3.1? I am getting an error "More than one feature in Source feature class. Only one feature is allowed in Source feature class." Any chance you could provide the data table for the example above? 

Thanks in advance!

AnthonyOlivieri
New Contributor

I am excited to explore this tool! Can the results of the PRO analysis be sent to AGOL as a layer?


Bob_Gerlt
New Explorer

Yes,  The output will be a feature class that you can then publish to AGOL

CoreyRichidt
New Explorer

Hi Bob,

I have downloaded the tool and have been using it for the past week. I plan on using the results in a Dashboard where I would like to have the flowlines turn on/of dynamically when certain geographies are selected (i.e. counties, and zip codes, etc.). 

However, I've noticed that when generating the flow lines from a zip code centroid point layer, there is now way to tie the flow lines back to their zip code centroid point feature class. Is there a way to have an OID field or perhaps a field a user can specify to carry over into the flow lines result? This would be extremely helpful as it would allow for correlation back to the Destination point layer.

Thanks for your help and great work on this tool! 

Bob_Gerlt
New Explorer
Hi Corey,

This is a good idea and thanks for your comment. I do not see an easy way to do this in the code but I will look into it at some point. I suspect I am overlooking an opportunity. One challenge is that the output lines eventually join with lines from other features. At that point, it becomes a challenge to assign a destination feature ID. Here are a couple of ideas that might give you a partial solution. One would be to run the tool a second time using the zip code or destination feature ID as the distributed quantity. You could then join the distributed quantity back to the flowlines using Join Field. Use the Zip code or ID as the Join Field. This would solve the issue up to the point where two lines came together. You could also use Feature Vertices to Points on the Start vertex then intersect the from vertex with the zip code poly or if you just have points use Near instead of Interesect. You would then have the destination feature and line id's in the same table and you could join back to the flow lines this also only works up until two lines join. Another possibility would be to use network traces going upstream or downstream to assign a zip code to each route but for some reason this does not seem like the right approach. I would be glad to here what you do or if you come up with an effective method.

Thanks,
Bob
YanaNikolova
New Explorer

Hi Bob,

Does the tool work with ArcGIS Pro 3.2? I am running it with all necessary parameters filled, no errors appear and there is a message saying the tool has run successfully, however, no output layer is created.

Best regards,

Yana

YanaNikolova_0-1701278604855.png


Bob_Gerlt
New Explorer
Yes I believe the tool should work with 3.2. Generally if it runs and does not generate output then there are not possible paths between your source feature and destination features. This may be because impassable features were used and they surround either the source or destinations. Try running the tool without impassable or impedance features. If you have already tried this and no paths are generated you can respond directly to me and I will see if I can help you get to the bottom of the issue.

Best,

YunusEmreTortamis
New Explorer

Hi,

My Distributive Flow Map tool does not produce an output.

I am trying to create flow map of tribes migrating between winter and summer pastures (Megelgin) but it does not produce any lines and the operation takes 3 seconds. I attached the screenshot.

Interestingly, destination feature class created by my advisor does not have this problem. I attached screenshot of it as well.

Something is preventing Spatial analysis in my case, returns null or something but I cannot figure out.

Thanks,


image_2024-02-27_102946941.png


2.JPG

TimoWidbom
Occasional Contributor

Hi

I have an issue with Distributive Flow lines and ArcGIS Pro 3.3! The code doesn’t finish; it gets stuck during the data cleanup phase and never complete. However, the output file is still generated in the catalog.


TimoWidbom_0-1716750337610.png

Thanks

About the Author
Member of the Esri Applications Prototype Lab Spatializing in Python, 3D, CCM, Centrality, Flow Maps and Raster in general