- Home
- :
- All Communities
- :
- Products
- :
- ArcGIS Survey123
- :
- ArcGIS Survey123 Blog
- :
- Securing data in public surveys (Survey123 web des...
Securing data in public surveys (Survey123 web designer)
- Subscribe to RSS Feed
- Mark as New
- Mark as Read
- Bookmark
- Subscribe
- Printer Friendly Page
[Updated October 27, 2021. Screenshots updated]
By definition, a public survey is accessible to anyone who wants to submit data to it, but that does not mean you need to make your survey results public as well. In fact, the default configuration of a public survey always keeps your survey results private. This ensures that users in the public domain cannot view, query, download or update already submitted data.
Unfortunately, it is not uncommon to find public surveys where the security configuration of the survey is not set appropriately, allowing unauthorized access to the survey’s data. This article describes best practice for securing the data of surveys published in the Survey123 web designer.
If you are interested in securing data for a public survey published with Survey123 Connect, go to https://community.esri.com/groups/survey123/blog/2020/05/11/securing-data-in-public-surveys-survey12...
If you are not familiar with the basics of public surveys, refer to https://community.esri.com/groups/survey123/blog/2016/11/10/getting-started-with-public-surveys.
Sharing your survey publicly while keeping your data private
Technically speaking, you can control the sharing of your survey from the Survey123 website as well as from ArcGIS.com. The easiest and safest way to share your surveys is through the Survey123 website. Using the ArcGIS.com website is more error prone and can lead you to inadvertently share, and expose your data.
To share your survey publicly:
- Sign in to the Survey123 website at survey123.arcgis.com.
- From the survey gallery, open the Collaborate tab of your survey

- The Share survey panel controls who can submit data to your survey. While in the Share survey panel, look for the section named Who can submit to this survey? and check the Everyone (Public) option to share your survey publicly.

You will not be able to share a survey publicly if your role in the organization lacks the Share items publicly privilege, or if the organization has disabled the Allow users to share items publicly security setting.
- Scroll down the page and look for the What can submitters do? section. Note that by default, the selected option is 'Only add new records'. This guarantees that your survey layer will not expose your survey results.
- Click on Save at the bottom to persist all changes.

At this moment, your survey is shared publicly, allowing anyone to submit data through both the Survey123 web and field apps. You can get the link to your survey from the top of the Collaborate tab and distribute the link with your users. Since you have restricted access to 'Only add new records' in the Collaborate tab, it will not be possible to query, update, delete or download your survey data through the Survey123 web or field apps. Your survey's feature layer will also be secure, preventing any type of access (other than adding new records), from other Esri, third party apps or programmatic access.
Sharing your survey results privately for use within the Survey123 website
Your survey data is useful for people to make decisions. Sooner or later you will likely want to share that data with people who need it. Through the Collaborate tab, you can privately share this data with members of your ArcGIS organization so they can view, analyze and even download the data from the Survey123 website.
- From the Collaborate tab of your survey, switch to the Viewer panel.
- Look for the "Who can view results of this survey?" and check the groups within your organization that should have access to your survey's data.
- Click on Save to persist changes.

Now that you have shared the results of your survey, users with access to the survey results will be able to look at the data from the Survey123 website using the Overview, Data and Analyze tabs of the Survey123 website.
You can get the survey results link from the top of the Collaborate tab and distribute it within your organization. Alternatively ask users to login into the survey123.arcgis.com website to see the survey results.
A deeper view into how all of this works
The Collaborate tab in the Survey123 website is meant to make the process for sharing and securing your data easy and error-free. Under the covers, sharing and access control to your survey data is managed through the use of ArcGIS feature layers and hosted feature layer views. These layers an views are saved in a folder created in the ArcGIS account of the survey owner. Next, we are going to look at these feature layer views in detail.
- Log into the arcgis.com website and click on the My Content tab.
- Look for your survey's folder in the Content tab. Note that Survey123 folders carry a Survey prefix followed by the name of your survey. It will look something like this:
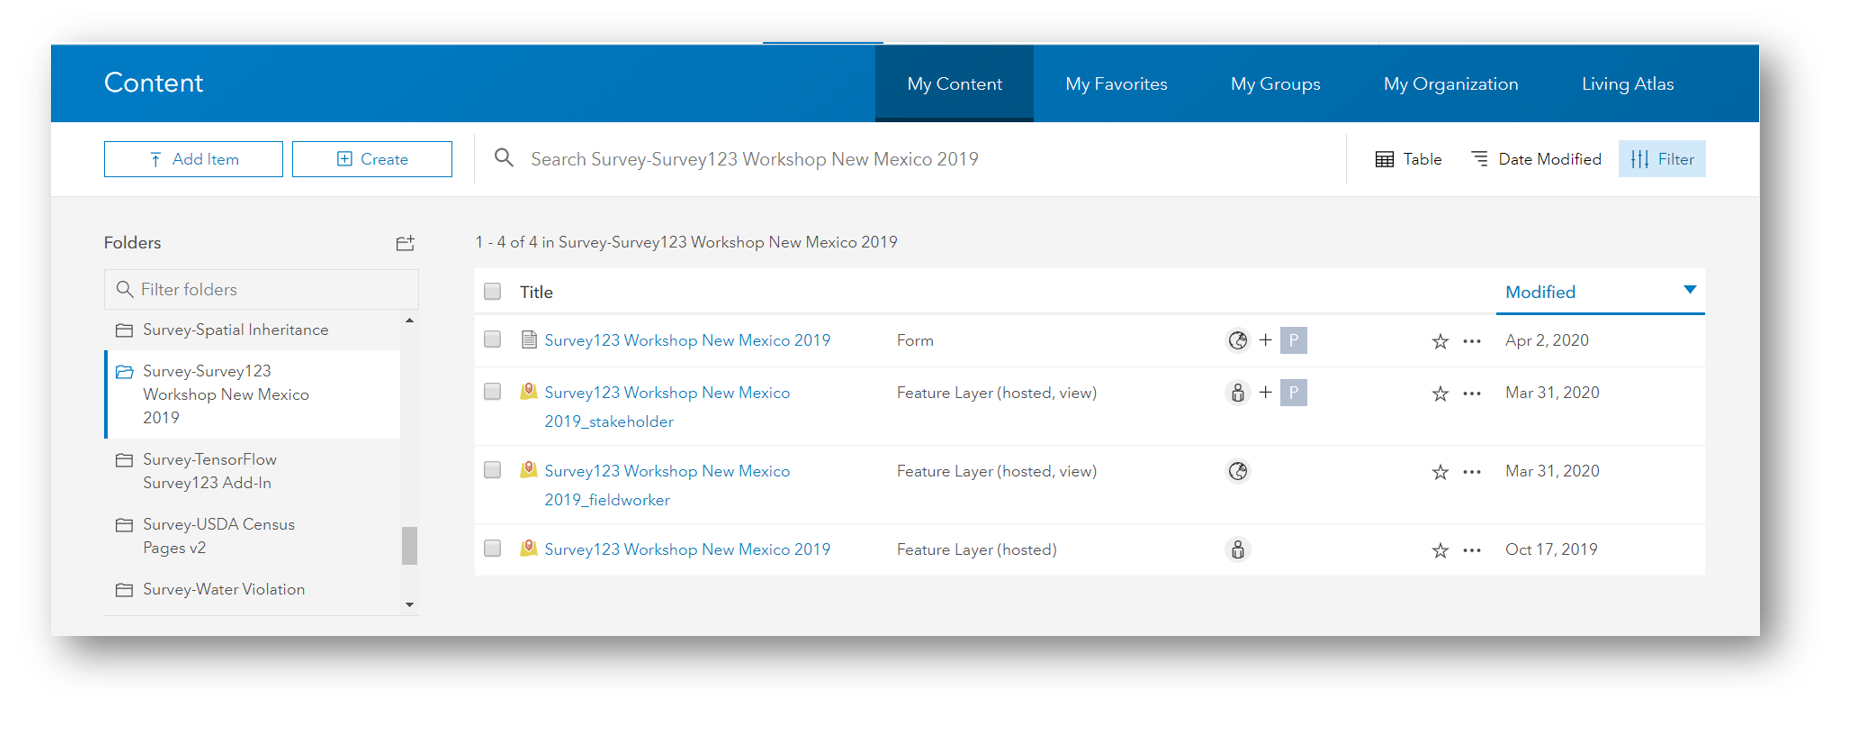
Here is a brief explanation of the items in your survey directory:
- A form item: This ArcGIS item contains the definition of your survey with its questions, rules, look and feel and other properties. This item allows end-users to use your form from the Survey123 web or field apps.
- A hosted feature layer view with a "_fieldworker" suffix in its name. This item is created by the Survey123 web designer when the survey is first published. This item is used by the Survey123 web and field apps to submit data into ArcGIS. Permissions and sharing for this item are controlled via the Share survey panel in the Collaborate tab of the Survey123 website.
- A hosted feature layer view with a "_stakeholder" suffix in its name. This item is created by the Survey123 website when the survey results are shared through the Collaborate tab. This item is used to control access to the survey results through the Survey123 website. If the Share results panel of the Collaborate tab has not been used to share the survey results, this item will be missing.
- A hosted feature layer. This is where the actual data of your survey is stored. This item is created by the Survey123 web designer when the survey is published. You should never share this item.
The Survey123 website, through the Collaborate tab, manages the sharing and permissions set in each of these items. The website guarantees that the sharing across the items is consistent so the Survey123 website and apps work while keeping your data secure. Manually controlling the sharing of these items through the ArcGIS.com website can lead to inconsistencies and inadvertently expose your data.
- The Form item is shared with all groups in the Share survey and Share results panels of the Collaborate tab. Since the Form item simply describes questions and rules in your survey, it does not provide access to your data. If your survey is shared publicly for submits, this item will be shared publicly. If your survey is shared with specific groups in your organization for viewing results, this item will be shared with these groups as .
- The _fieldworker feature layer view is shared with users who need to submit data (Share survey panel in the Collaborate tab). If your survey is shared publicly, this item will also be shared publicly. Access privileges in this item control how your data is accessed according to your choices in the Share survey panel of the Collaborate tab.
- The _stakeholder view is shared with users who need to view survey results. Access privileges are controlled through the Share results panel of the Collaborate tab.
- The Hosted Feature Layer is kept private so only the owner of the survey has access to it. As long as there are _fieldworker and _stakeholder views, the Survey123 website and apps do not require direct access to this item. This item should always remain private.
Never share your source survey feature layer. Keep your survey feature layer private and let the views do the sharing.
For a more in-depth exploration of the specific security settings present in the _fieldworker and _stakeholder views, you can follow these steps:
- From the ArcGIS.com Content panel, while looking at your survey's folder, click on the _fieldworker feature layer view.
- Switch to the Settings tab and scroll down to explore all the permissions.
Sharing your survey results in web applications and dashboards
It is very common to build web mapping applications and dashboards on top of survey data. Enabling access to your survey data from these applications must be done with care, carefully controlling what data is shared and with whom.
The best way to enable access to your survey data by third party applications is by creating a new feature layer view on top of your survey's feature layer. By creating a new view, you can better control what data from your survey is shared and with whom, tailoring this to the needs of your third party application.
Using your survey's feature layer, fieldworker or stakeholder views to support third party applications is not recommended because in the future you may need to make adjustments to the sharing or permissions of these items to satisfy the needs of your third party application. These changes will affect the normal behavior of your survey and compromise the security of your survey data.
Please read the previous paragraph again. Read it carefully so it sticks! Remember: Do NOT use the field worker or stakeholder views to share your survey results in dashboards or web maps. Do NOT use the source survey feature layer either! Always create a NEW feature layer view on top of the source survey feature layer and configure your view privileges and sharing as appropriate for the needs of your web map, dashboard, etc.
This is how you can create a new view, for example, to support a web mapping application:
- From your survey's folder in My Content, click on your survey's feature layer to open it's item details page.

- Next click on Create View Layer.
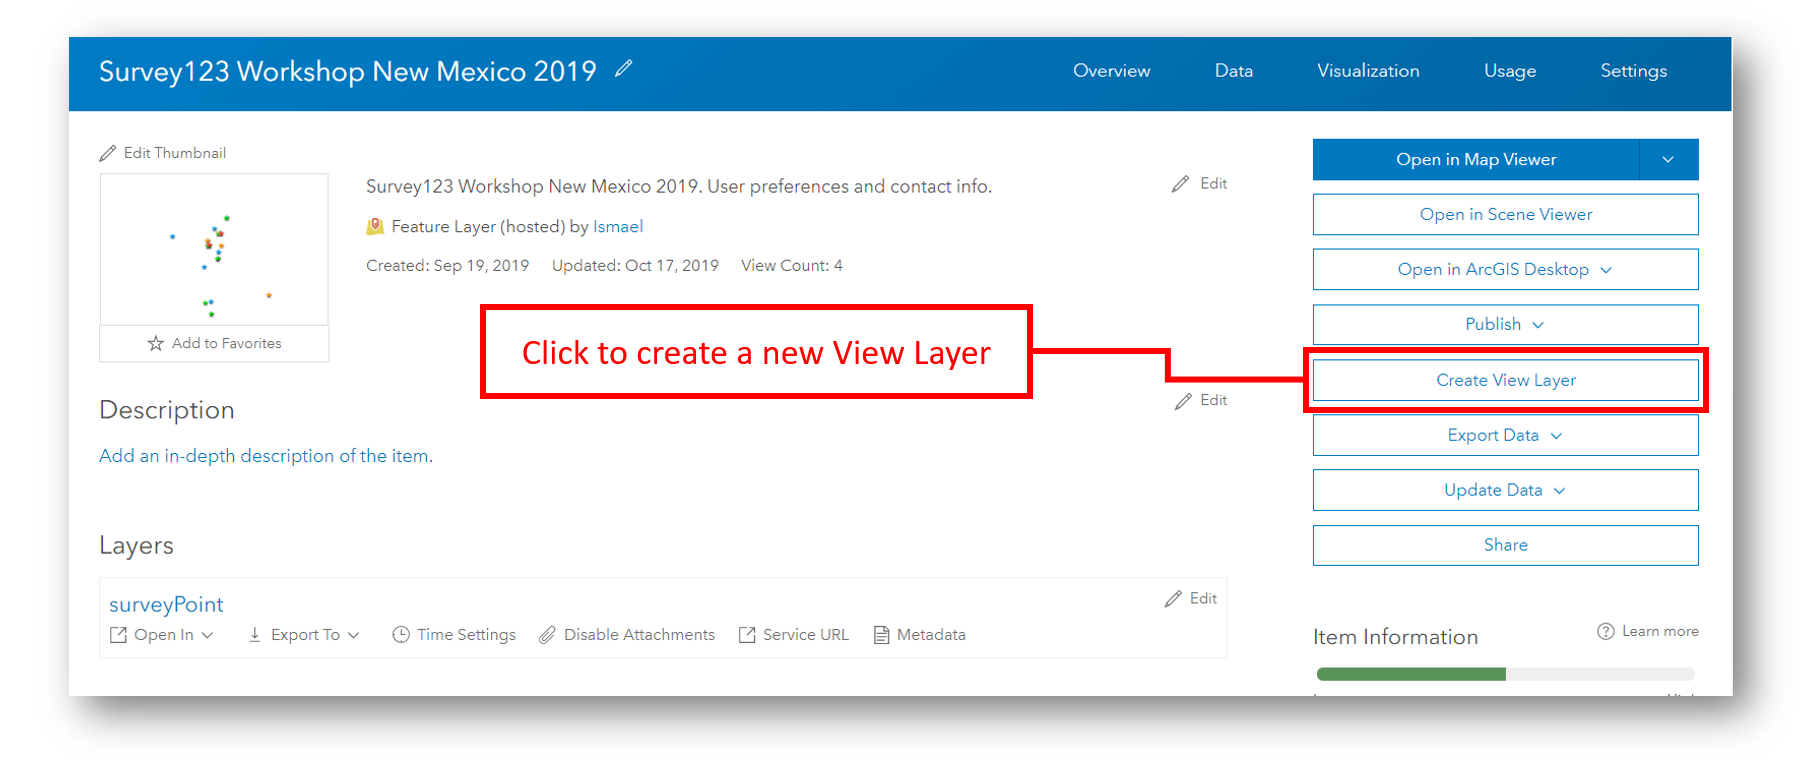 Once your new view layer is created, you can control through the Settings dialog the permissions set on that layer. For example, you can disable editing and make it read-only. Through the Visualization tab, you can also use the feature layer view definition to choose which fields in your feature layer you want to expose. It is also possible to apply filters to your view to hide certain rows, such as non-vetted submitted survey entries, etc. Finally, you can also share this new view layer according to the needs of your web application, which will likely be different from those of your survey.
For more information about working with feature layer views:
- Create hosted feature layer views—ArcGIS Online Help | Documentation
- Set hosted feature layer view definition—ArcGIS Online Help | Documentation
- Getting started with Hosted Layer Views (Blog)
Do's and Don't s. Once more.
For surveys authored from the Survey123 web designer, the easiest and safest way to control the sharing of your survey and access to your survey results is through the Collaborate tab in the Survey123 website. It is recommended that you use the Collaborate tab for this purpose.
Altering the sharing and privileges on your survey items directly through the ArcGIS.com website is more error prone and can lead to a broken survey (for example, a survey that cannot access the _fieldworker view to submit data), or to a survey that exposes your data (through a misconfiguration of the sharing for the feature layer or its feature layer views).
It is not recommended that you alter the sharing or security properties of the survey form item or its corresponding feature layer and views. Let the Survey123 website do that for you.
In the event that you need to enable access to your survey data for third party applications, it is highly recommended that you create a new feature layer view on top of your survey's feature layer. It is not good practice to use the _fieldworker or _stakeholder views to support third party applications, because the sharing and access needed by your survey and the third party apps are likely very different.
You must be a registered user to add a comment. If you've already registered, sign in. Otherwise, register and sign in.