- Home
- :
- All Communities
- :
- Industries
- :
- Gas and Pipeline
- :
- Gas and Pipeline Blog
- :
- Tracking and Traceability 2019 - Part 2
- Subscribe to RSS Feed
- Mark as New
- Mark as Read
- Bookmark
- Subscribe
- Printer Friendly Page
By Tom Coolidge and Tom DeWitte
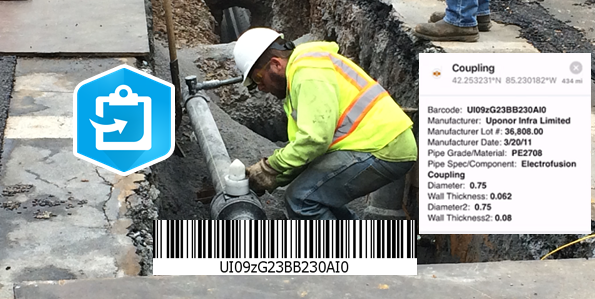
Today’s Collector and ArcGIS Enterprise provide new enhancements and capabilities. These enhancements include; improved user interface, better GPS antenna support, direct capture of barcode via the mobile device camera, and allow for a more streamlined workflow for field users. In addition to those important enhancements, the enterprise geodatabase capability of attribute rules allows for the automatic decoding of the barcode and the derived barcode data to be automatically written to the appropriate attributes. This automatic decoding and attribute population provides significant productivity gains for field users and allows for a simpler deployment pattern for administrators. In this blog we will take a deeper dive into how to configure and deploy the ArcGIS platform and collector to address the industry need of Tracking and Traceability.
For an introductory explanation of how the ArcGIS platform addresses Tracking and Traceabiliy, please read the first blog of this 2 blog series: Tracking & Traceability – Part 1
Like any good recipe for success, we need to know the required ingredients. The Tracking and Traceability solution requires the following software:
- Collector for ArcGIS
- ArcGIS Enterprise 10.6.1 or higher
Additionally, we will need arcade scripts which provide the logic of how to decode the ASTM F2897 barcode 16-character string and use the derived data to automatically populate the appropriate attributes.
Though not required, most deployments also include a GPS Antenna to improve spatial accuracy.
The Basic deployment steps
Deploying the ArcGIS Platform to meet the needs of Tracking and Traceability can be broken down into 5 steps. These steps are:
- Preparing the enterprise geodatabase
- Creation of staging geodatabase layers
- Application of attribute rules
- Publication of staging geodatabase layers as a feature service
- Creation of web map for Collector
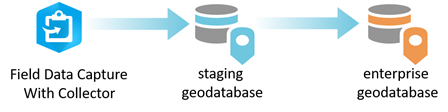
The overall data flow process for Tracking and Traceability is to have Collector post the field collected features directly to the staging geodatabase. There is NO translation or conversion of the field collected data. Once the field collected data is submitted to the staging geodatabase a GIS mapping technician can review the new features and append them into the enterprise geodatabase.
Preparing the Enterprise Geodatabase
The first step to setting up this workflow is ensuring your Enterprise Geodatabase has the required feature classes, feature class attributes and coded value domains to store the information collected in the field.
If you are starting a new enterprise geodatabase, it is recommended that you use the Esri provided pipe system data model called Utility and Pipeline Data Model (UPDM). The 2019 edition of UPDM includes everything needed to store the information collected in the field. You can download this data model with this link:
If you have an existing enterprise geodatabase, then you need to make sure the asset feature classes have the correct attributes to store the field collected data. Examples of assets captured by field staff include, fittings, valves, and pipe segments. Here is a specific listing of the minimally required attributes:
Point Asset Featureclasses
Field Name | Field Definition | Coded Value Domain |
barcode | Text(16) |
|
manufacturer | Text(2) | Pipeline_ASTM_Manufacturer |
manufacturerlotno | Long Integer |
|
manufacturedate | Date |
|
manufacturecomponent | Text(2) | Pipeline_ASTM_Manufacture Component |
material | Text(2) | Pipeline_ASTM_Material |
diameter | Double | Pipeline_Fitting_Diameter |
diameter2 | Double | Pipeline_Fitting_Diameter |
wallthickness | Double |
|
wallthickness2 | Double |
|
Line Asset Featureclasses
Field Name | Field Definition | Coded Value Domain |
barcode | Text(16) |
|
manufacturer | Text(2) | Pipeline_ASTM_Manufacturer |
manufacturerlotno | Long Integer |
|
manufacturedate | Date |
|
manufacturecomponent | Text(2) | Pipeline_ASTM_Pipe_Manufacture Component |
Material | Text(2) | Pipeline_ASTM_Material |
nominaldiameter | Double | Pipeline_Pipe_Diameter |
wallthickness | Double | Pipeline_Pipe_Wall Thickness |
After your Enterprise Geodatabase is ready to accept the decoded barcode values and the appropriate ASTM F2897 coded value domains have been assigned, you are ready to create the staging geodatabase.
Creating the Staging GDB
This step involves setting up your staging geodatabase layers. These layers should be a schema duplicate of the enterprise geodatabase asset layers. Being a schema duplicate will simplify the appending of data from the staging geodatabase to the enterprise geodatabase.
The simplest approach to setting up the staging geodatabase is to create schema duplicate feature classes in the enterprise geodatabase. I recommend creating a new feature dataset to store these duplicate layers. If using the UPDM 2019 edition data model the feature classes to duplicate are:
- PipelineDevice
- PipelineJunction
- PipelineLine
To help keep the staging layers uniquely separate from the production layers I like to rename the layers as follows:
- StagingDevice
- StagingJunction
- StagingLine

These duplicate layers should not have any features/records.
To properly support disconnected field capabilities, you should use the “Add GlobalID” tool to add a GlobalID field to every staging feature class.
Additionally, though not required, it is recommended that you enable “Editor Tracking” to allow all edits to have a date/time stamp and the ArcGIS platform user ID of who created and last updated the feature/record.
A final step not to be overlooked is to decide whether you want to include photos as part of the new construction data collection process. It the answer is “yes” then remember to “Enable Attachments” for each of the layers you want to have field staff capturing photos.
With the staging geodatabase layers now created it is time for attribute rules.
Application of attribute rules
With ArcGIS Enterprise 10.6.1 the attribute rule capability has evolved to provide a robust automation capability for managing attributes. For Tracking and Traceability, attribute rules provide the ability to automatically read the barcode value, decode the barcode and automatically populate the derived attribute fields (manufacturer, manufacture lot #, manufacture component type, manufacture date, material, diameter, and wall thickness). When this capability is applied to the staging geodatabase layers, the auto-population occurs when Collector submits the new feature. This means a connected mobile device running Collector to capture new construction will be able to see the decoded information while they are documenting the new assets in the field.
The following link provides the arcade attribute rule scripts and detailed documentation on how to apply them.
ASTM F2897 barcode decode attribute rules
The way attribute rules work is to assign them to a single attribute field. This means the decoding of the barcode is broken out into 9 separate arcade scripts. Here is a breakdown of how the arcade scripts are applied to the staging geodatabase layers.
StagingDevice Featureclass
Attribute Fields | Arcade attribute rule script |
manufacturer | Device_Manufacturer.txt |
manufacturerlotno | Device_Manufacturelotno.txt |
manufacturedate | Device_ManufactureDate.txt |
manufacturecomponent | Device_ManufactureModel.txt |
material | Device_Material.txt |
diameter | Device_Diameter.txt |
diameter2 | Device_Diameter2.txt |
wallthickness | Device_Wallthickness.txt |
wallthickness2 | Device_Wallthickness2.txt |
StagingJunction Featureclass
Attribute Fields | Arcade attribute rule script |
manufacturer | Junction_Manufacturer.txt |
manufacturerlotno | Junction_Manufacturelotno.txt |
manufacturedate | Junction_ManufactureDate.txt |
manufacturecomponent | Junction_ManufactureModel.txt |
material | Junction_Material.txt |
diameter | Junction_Diameter.txt |
diameter2 | Junction_Diameter2.txt |
wallthickness | Junction_Wallthickness.txt |
wallthickness2 | Junction_Wallthickness2.txt |
StagingLine Featureclass
Attribute Fields | Arcade attribute rule script |
manufacturer | Line_Manufacturer.txt |
manufacturerlotno | Line_Manufacturelotno.txt |
manufacturedate | Line_ManufactureDate.txt |
manufacturecomponent | Line_ManufactureComponent.txt |
material | Line_Material.txt |
nominaldiameter | Line_NominalDiameter.txt |
wallthickness | Line_Wallthickness.txt |
Once the attribute rules are successfully applied to your enterprise geodatabase staging layers you are ready to publish the staging layers as a feature service.
Publication of staging geodatabase layers as a feature service
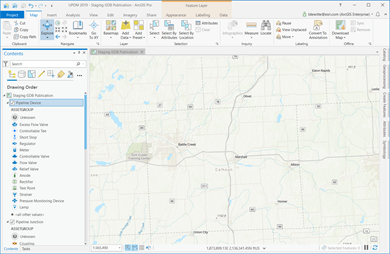
Publishing the staging layers from ArcGIS Pro is a very straight forward process. The steps are as follows:
- Create a new Map
- Add staging gdb layers to map
- Symbolize layers as desired
- Publish map as a feature service
After the map is created and the staging geodatabase layers are added to you map you will have a ArcGIS Pro map which looks like the following:

I find using ArcPro for defining the symbology to be easier and quicker than using the ArcGIS Enterprise Portal map viewer tools. Additionally, I can use more advanced symbology such as the UPDM2019_Symbols style set that is included in the UPDM 2019 Edition download. When the layers are symbolized as desired, remove the basemaps and prepare to publish.
To publish the staging layers as a feature service, use the sharing ribbons’ web layer – Publish Web Layer tool to create the feature service.

With the feature service now published your staging geodatabase layers are ready for the final step which is to create the web map for Collector.
Creation of web map for Collector
Creating a web map for Collector is the opportunity to fine tune the interface your field staff will use for documenting the new construction. Items to think about when creating the web map are:
- Scale Constraints of layers
- Which data fields will be exposed to the field staff
- Which fields will be exposed during editing
- Which field will be exposed during viewing
Both the ArcGIS Enterprise portal map viewer or the ArcGIS Pro desktop tool can be used to accomplish this task.
When the web map is defined and saved you are now ready to take Collector to the field to being collecting your new gas pipe construction.
Summary
With the latest enhancements to Collector and the new attribute rule capability for enterprise geodatabases. Deploying the ArcGIS platform to address the needs of tracking and traceability is easier than ever. Five basic steps are all that it takes to enable your field staff to efficiently capture new construction digitally and retire the time consuming and inefficient historical paper based process.
- Preparing the enterprise geodatabase
- Creation of staging geodatabase layers
- Application of attribute rules
- Publication of staging geodatabase layers as a feature service
- Creation of web map for Collector
PLEASE NOTE: The postings on this site are my own and don’t necessarily represent Esri’s position, strategies, or opinions
You must be a registered user to add a comment. If you've already registered, sign in. Otherwise, register and sign in.