Turn on suggestions
Auto-suggest helps you quickly narrow down your search results by suggesting possible matches as you type.
Cancel
- Home
- :
- All Communities
- :
- Developers
- :
- Native Maps SDKs
- :
- Runtime SDK WPF (Retired) Ques
- :
- How to open a MapTip programmatically
Options
- Subscribe to RSS Feed
- Mark Topic as New
- Mark Topic as Read
- Float this Topic for Current User
- Bookmark
- Subscribe
- Mute
- Printer Friendly Page
How to open a MapTip programmatically
Subscribe
08-26-2013
12:54 PM
- Mark as New
- Bookmark
- Subscribe
- Mute
- Subscribe to RSS Feed
- Permalink
Hi,
Is it possible to open a MapTip programmatically in code-behind? Alternatively, is it possible to make use of a different event than MouseEnter to open the MapTip for a graphic? The reason I ask is that I need to get MapTips working on touchdevices.
Cheers
Is it possible to open a MapTip programmatically in code-behind? Alternatively, is it possible to make use of a different event than MouseEnter to open the MapTip for a graphic? The reason I ask is that I need to get MapTips working on touchdevices.
Cheers
Solved! Go to Solution.
1 Solution
Accepted Solutions
08-27-2013
02:35 AM
- Mark as New
- Bookmark
- Subscribe
- Mute
- Subscribe to RSS Feed
- Permalink
Did you remove BorderPath definition from Template? The control is expecting it.
One hack that you can do here is to set BorderPath's Opacity to 0 to get it away from UI and then define correct margin in InfoWindows ContentTemplate.
Something like this:
Then you can use ContentTemplate like this:
Notice Margin that lowers control by 10. This is default size of "anchor" path (BorderPath) that was hidden from UI. In this case I set to -10 to start from graphics point to up, but if you set that -20 (middle of point) then it will crash. -19 works fine thou.
Usage of InfoWindow:
Notice CornerRadious value that is set to 0. This is used internally to calculate position of InfoWindow.
This example should look about like this:
[ATTACH=CONFIG]27011[/ATTACH]
I haven't tested this solution in production. Honestly I think that the neatest option would be writing your own control to handle this use case but you can do that with InfoWindow. In this solution just style DataTemplate as you like but play around with Positions to see how Margins affect each.
Hope this helped. Here is a code how I set graphic to InfoWindow in this test.
<Path x:Name="BorderPath" StrokeLineJoin="Round" Fill="{TemplateBinding Background}" Stroke="{TemplateBinding BorderBrush}" StrokeThickness="{TemplateBinding StrokeThickness}" />One hack that you can do here is to set BorderPath's Opacity to 0 to get it away from UI and then define correct margin in InfoWindows ContentTemplate.
Something like this:
<Style TargetType="esri:InfoWindow"> <Setter Property="Background" Value="White" /> <Setter Property="BorderBrush" Value="Black" /> <Setter Property="HorizontalAlignment" Value="Left" /> <Setter Property="VerticalAlignment" Value="Top" /> <Setter Property="Padding" Value="0" /> <Setter Property="Template"> <Setter.Value> <ControlTemplate TargetType="esri:InfoWindow"> <Grid x:Name="Root" RenderTransformOrigin="{Binding RelativeSource={RelativeSource TemplatedParent}, Path=RenderTransformOrigin}"> <VisualStateManager.VisualStateGroups> <VisualStateGroup x:Name="CommonStates"> <VisualState x:Name="Show"> <Storyboard> <DoubleAnimationUsingKeyFrames Storyboard.TargetProperty="(UIElement.RenderTransform).(ScaleTransform.ScaleX)" Storyboard.TargetName="Root"> <EasingDoubleKeyFrame KeyTime="0:0:0.5" Value="1"> <EasingDoubleKeyFrame.EasingFunction> <BackEase EasingMode="EaseOut" Amplitude=".5"/> </EasingDoubleKeyFrame.EasingFunction> </EasingDoubleKeyFrame> </DoubleAnimationUsingKeyFrames> <DoubleAnimationUsingKeyFrames Storyboard.TargetProperty="(UIElement.RenderTransform).(ScaleTransform.ScaleY)" Storyboard.TargetName="Root"> <EasingDoubleKeyFrame KeyTime="0:0:0.5" Value="1"> <EasingDoubleKeyFrame.EasingFunction> <BackEase EasingMode="EaseOut" Amplitude=".5"/> </EasingDoubleKeyFrame.EasingFunction> </EasingDoubleKeyFrame> </DoubleAnimationUsingKeyFrames> </Storyboard> </VisualState> <VisualState x:Name="Hide"> <Storyboard> <DoubleAnimationUsingKeyFrames Storyboard.TargetProperty="(UIElement.RenderTransform).(ScaleTransform.ScaleX)" Storyboard.TargetName="Root"> <EasingDoubleKeyFrame KeyTime="0:0:0.25" Value="0"> <EasingDoubleKeyFrame.EasingFunction> <CircleEase EasingMode="EaseIn" /> </EasingDoubleKeyFrame.EasingFunction> </EasingDoubleKeyFrame> </DoubleAnimationUsingKeyFrames> <DoubleAnimationUsingKeyFrames Storyboard.TargetProperty="(UIElement.RenderTransform).(ScaleTransform.ScaleY)" Storyboard.TargetName="Root"> <EasingDoubleKeyFrame KeyTime="0:0:0.25" Value="0"> <EasingDoubleKeyFrame.EasingFunction> <CircleEase EasingMode="EaseIn" /> </EasingDoubleKeyFrame.EasingFunction> </EasingDoubleKeyFrame> </DoubleAnimationUsingKeyFrames> </Storyboard> </VisualState> </VisualStateGroup> </VisualStateManager.VisualStateGroups> <Grid.RenderTransform> <ScaleTransform ScaleX="0" ScaleY="0" /> </Grid.RenderTransform> <Path x:Name="BorderPath" StrokeLineJoin="Round" Fill="{TemplateBinding Background}" Stroke="{TemplateBinding BorderBrush}" StrokeThickness="{TemplateBinding StrokeThickness}" Opacity="0" /> <ContentPresenter ContentTemplate="{TemplateBinding ContentTemplate}" Content="{TemplateBinding Content}" Margin="{TemplateBinding Margin}" /> </Grid> </ControlTemplate> </Setter.Value> </Setter> </Style>Then you can use ContentTemplate like this:
<DataTemplate x:Key="MyFeatureLayerInfoWindowTemplate"> <Grid Background="Blue" Width="100" Height="20" Margin="0,0,0,-10"> <TextBlock Text="{Binding Attributes[Number]}" Foreground="White" FontSize="12" HorizontalAlignment="Center" VerticalAlignment="Center" /> </Grid> </DataTemplate>Notice Margin that lowers control by 10. This is default size of "anchor" path (BorderPath) that was hidden from UI. In this case I set to -10 to start from graphics point to up, but if you set that -20 (middle of point) then it will crash. -19 works fine thou.
Usage of InfoWindow:
<esri:InfoWindow x:Name="MyInfoWindow" Padding="0" CornerRadius="0" Map="{Binding ElementName=_map}" ContentTemplate="{StaticResource MyFeatureLayerInfoWindowTemplate}" />Notice CornerRadious value that is set to 0. This is used internally to calculate position of InfoWindow.
This example should look about like this:
[ATTACH=CONFIG]27011[/ATTACH]
I haven't tested this solution in production. Honestly I think that the neatest option would be writing your own control to handle this use case but you can do that with InfoWindow. In this solution just style DataTemplate as you like but play around with Positions to see how Margins affect each.
Hope this helped. Here is a code how I set graphic to InfoWindow in this test.
private void OpenOnMouseClick(object sender, Map.MouseEventArgs e) { var layer = _map.Layers["Graphics"] as GraphicsLayer; var graphics = layer.FindGraphicsInHostCoordinates(e.ScreenPoint); if (graphics.Count() == 1) { var graphic = graphics.ToList()[0]; MyInfoWindow.Anchor = graphic.Geometry as MapPoint; MyInfoWindow.IsOpen = true; MyInfoWindow.Content = graphic; } }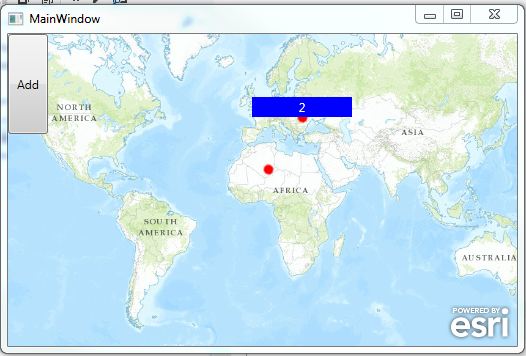
4 Replies
08-26-2013
09:24 PM
- Mark as New
- Bookmark
- Subscribe
- Mute
- Subscribe to RSS Feed
- Permalink
On touch devices I have been using InfoWindows instead MapTips since they are simpler to work with when interaction is tap based.
08-27-2013
12:41 AM
- Mark as New
- Bookmark
- Subscribe
- Mute
- Subscribe to RSS Feed
- Permalink
Thanks for the reply Antti. If I were to use infowindows, do you know if it is possible to get the same look and feel as that found on MapTips (i.e. a small box that can be expanded)? I've tried changing the default style/template of InfoWindow but it keep giving me cryptic errors when I add them to the layoutroot, such as "Object reference not set to an instance of an object".
Cheers
Cheers
08-27-2013
02:35 AM
- Mark as New
- Bookmark
- Subscribe
- Mute
- Subscribe to RSS Feed
- Permalink
Did you remove BorderPath definition from Template? The control is expecting it.
One hack that you can do here is to set BorderPath's Opacity to 0 to get it away from UI and then define correct margin in InfoWindows ContentTemplate.
Something like this:
Then you can use ContentTemplate like this:
Notice Margin that lowers control by 10. This is default size of "anchor" path (BorderPath) that was hidden from UI. In this case I set to -10 to start from graphics point to up, but if you set that -20 (middle of point) then it will crash. -19 works fine thou.
Usage of InfoWindow:
Notice CornerRadious value that is set to 0. This is used internally to calculate position of InfoWindow.
This example should look about like this:
[ATTACH=CONFIG]27011[/ATTACH]
I haven't tested this solution in production. Honestly I think that the neatest option would be writing your own control to handle this use case but you can do that with InfoWindow. In this solution just style DataTemplate as you like but play around with Positions to see how Margins affect each.
Hope this helped. Here is a code how I set graphic to InfoWindow in this test.
<Path x:Name="BorderPath" StrokeLineJoin="Round" Fill="{TemplateBinding Background}" Stroke="{TemplateBinding BorderBrush}" StrokeThickness="{TemplateBinding StrokeThickness}" />One hack that you can do here is to set BorderPath's Opacity to 0 to get it away from UI and then define correct margin in InfoWindows ContentTemplate.
Something like this:
<Style TargetType="esri:InfoWindow"> <Setter Property="Background" Value="White" /> <Setter Property="BorderBrush" Value="Black" /> <Setter Property="HorizontalAlignment" Value="Left" /> <Setter Property="VerticalAlignment" Value="Top" /> <Setter Property="Padding" Value="0" /> <Setter Property="Template"> <Setter.Value> <ControlTemplate TargetType="esri:InfoWindow"> <Grid x:Name="Root" RenderTransformOrigin="{Binding RelativeSource={RelativeSource TemplatedParent}, Path=RenderTransformOrigin}"> <VisualStateManager.VisualStateGroups> <VisualStateGroup x:Name="CommonStates"> <VisualState x:Name="Show"> <Storyboard> <DoubleAnimationUsingKeyFrames Storyboard.TargetProperty="(UIElement.RenderTransform).(ScaleTransform.ScaleX)" Storyboard.TargetName="Root"> <EasingDoubleKeyFrame KeyTime="0:0:0.5" Value="1"> <EasingDoubleKeyFrame.EasingFunction> <BackEase EasingMode="EaseOut" Amplitude=".5"/> </EasingDoubleKeyFrame.EasingFunction> </EasingDoubleKeyFrame> </DoubleAnimationUsingKeyFrames> <DoubleAnimationUsingKeyFrames Storyboard.TargetProperty="(UIElement.RenderTransform).(ScaleTransform.ScaleY)" Storyboard.TargetName="Root"> <EasingDoubleKeyFrame KeyTime="0:0:0.5" Value="1"> <EasingDoubleKeyFrame.EasingFunction> <BackEase EasingMode="EaseOut" Amplitude=".5"/> </EasingDoubleKeyFrame.EasingFunction> </EasingDoubleKeyFrame> </DoubleAnimationUsingKeyFrames> </Storyboard> </VisualState> <VisualState x:Name="Hide"> <Storyboard> <DoubleAnimationUsingKeyFrames Storyboard.TargetProperty="(UIElement.RenderTransform).(ScaleTransform.ScaleX)" Storyboard.TargetName="Root"> <EasingDoubleKeyFrame KeyTime="0:0:0.25" Value="0"> <EasingDoubleKeyFrame.EasingFunction> <CircleEase EasingMode="EaseIn" /> </EasingDoubleKeyFrame.EasingFunction> </EasingDoubleKeyFrame> </DoubleAnimationUsingKeyFrames> <DoubleAnimationUsingKeyFrames Storyboard.TargetProperty="(UIElement.RenderTransform).(ScaleTransform.ScaleY)" Storyboard.TargetName="Root"> <EasingDoubleKeyFrame KeyTime="0:0:0.25" Value="0"> <EasingDoubleKeyFrame.EasingFunction> <CircleEase EasingMode="EaseIn" /> </EasingDoubleKeyFrame.EasingFunction> </EasingDoubleKeyFrame> </DoubleAnimationUsingKeyFrames> </Storyboard> </VisualState> </VisualStateGroup> </VisualStateManager.VisualStateGroups> <Grid.RenderTransform> <ScaleTransform ScaleX="0" ScaleY="0" /> </Grid.RenderTransform> <Path x:Name="BorderPath" StrokeLineJoin="Round" Fill="{TemplateBinding Background}" Stroke="{TemplateBinding BorderBrush}" StrokeThickness="{TemplateBinding StrokeThickness}" Opacity="0" /> <ContentPresenter ContentTemplate="{TemplateBinding ContentTemplate}" Content="{TemplateBinding Content}" Margin="{TemplateBinding Margin}" /> </Grid> </ControlTemplate> </Setter.Value> </Setter> </Style>Then you can use ContentTemplate like this:
<DataTemplate x:Key="MyFeatureLayerInfoWindowTemplate"> <Grid Background="Blue" Width="100" Height="20" Margin="0,0,0,-10"> <TextBlock Text="{Binding Attributes[Number]}" Foreground="White" FontSize="12" HorizontalAlignment="Center" VerticalAlignment="Center" /> </Grid> </DataTemplate>Notice Margin that lowers control by 10. This is default size of "anchor" path (BorderPath) that was hidden from UI. In this case I set to -10 to start from graphics point to up, but if you set that -20 (middle of point) then it will crash. -19 works fine thou.
Usage of InfoWindow:
<esri:InfoWindow x:Name="MyInfoWindow" Padding="0" CornerRadius="0" Map="{Binding ElementName=_map}" ContentTemplate="{StaticResource MyFeatureLayerInfoWindowTemplate}" />Notice CornerRadious value that is set to 0. This is used internally to calculate position of InfoWindow.
This example should look about like this:
[ATTACH=CONFIG]27011[/ATTACH]
I haven't tested this solution in production. Honestly I think that the neatest option would be writing your own control to handle this use case but you can do that with InfoWindow. In this solution just style DataTemplate as you like but play around with Positions to see how Margins affect each.
Hope this helped. Here is a code how I set graphic to InfoWindow in this test.
private void OpenOnMouseClick(object sender, Map.MouseEventArgs e) { var layer = _map.Layers["Graphics"] as GraphicsLayer; var graphics = layer.FindGraphicsInHostCoordinates(e.ScreenPoint); if (graphics.Count() == 1) { var graphic = graphics.ToList()[0]; MyInfoWindow.Anchor = graphic.Geometry as MapPoint; MyInfoWindow.IsOpen = true; MyInfoWindow.Content = graphic; } }
08-27-2013
09:26 AM
- Mark as New
- Bookmark
- Subscribe
- Mute
- Subscribe to RSS Feed
- Permalink
Thank you so much for your long and detailed explanation Antti! Although the approach you outline does work, my impression is that I will get into more trouble as I try to demystify the workings of the InfoWindow. Therefore I've decided to write my own control for this. It's really a pity that ArcGIS does not provide better touch support. We spend a lot of money on these products.
Kind regards
Kind regards