- Home
- :
- All Communities
- :
- Developers
- :
- ArcGIS Pro SDK
- :
- ArcGIS Pro SDK Questions
- :
- Edit operation failed when attempting to run two s...
- Subscribe to RSS Feed
- Mark Topic as New
- Mark Topic as Read
- Float this Topic for Current User
- Bookmark
- Subscribe
- Mute
- Printer Friendly Page
Edit operation failed when attempting to run two separate edit operations.
- Mark as New
- Bookmark
- Subscribe
- Mute
- Subscribe to RSS Feed
- Permalink
I receive the following error when attempting to run a second separate edit operation:
Edit operation failed.Exception of type 'ArcGIS.Desktop.Editing.AbortEditException' was thrown.
I am trying to do one edit operation populating a feature layer, and then a second separate edit operation populating a different feature layer.
- Mark as New
- Bookmark
- Subscribe
- Mute
- Subscribe to RSS Feed
- Permalink
You cannot perform 'nested' edit operations, instead you would use the same 'EditOperation' instance to perform all your edits (or feature creations) as outlined here: https://github.com/esri/arcgis-pro-sdk/wiki/ProConcepts-Editing#edit-operations To see an example or multiple creations scroll to the 'The first example shows 3 separate creates' paragraph in the referenced section. If you need to reference the object id of a newly created feature in a subsequent edit operation you can take a look at this section: https://github.com/esri/arcgis-pro-sdk/wiki/ProConcepts-Editing#chaining-edit-operations which describes a 'chained edit operation'.
- Mark as New
- Bookmark
- Subscribe
- Mute
- Subscribe to RSS Feed
- Permalink
Trying to frame them similarly to the ProConcepts example results in the following error:
System.InvalidOperationException: 'Operation is not valid due to the current state of the object.'
To be clear, I am trying to Execute the EditOperation the first time, then do a different edit using the same EditOperation and Execute it a second time.
- Mark as New
- Bookmark
- Subscribe
- Mute
- Subscribe to RSS Feed
- Permalink
I think you are trying to use EditOperation for something it was not designed to do. You can't perform multiple operations in one EditOperation instance. Use one of the following two methods to get your edits to work:
For the following examples I used the FeatureTest dataset from the community sample GitHub repo. To run the sample snippets below simply create an Add-in with one button and insert this code in the OnClick for the button's code-behind. As you can see the code creates ONE EditOperation instance, then creates two features, then finally calls ONE .Execute:
if (MapView.Active == null) return;
try
{
var pointsLayer1 = MapView.Active.Map.GetLayersAsFlattenedList().Where((l) => l.Name == "TestPoints").FirstOrDefault();
if (pointsLayer1 == null) throw new Exception($@"Unable to find ""TestPoints"" Layer");
var polyLayer1 = MapView.Active.Map.GetLayersAsFlattenedList().Where((l) => l.Name == "TestPolygons").FirstOrDefault();
if (polyLayer1 == null) throw new Exception($@"Unable to find ""TestPolygons"" Layer");
QueuedTask.Run(() =>
{
var centerPt = MapView.Active.Map.GetDefaultExtent().Center;
var editOp = new EditOperation();
editOp.Name = "Simple edit operation";
editOp.Create(pointsLayer1, centerPt);
editOp.Create(polyLayer1, GeometryEngine.Instance.Buffer(centerPt, 50.0));
//Execute the operations
var result = editOp.Execute();
if (result != true || editOp.IsSucceeded != true)
throw new Exception($@"Edit failed: {editOp.ErrorMessage}");
MessageBox.Show("Edit complete");
});
}
catch (Exception ex)
{
MessageBox.Show($@"Error: {ex.ToString()}");
}This will work for you. If you want to execute two operations (in order to get two undo / redo stacks) you can use this sample, where you create two EditOperation Instances and call .Execute for each instance.
if (MapView.Active == null) return;
try
{
var pointsLayer1 = MapView.Active.Map.GetLayersAsFlattenedList().Where((l) => l.Name == "TestPoints").FirstOrDefault();
if (pointsLayer1 == null) throw new Exception($@"Unable to find ""TestPoints"" Layer");
var polyLayer1 = MapView.Active.Map.GetLayersAsFlattenedList().Where((l) => l.Name == "TestPolygons").FirstOrDefault();
if (polyLayer1 == null) throw new Exception($@"Unable to find ""TestPolygons"" Layer");
QueuedTask.Run(() =>
{
var centerPt = MapView.Active.Map.GetDefaultExtent().Center;
var editOp = new EditOperation();
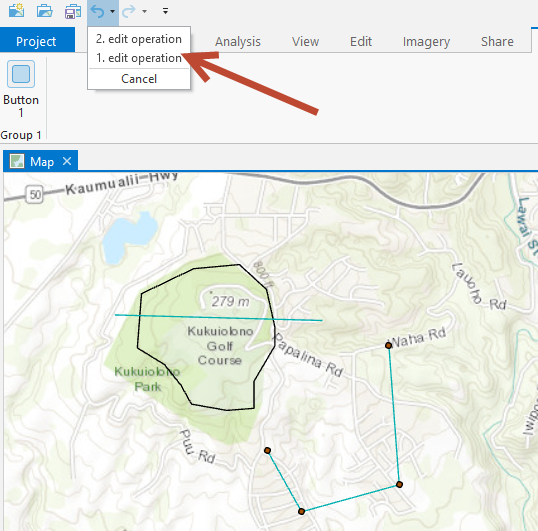
editOp.Name = "1. edit operation";
editOp.Create(pointsLayer1, centerPt);
var result1 = editOp.Execute();
if (result1 != true || editOp.IsSucceeded != true)
throw new Exception($@"Edit 1 failed: {editOp.ErrorMessage}");
MessageBox.Show("Edit 1 complete");
editOp = new EditOperation();
editOp.Name = "2. edit operation";
editOp.Create(polyLayer1, GeometryEngine.Instance.Buffer(centerPt, 50.0));
//Execute the operations
var result2 = editOp.Execute();
if (result2 != true || editOp.IsSucceeded != true)
throw new Exception($@"Edit 2 failed: {editOp.ErrorMessage}");
MessageBox.Show("Edit 2 complete");
});
}
catch (Exception ex)
{
MessageBox.Show($@"Error: {ex.ToString()}");
}As mentioned before the difference is the undo / redo stack... you get one entry for each 'EditOperation'.
- Mark as New
- Bookmark
- Subscribe
- Mute
- Subscribe to RSS Feed
- Permalink
Your second example looks closest to what I am trying to do, but I'm back to getting the "'ArcGIS.Desktop.Editing.AbortEditException' was thrown" error.
My add-in has two buttons to it.
The first button generates a layer, creates points, and applies them to the created layer while calculating a bunch of data to go into the gdb table.
The second button generates a separate layer, creates points, and applies them to the second created layer while calculating a bunch of different data.
Users may want to run one workflow, and then the other, in no particular order.
In an attempt to match your second example as closely as possible, I have my instantiated EditOperation object within the module class, then re-instantiate it at the beginning of each of the two workflows to execute on.
The first button click, no matter which workflow it is, works perfectly. The second button click when attempting the other workflow fails when executing the EditOperation.
- Mark as New
- Bookmark
- Subscribe
- Mute
- Subscribe to RSS Feed
- Permalink
Does your second 'button' function properly if you execute it first? It seems to me that some other issue is the cause for your problem, maybe a field name that doesn't exist or is misspelled? you should be able to perform as many edit operations as you like as long as you follow the workflow outlined above, so I think your code must have another cause for the error not the EditOperation class.
- Mark as New
- Bookmark
- Subscribe
- Mute
- Subscribe to RSS Feed
- Permalink
Yes, either operation work properly as long as it is the first one. The second one always fails.
- Mark as New
- Bookmark
- Subscribe
- Mute
- Subscribe to RSS Feed
- Permalink
Not sure how I can help you further without taking a look at the code or a sample with the same issue. Maybe one more thing to check would be to make sure that any data that is used to create a feature (i.e. attributes passed into the .Create method) are still in scope (and haven't been disposed yet) when you call .Execute.
- Mark as New
- Bookmark
- Subscribe
- Mute
- Subscribe to RSS Feed
- Permalink

Button A:

Button B:

Here's the code around the edit operations. The two bottom code segments are tied to the two buttons. As stated, each one works as intended, as long as it's the first one. So if I use button A, then button B, button B will fail with the error message. Using button B, then button A will cause button A to fail. Using either button repeatedly results in no errors.
After playing with it more it appears that the issue occurs when the two feature classes are created in the same session. If I use a project with one of the layers already created, I can use both buttons without restriction.
- Mark as New
- Bookmark
- Subscribe
- Mute
- Subscribe to RSS Feed
- Permalink
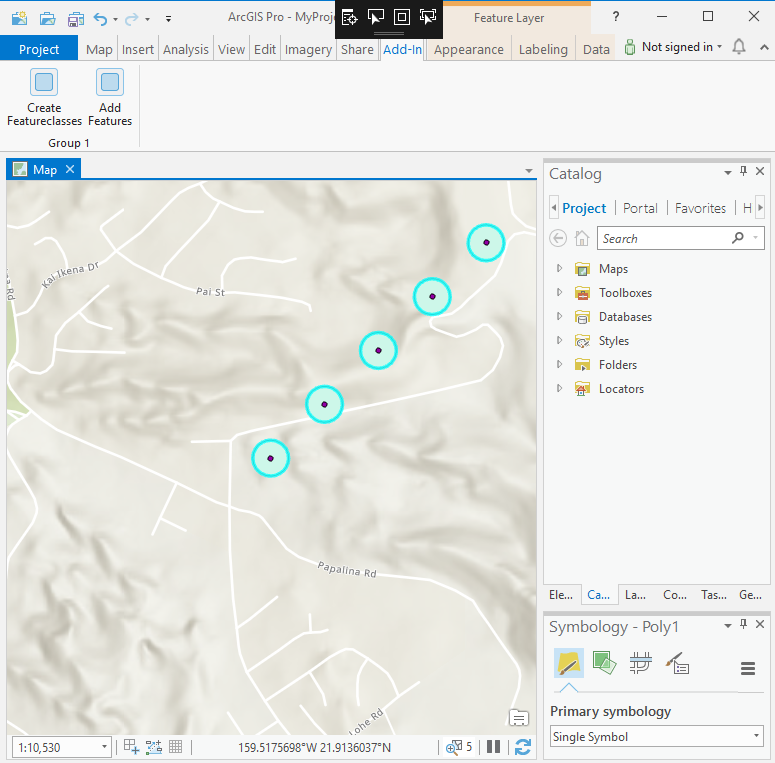
I made a sample add-in that creates two feature classes in your default file geodatabase (including a description attribute) and then adds features to each one of the newly created feature classes. I tested this add-in in ArcGIS Pro 2.2.3 and I cannot duplicate your issue. I added the project to the community samples here: https://github.com/Esri/arcgis-pro-sdk-community-samples/tree/master/Editing/AddFeatureTest so you can compare it with your code. To debug the sample add-in you can open a new map and zoom into your neighborhood (the created features are close together). Click the 'Create Featureclasses' button and then the 'Add Features' button. The result looks like this: