- Home
- :
- All Communities
- :
- User Groups
- :
- Local Government Solutions Users
- :
- Questions
- :
- Problem with the Capital Projects Solution Deploym...
- Subscribe to RSS Feed
- Mark Topic as New
- Mark Topic as Read
- Float this Topic for Current User
- Bookmark
- Subscribe
- Mute
- Printer Friendly Page
Problem with the Capital Projects Solution Deployment tool
- Mark as New
- Bookmark
- Subscribe
- Mute
- Subscribe to RSS Feed
- Permalink
I have been trying to deploy a solution from the ArcGIS Pro Solutions Deployment tool. I was and am still getting errors as I work with ESRI to try and fix the problem. As usual, I don't have time to wait and started following the steps laid out in the Manual Section of the link Publish feature layer - Capital Project Locator | ArcGIS for Local Government .
I am frustrated because I have walked through the setup of the Capital Project Plans and manually created the maps, layers and apps. Next, I want to use the Capital Project Locator and walked through all the setup steps laid out in the link above. However, when I view the completed web app I am not seeing what ESRI shows in their demo.
I walked through the steps of the Capital Project Plans and have a working version of this app: http://statelocaltryit.maps.arcgis.com/apps/MapAndAppGallery/index.html?appid=3639e59d32874bb6ae4bea...
I'm trying to get my Capital Project Locator app to look like this: ArcGIS Web Application
But the information shown in my app is nowhere near what the above app shows. In one of the steps on the Manual Set Up it says
- Configure the pop-up for each layer using a custom attribute display option.
But it doesn't say what that custom display should be.
Has anyone successfully deployed or walked through this maze?
My apps are here: ArcGIS Web Application
- Mark as New
- Bookmark
- Subscribe
- Mute
- Subscribe to RSS Feed
- Permalink
Hi Michael,
I apologize you are having trouble with the Solutions Deployment Tool, I took a look at your support incident and it looks like you identified the issue with the firewall and will be working to setup a dedicated machine to deploy the solutions.
In regards to your question about the pop-up configuration. The solution is using a custom pop-up attribute display. You will want to add the following html:
<font face="Avenir Light">The <b>{PROJNAME}</b> project will accomplish the following: <br /><br />{PROJDESC}<br /><br /></font><font face="Avenir Light"><b>Schedule</b><br /><br />Planned Start Date: <b>{PLANSTART}</b><br />Actual Start Date: <b>{ACTSTART}</b><br /><br />Planned Completion Date: <b>{PLANEND}</b> <br />Actual Completion Date: <b>{ACTEND}</b><br /></font><font face="Avenir Light"><br />
<span><b>Phase</b></span>
<table style=" border-collapse: separate; border-spacing: 6px 4px; width: 100%; table-layout: fixed;">
<tbody><tr height="16">
<td style="{expression/expr2}"></td>
<td style="{expression/expr3}"></td>
<td style="{expression/expr4}"></td>
<td style="{expression/expr5}"></td>
</tr>
<tr height="24" style="text-align: center;">
<td>PreDesign</td>
<td>Design</td>
<td>Construction</td>
<td>Closeout</td>
</tr>
</tbody></table>
</font><font face="Avenir Light"><b>Budget</b><br /> <br />The project is </font><b><font face="Avenir Light"><font color="#228b22">{expression/expr0}</font><font color="#ff0000">{expression/expr1}</font><font color="#000000">.<br /> </font></font></b><font face="Avenir Light"><br />If you have any questions, please contact:<br /><br /><b>{POCNAME}<br /></b>T: {POCPHONE}<br /><a href="mailto: {POCEMAIL}" target="_blank">{POCEMAIL}</a> </font>Next you will need to add some attribute expressions:
First add an attribute expression called Under Budget
if ($feature.actcost <= $feature.estcost) {
return Text(Abs($feature.actcost - $feature.estcost), '$#,###') + ' under budget'
}
returnAdd an attribute expression called Over Budget
if ($feature.actcost > $feature.estcost) {
return Text(Abs($feature.actcost - $feature.estcost), '$#,###') + ' over budget'
}
returnAdd an attribute expression called PreDesign
if ($feature.projphase == 'PreDesign') {
return 'background-color:#1987bb'
}
return 'background-color:#DDDDDD'Repeat the previous step for the phases Design, Construction, and Closeout replacing the text in the code with the appropriate phase.
This should be everything you need to define the custom pop-up display. I see in the technical support incident you also had a question about how to change the project to funded and then after that how you edit the actual start date, actual cost, project phase or other active project information.
To edit the project phase you are going to use the Capital Project Review application and to edit information about the active projects you will want to use the Capital Project Reports application.
- Mark as New
- Bookmark
- Subscribe
- Mute
- Subscribe to RSS Feed
- Permalink
Thank you very much for getting back to me. I was able to deploy all of the solutions from my home computer and have been using the deployed apps instead of the ones I tried to manually configure.
From what I can see, this is the start of the workflow
- Leads use the Capital Project Plans to create projects for transportation, sewer, parks, etc...
- They set the Funded Project field to Yes and Project Status field to Board Authorized to move forward
- use the Capital Project Reports app to update construction phase/dates/etc...
- Use the other apps to report to heads and public.
Where do you set the Funded Project field to Yes. In the apps contained in the Capital Project Plans, the Funded Project Field is not editable. And in the Park Projects Plan, the Funded Project Field isn't there at all.
I can go into the web maps and set those to an be editable field and in the park web map, make the funded project field visible and editable. Is this what I have to do?
Also, where in the Capital Project Review app can you edit any data?
Again, thanks SO much for the help!
- Mark as New
- Bookmark
- Subscribe
- Mute
- Subscribe to RSS Feed
- Permalink
Hi Michael,
You found a bug in the solution. The original intent was that you set the status to Analysis and Review in the Capital Project Plans. The project would then show up in Capital Project Review and you could use this application to set the Funded Project to 'Yes' and update the status to Board Authorized when it was ready to move forward. This field wasn't exposed in the application. I updated the this on our side so if you delete the Capital Project Review web map and web application and re-deploy Capital Project Review you will get the update. Otherwise you can edit the pop-up to make the field visible and editable and edit the Funding and Status widget to expose the Funded Project field.
To edit data in the Capital Project Review select one of the drawing tools in the Funding and Status widget and select one of the projects. This will pop up a dialog where you can edit attributes on the feature. The nice thing about this widget is you can select multiple projects and update their status all at once and you can use the filters in the app to narrow down the visible projects.
- Mark as New
- Bookmark
- Subscribe
- Mute
- Subscribe to RSS Feed
- Permalink
I've just implemented this solution in the last couple of weeks. I am having issues with being able to access / edit the "Funded Project" Status. Its not available in the Capital Project Review Application. I'm not able to edit it. I can't find the Funding and Status Widget you refer to and It is not updated in the deployment. If you've fixed this a year ago someone has overwritten it now.
Is there any documentation that actually describes the proper workflow that these solutions are based upon? If I had not found this thread I would have never figured this out. The documentation seems to lack all of the fine details that makes these solutions work.
I read something that stated I can edit the Pop - up configuration but I cant seem to find exactly where that is accomplished within the Solutions provided. I realize this is an older thread but maybe someone is still watching and can assist?
- Mark as New
- Bookmark
- Subscribe
- Mute
- Subscribe to RSS Feed
- Permalink
Hi,
Believe it or not, I'm still working on a CIP solution. I ended up dropping the solution as presented because city managers and council wanted to consolidate reporting on projects across the departments, include details that the solution wasn't meant to handle. Instead of having a single project with all the information from start to finish in one record, they wanted to have a record based on contracts and services for each stage. Have a project for predesign and another project with construction and another project for CEI. Honestly, the difficulty of entering and editing data like that in the ArcGIS Online environment was daunting to say the least to the end users. The solution as presented was too complex.
We started up again last fall with a complete SQL MVC back end app to handle the creation and editing of the data. The mvc app included javascript 4.x views to create project boundaries in the back end. The front end and public facing view is a take off of the Capital Projects Locator App.
to get to the funded project field and be able to change it, you have to edit the popup content in the web map for the plans. Go to the plans web map for each of the project types (transp, water, sewer,...) and make sure the funded project field is set to editable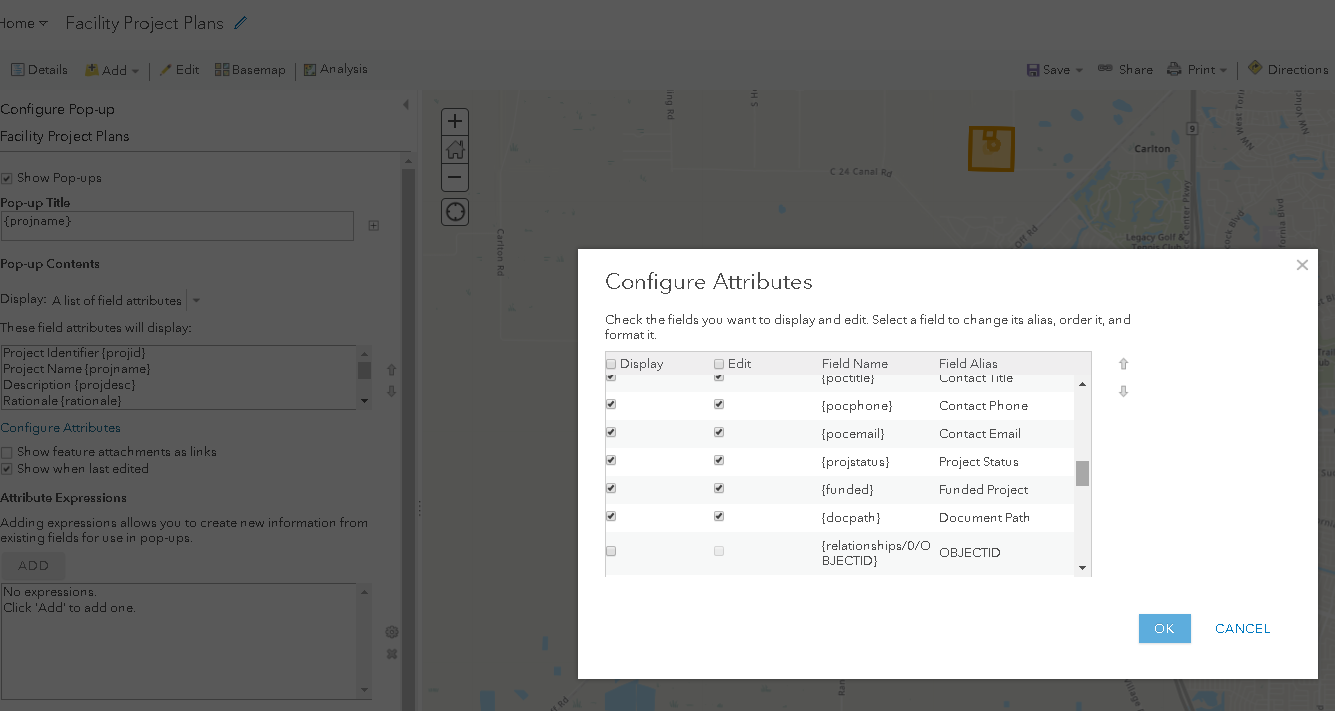
The app should allow you to access that field.
that might be what you need. if not, let me know.
- Mark as New
- Bookmark
- Subscribe
- Mute
- Subscribe to RSS Feed
- Permalink
There was a bug recently introduced in the most recent version of ArcGIS Online that is causing the Capital Project Review to not show the pencil button to edit a selected record. You can resolve this issue by going to the InfrastructureProjects_allprojectplans layer in your content and update the editor settings. Under the option "What kind of editing is allowed?" change it from "Update features" to "Add and update features" and save the changes. When you refresh the application you should be able to edit a selected record in the Capital Project Review application.
- Mark as New
- Bookmark
- Subscribe
- Mute
- Subscribe to RSS Feed
- Permalink
Thanks for the quick response Chris. That worked for exposing the editing functions within the Capital project Review Application. I can now modify and update the Funded Status of the projects that allows them to be viewed within the Capital Protect Dashboard. T
The Template solution seems to be well developed its just that without a flow chart or something to help guide me through the expected process its difficult to understand the workflow procedures the templates were designed to follow. Do you know if there is any documentation that explains the expected workflow process? I'd like to follow that instead of my trial and error process? I'm unable to find any documentation that explains it and if it wasn't for you I might have deleted the Solution and designed something from scratch. I guarantee that it wouldn't be as well thought out and designed as this solution.
- Mark as New
- Bookmark
- Subscribe
- Mute
- Subscribe to RSS Feed
- Permalink
Unfortunately we don't have anything that more clearly describes this workflow and agree it can be difficult to understand and figure out through trial and error. Our plan is to release a story map to describe all the applications, how they work together and how a project plan moves through the different phases. Hope to have this available later this year.
- Mark as New
- Bookmark
- Subscribe
- Mute
- Subscribe to RSS Feed
- Permalink
I would agree that the solution is great and well thought out. Having no instructions of how this is supposed to operate made it difficult to implement.