- Home
- :
- All Communities
- :
- Products
- :
- Mapping and Charting Solutions
- :
- Mapping and Charting Questions
- :
- How do I create a square of a defined area around ...
- Subscribe to RSS Feed
- Mark Topic as New
- Mark Topic as Read
- Float this Topic for Current User
- Bookmark
- Subscribe
- Mute
- Printer Friendly Page
How do I create a square of a defined area around my points?
- Mark as New
- Bookmark
- Subscribe
- Mute
- Subscribe to RSS Feed
- Permalink
You can use some Python code to accomplish this. Sample code can be found here for a similar problem: https://community.esri.com/thread/84853
- Mark as New
- Bookmark
- Subscribe
- Mute
- Subscribe to RSS Feed
- Permalink
I'm not into Python yet, but I'll have a look. Thanks!
- Mark as New
- Bookmark
- Subscribe
- Mute
- Subscribe to RSS Feed
- Permalink
It is not that complex, if necessary I can explain the code or create a small toolbox from it to make it easier to use.
- Mark as New
- Bookmark
- Subscribe
- Mute
- Subscribe to RSS Feed
- Permalink
A small toolbox would be perfect! Could you be so kind to create one? Thanks a lot in advance. Paul
- Mark as New
- Bookmark
- Subscribe
- Mute
- Subscribe to RSS Feed
- Permalink
Question: Do you have ArcGIS Pro or ArcMap and what version do you have?
- Mark as New
- Bookmark
- Subscribe
- Mute
- Subscribe to RSS Feed
- Permalink
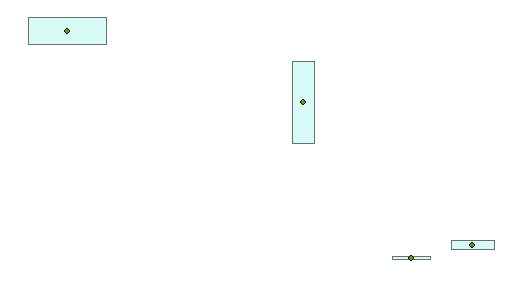
I have attached a 10.6 version of the toolbox.

And this is the result:
It is very likely that you don't have 10.6 (yet) since it was released last week. In that case you can construct the toolbox in your version, using the .py that you can find in the ZIP attached.
In case you have any problems just let me know and I will include a description of how to configure the toolbox for your version.
- Mark as New
- Bookmark
- Subscribe
- Mute
- Subscribe to RSS Feed
- Permalink
Wow, that looks perfect! Sorry I only have ArcMap 10.5 and furthermore I cannot find the attachment in your post. Sorry to cause so many problems 😕
- Mark as New
- Bookmark
- Subscribe
- Mute
- Subscribe to RSS Feed
- Permalink
No problem, I will try and add a description of how you can define the toolbox in 10.5 yourself. I don't have access to 10.5 at his moment to do it for you.
- Mark as New
- Bookmark
- Subscribe
- Mute
- Subscribe to RSS Feed
- Permalink
So here are the steps involved...
Go to the folder where you want to create the toolbox and copy the python script in that same folder.
In the Catalog pane of ArcMap, go to that folder and create a new toolbox:

... and give it a recognizable name (not like I did in the example below):

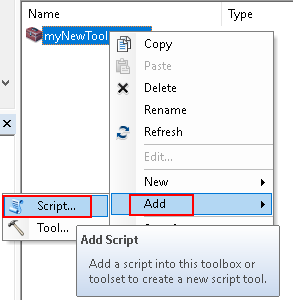
Next yo can add the script by right clicking on the newly created toolbox and select Add, Script...:
and fill out the fields:

Click on "Next" (Siguiente in my case) to go to the next screen.

Browse to the script and select it and hit Next:
The the screen to enter the script parameters will appear:

Enter the following:
1) your first parameter, the point featureclass:
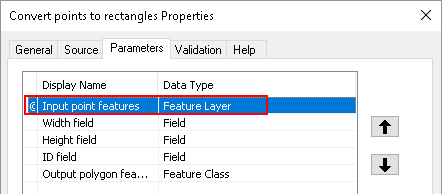
- Give it a display name (this is what the user will see)
- Select "Feature Layer" as display type
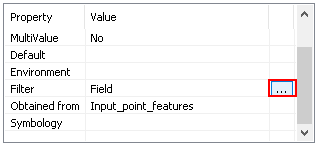
In the lower section of the screen, make sure it is required, Input and not a multi value (default options):

- For "Filter" select "Feature Class" and click on the button with the three dots to the right of it. This will show another dialog where you will only leave "Point" selected (this way only point feature layers van be selected):

Hit "OK" to close the dialog.
2) Width field
The second parameter is the width field:

Specify the display name and the data type "Field". In the lower section:
- Click on the button with the three dots and select the relevant field types (only numeric fields should be shown):

This will limit the number of fields that are selectable in the dialog to those that are numeric. Hit OK to close the dialog.
Below the "Filter" you can see that I selected "Input_point_features" as "Obtained from". This will retrieve the list of fields from the feature layer specified as first parameter:

3) the height parameter
The Height field shold be configured following the steps from parameter 2 (width). The only thing that changes is the Display name:

4) the ID field
The ID field is very similar to the previous two fields:
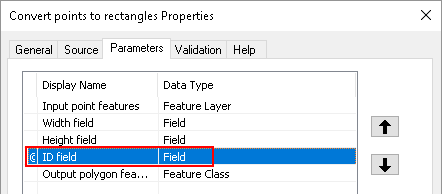
Only the display name is different and the list of field types when you specify the Filter in the lower part of the screen:
List of fields:

As you can see the ID field can also be text and OID. Include and exclude the field types as you wish.
5) the output rectangle featureclass
The last parameter is the output featureclass. This should be defined as "Feature Class":
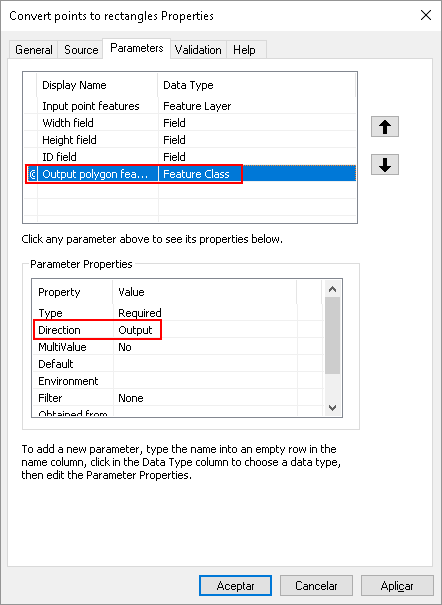
Furthermore, the Direction should be configured as "Output".
Now you script tool has been configured and is ready to use.