- Home
- :
- All Communities
- :
- Industries
- :
- Business
- :
- Business Blog
- :
- Arcade: Calculating Relative Time for Popups and S...
Arcade: Calculating Relative Time for Popups and Symbology
- Subscribe to RSS Feed
- Mark as New
- Mark as Read
- Bookmark
- Subscribe
- Printer Friendly Page
Introduction
Date/Time fields add a whole new dimension to analysis and visualization of spatial data. They specify an exact point in time, similar to how coordinates specify an exact point in space. When working with spatial data, generating relative content is something we naturally do all the time. For example, we might calculate an area (such as a buffer) that is anchored on an input point. Or we might measure a distance from a point to another object. The outcomes of those analyses are relative, that is, they are relative representations based on an exact starting point. By themselves, the exact coordinates might not mean much, but we can derive something of meaning and value from it.
Time works the same way. When talking about your birthday party, you could say “my birthday party on February 15th 2020, 6:00 PM”…but it’s easier for the person you’re talking to understand if you just say “my birthday party last night”. Or when your friend asks you “When will the burgers be done?”, you could say “February 26th, 5:30 PM”, when “in about 30 minutes” is going to be far more effective in getting your point across. These expressions are relative to a precise point in time: right now. In ArcGIS, dates and times are specified precisely, but you can incorporate relative representations of those dates and times in your maps to make them easier to understand. In this post, we're going to look at manipulating symbols and popups to reflect relative time.
Incorporating Relative Time in Symbology
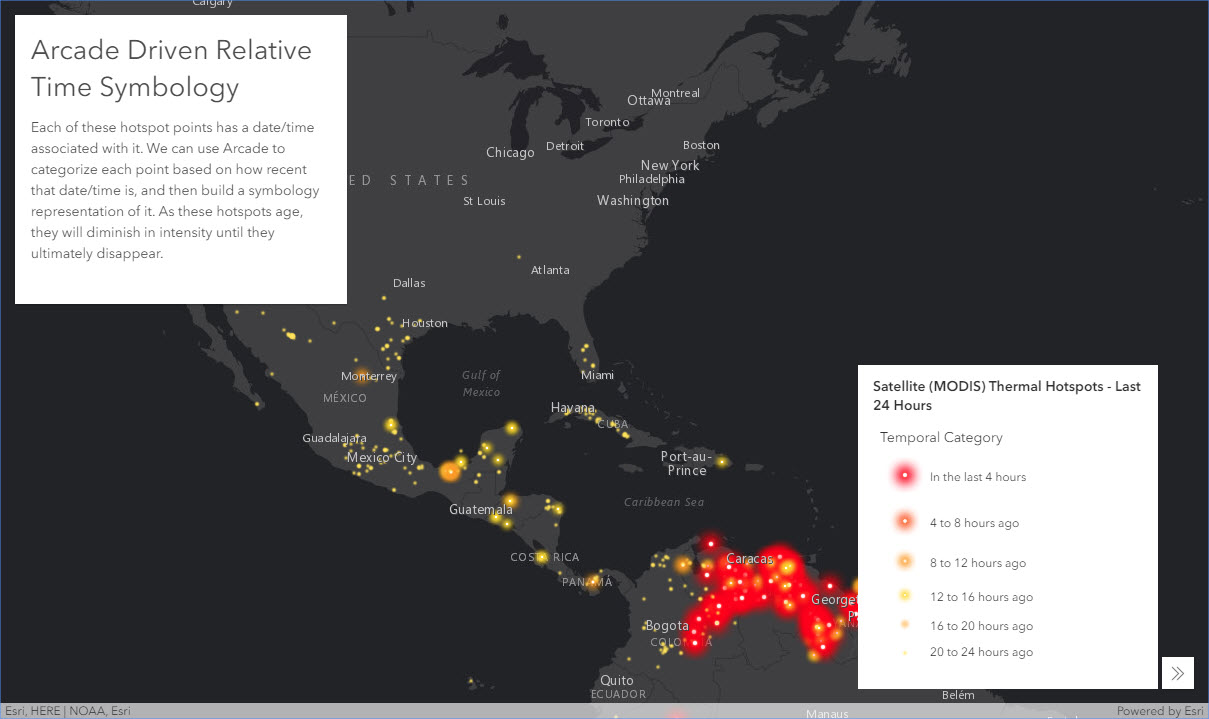
When viewing a live feed, we might want to want to symbolize the data in such a way that, as events age, they become less and less visually significant until they phase out all together. For example, take a look at the map below. We pulled in MODIS Hotspots from the Living Atlas, applied a filter to just show the last 24 hours, and then used Arcade to categorize each hotspot to a "recentness" category. As these hotspots age, they'll diminish and ultimately disappear from view.
With Arcade, you have the flexibility to work with your date fields in any number of ways, customize thresholds, and even calculate your own new, derived dates. Read on to learn how to build this exact map for yourself to get started.
First, lets setup the map. Open a new webmap, Click Add >> Browse Living Atlas Layers >> and search "MODIS". The first result should be a "Satellite (MODIS) Thermal Hotspots and Fire Activity" feature layer by Esri. Go ahead and add that layer to your map. In the Content pane, click on the filter button for the MODIS layer and set a filter for "Acquisition Date in the last 1 day(s)". Apply Filter. This will filter the hotspots to be in the last 24 hours. Now click Basemap at the top, and select the Dark Gray Canvas basemap. Now it's time to use Arcade to build our own relative time symbology for the hotspots.
For the MODIS layer, click the Change Style button. Expand "Choose an attribute to show", scroll to the bottom of the field list and click "New Expression". This will launch the Arcade Expression builder. Paste the following code into the Expression body.
function determineCategory(value){ if (value <= 4 ){ return "1" } else if (value > 4 && value <= 8){ return "2" } else if (value > 8 && value <= 12){ return "3" } else if (value > 12 && value <= 16){ return "4" } else if (value > 16 && value <= 20){ return "5" } else { return "6" } } var hours = DateDiff(now(),$feature["ACQ_DATE"], "hours") determineCategory(hours)
You can modify the thresholds for each category here if desired. Just keep in mind that the filter we applied to the layer only displays those hotspots that were recorded in the last 24 hours. If you happen to be working with a different layer, you'll need to replace the $feature["ACQ_DATE"] so it's pointing to a date field in your layer. Click "Test" to make sure it's working. If it's successful, you should see a Result value of 1-6 (1 being most recent, 6 being oldest). Click OK to apply the script.
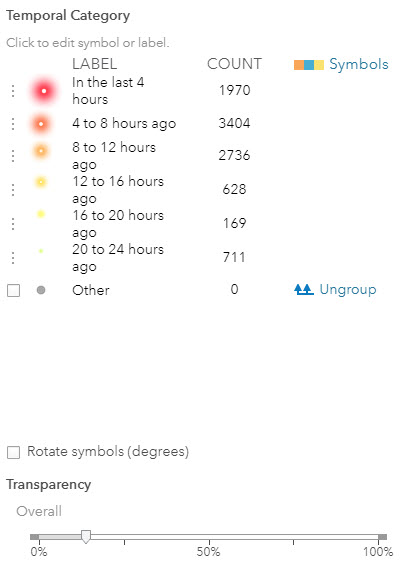
The "Unique symbols" types will automatically be selected. Click Options to modify how these display. Modify the symbol order to 1-6 by dragging the entries to the appropriate position. Now that everything is in the right order, go ahead and change the Labels for each category so that they are reflective of the time range.. I used "In the last 4 hours" for the first one and a schema of "X to Y hours ago" for the last five. Alright, now we're ready to create the symbols. Click on the first symbol to open up the Symbol Changer. Click Shape, open the dropdown, and select "Firefly". The ramp I used was the light green to red ramp.
Select the most intense one on the ramp (the farthest to the right), and set the size to 36. Repeat this process for the other categories, working your way left on the ramp, and decreasing the size each time by 6 (e.g. 36, 30, 24, 18, 12, and 6). Once all your symbols are configured how you like, go ahead and play around with the Transparency slider in the Style pane to dial in the look you're going for. When it's all said and done, your Style pane should look something like this:

Click OK to lock it all in. And, voila! You should now have a map of MODIS hotspots that age over time based on current time. Great work! Also, don't forget to save your map!
Incorporating Relative Time in Popups
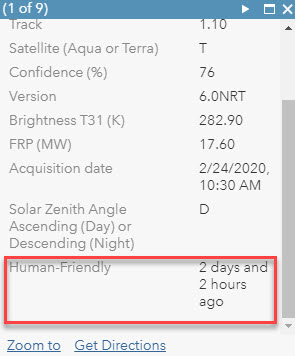
You can also setup relative time expressions in your popups and transform a precise date and time into something a little more human-friendly. For example, go back to the example map provided toward the top of this post. If you click a hotspot, in the popup you'll see the exact date and time as well as a relative expression like "2 hours and 5 minutes ago". That second part is being calculated by Arcade on-the-fly as well.
To set this up in your own map, open the "Configure Popup" pane for the MODIS Hotspot layer. Click "ADD" under the Attribute Expressions section. This will launch another Arcade Expression builder. Paste the following code into the Expression block:
var myDateField = $feature["ACQ_DATE"];
function getTimeDelta(alertDate){
var minutes = DateDiff(now(),alertDate, "minutes")
var hours = DateDiff(now(),alertDate, "hours")
var days = DateDiff(now(),alertDate, "days")
if (minutes <= 120){
return round(minutes) + " minutes ago"
}
if (minutes > 120){
if (hours <= 48){
var tFloor = floor(hours)
var deltaMin = datediff(now(),dateadd(alertDate,tFloor,'hours'),'minutes')
return round(tFloor) + " hours and " + round(deltaMin) + " minutes ago"
}
if (hours > 48){
var dFloor = floor(days)
var deltaHour = datediff(now(),dateadd(alertDate,dFloor,'days'),'hours')
return round(dFloor) + " days and " + round(deltaHour) + " hours ago"
}
}
}
return getTimeDelta(myDateField)This expression will look at the time delta between the current time and the date in the field and use some conditional logic to build a human friendly expression of that delta. This expression is built to also work with Days, but since we've setup our hotspots to only see the last 24 hours, we won't see that. But you can use this expression as a template to for other layers you want to work with. In that case, the only thing you'll have to do is change the $feature["ACQ_DATE"] bit to point to a date field in your layer.
Click Test to verify it works, followed by an exuberant click of the "OK" button. From here, configure the popups however you like, making sure that the expression you created is visible. The expression acts like a field, so you can see it as part of a default popup style or configure it as part of a custom attribute display.

Arcade gives you the flexibility to customize how things are conveyed to your audience without requiring you to modify the schema of your data or run constant field calculations. Temporal representations is just one use case of that. Hopefully this gives you a start to exploring whats possible. Thanks for reading!
You must be a registered user to add a comment. If you've already registered, sign in. Otherwise, register and sign in.
