- Home
- :
- All Communities
- :
- Products
- :
- ArcGIS Spatial Analyst
- :
- ArcGIS Spatial Analyst Questions
- :
- How does clipping a DEM (raster) affect the data?
- Subscribe to RSS Feed
- Mark Topic as New
- Mark Topic as Read
- Float this Topic for Current User
- Bookmark
- Subscribe
- Mute
- Printer Friendly Page
How does clipping a DEM (raster) affect the data?
- Mark as New
- Bookmark
- Subscribe
- Mute
- Subscribe to RSS Feed
- Permalink
I am working on a viewshed analysis using the USGS National Elevation Data. An area covering western NC and a small portion of eastern TN was originally extracted from Google Earth Engine. This data was transformed to NAD83 NC State Plane. I am using the Oberserver Points and Viewshed tools using a z factor of 3.281 (xy in feet, z in meters), which I believe is correct. To speed analyses, I initially clipped the data further using the Clip Raster Tool (with "Maintain Clipping Extent" unchecked).
For some of the points, the viewshed analyses with the clipped data are VERY different than using the original data. Large viewshed areas areas are missing compared to analyses using the unclipped data. That said, some of the viewsheds are exactly the same between the two DEMs. It sees to happen to viewpoints that are mostly in one area...
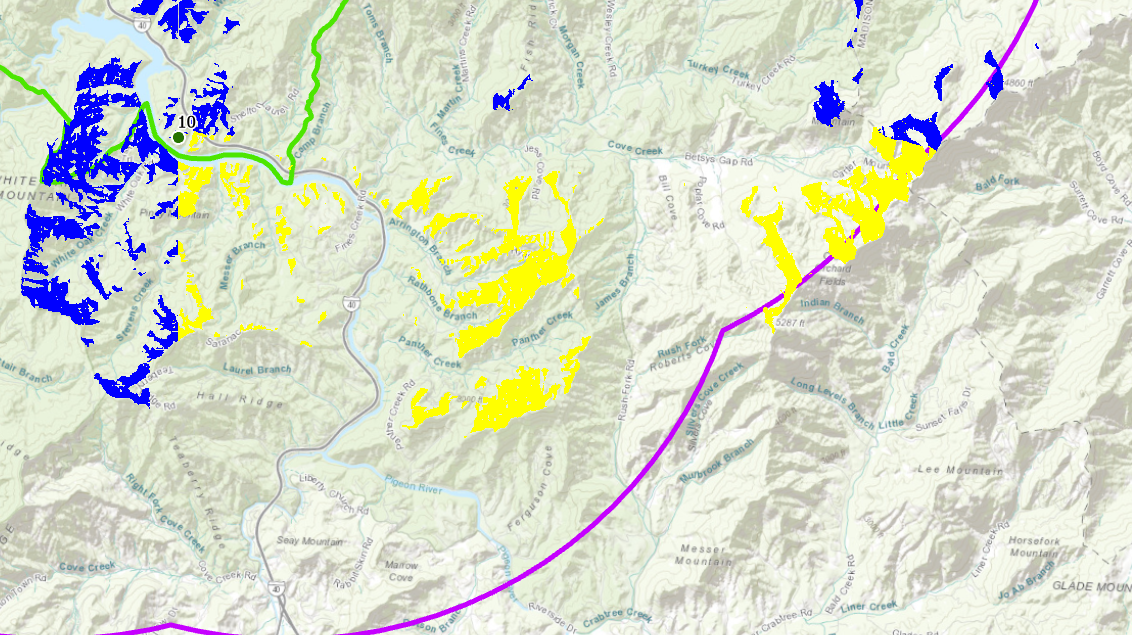
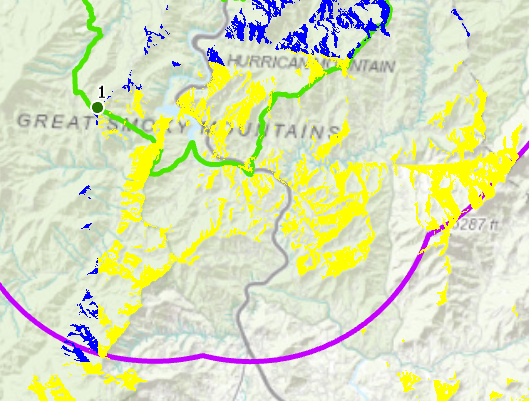
It seems that there are patterns...areas to the east and south are missing compared to the original data...and there are some seemingly unnatural straight lines. See two examples below (these patterns repeat for about 1/4 of my total viewpoints). The viewshed using the original, unclipped DEM is in yellow, and the viewshed using the clipped DEM is blue. There is yellow underneath all the blue. What causes this? Checking "Maintain Clipping Extent" mostly fixes the problem, although there are still some small discrepancies...
Mostly just curious if somebody can explain what is going on? Thanks...
Solved! Go to Solution.
Accepted Solutions
- Mark as New
- Bookmark
- Subscribe
- Mute
- Subscribe to RSS Feed
- Permalink
When you clipped, did you go to the Environments tab of the tool and set your raster cell size and snap raster to match the input raster? If you don't, then the cell size may default to something other than you want and the cell edges may not align exactly to the input raster leading to potential interpolation differences.
Always check the Environment for every tool in Arc* anything, the environments that can be controlled by each tool will enable you to control what you want rather than leaving things to the unknown 'helping hand'
- Mark as New
- Bookmark
- Subscribe
- Mute
- Subscribe to RSS Feed
- Permalink
Thanks Dan, yes this helped. I guess the lesson is that somehow clipping a raster can result in cell misalignment unless the appropriate environments are controlled. Thanks very much.
- Mark as New
- Bookmark
- Subscribe
- Mute
- Subscribe to RSS Feed
- Permalink
Glad it worked out. I think it would be much better if the Environments tab flashed whenever a tool was opened as a reminder to check 
- Mark as New
- Bookmark
- Subscribe
- Mute
- Subscribe to RSS Feed
- Permalink
The default behavior of the Clip_management tool (that clip to extent parameter UN checked) is set up not to shift the cell locations, the output raster should "snap" to the input raster. Setting the snap raster and cell size is very helpful when other tools are run to make sure they do not shift things either.
- Mark as New
- Bookmark
- Subscribe
- Mute
- Subscribe to RSS Feed
- Permalink
Thanks again for the help Dan and Curtis.